服务器Nacos集群搭建及使用总结
1. 架构图

实际使用:

2. 下载
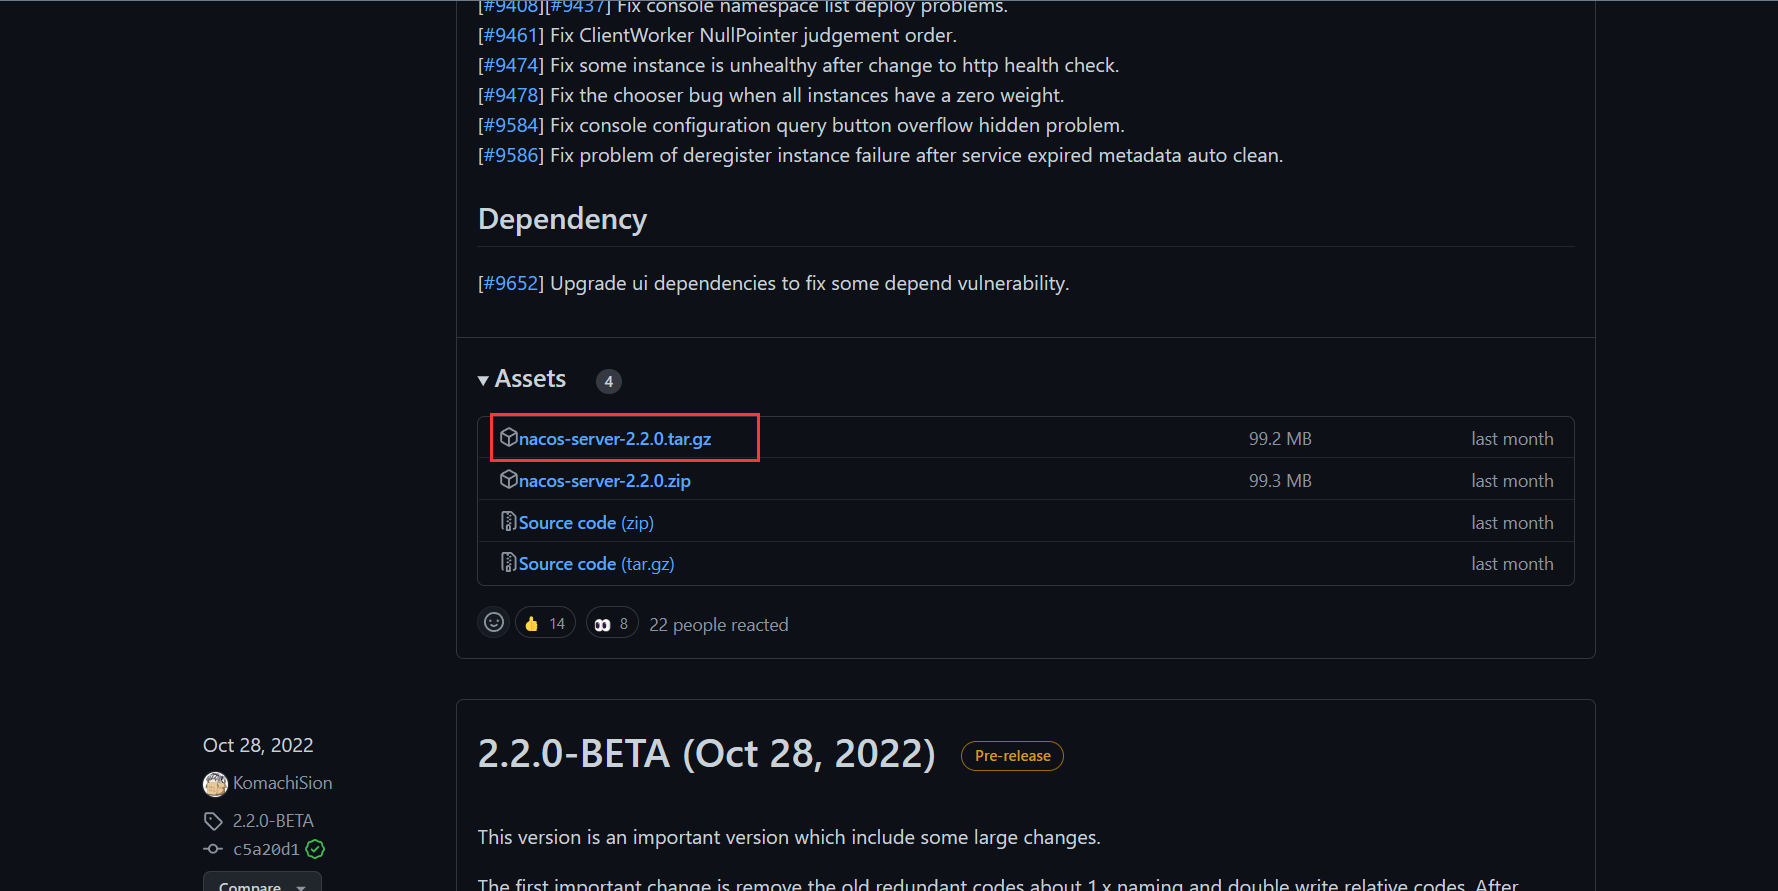
官网地址:home (nacos.io)
GitHub 下载地址:Releases · alibaba/nacos (github.com)
选择对应版本进行下载,下载有可能会很慢
3. 单机模式
1、下载完成后上传到服务器

2、解压文件
tar -zxvf nacos-server-2.2.0.tar.gz

3、重命名一下文件(非必要)
mv nacos nacos-2.2.0

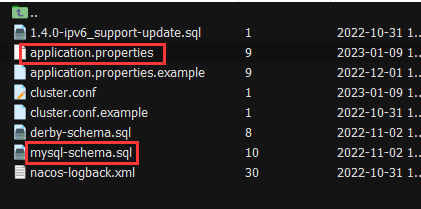
4、进入 Nacos 的 conf 目录下,在 Nacos 配置文件 application.properties 里设置端口为 3333(默认为 8848),并且设置 MySQL 连接属性进行持久化配置,这里的 nacos_config 数据库使用 Nacos 自带的 mysql-schema.sql 数据库脚本构建
server.port=3333

###########################################################
spring.datasource.platform=mysql

db.num=1
db.url.0=jdbc:mysql://127.0.0.1:3306/nacos_config?characterEncoding=utf8&connectTimeout=1000&socketTimeout=3000&autoReconnect=true&useUnicode=true&useSSL=false&serverTimezone=UTC
db.user.0=root
db.password.0=xxx
5、进入 Nacos 的 bin 目录下,直接执行如下命令即可启动
sh startup.sh -m standalone
或者 ./startup.sh -m standalone
由于 Nacos 默认模式为 cluster,即集群模式,需设置启动参数 -m standalone 为单机模式,也可在 application.properties 配置文件里修改默认模式为单机模式,则可直接通过 ./startup.sh 启动单机模式


4. 集群模式
4.1 配置 Nacos
前 4 步与单机版同
5、复制 cluster.conf.example 文件为 cluster.conf
cp cluster.conf.example cluster.conf
6、在集群配置文件 cluster.conf 里配置集群节点,IP:Port,IP 为服务器 IP 地址,端口为 Nacos 的端口,即 application.properties 配置文件里的 server.port=3333,包括其他集群节点的端口,同时在服务器防火墙中开放需要访问的端口 3333、4444、5555
10.0.4.9:3333
10.0.4.9:4444
10.0.4.9:5555
7、以集群模式启动,./startup.sh

可以看到 3333 的节点已经启动

8、如法炮制,再复制两份 Nacos,在 application.properties 配置文件里分别设置端口为 4444、5555,这样就有了三个 Nacos 文件,端口分别为 3333、4444、5555,并且在 cluster.conf 配置文件里都配置了这三个节点
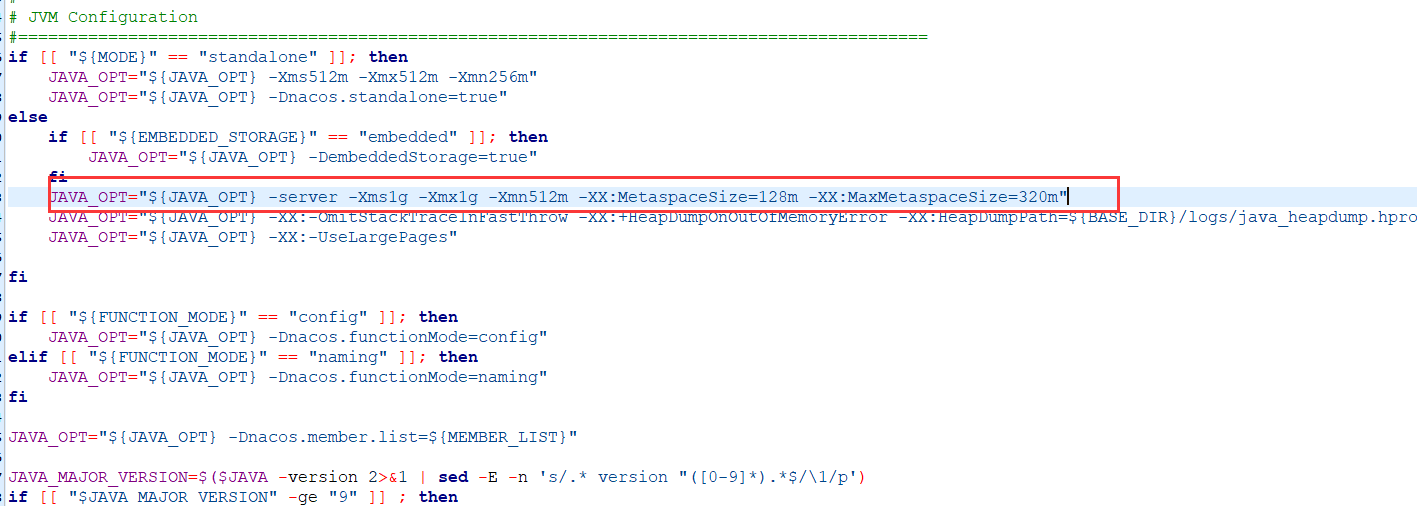
9、分别启动三个 Nacos,假如服务器内存不够,会出现只能启动一两个,三个服务不能全部启动的情况,或者启动另一个之后,之前启动的服务关闭,可以修改 startup.sh 文件的启动参数数值大小,改小一点
JAVA_OPT="${JAVA_OPT} -server -Xms1g -Xmx1g -Xmn512m -XX:MetaspaceSize=128m -XX:MaxMetaspaceSize=320m"
4.2 配置 Nginx
1、进入 Nginx 的 conf 目录下修改配置文件 nginx.conf
# 代理转发地址
upstream cluster{
        server 124.222.xxx.90:3333;
        server 124.222.xxx.90:4444;
        server 124.222.xxx.90:5555;
}

server {
        listen       1111; # 监听端口
        server_name  124.222.xxx.90; # 访问地址

        #charset koi8-r;

        #access_log  logs/host.access.log  main;

        location / {
            #root   html;
            #index  index.html index.htm;
            proxy_pass http://cluster;
        }
}
2、在服务器的防火墙里开放监听端口,即 1111
3、进入 Nginx 的 sbin 目录下,执行命令启动 Nginx
./nginx
或指定配置文件启动:./nginx -c /usr/nginx/conf/nginx.conf
假如 Nginx 已启动,则执行
./nginx -s reload
重新加载 Nginx 即可
4、访问 124.222.xxx.90:1111/nacos,其实就是转发到访问 124.222.xxx.90:3333/nacos 或 124.222.xxx.90:4444/nacos 或 124.222.xxx.90:5555/nacos
5、查看 Nacos 的启动情况,在集群节点里可以看到三个节点全是 UP 的状态,由于服务器内存原因,这里只启动了两个,内存不够了

5. 微服务注册进 Nacos
5.1 引入依赖
这里用的是 Spring Cloud,假如只使用 Spring Boot 参考官网的 Spring Boot 快速开始:Nacos Spring Boot 快速开始
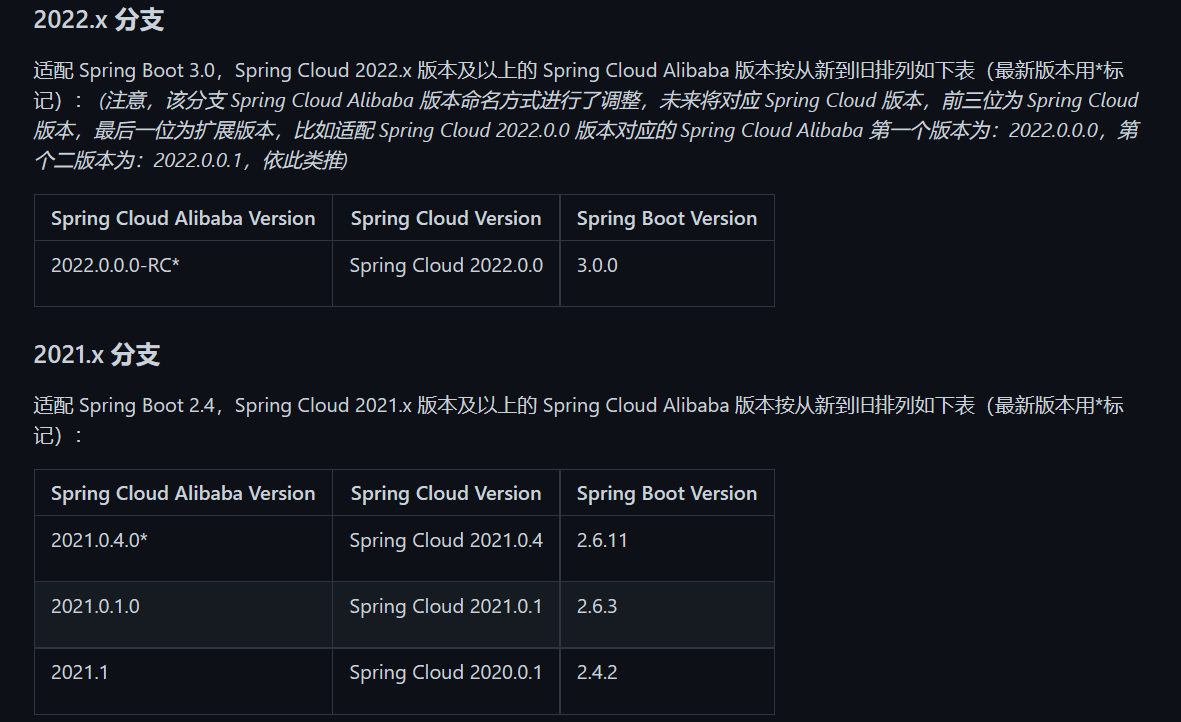
按照对应关系来选择对应的版本,这里使用的版本是 Spring Boot 2.7.7、Spring Cloud Alibaba 2021.0.4.0、Spring Cloud 2021.0.4
<dependency>
	<groupId>com.alibaba.cloud</groupId>
	<artifactId>spring-cloud-starter-alibaba-nacos-discovery</artifactId>
</dependency>

<dependency>
    <groupId>org.springframework.boot</groupId>
    <artifactId>spring-boot-starter-web</artifactId>
</dependency>
5.2 修改配置文件
spring:
  application:
    name: discovery-config
  cloud:
    nacos:
      discovery:
        server-addr: 124.222.xxx.90:3333
5.3 添加注解
在启动类上添加 Spring Cloud 原生注解 @EnableDiscoveryClient 开启服务注册发现功能
@SpringBootApplication
@EnableDiscoveryClient
public class DemoApplication {
    public static void main(String[] args) {
        SpringApplication.run(DemoApplication.class, args);
    }
}
5.4 注意
Nacos2.0 版本相比 1.X 新增了 GRPC 的通信方式,Nacos 2.0 的 GRPC 端口都是通过主端口的偏移量产生,GRPC 端口 = Nacos 主端口 + 1000,因此还要额外开放 主端口 + 1000 的端口,如主端口为 3333,则还需开放端口 4333,这里为客户端 GRPC 请求服务端端口。假如服务端 GRPC 请求服务端接口,还需开放偏移量为 1001 的端口,即 4334
否则会报 com.alibaba.nacos.api.exception.NacosException: Client not connected, current status:STARTING 异常
5.5 启动
启动主启动类后,即可在 Nacos 管理页面看到服务已经被注册了进来

6. Nacos 作为配置中心
在上面注册中心的基础上
6.1 引入依赖
由于在 SpringCloud 2020.* 版本把 bootstrap 禁用了,导致在读取文件的时候读取不到报错 No spring.config.import property has been defined,所以要重新引入 bootstrap 依赖
<dependency>
    <groupId>com.alibaba.cloud</groupId>
    <artifactId>spring-cloud-starter-alibaba-nacos-config</artifactId>
</dependency>

<dependency>
    <groupId>org.springframework.cloud</groupId>
    <artifactId>spring-cloud-starter-bootstrap</artifactId>
</dependency>
6.2 配置
这里需要两个配置文件 bootstrap.yml 和 application.yml,在项目初始化时,要保证先从配置中心进行配置拉取,拉取配置之后,才能保证项目的正常启动。而 SpringBoot 中配置文件的加载是存在优先级顺序的,bootstrap 优先级高于 application
1、bootstrap.yml
server:
  port: 9001

spring:
  application:
    name: discovery-config
  cloud:
    nacos:
      discovery:
        server-addr: 124.222.xxx.90:3333
      config:
        server-addr: 124.222.xxx.90:3333
        file-extension: yaml # 指定 yaml 格式的配置
2、application.yml
 spring:
  profiles:
    active: dev # 表示开发环境
6.3 ConfigController
通过 SpringCloud 原生注解 @RefreshScope 实现配置的自动更新
@RestController
@RefreshScope
public class ConfigController {

    @Value("${config.info}")
    private String configInfo;

    @GetMapping("/config/info")
    public String getConfigInfo() {
        return configInfo;
    }
}
6.4 持久化配置
在 Nacos 的配置列表里新建一个配置,这里的 Data ID,计算公式为:
${spring.application.name}-${spring.profiles.active}.$
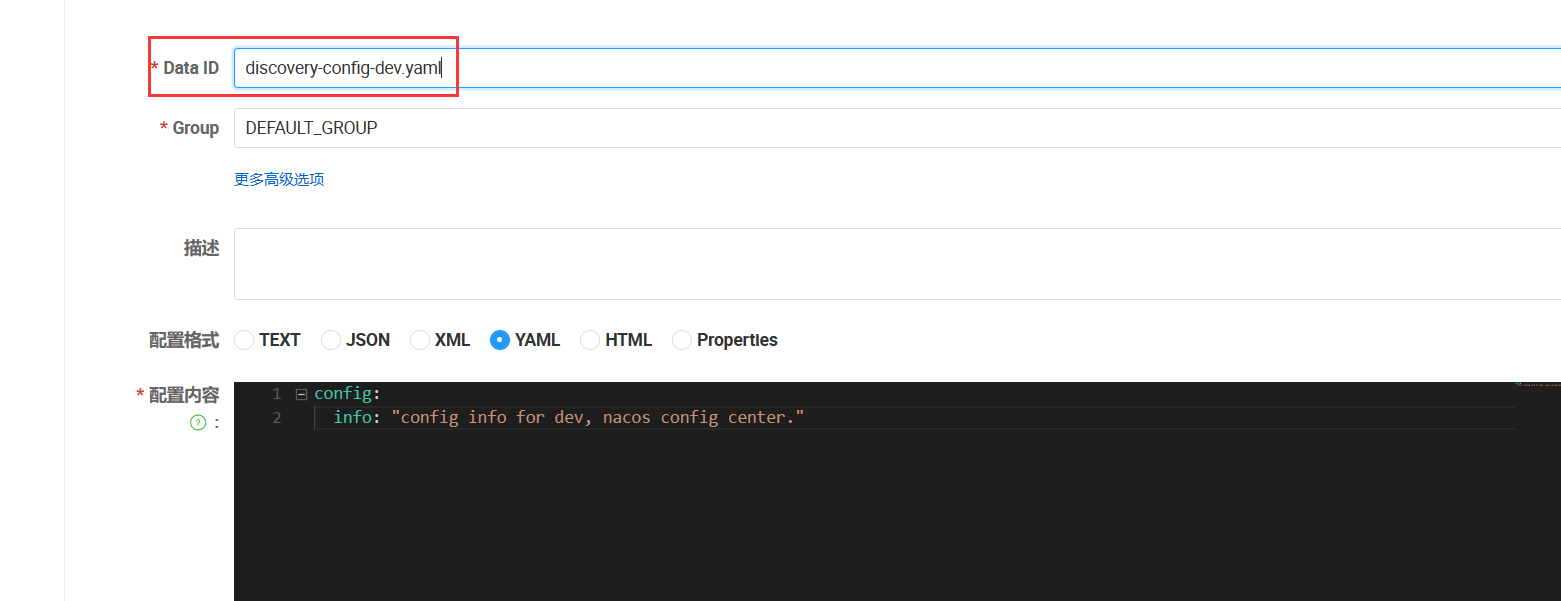

在前面已经配置好了持久化配置属性,配置信息会保存到数据库中

6.5 查看配置
启动服务,访问 http://localhost:9001/config/info,即可读取到配置中心的配置信息

更新一下配置信息
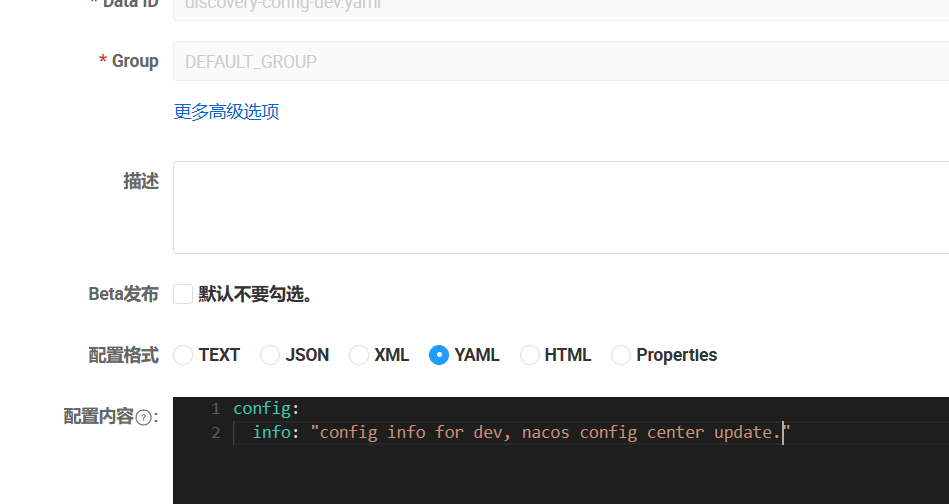
可以发现读取的配置信息也随之动态刷新

6.6 加载方案
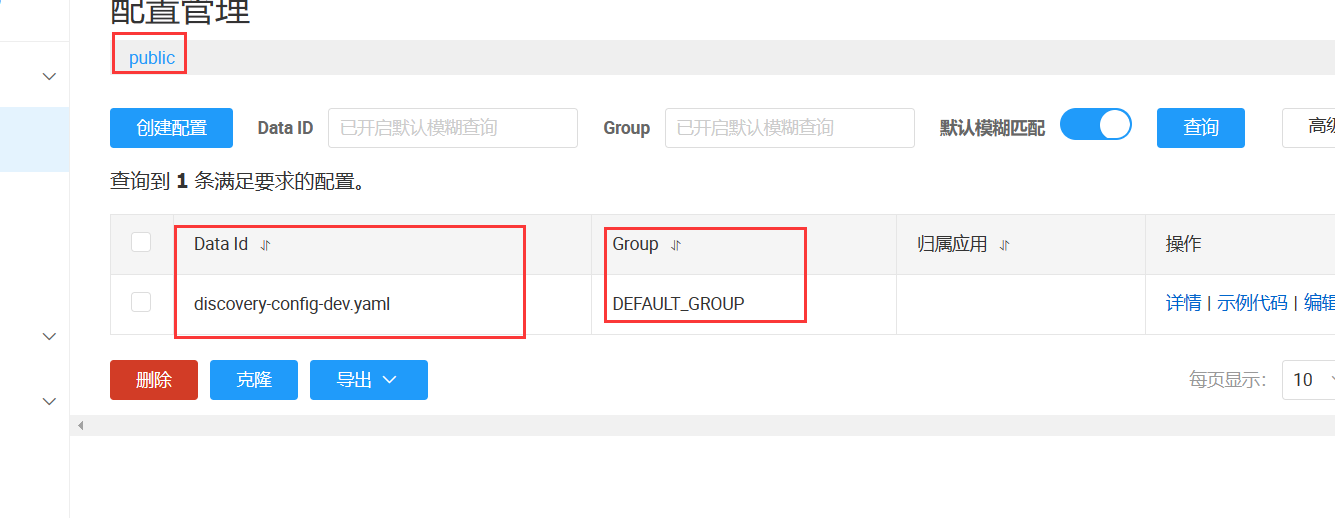
6.61 Data ID 方案
默认空间 + 默认分组 + Data ID,主要通过不同的 Data ID 来进行区分,即上面的配置
6.6.2 Group 方案
通过 Group 实现环境区分
1、新建 Group
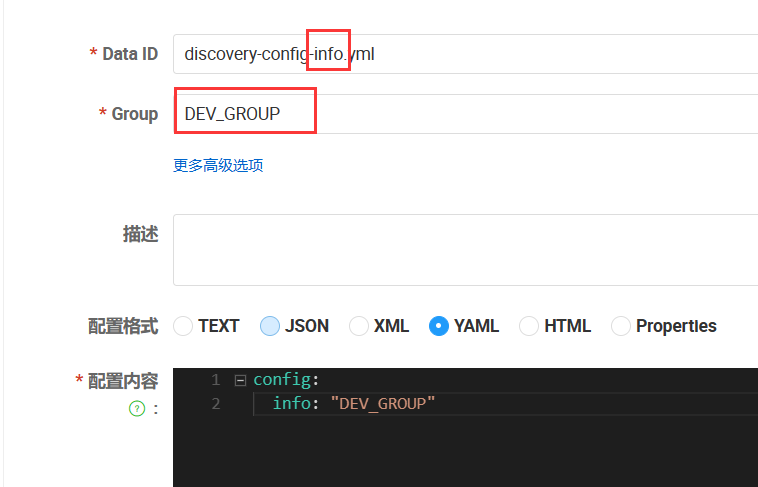
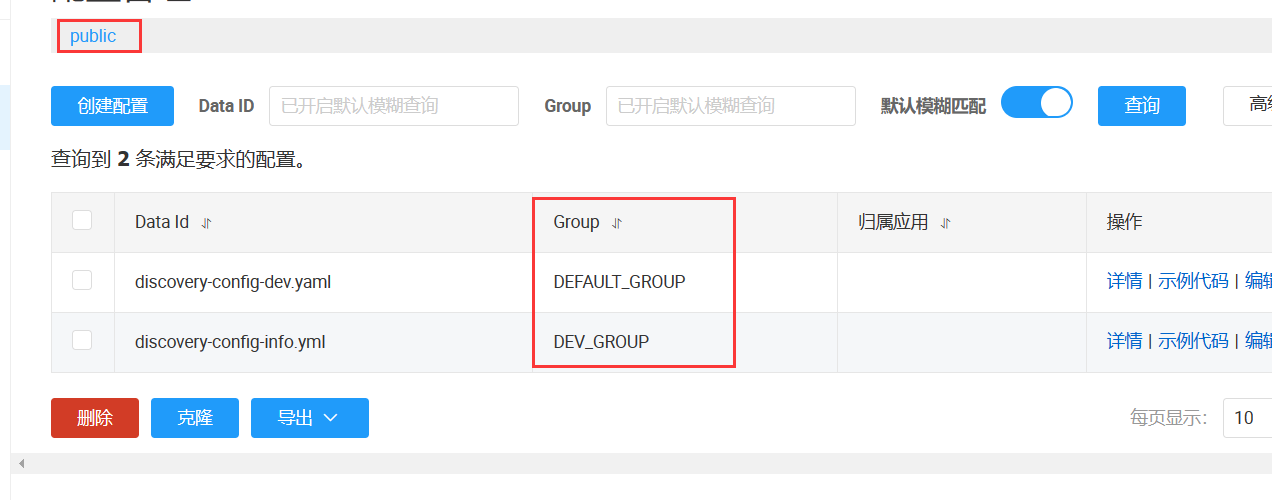
2、增加 group 配置
bootstrap.yml
server:
  port: 9001

spring:
  application:
    name: discovery-config
  cloud:
    nacos:
      discovery:
        server-addr: 124.222.xxx.90:3333
      config:
        server-addr: 124.222.xxx.90:3333
        file-extension: yaml
        group: DEV_GROUP
application.yml
spring:
  profiles:
    # active: dev # 表示开发环境
    active: info # 表示开发环境
6.6.3 Namespace 方案
1、新建命名空间


2、选择该命名空间进行配置管理

3、配置命名空间
bootstrap.yml
server:
  port: 9001

spring:
  application:
    name: discovery-config
  cloud:
    nacos:
      discovery:
        server-addr: 124.222.118.90:8848
      config:
        server-addr: 124.222.118.90:8848
        file-extension: yaml
        namespace: a404abf6-f7ca-40f5-a106-2a892793fb48


