Spring相关框架设置
一、Spring
二、SpringMVC
首先注意相关依赖引入,同时注意记住在project structure中添加Lib文件夹导入依赖
<dependencies>
    <dependency>
        <groupId>javax.servlet</groupId>
        <artifactId>servlet-api</artifactId>
        <version>2.5</version>
    </dependency>

    <dependency>
        <groupId>javax.servlet.jsp</groupId>
        <artifactId>jsp-api</artifactId>
        <version>2.2</version>
    </dependency>
    <dependency>
        <groupId>javax.servlet</groupId>
        <artifactId>jstl</artifactId>
        <version>1.2</version>
    </dependency>
</dependencies>

<build>
    <resources>
        <resource>
            <directory>src/main/java</directory>
            <includes>
                <include>**/*.properties</include>
                <include>**/*.xml</include>
            </includes>
            <filtering>false</filtering>
        </resource>
        <resource>
            <directory>src/main/resources</directory>
            <includes>
                <include>**/*.properties</include>
                <include>**/*.xml</include>
            </includes>
            <filtering>false</filtering>
        </resource>
    </resources>
</build>
(1)xml文件开发
1.Maven工程中添加web支持

2.在Web.xml中配置DispatcherServlet以及servletMapping
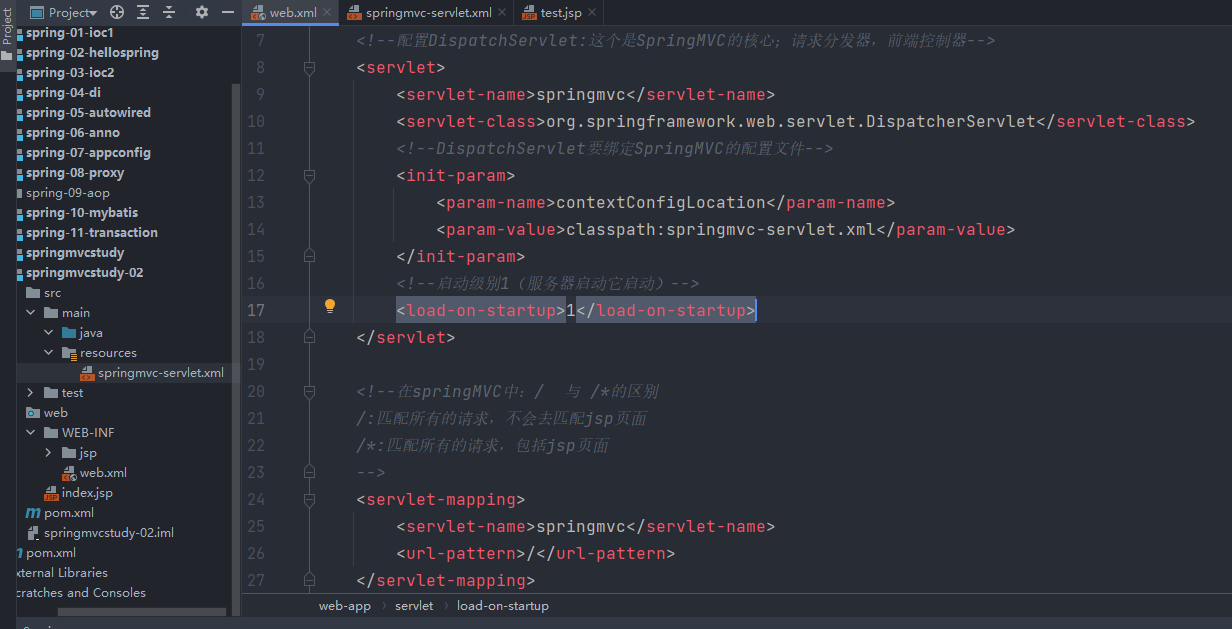
<?xml version="1.0" encoding="UTF-8"?>
<web-app xmlns="http://xmlns.jcp.org/xml/ns/javaee"
xmlns:xsi="http://www.w3.org/2001/XMLSchema-instance"
xsi:schemaLocation="http://xmlns.jcp.org/xml/ns/javaee http://xmlns.jcp.org/xml/ns/javaee/web-app_4_0.xsd"
version="4.0">
<!--配置DispatchServlet:这个是SpringMVC的核心;请求分发器,前端控制器-->
<servlet>
<servlet-name>springmvc</servlet-name>
<servlet-class>org.springframework.web.servlet.DispatcherServlet</servlet-class>
<!--DispatchServlet要绑定SpringMVC的配置文件-->
<init-param>
<param-name>contextConfigLocation</param-name>
<param-value>classpath:springmvc-servlet.xml</param-value>
</init-param>
<!--启动级别1(服务器启动它启动)-->
<load-on-startup>1</load-on-startup>
</servlet>
<!--在springMVC中:/ 与 /*的区别
/:匹配所有的请求,不会去匹配jsp页面
/*:匹配所有的请求,包括jsp页面
-->
<servlet-mapping>
<servlet-name>springmvc</servlet-name>
<url-pattern>/</url-pattern>
</servlet-mapping>
</web-app>
3. 在Resource下配置springMVC的绑定文件
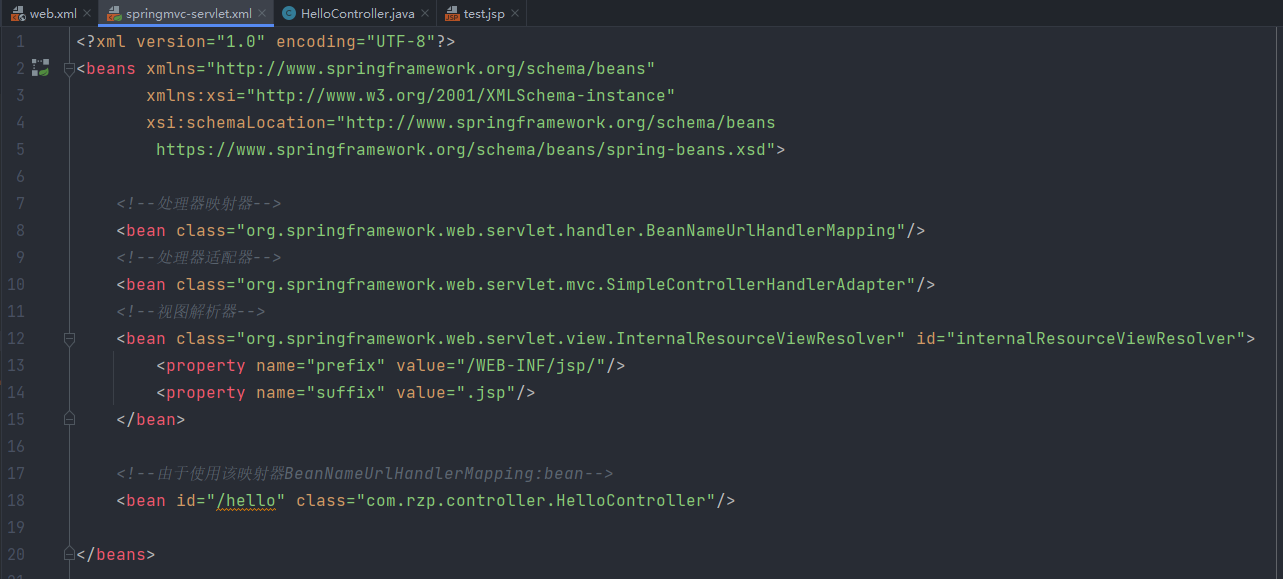
<?xml version="1.0" encoding="UTF-8"?>
<beans xmlns="http://www.springframework.org/schema/beans"
xmlns:xsi="http://www.w3.org/2001/XMLSchema-instance"
xsi:schemaLocation="http://www.springframework.org/schema/beans
https://www.springframework.org/schema/beans/spring-beans.xsd">
<!--处理器映射器-->
<bean class="org.springframework.web.servlet.handler.BeanNameUrlHandlerMapping"/>
<!--处理器适配器-->
<bean class="org.springframework.web.servlet.mvc.SimpleControllerHandlerAdapter"/>
<!--视图解析器-->
<bean class="org.springframework.web.servlet.view.InternalResourceViewResolver" id="internalResourceViewResolver">
<property name="prefix" value="/WEB-INF/jsp/"/>
<property name="suffix" value=".jsp"/>
</bean>
<!--由于使用该映射器BeanNameUrlHandlerMapping:bean,Controller设置见第四步-->
<bean id="/hello" class="com.rzp.controller.HelloController"/>
</beans>
4.设置业务,编写Controller控制器类
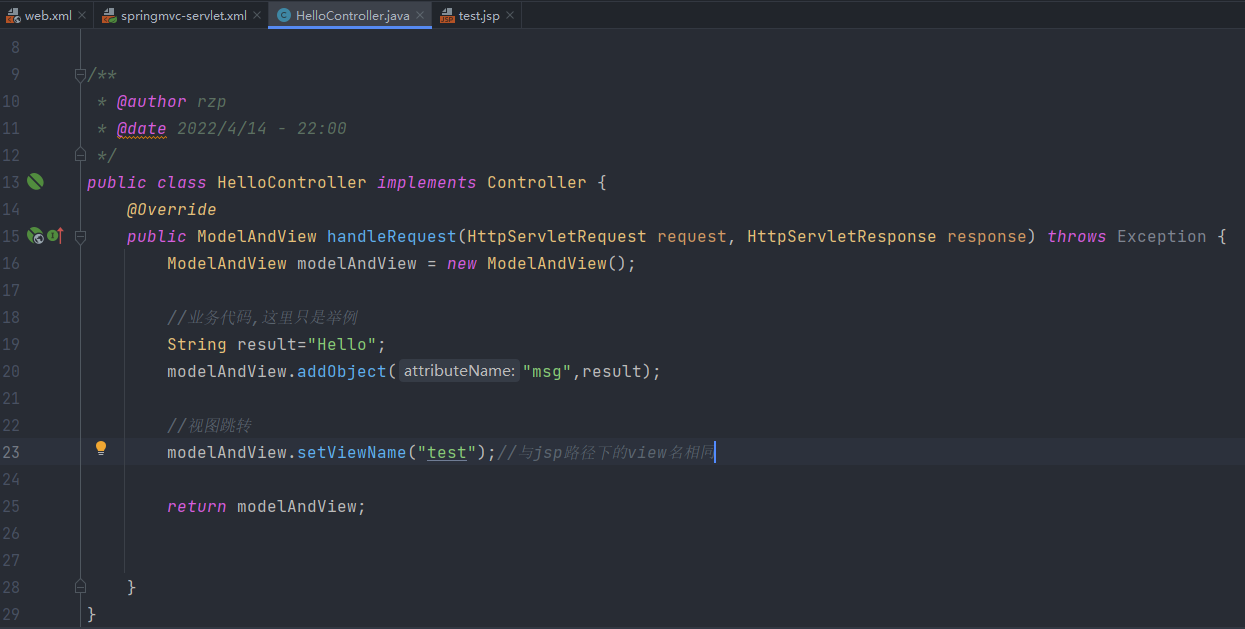
(2)注解开发
1.Maven工程中添加web支持

2.在项目结构中添加lib文件夹放入相关依赖避免程序报错(xml方式中也需要执行该步骤)
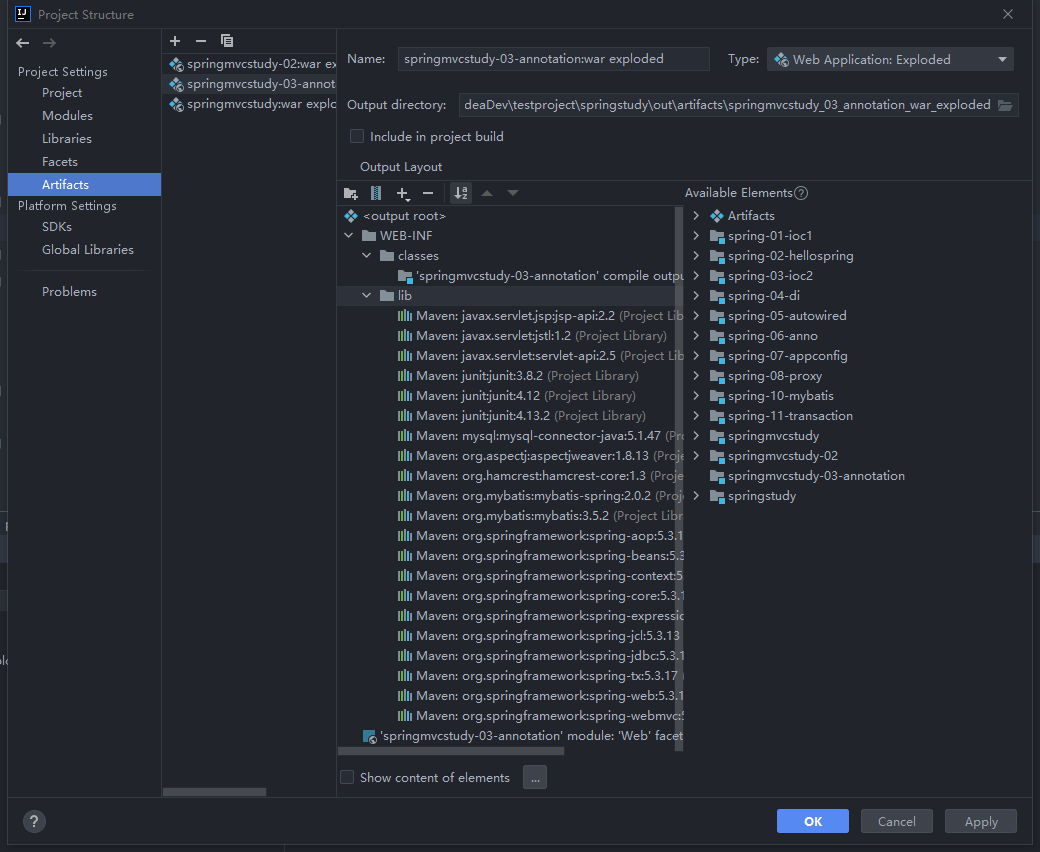
3.在Web.xml中配置DispatcherServlet以及servletMapping

<?xml version="1.0" encoding="UTF-8"?>
<web-app xmlns="http://xmlns.jcp.org/xml/ns/javaee"
xmlns:xsi="http://www.w3.org/2001/XMLSchema-instance"
xsi:schemaLocation="http://xmlns.jcp.org/xml/ns/javaee http://xmlns.jcp.org/xml/ns/javaee/web-app_4_0.xsd"
version="4.0">
<!--配置DispatchServlet:这个是SpringMVC的核心;请求分发器,前端控制器-->
<servlet>
<servlet-name>springmvc</servlet-name>
<servlet-class>org.springframework.web.servlet.DispatcherServlet</servlet-class>
<!--DispatchServlet要绑定SpringMVC的配置文件-->
<init-param>
<param-name>contextConfigLocation</param-name>
<param-value>classpath:springmvc-servlet.xml</param-value>
</init-param>
<!--启动级别1(服务器启动它启动)-->
<load-on-startup>1</load-on-startup>
</servlet>
<!--在springMVC中:/ 与 /*的区别
/:匹配所有的请求,不会去匹配jsp页面
/*:匹配所有的请求,包括jsp页面
-->
<servlet-mapping>
<servlet-name>springmvc</servlet-name>
<url-pattern>/</url-pattern>
</servlet-mapping>
</web-app>
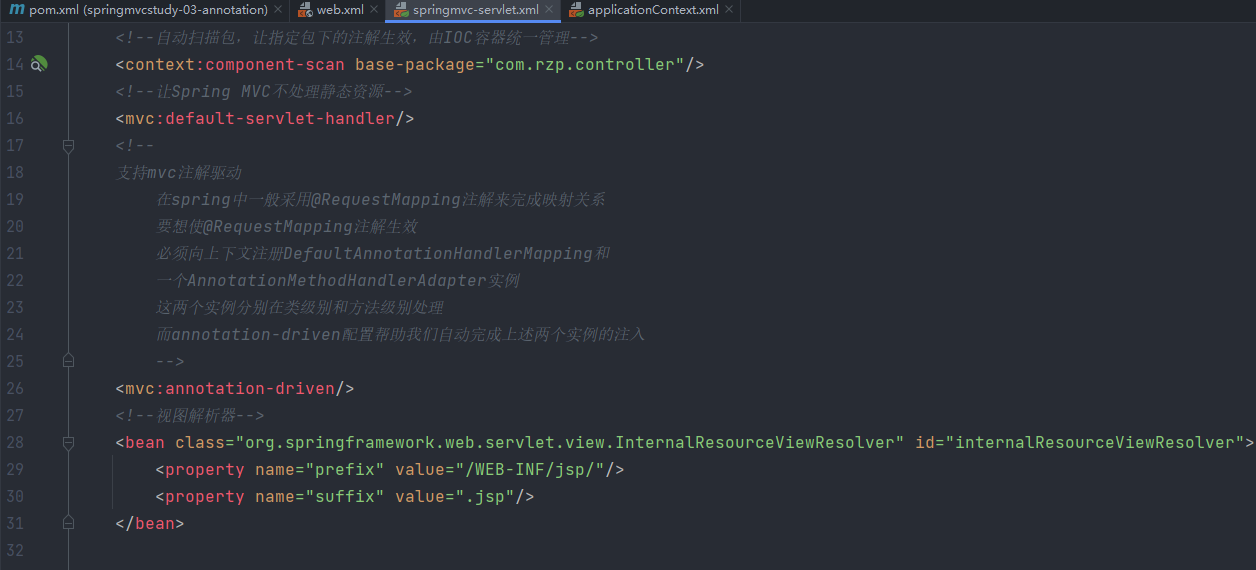
4.在Resource下配置springMVC的绑定文件
<?xml version="1.0" encoding="UTF-8"?>
<beans xmlns="http://www.springframework.org/schema/beans"
       xmlns:xsi="http://www.w3.org/2001/XMLSchema-instance"
       xmlns:context="http://www.springframework.org/schema/context"
       xmlns:mvc="http://www.springframework.org/schema/mvc"
       xsi:schemaLocation="http://www.springframework.org/schema/beans
https://www.springframework.org/schema/beans/spring-beans.xsd
http://www.springframework.org/schema/context
https://www.springframework.org/schema/context/spring-context.xsd
http://www.springframework.org/schema/mvc
http://www.springframework.org/schema/mvc/spring-mvc.xsd">

    <!--自动扫描包,让指定包下的注解生效,由IOC容器统一管理-->
    <context:component-scan base-package="com.rzp.controller"/>
    <!--让Spring MVC不处理静态资源-->
    <mvc:default-servlet-handler/>
    <!--
    支持mvc注解驱动
        在spring中一般采用@RequestMapping注解来完成映射关系
        要想使@RequestMapping注解生效
        必须向上下文注册DefaultAnnotationHandlerMapping和
        一个AnnotationMethodHandlerAdapter实例
        这两个实例分别在类级别和方法级别处理
        而annotation-driven配置帮助我们自动完成上述两个实例的注入
        -->
    <mvc:annotation-driven/>
    <!--视图解析器-->
    <bean class="org.springframework.web.servlet.view.InternalResourceViewResolver" id="internalResourceViewResolver">
        <property name="prefix" value="/WEB-INF/jsp/"/>
        <property name="suffix" value=".jsp"/>
    </bean>


</beans>
注意在web-inf目录下创建jsp目录并放入指定首页,保证安全获取
5.创建Controller类
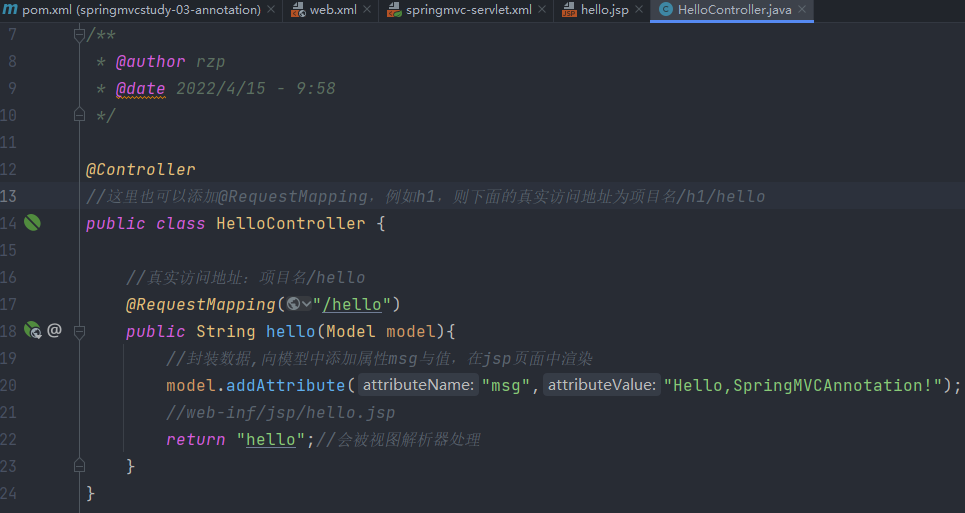
注意@Controller //代表这个类会被Spring接管,被这个类中所有的方法,如果返回值为String,并且有具体页面可以跳转,那么就会被视图解析器解析拼接字符串访问具体的jsp
Restful风格设置(Controller类中)
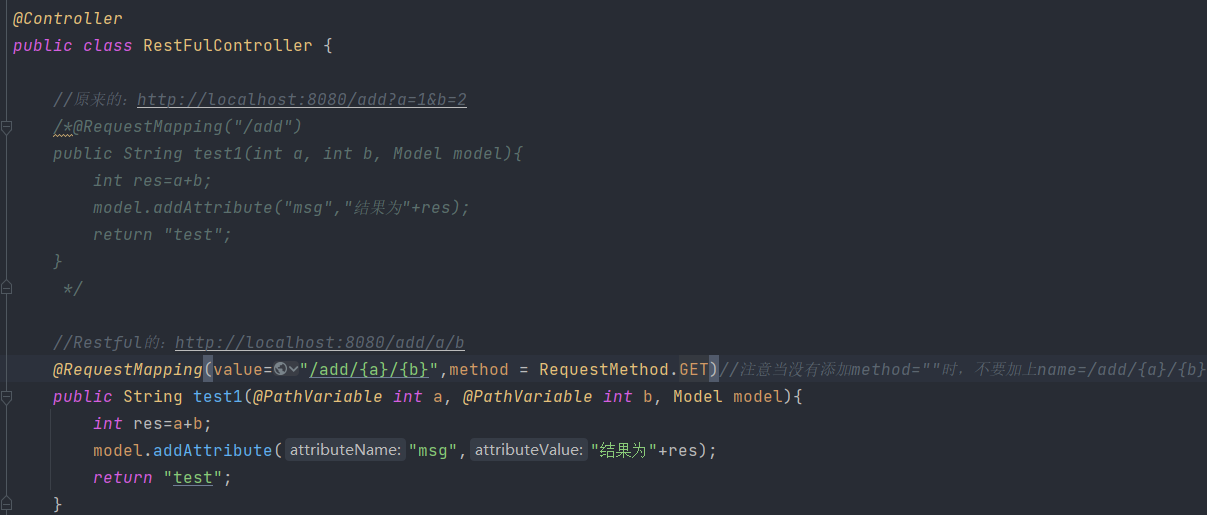
对于方法的设置还可以使用:
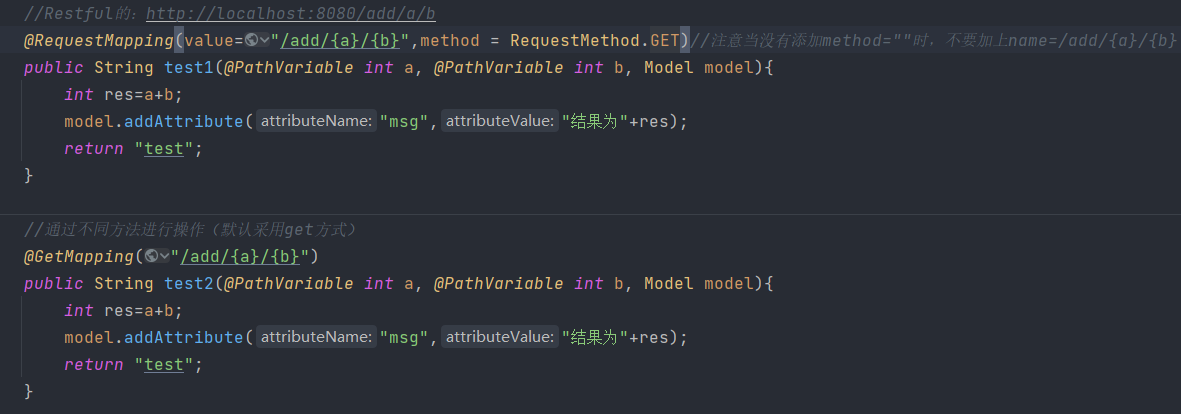
@GetMapping
@PostMapping
@PutMapping
@DeleteMapping
@PatchMapping
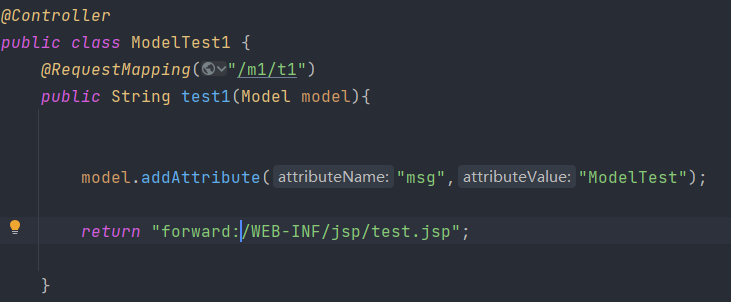
视图解析器
视图解析器个人理解主要的作用是拼接url,如果没有视图解析器,那么可使用转发或者重定向方法,url要写全(以下例子视图解析器已删除)
过滤器
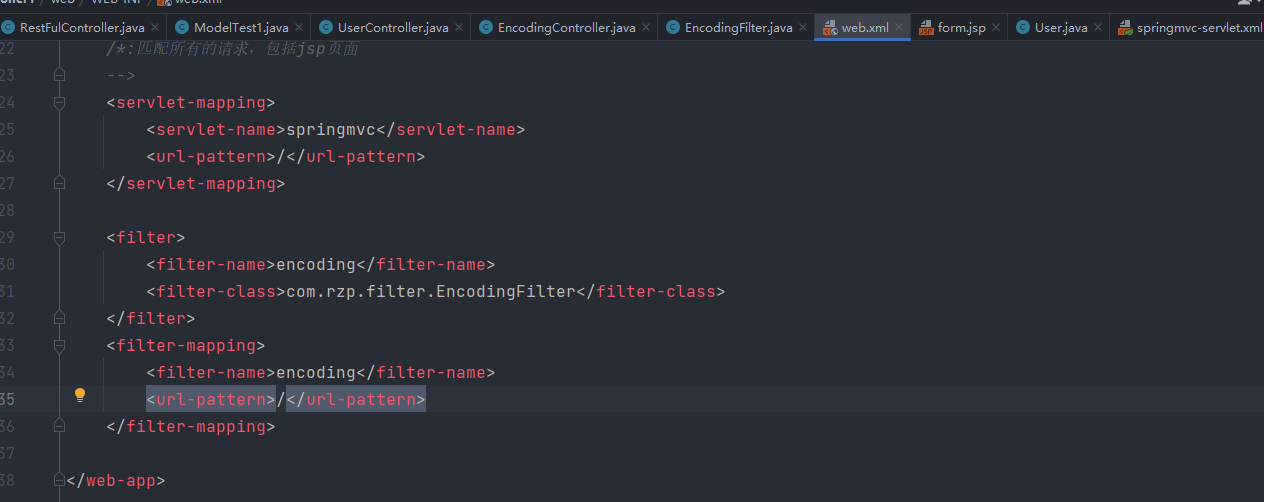
过滤器的使用(解决乱码问题)
1)首先创建过滤类实现Filter

2) web.xml中注册
<filter>
<filter-name>encoding</filter-name>
<filter-class>com.rzp.filter.EncodingFilter</filter-class>
</filter>
<filter-mapping>
<filter-name>encoding</filter-name>
<url-pattern>/*</url-pattern>
</filter-mapping>
但以上步骤还是不能解决post方法下的乱码问题,可以直接配置SpringMVC的过滤器
<filter>
    <filter-name>encoding</filter-name>
    <filter-class>org.springframework.web.filter.CharacterEncodingFilter</filter-class>
    <init-param>
        <param-name>encoding</param-name>
        <param-value>utf-8</param-value>
    </init-param>
</filter>
<filter-mapping>
    <filter-name>encoding</filter-name>
    <url-pattern>/*</url-pattern>
</filter-mapping>
JSON的使用
1)导入JSON的包
<dependency>
    <groupId>com.fasterxml.jackson.core</groupId>
    <artifactId>jackson-databind</artifactId>
    <version>2.13.2</version>
</dependency>
2)在Springmvc-servlet.xml下配置
<mvc:annotation-driven>
    <mvc:message-converters register-defaults="true">
        <bean class="org.springframework.http.converter.StringHttpMessageConverter">
            <constructor-arg value="UTF-8"/>
        </bean>
        <bean class="org.springframework.http.converter.json.MappingJackson2HttpMessageConverter">
            <property name="objectMapper">
                <bean class="org.springframework.http.converter.json.Jackson2ObjectMapperFactoryBean">
                    <property name="failOnEmptyBeans" value="false"/>
                </bean>
            </property>
        </bean>
    </mvc:message-converters>
</mvc:annotation-driven>
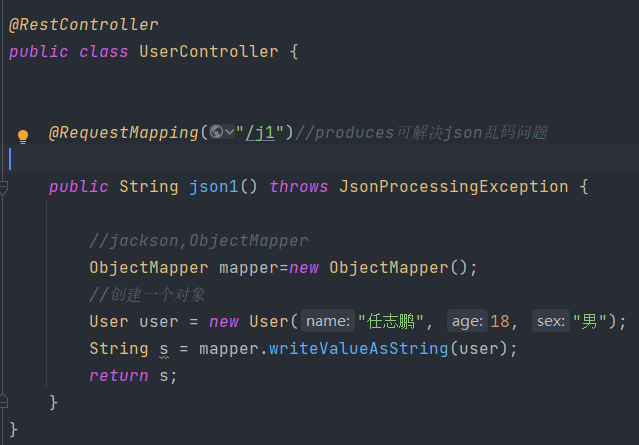
3)设置Controller类
拦截器
SpringMVC的处理器拦截器类似于Servlet开发中的过滤器Filter,用于对处理器进行预处理和后处理
拦截器和过滤器的区别:拦截器是AOP思想的具体应用
过滤器:
Sevlet规范中的一部分,任何java web工程都可以使用(因此在web.xml中配置)
在Url-pattern中配置了/*后,可以对所有要访问的资源进行拦截
拦截器:
拦截器是Spring MVC框架中的,只有使用Spring MVC框架的工程才能使用(在applicationContext下配置)
拦截器只会拦截访问的控制器方法,如果访问的是Jsp/html/css/image/js是不会进行拦截的
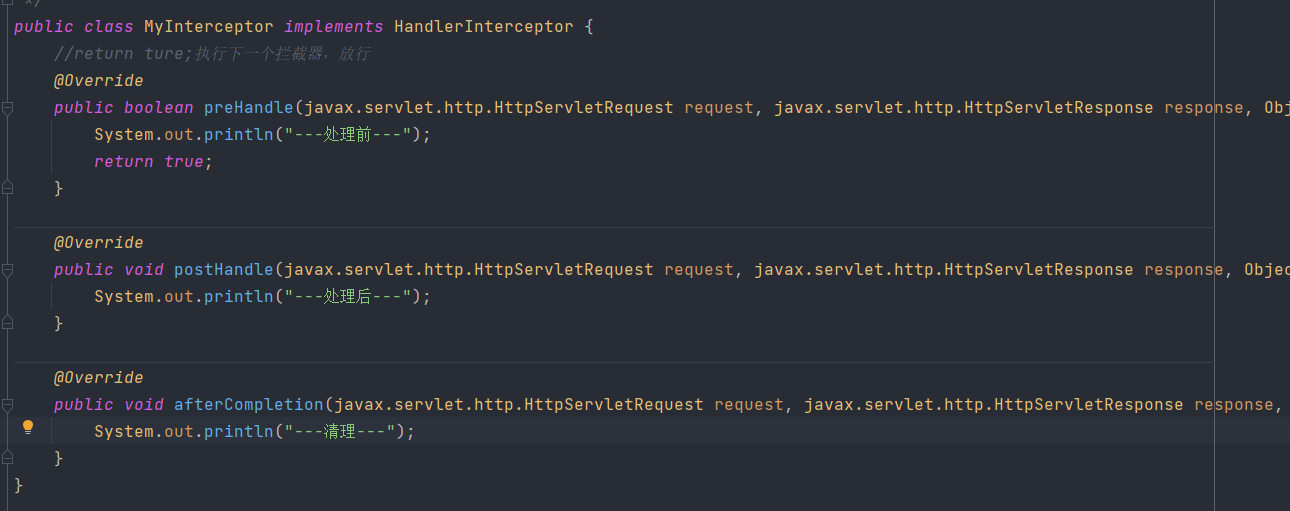
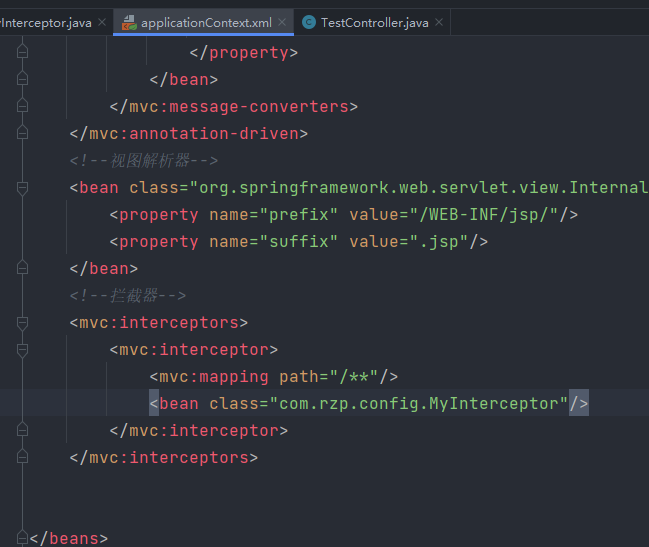
配置applicationContext.xml
控制台显示
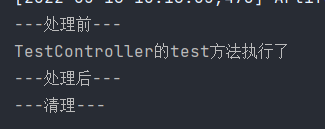
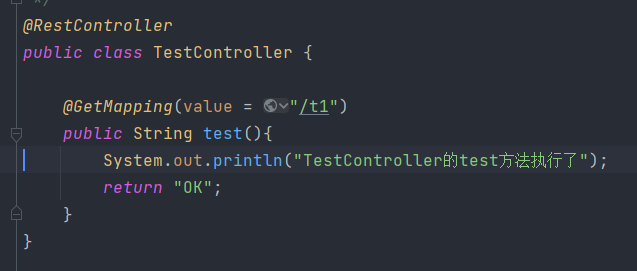
没有修改Controller的代码,充分体现了AOP的思想
三、SpringBoot
(1)创建步骤
1.起始创建一个空工程

2.空工程创建之后新建Module

3.Module采用Spring Initializr
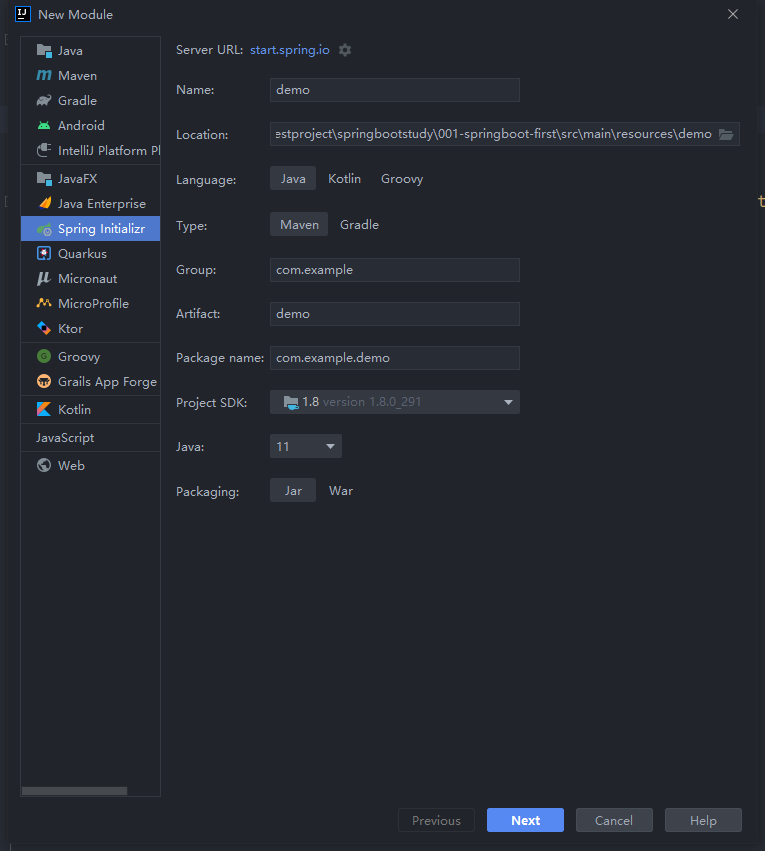
注意设置web
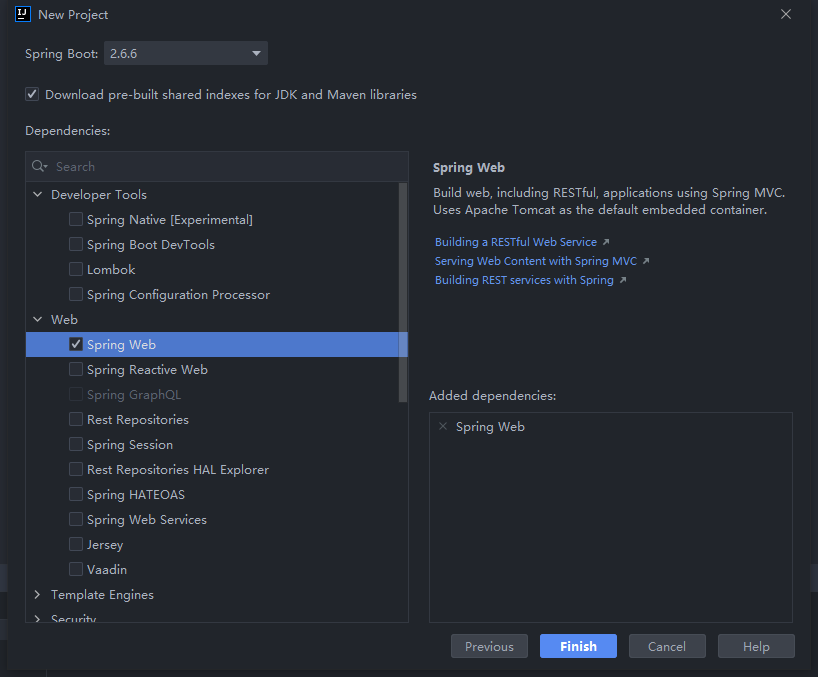
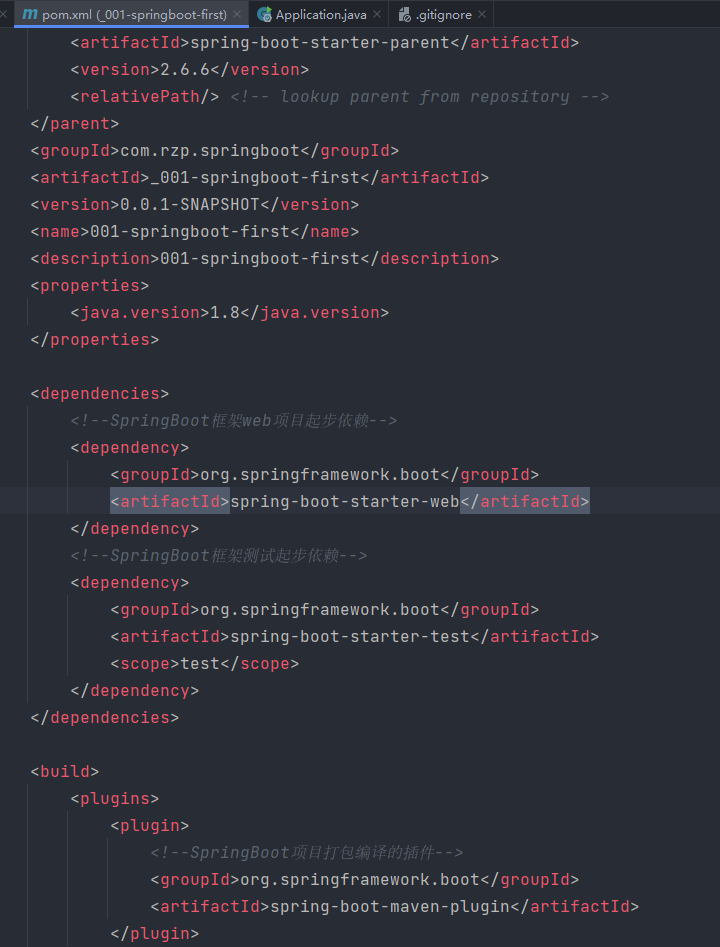
4.工程中已自动设置相关依赖,等待加载即可
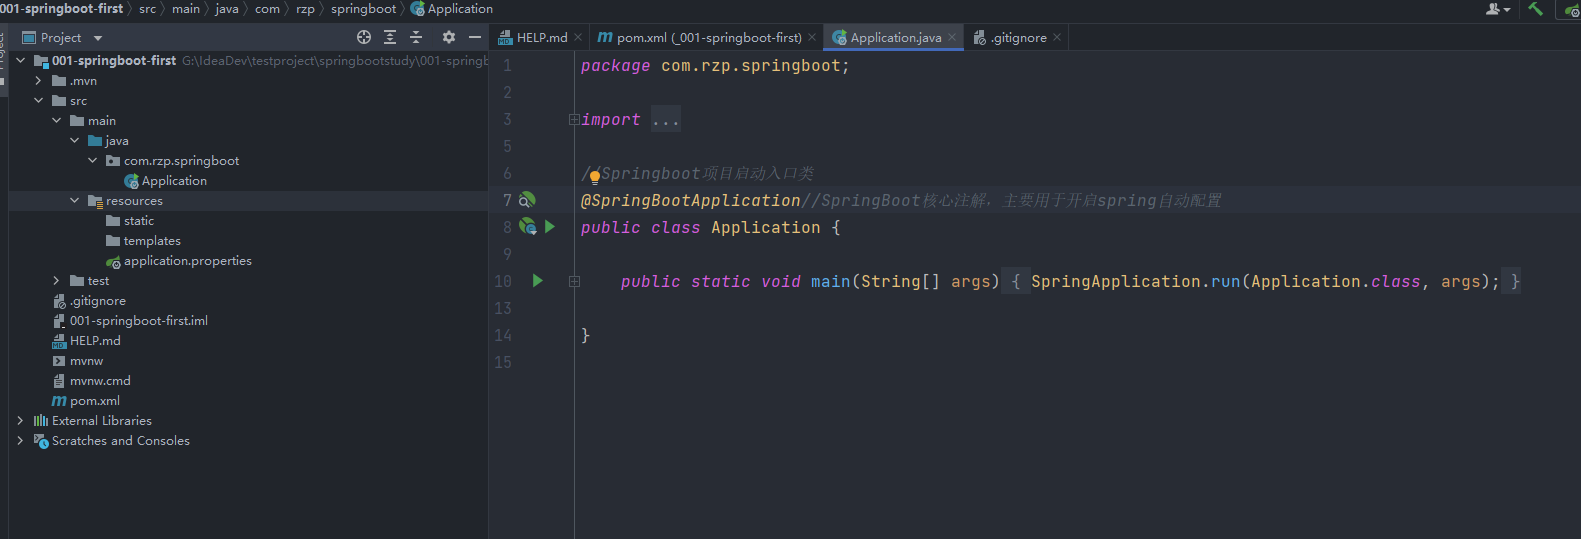
5.以下为新建SpringBoot工程目录及项目启动接口
(2)其他说明
1.在核心配置文件properties(在resource包下,一个module只能有一种配置文件)设置端口号以及上下文根
1)在application.properties中设置(以下配置文件均存在时已properties为准)

2)在application.yml中设置

3)在application.yaml中设置

2.多环境下核心配置文件的使用(开发环境、测试环境、准生产环境、生产环境)
a.对不同环境编写properties文件
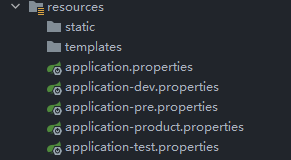
b.在主配置properties文件中激活

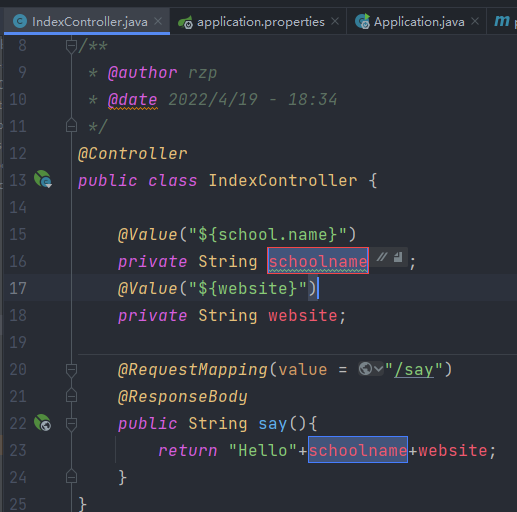
3.获取自定义参数的值(@Value的使用)
a.在properties文件中设置k/v
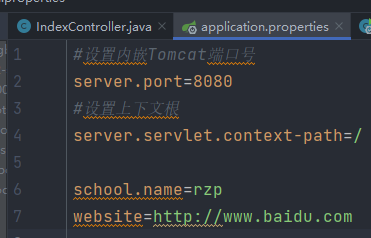
b.在Controller类中通过反射输入自定义参数(@Value可以在任意层中使用)
4.将自定义配置映射到对象(@ConfigurationProperties的使用,注意需要添加前缀)
a.如果properties文件中设置了相同的参数但属于不同的对象,通过@ConfigurationProperties对不同对象属性进行区分
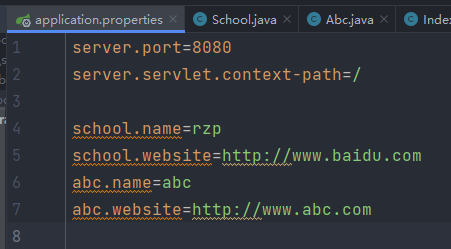
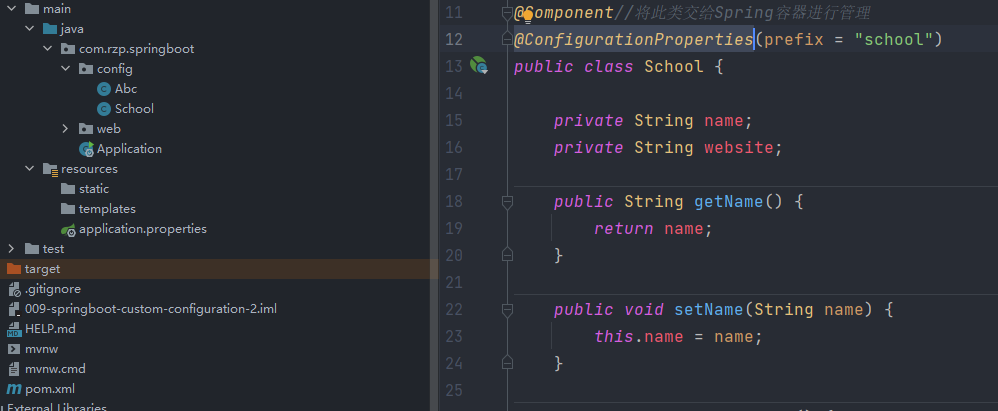
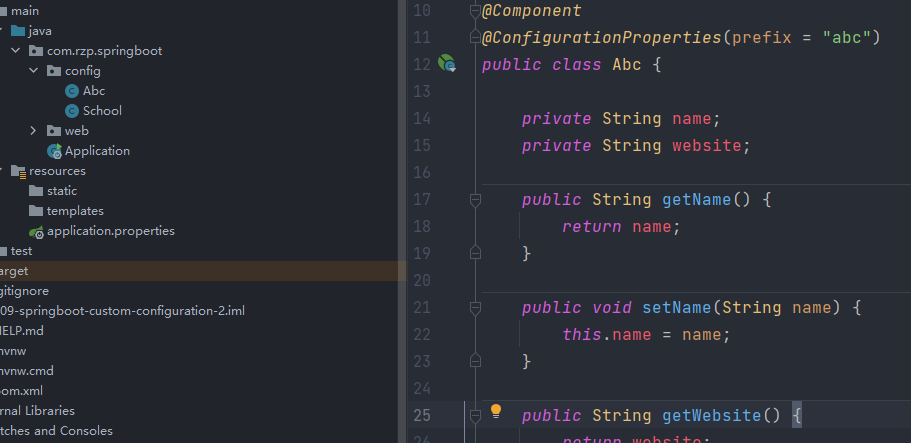
b.完成设置后在Controller类中自动装配对象即可
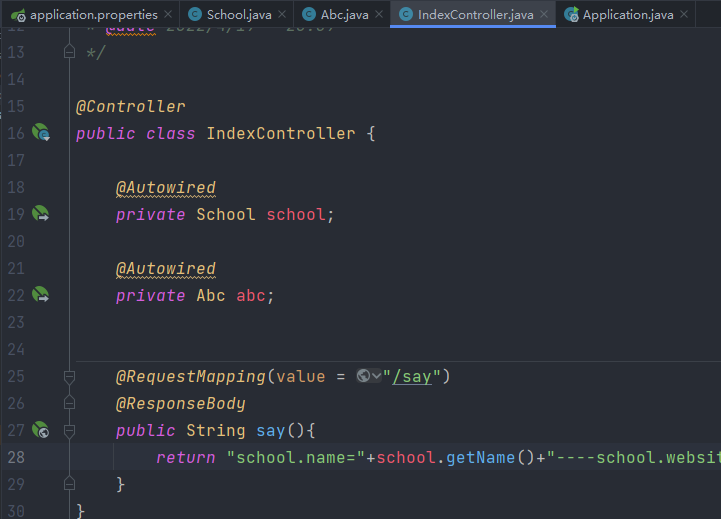
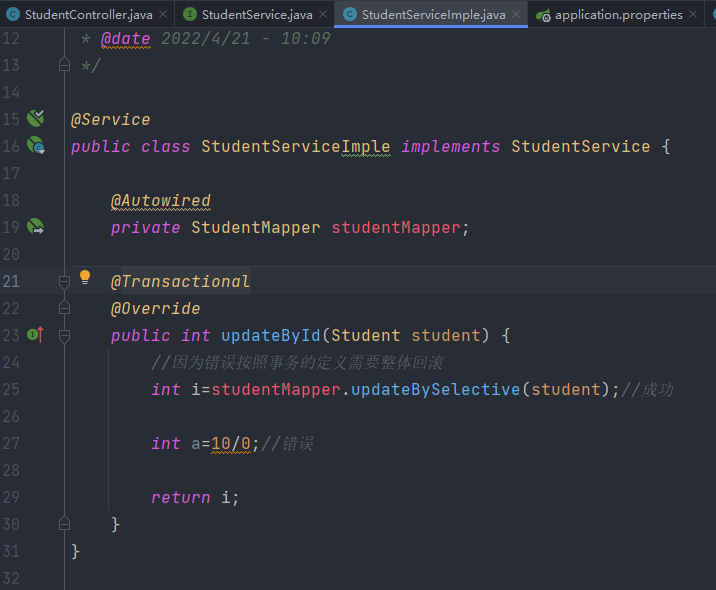
5.Springboot事务
在service层方法上添加@transactional注解实现事务
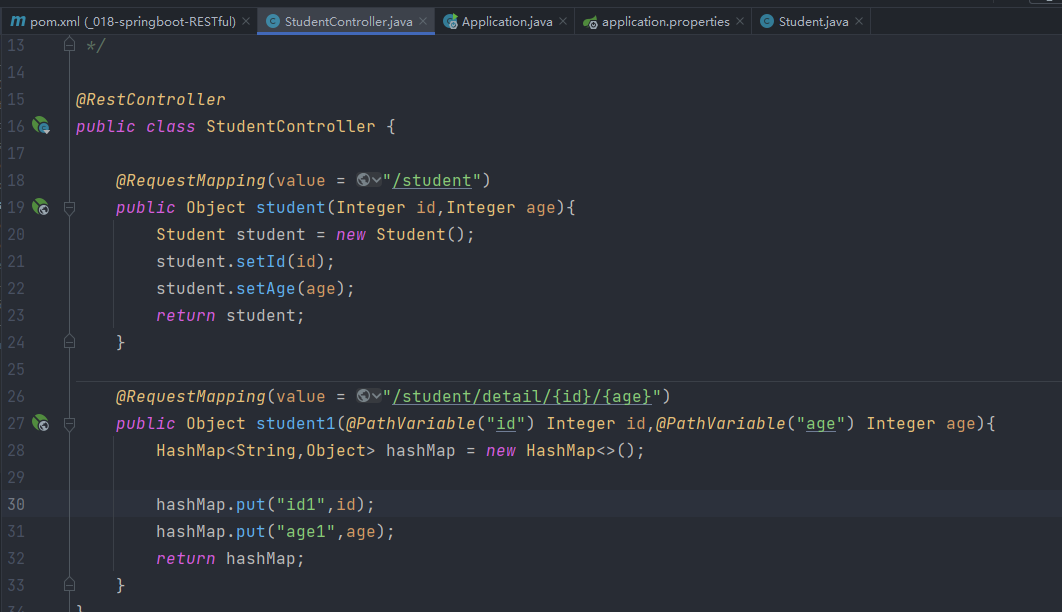
6.RESTful风格设置
@PathVariable注解的使用
集成JSP
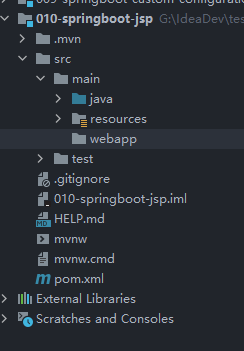
a.首先设置webapp包
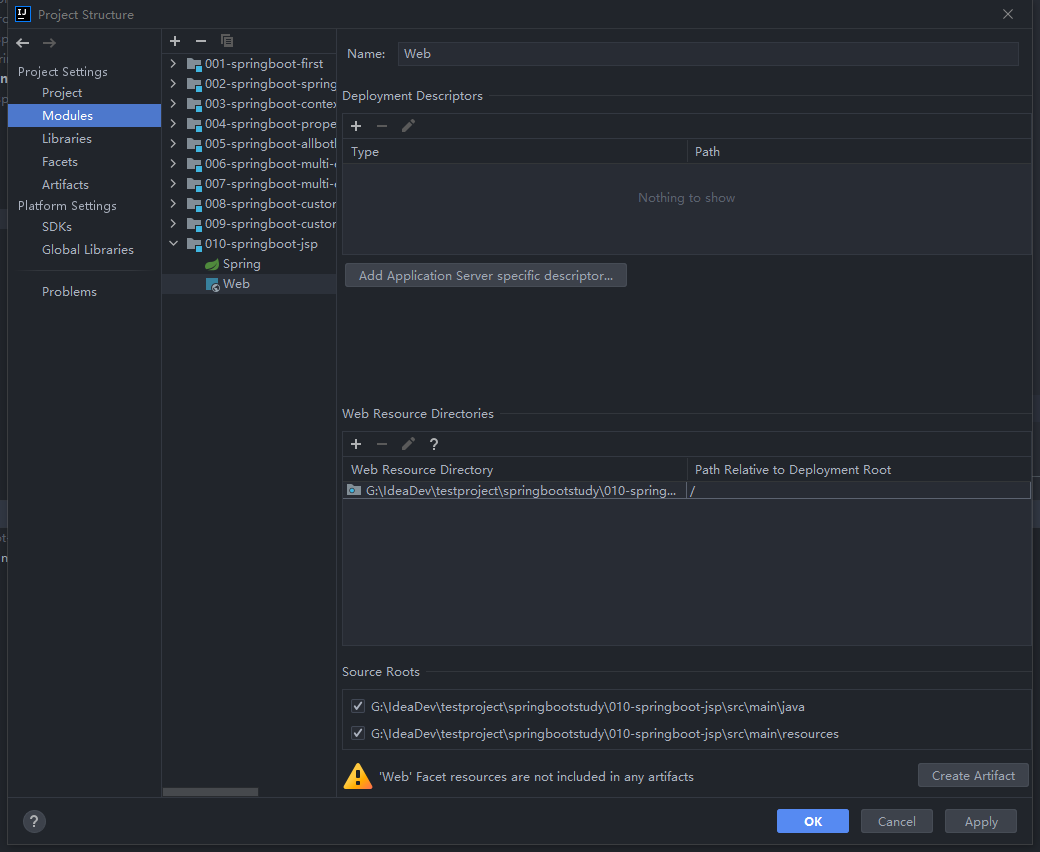
b.在project structure中设置web添加web resource directory,注意添加完成后create artifact
c. 在POM中添加依赖

<dependency>
    <groupId>org.apache.tomcat.embed</groupId>
    <artifactId>tomcat-embed-jasper</artifactId>
</dependency>
d. 同样在POM文件中指定编译的位置
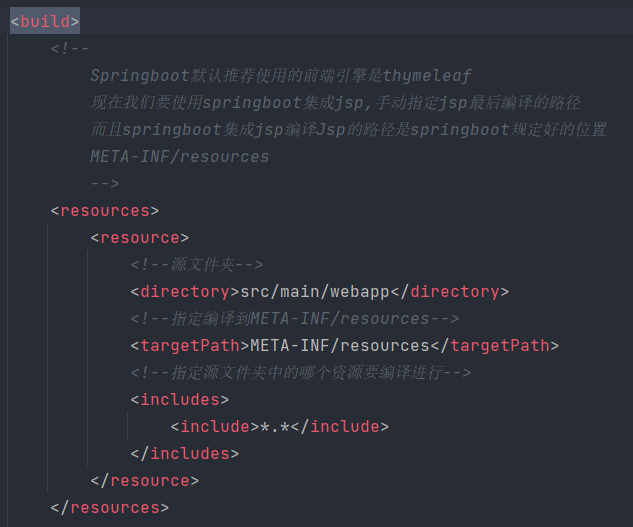
<resources>
<resource>
<!--源文件夹-->
<directory>src/main/webapp</directory>
<!--指定编译到META-INF/resources-->
<targetPath>META-INF/resources</targetPath>
<!--指定源文件夹中的哪个资源要编译进行-->
<includes>
<include>*.*</include>
</includes>
</resource>
</resources>
e.配置视图解析器

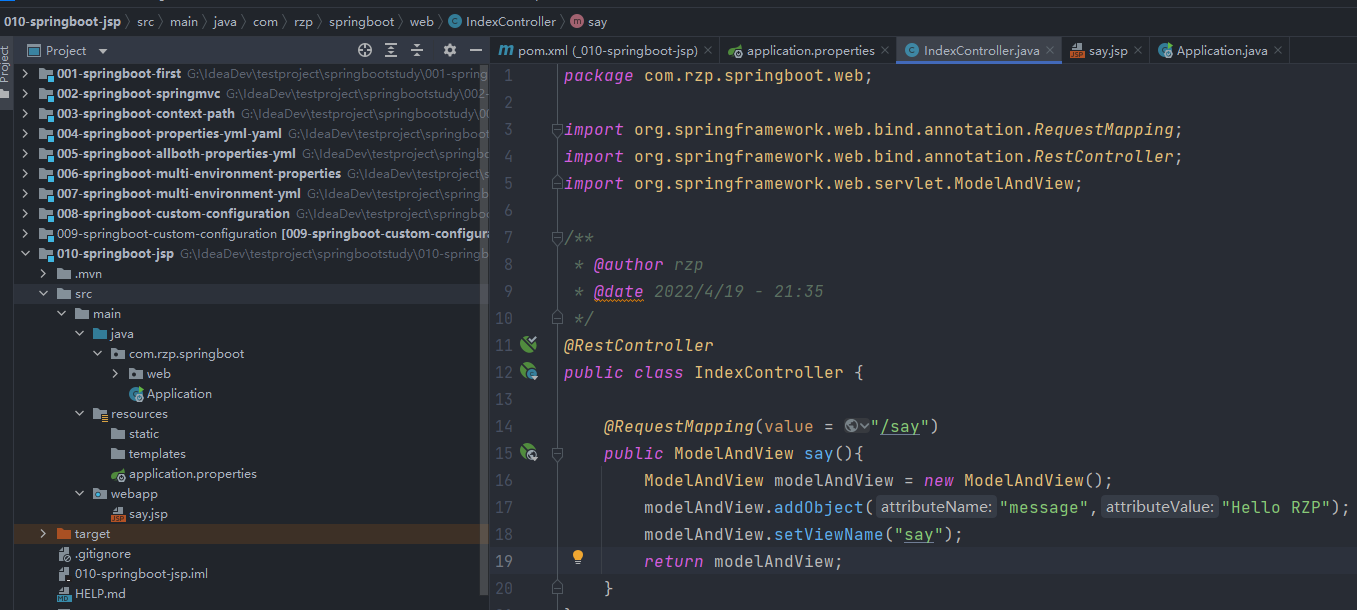
f.配置好Controller以及jsp文件即可,这里要注意,Controller的注解要求必须是RestController
集成Mybatis
a.首先添加Mybatis以及数据库相关依赖
<!--MySQL驱动-->
<dependency>
    <groupId>mysql</groupId>
    <artifactId>mysql-connector-java</artifactId>
</dependency>

<!--myBatis整合SpringBoot框架的起步依赖-->
<dependency>
    <groupId>org.mybatis.spring.boot</groupId>
    <artifactId>mybatis-spring-boot-starter</artifactId>
    <version>2.2.2</version>
</dependency><build><!--手动指定文件夹为resources-->
<resources>
<resource>
<directory>src/main/java</directory>
<includes>
<include>**/*.properties</include>
<include>**/*.xml</include>
</includes>
<filtering>false</filtering>
</resource>
<resource>
<directory>src/main/resources</directory>
<includes>
<include>**/*.properties</include>
<include>**/*.xml</include>
</includes>
<filtering>false</filtering>
</resource>
</resources>b.使用Mybatis提供的逆向工程生成实体bean,映射文件,DAO接口
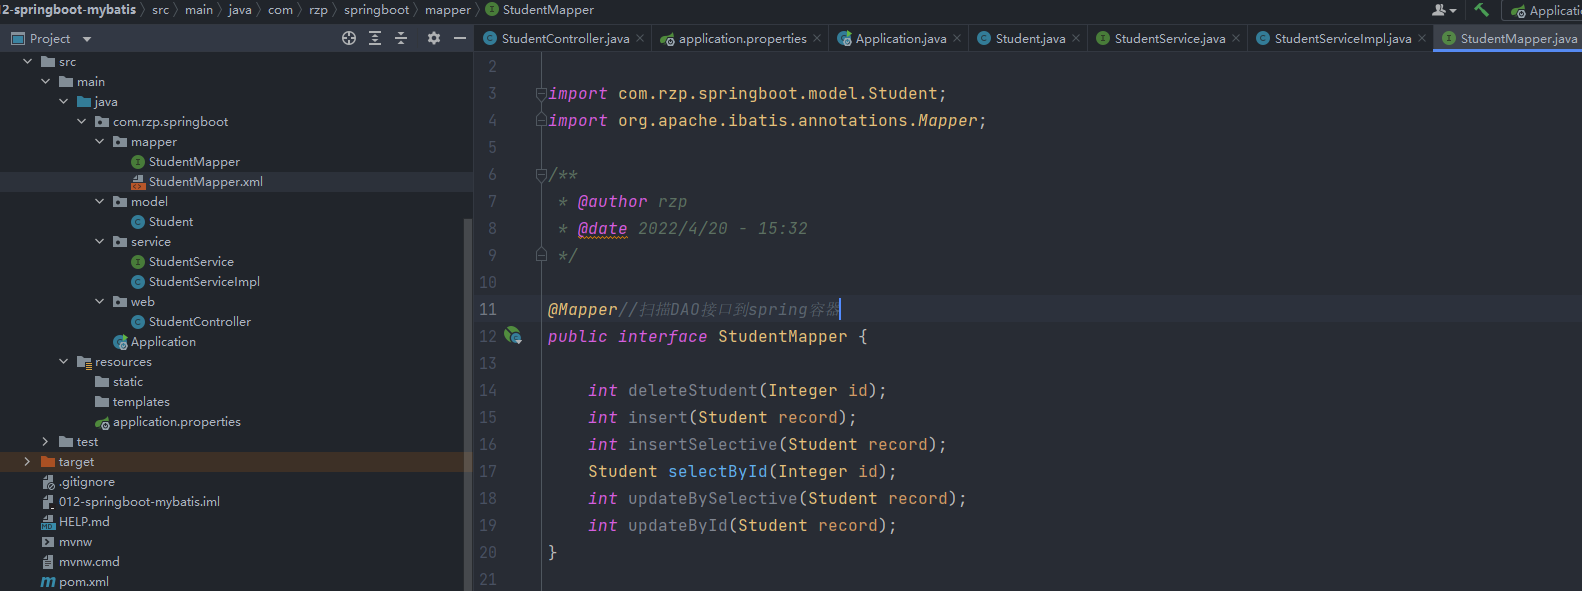
对于逆向工程的使用暂时没有学习,实际就是依照Mybatis的设置构建映射Mapper及对应接口还有实体类,注意在Mapper接口中添加@Mapper注解
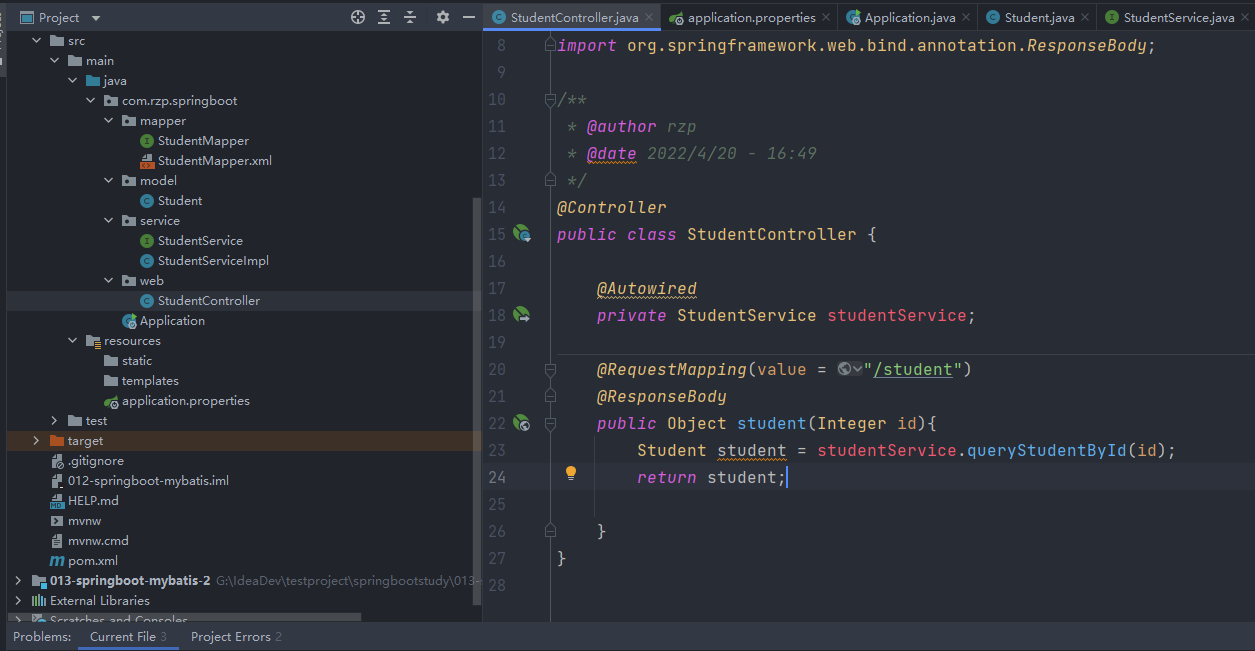
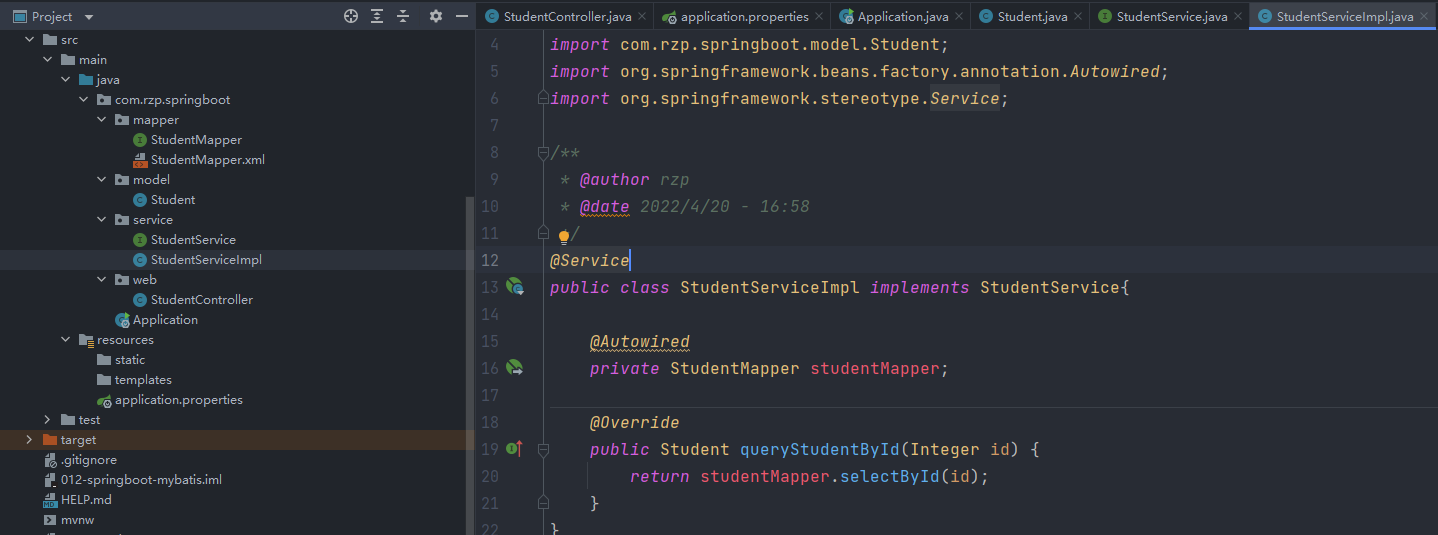
c. 编写Controller(前端交互)类以及Service层(注意注解的使用)
d.在properties文件下配置数据库环境

spring.datasource.driver-class-name=com.mysql.cj.jdbc.Driver
spring.datasource.url=spring.datasource.url=jdbc:mysql://localhost:3306/mybatis?useSSL=true&useUnicode=false&characterEncoding=UTF-8
spring.datasource.username=root
spring.datasource.password=123
Springboot集成MyBatis最主要的两个注解@Mapper,@MapperScan
@Mapper需要在每个Mapper接口类添加,作用扫描dao接口
@MapperScan是在SpringBoot启动入口类添加,扫描所有包
关于Mapper映射文件存放的位置的写法有以下两种:
1.将Mapper接口和Mapper映射文件存放在src/main/java同一目录下,需要在POM配置文件中配置build指定资源文件夹路径
2.将Mapper接口和Mapper映射文件分开存放
Mapper接口类存放在src/main/java目录下,Mapper映射文件存放在resources(类路径),在springboot properties配置文件中指定mapper映射位置

集成Redis
a.在POM文件中添加相关依赖
<!--Springboot集成Redis的起步依赖-->
<dependency>
    <groupId>org.springframework.boot</groupId>
    <artifactId>spring-boot-starter-data-redis</artifactId>
    <version>2.6.6</version>
</dependency>
b.连接redis数据库(linux)
确保主机与linux系统Ping通,如果出现IP能够联通但端口6379无法连接的情况,考虑临时关闭linxu防火墙
在linux系统下输入systemctl stop firewalld命令
或者输入systemctl disable firewalld.service执行开启禁用命令
注意properties配置文件中标记正确的IP地址,如果redis没有设置密码,则不需要输入

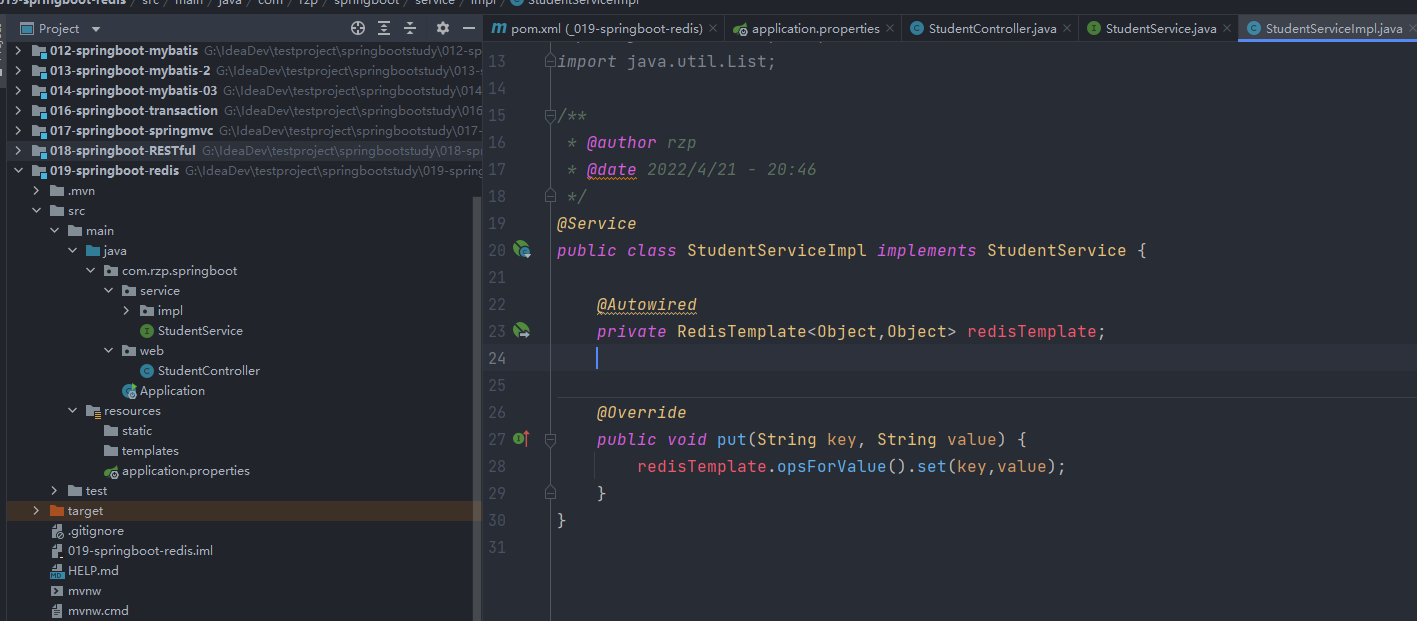
c.编写Controller层以及Service层测试
注意Service层下redisTemplate的使用
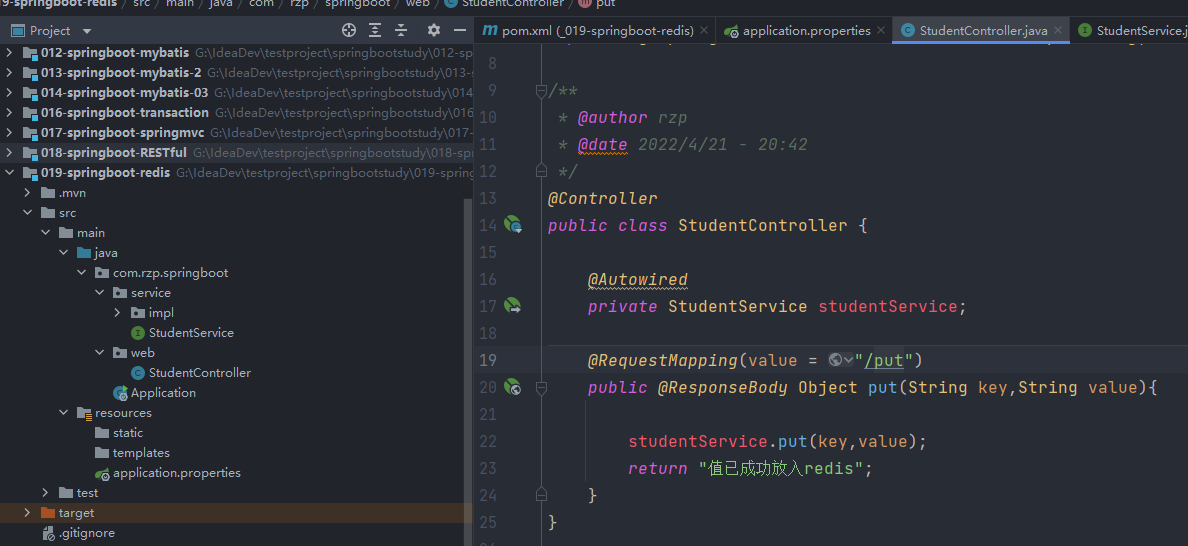
d.redis下的乱码问题

原因在于RedisTemplate序列化问题(serializer接口使用的outputStream默认为ISO-8859-1编码),原博客https://blog.csdn.net/weixin_42408447/article/details/120178004
可在service层下添加如下代码:
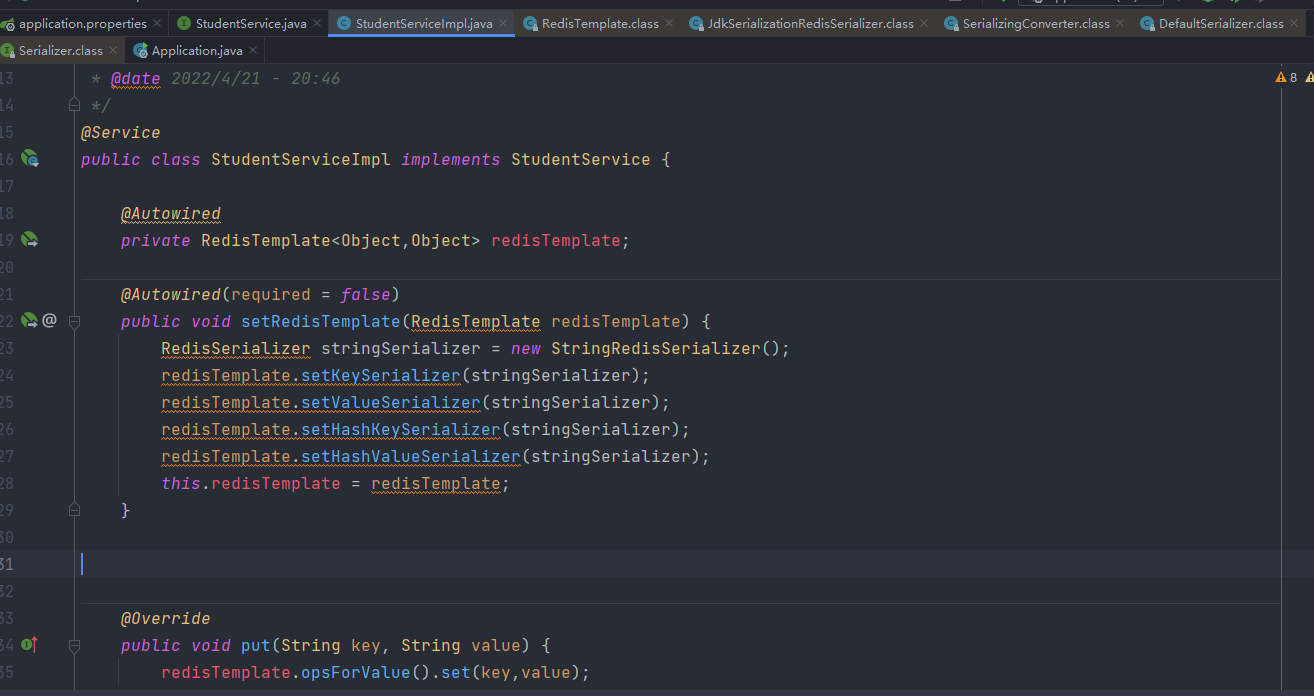
@Autowired(required = false)
public void setRedisTemplate(RedisTemplate redisTemplate) {
RedisSerializer stringSerializer = new StringRedisSerializer();
redisTemplate.setKeySerializer(stringSerializer);
redisTemplate.setValueSerializer(stringSerializer);
redisTemplate.setHashKeySerializer(stringSerializer);
redisTemplate.setHashValueSerializer(stringSerializer);
this.redisTemplate = redisTemplate;
}
或者在定义的配置包下定义
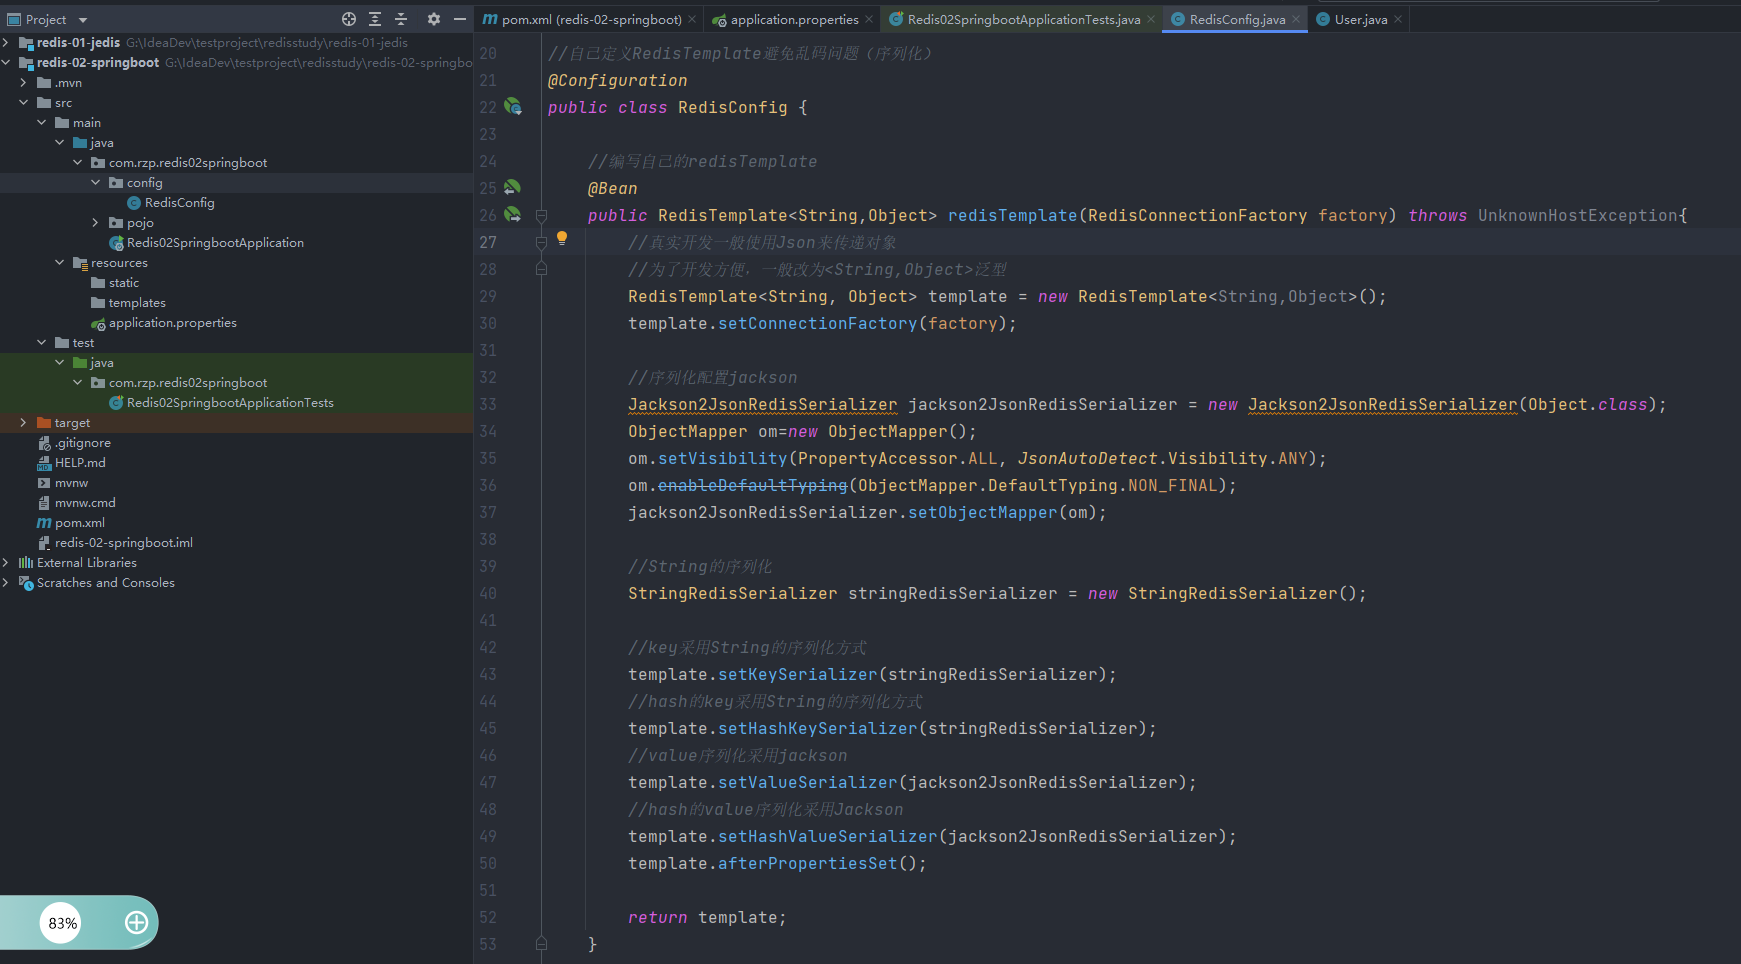
@Configuration
public class RedisConfig {
//编写自己的redisTemplate
@Bean
public RedisTemplate<String,Object> redisTemplate(RedisConnectionFactory factory) throws UnknownHostException{
//真实开发一般使用Json来传递对象
//为了开发方便,一般改为<String,Object>泛型
RedisTemplate<String, Object> template = new RedisTemplate<String,Object>();
template.setConnectionFactory(factory);
//序列化配置jackson
Jackson2JsonRedisSerializer jackson2JsonRedisSerializer = new Jackson2JsonRedisSerializer(Object.class);
ObjectMapper om=new ObjectMapper();
om.setVisibility(PropertyAccessor.ALL, JsonAutoDetect.Visibility.ANY);
om.enableDefaultTyping(ObjectMapper.DefaultTyping.NON_FINAL);
jackson2JsonRedisSerializer.setObjectMapper(om);
//String的序列化
StringRedisSerializer stringRedisSerializer = new StringRedisSerializer();
//key采用String的序列化方式
template.setKeySerializer(stringRedisSerializer);
//hash的key采用String的序列化方式
template.setHashKeySerializer(stringRedisSerializer);
//value序列化采用jackson
template.setValueSerializer(jackson2JsonRedisSerializer);
//hash的value序列化采用Jackson
template.setHashValueSerializer(jackson2JsonRedisSerializer);
template.afterPropertiesSet();
return template;
}
}
拦截器
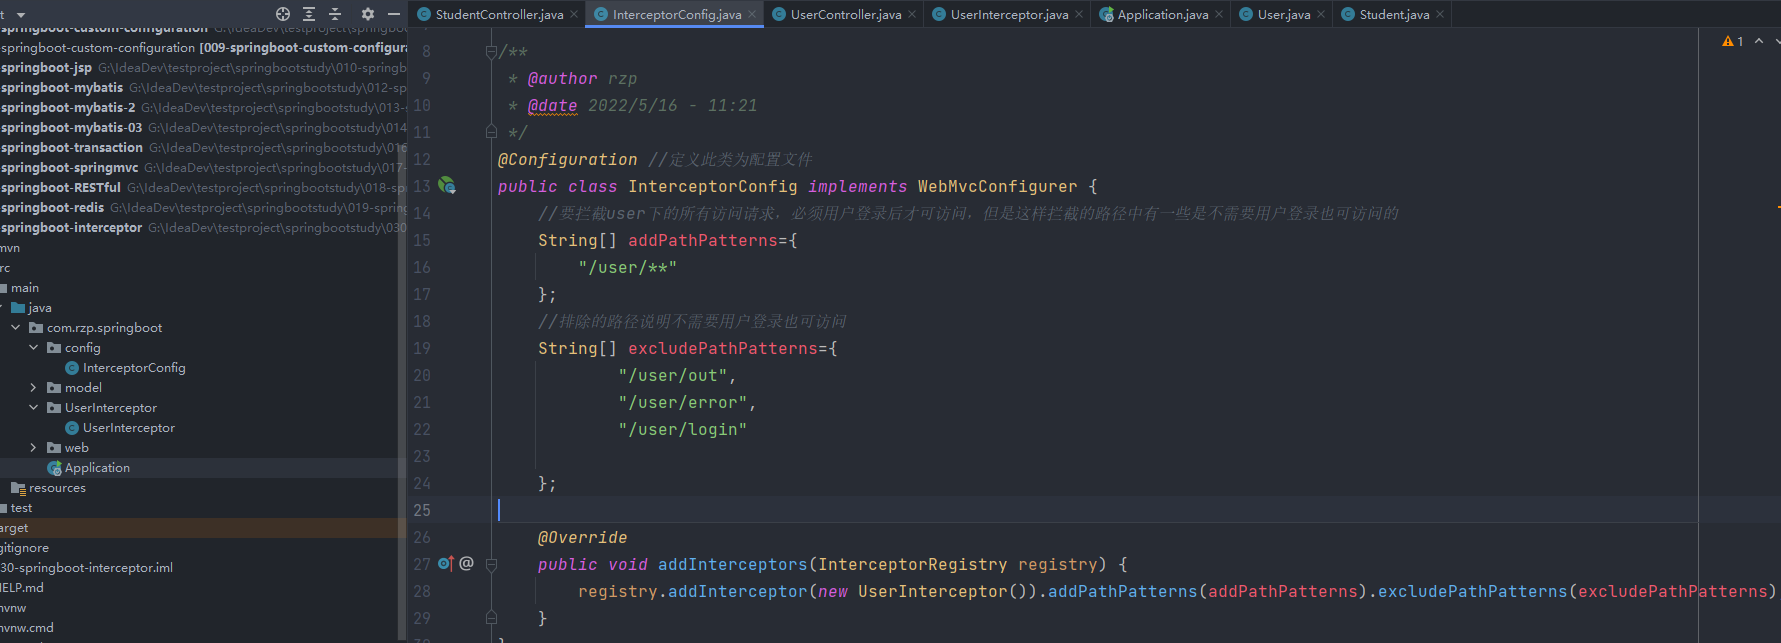
首先定义拦截器类实现HandlerInterceptor接口
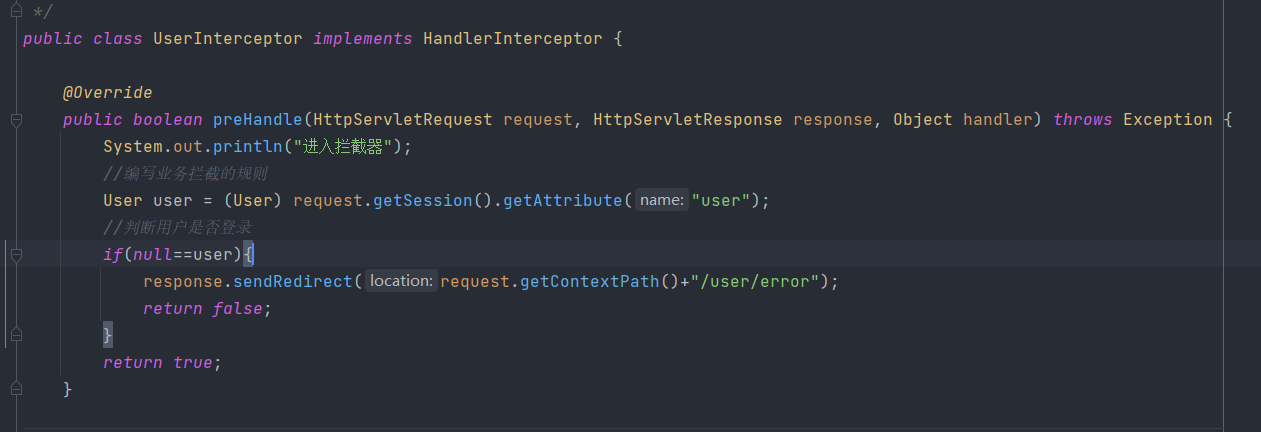
SpringMVC中需要配置拦截器,但是在SpringBoot中则需要实现一个配置类,配置类中说明拦截的路径或者排除的路径即可
使用Servlet
Springmvc中需要创建一个servlet基础HttpServlet
之后在xml配置在文件中使用servlet以及servlet-mapping
而Springboot两种方式
1.注解 @WebServlet,@ServletComponentScan


2.通过配置类注册组件
同样首先定义个servlet类

定义ServletConfig

过滤器
与使用servlet的方式类似
1.注解方式


2.配置类注册组件
过滤器类同样需要定义

定义配置类

字符编码设置
1.第一种实现方式
首先定义servlet类(这里定义servlet类是为了访问web工程)
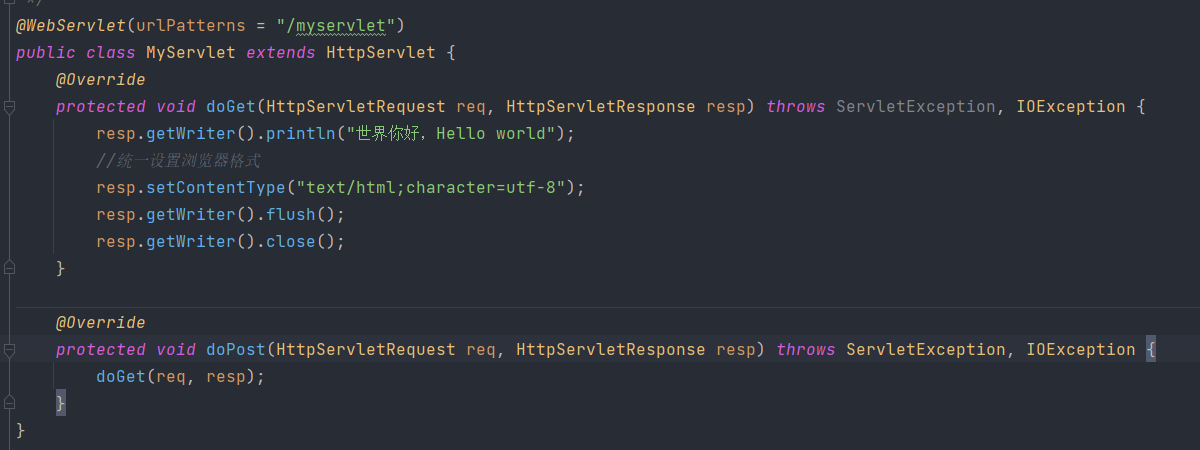

之后定义配置编码类,使用到了过滤器
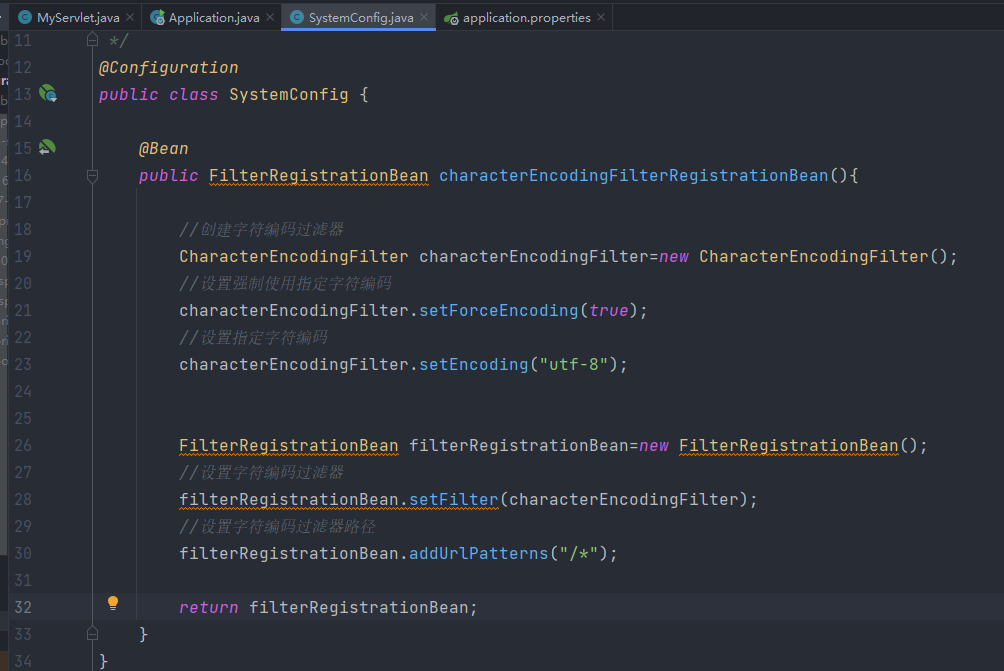
注意需要在配置文件中设置

2.第二种实现方式
配置servlet类实现WEB工程
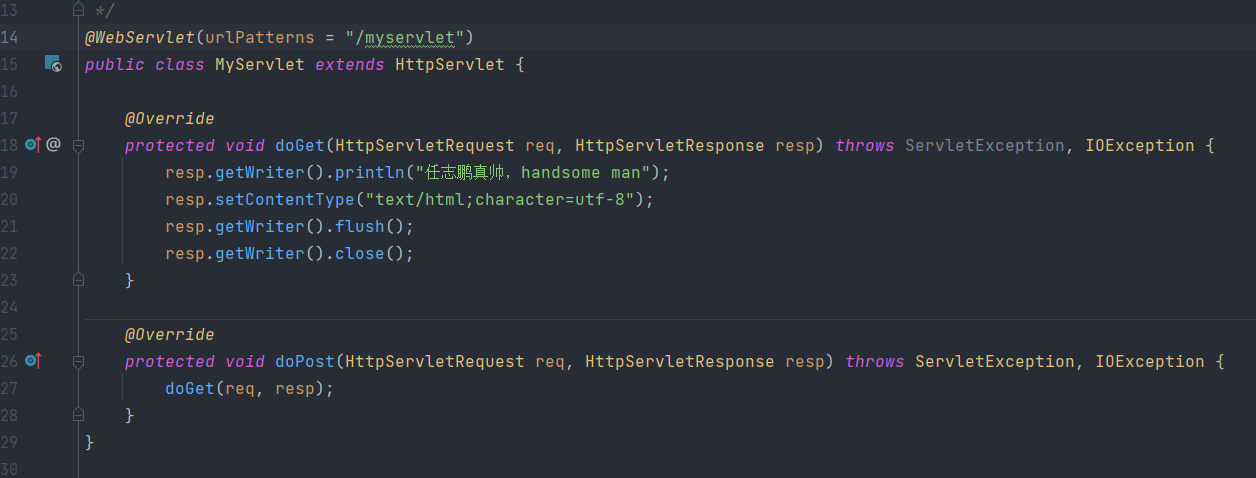
配置配置文件

SpringBoot打war包
1.首先编写可运行的工程
依赖导入

<dependency>
    <groupId>org.apache.tomcat.embed</groupId>
    <artifactId>tomcat-embed-jasper</artifactId>
</dependency> 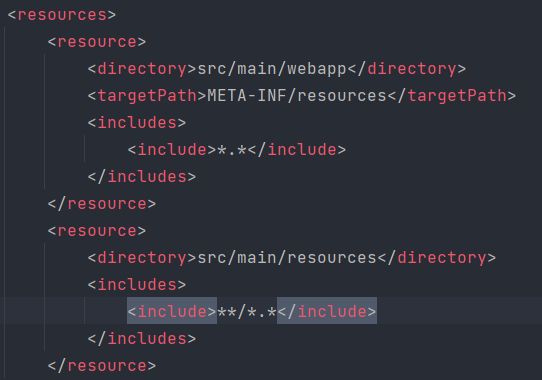
<resources>
    <resource>
        <directory>src/main/webapp</directory>
        <targetPath>META-INF/resources</targetPath>
        <includes>
            <include>*.*</include>
        </includes>
    </resource>
    <resource>
        <directory>src/main/resources</directory>
        <includes>
            <include>**/*.*</include>
        </includes>
    </resource>
</resources>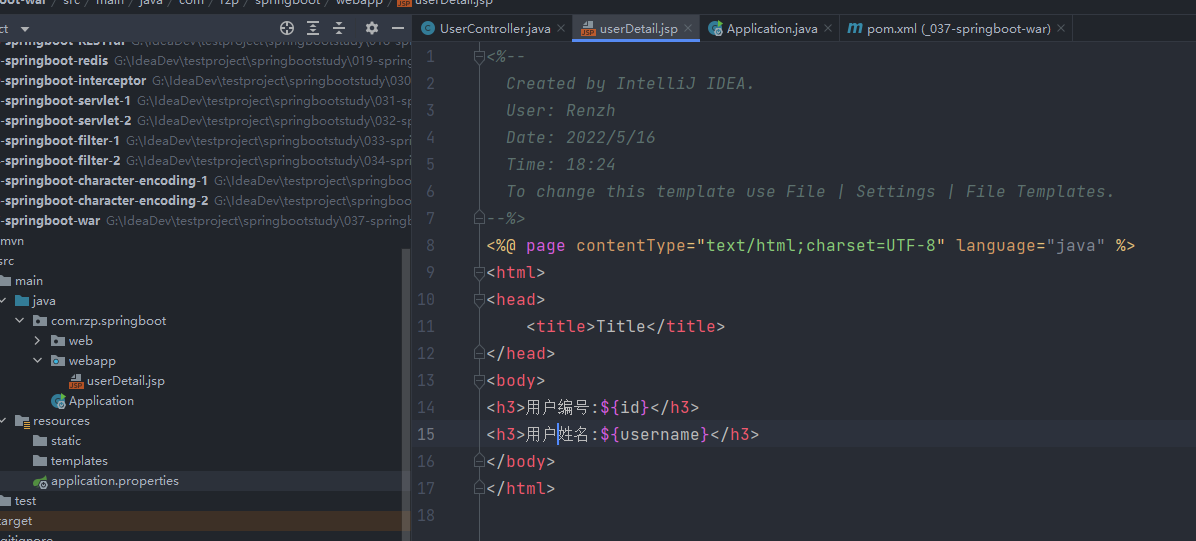
2.修改Springboot启动类
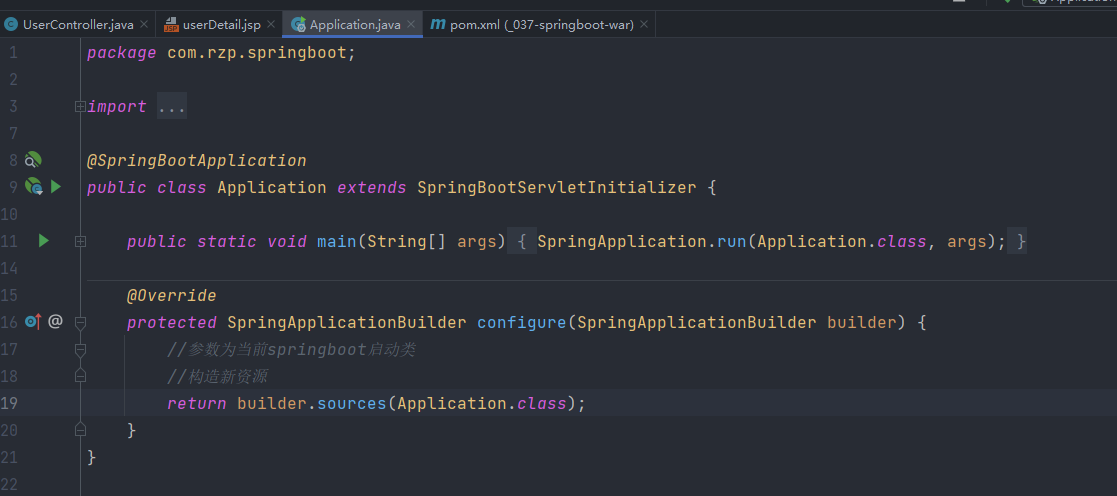
3.添加打包依赖


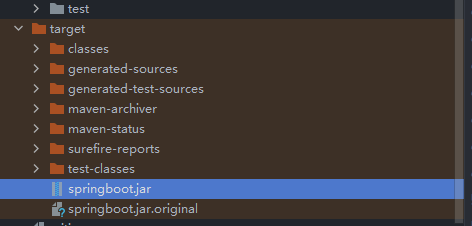
clean清除target文件夹
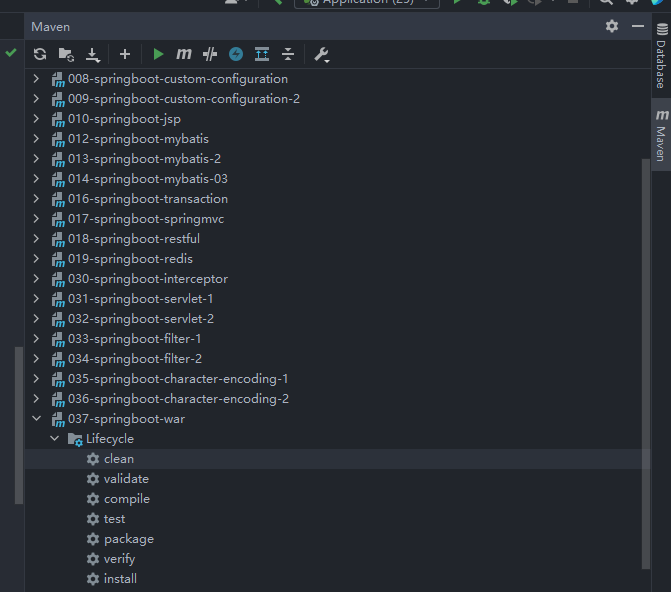
package打包
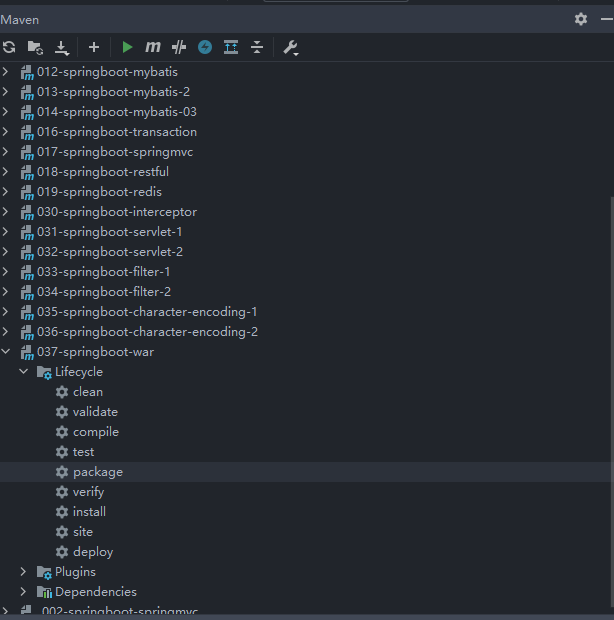
再看target文件夹会出现war包
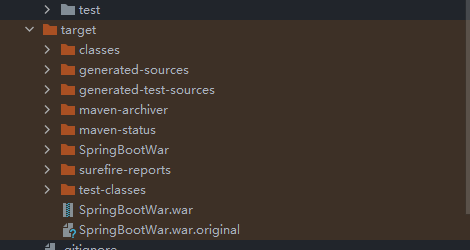
SpringBoot打Jar包
1.创建可用的工程
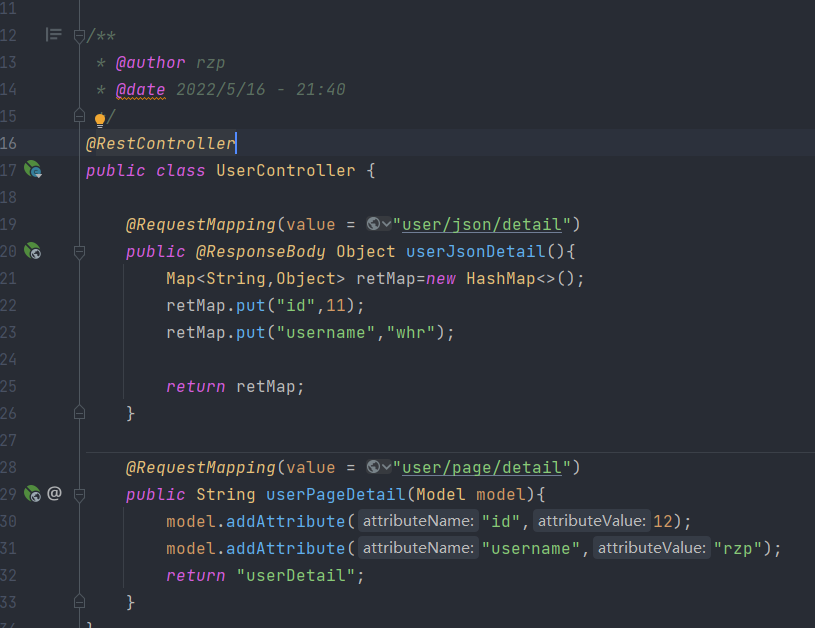
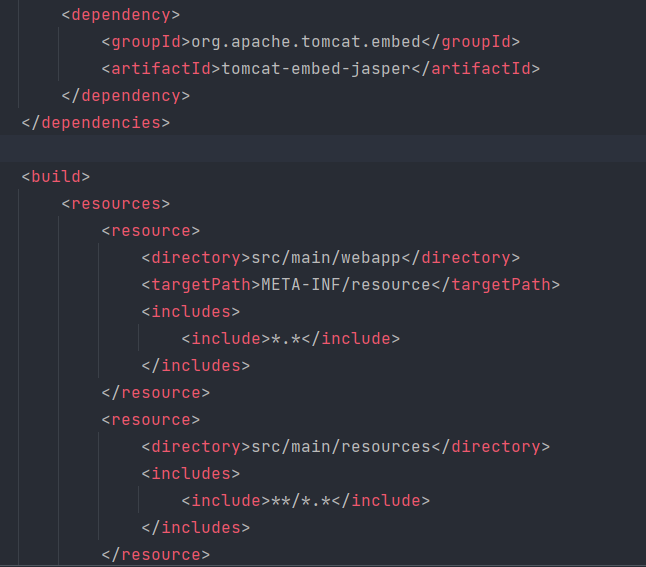
<dependency>
<groupId>org.apache.tomcat.embed</groupId>
<artifactId>tomcat-embed-jasper</artifactId>
</dependency>
<resources>
    <resource>
        <directory>src/main/webapp</directory>
        <targetPath>META-INF/resource</targetPath>
        <includes>
            <include>*.*</include>
        </includes>
    </resource>
    <resource>
        <directory>src/main/resources</directory>
        <includes>
            <include>**/*.*</include>
        </includes>
    </resource>
</resources>
2.打包
首先注意在POM中以下插件需要特定版本
<plugin>
    <groupId>org.springframework.boot</groupId>
    <artifactId>spring-boot-maven-plugin</artifactId>
    <version>1.4.2.RELEASE</version>
</plugin>
添加filename

clean/package得到jar包
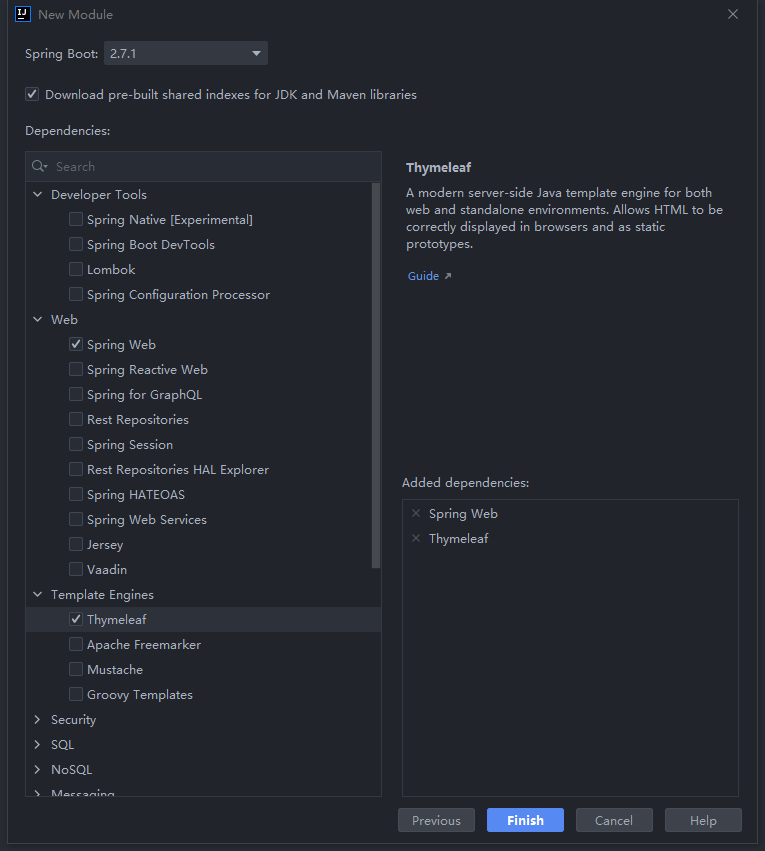
SpringBoot集成Thymeleaf
1.基础配置操作
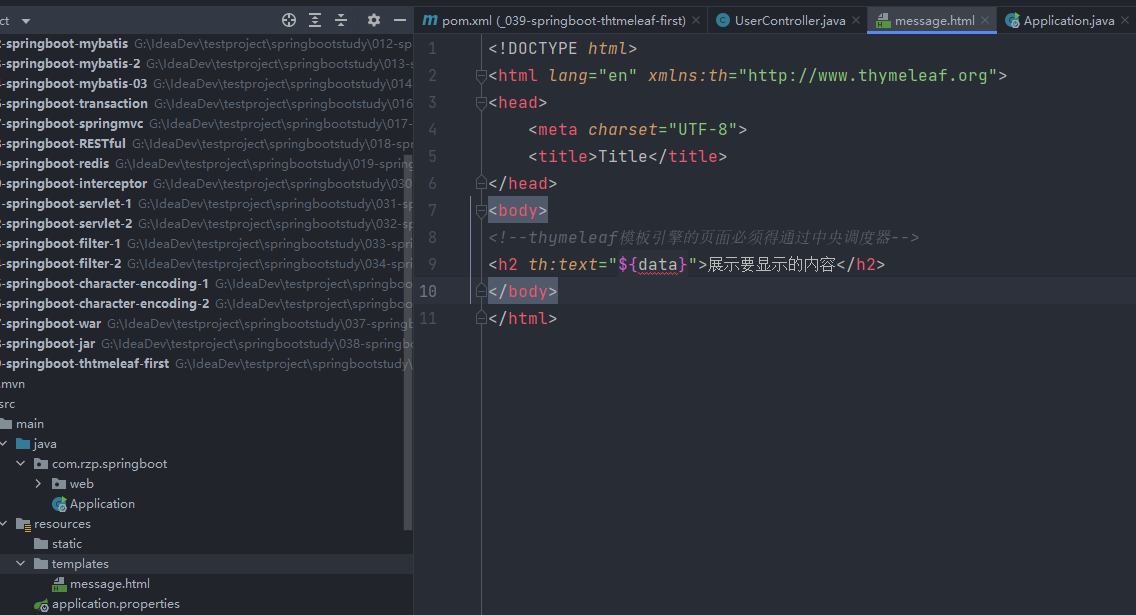
1.Controller中编写页面数据

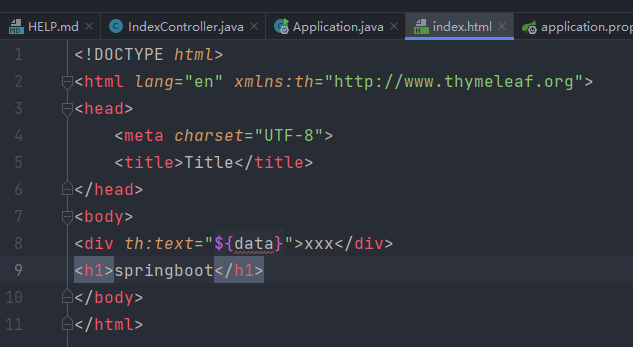
2.利用Thymeleaf将h2中静态资源替换,注意命名空间以及thymeleaf标签使用
结果

2.前端修改动态更新
设置properties
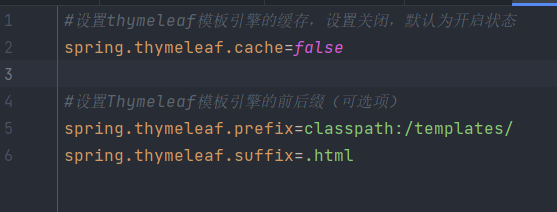
设置启动配置
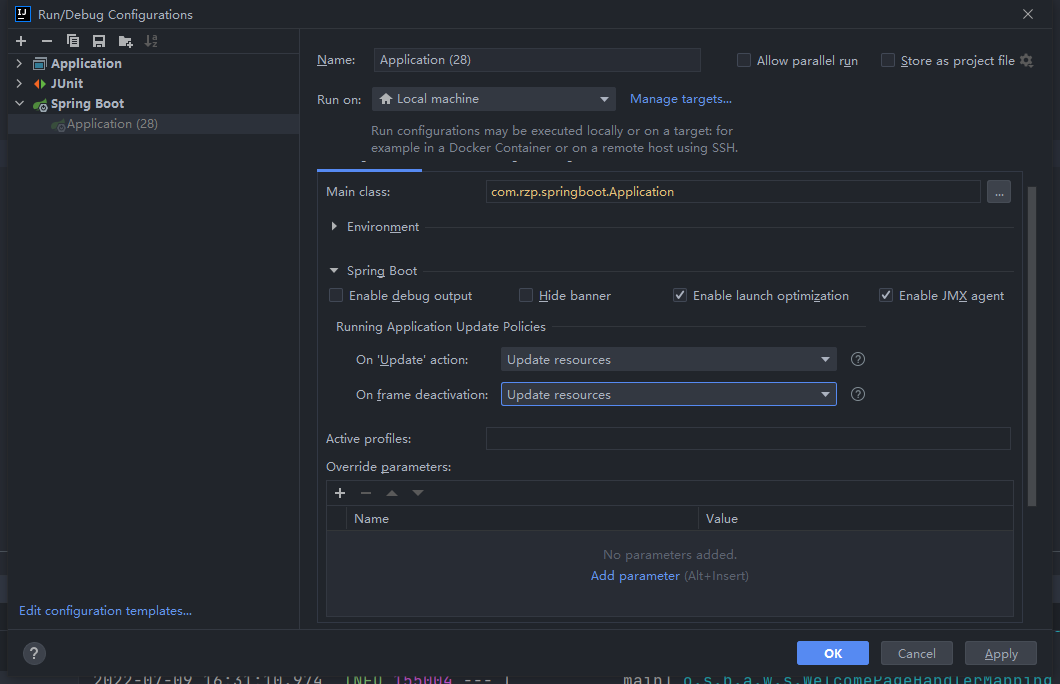
配置完成后更新html内容可直接刷新页面进行显示
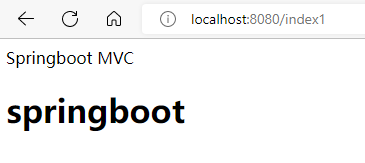
3.Controller下ModelAndView的两种表示方法
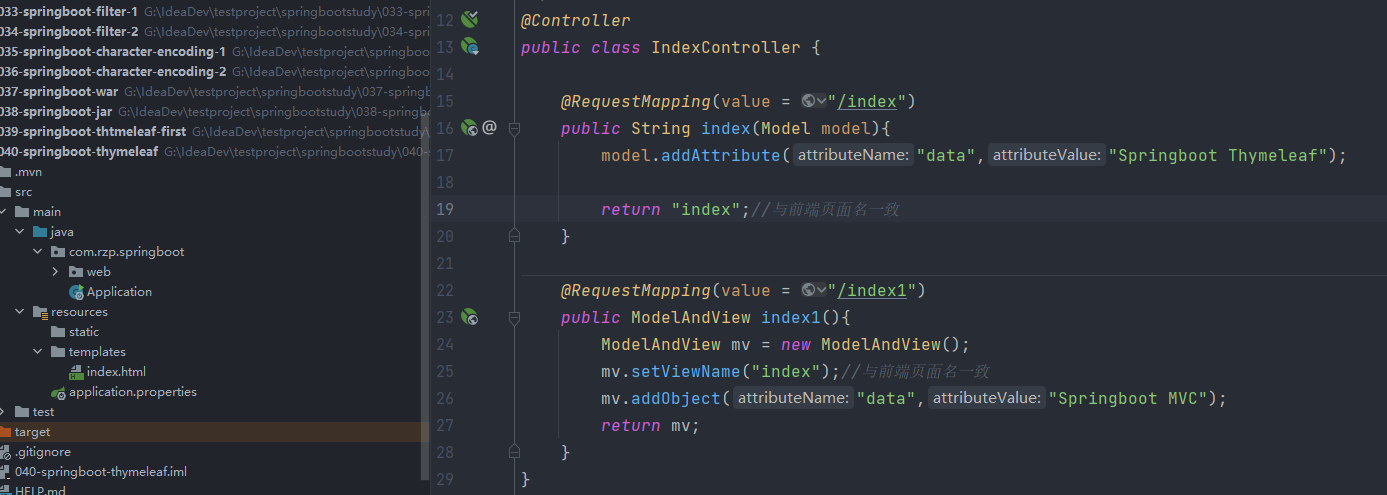
Index.html
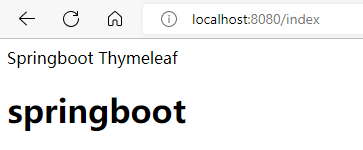
结果显示
本文来自博客园,作者:面向机器编程,转载请注明原文链接:https://www.cnblogs.com/face-to-machine-program/articles/16142167.html


 浙公网安备 33010602011771号