java面向对象基础(三):对象转型和多态
对象类型转换
分为向上转型和向下转型(强制对象转型)。向上转型是子对象向父对象转型的过程,例如猫类转换为动物类;向下转型是强制转型实现的,是父对象强制转换为子对象。这和基础数据类型的转换是类似的,byte在需要时会自动转换为int(向上转型),int可以强制转型为byte(向下转型)。
对于对象转型来说,向上转型后子对象独有的成员将不可访问。意思是,在需要一只动物时,可以把猫当作一只动物传递,因为猫继承自动物,猫具有动物的所有属性。但向上转型后,猫不再是猫,而是被当作动物看待,它自己独有的属性和方法就不可见了。换句话说,向上转型后,只能识别父对象中的内容。
可以通过"引用变量 instanceof 类名"的方式来判断引用变量所指向的对象是否属于某个类,也就是说"对象是不是某类",例如声明一个猫类对象的引用"Cat c",然后"c instanceof Animal"表述的意思是"对象c是一种动物吗?"对于instanceof返回true的对象,都可以转换为类对象,只不过有些可能需要强制转换。
向上转型可以自动进行,这本就是符合逻辑的,狗类继承自动物类,它本身就是一只动物,因此在需要动物类的时候,丢一只狗过去就会自动向上转型成动物类。但这时狗已经不是狗,而是动物,所以狗独有的成员不再可见。
强制转换的方式和基础数据类型强制转换一样,都是在待转换对象前加上目标类型,例如将动物a强制转换为狗d:Dog d = (Dog)a。
下面是一个对象类型转换的示例,很好地分析了能否转型、转型后能否访问某些成员等等。
class Animal {
    String name;
    Animal(String name) {this.name = name;}
}

class Cat extends Animal {
    String eyecolor;
    Cat(String name,String color) {super(name); this.eyecolor = color;}
}

class Dog extends Animal {
    String furcolor;
    Dog(String name,String color) {super(name); this.furcolor = color;}
}

public class OCast {
    public static void main(String [] args) {
        Animal a = new Animal("animal");
        Cat c = new Cat("cat","blue");
        Dog d = new Dog("dog","black");

        System.out.println( a instanceof Animal);//return true
        System.out.println( c instanceof Animal);//return true
        System.out.println( d instanceof Animal);//return true
        System.out.println( a instanceof Cat);   //return false

        System.out.println(a.name); //return animal
        a = new Dog("yellowdog","yellow");       //引用变量a向上转型,因为a是Animal类型
        System.out.println(a.name);              //return yellowdog
        System.out.println(a instanceof Animal); //return true
        System.out.println(a instanceof Dog);    //return true
        //System.out.println(a.furcolor);        //error! 因为a被当作Animal类的对象
        Dog d1 = (Dog)a;                         //因为"a instanceof Dog"为true,所以可以强制向下转型
        System.out.println(d1.furcolor);         //return yellow
    }
}
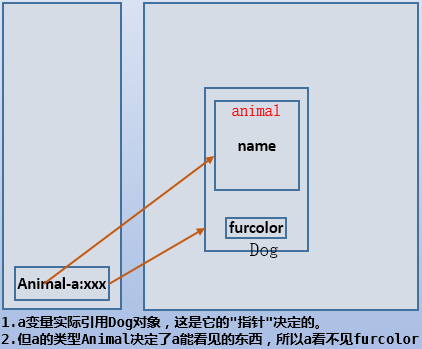
对于上面的a = new Dog("yellowdog",yellow),a是Animal类型,但此时它指向的是Dog对象。也就是说它是Dog,所以也是Animal类,所以a instanceof Animal);和a instanceof Dog;都是true,这是它的"指针"决定的。但因为它的类型是Animal类型,类型决定了能存储什么样的数据,对于已经存在的但不符合类型的数据都是不可见的,所以Animal类型决定了它只能看到Dog对象中的Animal部分。如下图:

既然可以向上转型,配合instanceof的逻辑判断,就能实现很好的扩展性。例如,动物类的sing(Animal a)方法需要的是一个动物类,可以给它一只狗d,这时会向上转型(就像需要double类型却给了一个int数据一样),虽然转型了,但狗d的实际引用仍然是Dog对象,于是if (a instanceof Dog)判断为真,则调用能体现狗sing()方法特殊性的语句。如果传递一只猫,if判断一下并调用能体现猫sing()方法特殊性的语句。这样,任何时候想添加一只动物,都只需要增加一条if语句就可以了。见下面的示例:
class Animal {
    String name;
    Animal(String name) {
        this.name = name;
    }
}

class Cat extends Animal {Cat(String name) {super(name);}}
class Dog extends Animal {Dog(String name) {super(name);}}

public class TestCast {
    public static void main(String [] args) {
        TestCast t = new TestCast();
        Animal a = new Animal("animal");
        Animal c = new Cat("cat");
        Animal d = new Dog("dog");
        t.sing(a);t.sing(c);t.sing(d);
    }

    void sing(Animal a) {
        if ( a instanceof Cat) {
            Cat cat = (Cat)a;
            System.out.println("cat is singing");
        } else if(a instanceof Dog) {
            Dog dog = (Dog)a;
            System.out.println("dog is singing");
        } else {
            System.out.println("not an instance of animal");
        }
    }
}
如果没有对象转型,那么Dog里要定义一次sing(),Cat里也要定义一次sing()。要增加一个动物类,动物类里也还要定义一次sing()。现在就方便多了,直接在sing()方法内部修改if语句就可以了。
注意,上面的sing()方法不属于Animal或其他子类的方法,而是独立定义在其他类里进行调用的。
多态
向上转型虽然在一定程度上提高了可扩展性,但提高的程度并不太高。以向上转型为基础,java的多态实现的扩展性更好更方便。
多态也叫动态绑定或后期绑定,它是执行期间进行的绑定,而非编译期间的绑定(这是静态绑定或称为前期绑定)。
多态的原理是:当向上转型后,调用一个被重写的方法时,本该调用的是父类方法,但实际上却会动态地调用子类重写后的方法。实际上,编译期间绑定的确实是父类方法,只不过在执行期间动态转调子类对应方法。
例如,Animal类的sing()方法,Cat和Dog类都重写了sing()方法。当需要一个Animal对象时,传递了一个Cat类,那么将调用Cat的sing()方法。动态绑定的逻辑正如下面的代码类似:
void sing(Animal a) {
    if ( a instanceof Cat) {
        Cat cat = (Cat)a;
        System.out.println("cat is singing");
    } else if(a instanceof Dog) {
        Dog dog = (Dog)a;
        System.out.println("dog is singing");
    } else {
        System.out.println("not an instance of animal");
    }
}
以下是一个多态的例子:
class Animal {
  private String name;
  Animal(String name) {this.name = name;}

  public void sing(){System.out.println("animal sing...");}
}

class Cat extends Animal {
  private String eyeColor;
  Cat(String n,String c) {super(n); eyeColor = c;}

  public void sing() {System.out.println("cat sing...");}
}

class Dog extends Animal {
    private String furColor;
    Dog(String n,String c) {super(n); furColor = c;}

    public void sing() {System.out.println("dog sing...");}
}

class Lady {
    private String name;
    private Animal pet;
    Lady(String name,Animal pet) {this.name = name; this.pet = pet;}
    public void myPetSing(){pet.sing();}
}

public class DuoTai {
    public static void main(String args[]){
        Cat c = new Cat("catname","blue");
        Dog d = new Dog("dogname","black");
        Lady l1 = new Lady("l1",c);
        Lady l2 = new Lady("l2",d);
        l1.myPetSing();
        l2.myPetSing();
    }
}
编译后的执行结果为:
cat sing...
dog sing...
在上面的示例中,Lady类的构造方法和她调用sing()方法的代码为:
Lady(String name,Animal pet) {this.name = name; this.pet = pet;}
public void myPetSing(){pet.sing();}
如果构造出Lady对象的pet是Cat对象c,这个c首先会向上转型为Animal类,也就是说Lady的pet属性虽然指向的是"Cat c"对象,但它只能看见其中的父对象Animal部分。那么myPetSing(pet.sing();)方法自然会调用Animal类的sing()方法。以上过程是编译器所认为的过程,也是静态绑定或前期绑定的过程。
但编译完成后,虽然pet属性只能看见Animal部分,但实际在执行时pet.sing()却换转换为执行c.sing()。就相当于做了一次对象类型强制转换Cat petx = (Cat)pet。这是动态绑定或后期绑定的过程,也称为多态。
实际上,对象在被new出来后,它所涉及到的方法都放在code segment内存区中的一个方法列表中,这个列表中包含了子类、父类的方法,只不过有些时候不可见的方法无法去调用。当执行程序时,内部的机制可以从方法列表中搜索出最符合环境的方法并执行它。
实现多态的技术的关键点在于:
- (1).定义一个父类引用f,并将其指向子类对象,即进行向上转型;
- (2).重写父类的方法,并使用父类引用f去引用这个方法。这样就可以面向父类进行编程。
正如上面的示例中,将pet定义为Animal类而非具体的子类,并在方法中调用pet.sing()。如此依赖,就无需考虑pet到底是Cat/Dog,在进行功能扩展添加Bird类时,完全不用再修改Lady类的这段代码。
再例如,父类Animal,子类Dog,方法sing()。
class Animal {public void sing(A);}
class Dog extends Animal {public void sing(B);}

public class Test {
    Animal a = new Dog();  //父类引用变量a指向子对象Dog,此时将向上转型
    a.sing();              //使用父类引用变量a引用被重写的方法sing(),执行时将动态绑定到Dog的sing()
}
Linux系列文章:https://www.cnblogs.com/f-ck-need-u/p/7048359.html
Shell系列文章:https://www.cnblogs.com/f-ck-need-u/p/7048359.html
网站架构系列文章:http://www.cnblogs.com/f-ck-need-u/p/7576137.html
MySQL/MariaDB系列文章:https://www.cnblogs.com/f-ck-need-u/p/7586194.html
Perl系列:https://www.cnblogs.com/f-ck-need-u/p/9512185.html
Go系列:https://www.cnblogs.com/f-ck-need-u/p/9832538.html
Python系列:https://www.cnblogs.com/f-ck-need-u/p/9832640.html
Ruby系列:https://www.cnblogs.com/f-ck-need-u/p/10805545.html
操作系统系列:https://www.cnblogs.com/f-ck-need-u/p/10481466.html
精通awk系列:https://www.cnblogs.com/f-ck-need-u/p/12688355.html
