02. Prometheus - 服务安装(Server)
系统设计
准备 2 台测试环境机器,配置为:
| 名称 | IP | 配置 | 系统 | 安装服务 |
|---|---|---|---|---|
| node-01 | 192.168.200.101 | 4C/4G | CentOS 7.9 | Prometheus Server,Exporter |
| node-02 | 192.168.200.102 | 4C/4G | CentOS 7.9 | Exporter |
服务器初始化
- 安装基本的环境依赖,关闭防火墙和 Selinux:
# 安装 epel 源
yum -y install epel-release

# 常用工具安装
yum -y install gcc gcc-c++ gd automakemake autoconf libjpeg libjpeg-devel libpng libpng-devel freetype freetype-devel \
libxml2 libxml2-devel zlib zlib-devel glibc glibc-devel glib2 glib2-devel bzip2 bzip2-devel ncurses ncurses-devel \
curl curl-devel e2fsprogs e2fsprogs-develkrb5 krb5-devel libidn libtools-libs libidn-devel \
openssl openssl-devel openldap openldap-devel nss_ldap openldap-clients openldap-servers libmcrypt-devel \
readline-devellibcap-devel wget net-tools tcping bash-completion dos2unix lrzsz ntp ntpdate \
pcre pcre-devel cmake make glibc libstdc++-4.8.5-44.el7.i686 ld-linux.so.2 git lsof sysstat ntp ntpdate \
iftop iotop tree zip zip-devel unzip bzip2 bzip2-devel tcping patch

# 关闭防火墙
systemctl stop firewalld
systemctl disable firewalld

# 关闭 Selinux
sed -i "s#SELINUX=enforcing#SELINUX=disabled#g" /etc/selinux/config
setenforce 0
2. 基础目录规划:
mkdir -p /ezops/{log,data,service,package,backup,shell,env}
目录说明:
ezops:用户数据存放目录,都统一在该目录下。log:日志统一存放目录。data:数据统一存放目录。service:服务安装目录。package:安装包存放目录,如源码包,二进制包等。backup:备份数据存放目录。shell:用户脚本存放目录,如定时任务脚本等。env:允许环境服务安装目录,如 nodejs,python,java 等。
3. 系统调优:
# 增大文件描述符和系统线程限制
cat >> /etc/security/limits.conf << EOF
* 	soft 	noproc  655350
* 	hard 	noproc  655350
* 	soft 	nofile  655350
* 	hard 	nofile  655350
EOF

# 内核参数调优
cat > /etc/sysctl.conf << EOF
# 关闭 IPV6
net.ipv6.conf.all.disable_ipv6 = 1
net.ipv6.conf.default.disable_ipv6 = 1
# 避免放大攻击
net.ipv4.icmp_echo_ignore_broadcasts = 1
# 开启恶意 icmp 错误消息保护
net.ipv4.icmp_ignore_bogus_error_responses = 1
# 决定检查过期多久邻居条目
net.ipv4.neigh.default.gc_stale_time=120
# 关闭路由转发
net.ipv4.ip_forward = 0
net.ipv4.conf.all.send_redirects = 0
net.ipv4.conf.default.send_redirects = 0
# 使用 arp_announce / arp_ignore 解决 ARP 映射问题
net.ipv4.conf.default.arp_announce = 2
net.ipv4.conf.all.arp_announce=2
net.ipv4.conf.lo.arp_announce=2
# 处理无源路由的包
net.ipv4.conf.all.accept_source_route = 0
net.ipv4.conf.default.accept_source_route = 0
# 开启反向路径过滤
net.ipv4.conf.all.rp_filter = 1
net.ipv4.conf.default.rp_filter = 1
# timewait 的数量,默认 180000
net.ipv4.tcp_max_tw_buckets = 6000
net.ipv4.tcp_sack = 1
net.ipv4.tcp_window_scaling = 1
net.ipv4.tcp_rmem = 4096 87380 4194304
net.ipv4.tcp_wmem = 4096 16384 4194304
# 限制仅仅是为了防止简单的 DoS 攻击
net.ipv4.tcp_max_orphans = 3276800
# 未收到客户端确认信息的连接请求的最大值
net.ipv4.tcp_max_syn_backlog = 262144
net.ipv4.tcp_timestamps = 0
# 内核放弃建立连接之前发送 SYNACK 包的数量
net.ipv4.tcp_synack_retries = 1
# 内核放弃建立连接之前发送 SYN 包的数量
net.ipv4.tcp_syn_retries = 1
# 启用 timewait 快速回收
net.ipv4.tcp_tw_recycle = 1
# 开启重用。允许将 TIME-WAIT sockets 重新用于新的 TCP 连接
net.ipv4.tcp_tw_reuse = 1
net.ipv4.tcp_mem = 94500000 915000000 927000000
net.ipv4.tcp_fin_timeout = 1
# 开启 SYN 洪水攻击保护(防范少量SYN攻击)
net.ipv4.tcp_syncookies = 1
# 修改消息队列长度
kernel.msgmnb = 65536
kernel.msgmax = 65536
# 设置最大内存共享段大小 bytes(这里写的 2G 和 1G)
kernel.shmmax = 2147483648
kernel.shmall = 1073741824
# core 文件名中添加 pid 作为扩展名
kernel.core_uses_pid = 1
net.core.wmem_default = 8388608
net.core.rmem_default = 8388608
net.core.rmem_max = 16777216
net.core.wmem_max = 16777216
# 每个网络接口接收数据包的速率比内核处理这些包的速率快时,允许送到队列的数据包的最大数目。
net.core.netdev_max_backlog = 32768
# web 应用中 listen 函数的 backlog 默认会限制到 128
net.core.somaxconn = 32768
EOF
4. 完成后重启机器:
reboot
安装 Prometheus Server
Prometheus 官方下载地址:
目前官方最新的版本为:2.38.0
- 在
node-01上面下载安装包进行安装:
cd /ezops/package
wget https://github.com/prometheus/prometheus/releases/download/v2.38.0/prometheus-2.38.0.linux-amd64.tar.gz
如果遇到 Github 下载慢可以使用以下加速地址:
解压安装:
# 解压
tar -zxf prometheus-2.38.0.linux-amd64.tar.gz
mv prometheus-2.38.0.linux-amd64 /ezops/service/prometheus

# 创建服务和配置目录
cd /ezops/service/prometheus/
mkdir bin conf
mv prometheus promtool bin/
mv prometheus.yml conf/

# 创建数据目录
mkdir /ezops/data/prometheus
2. 添加启动文件:
cat > /etc/systemd/system/prometheus.service << EOF
[Unit]
Description=Prometheus Server
Documentation=https://prometheus.io/
After=network.target

[Service]
Type=simple
User=root
Group=root
WorkingDirectory=/ezops/service/prometheus
ExecStart=/ezops/service/prometheus/bin/prometheus \\
  --config.file=/ezops/service/prometheus/conf/prometheus.yml \\
  --storage.tsdb.path=/ezops/data/prometheus \\
  --web.enable-lifecycle
ExecReload=/bin/kill -s HUP \$MAINPID
ExecStop=/bin/kill -s QUIT \$MAINPID
Restart=on-failure

[Install]
WantedBy=multi-user.target
EOF
其中 --web.enable-lifecycle 的参数作用在于用户可以通过接口来重载 Prometheus 配置:
curl -X POST http://192.168.200.101:9090/-/reload
3. 启动服务:
systemctl daemon-reload
systemctl start prometheus
systemctl status prometheus
systemctl enable prometheus
4. 访问测试服务启动完成监听 9090 端口:

5. Prometheus Server 自带的 Metrics 接口:

Prometheus UI 介绍
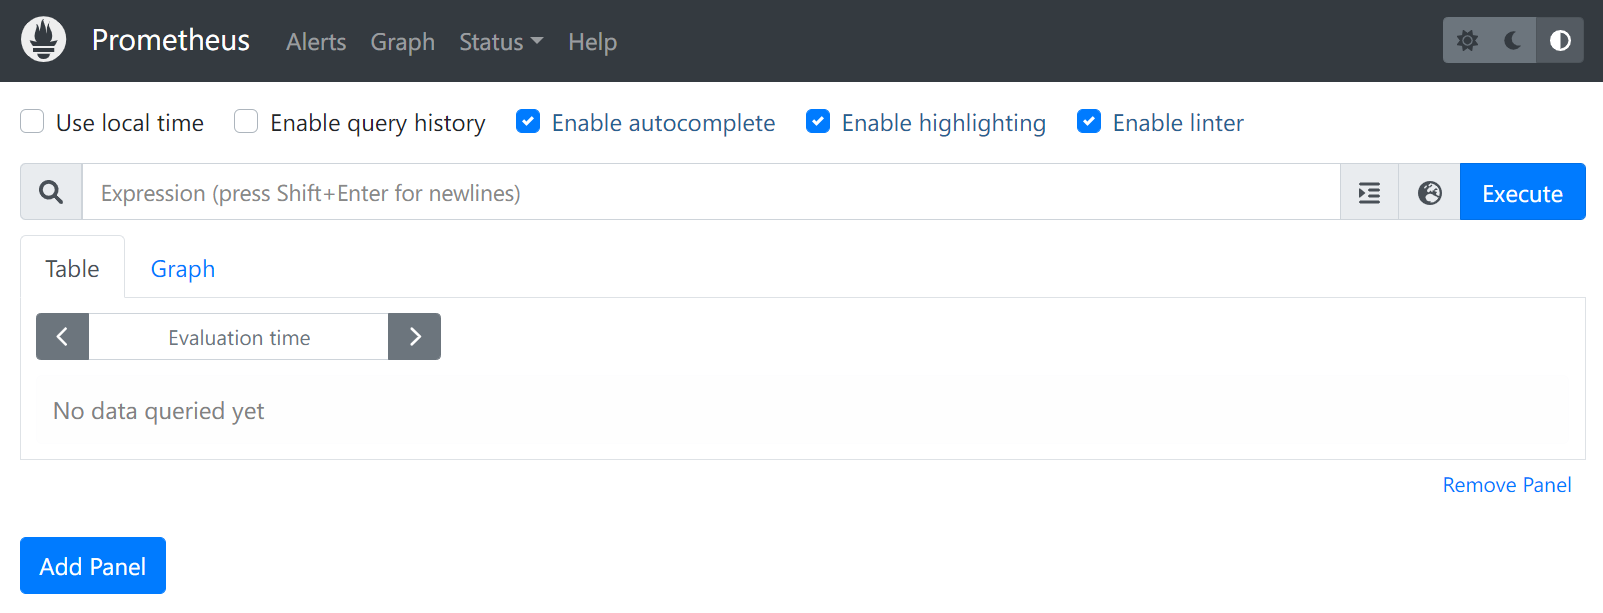
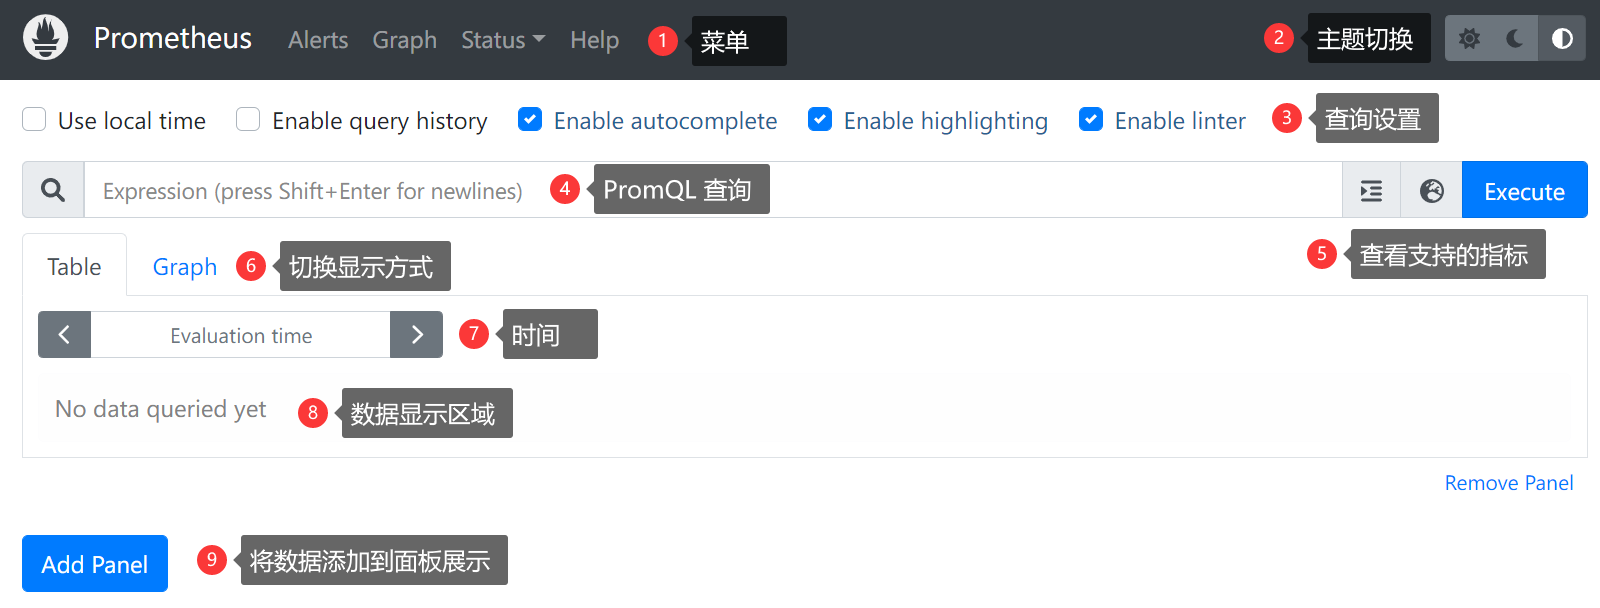
Prometheus Server 启动完成后会在监听的 9090 端口自带一个 UI 页面,该页面能够看到 Pormetheus 获取的指标,节点状态,告警等信息。
- 主页功能介绍:

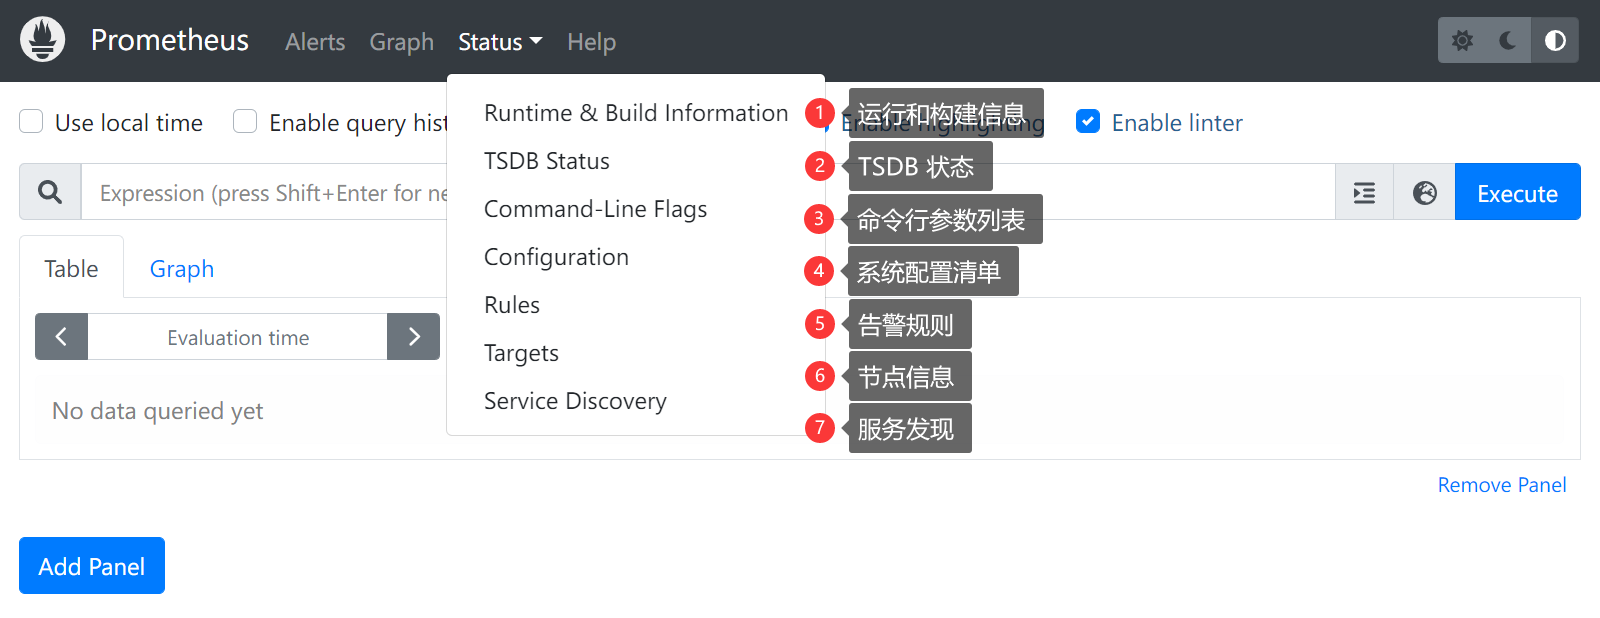
2. 主要菜单介绍:


 浙公网安备 33010602011771号