巧用ComboBox控件实现datagridView下拉菜单功能
5中DataGridView控件中加入下拉框的功能,写出来供大家参考:
在VS2005中创立一个C++语言的windows窗体应用程序,然后在Form1中添加一个DataGridView控件,这时
系统会提示你为DataGridView控件绑定数据,完成以上工作后,在Form1上添加一个comboBox控件comboBox1
如图:
然后,用鼠标在Form1窗体上双击,进入 窗体Form1_Load事件代码编写处,如下所示:
- private void Form1_Load(object sender, EventArgs e)
- {
- this.comboBox1.Visible = false;
- this.comboBox1.Width = 0;
- this.DataGridView1.Controls.Add(this.comboBox1);
- }
然后再进入到dataGridView1的CurrentCellChanged事件中加入以下代码:
- try
- {
- this.comboBox1.Visible = false;
- this.comboBox1.Width = 0;
- if (this.DataGridView1.CurrentCell.ColumnIndex == 1)
- {
- this.comboBox1.Visible = false;
- this.comboBox1.Width = 0;
- this.comboBox1.Left = this.DataGridView1.GetCellDisplayRectangle(this.DataGridView1.CurrentCell.ColumnIndex, this.DataGridView1.CurrentCell.RowIndex, true).Left;
- this.comboBox1.Top = this.DataGridView1.GetCellDisplayRectangle(this.DataGridView1.CurrentCell.ColumnIndex, this.DataGridView1.CurrentCell.RowIndex, true).Top;
- this.comboBox1.Width = this.DataGridView1.GetCellDisplayRectangle(this.DataGridView1.CurrentCell.ColumnIndex, this.DataGridView1.CurrentCell.RowIndex, true).Width;
- string content = Convert.ToString(this.DataGridView1.CurrentCell.Value);
- this.comboBox1.Text = content;
- this.comboBox1.Visible = true;
- }
- else
- {
- this.comboBox1.Visible = false;
- this.comboBox1.Width = 0;
- }
- }
- catch (Exception ex)
- {
- // MessageBox.Show(ex.Message);
- }
这里我有几点说明一下:
第一点:
- this.DataGridView1.CurrentCell.ColumnIndex == 1
是为了判断我们要在哪一列上显示下拉菜单。把数字1修改成你对应所需要的列号就可以了。
第二点:
- this.comboBox1.Left = this.DataGridView1.GetCellDisplayRectangle(this.DataGridView1.CurrentCell.ColumnIndex, this.DataGridView1.CurrentCell.RowIndex, true).Left;
- this.comboBox1.Top = this.DataGridView1.GetCellDisplayRectangle(this.DataGridView1.CurrentCell.ColumnIndex, this.DataGridView1.CurrentCell.RowIndex, true).Top;
- this.comboBox1.Width = this.DataGridView1.GetCellDisplayRectangle(this.DataGridView1.CurrentCell.ColumnIndex, this.DataGridView1.CurrentCell.RowIndex, true).Width;
这是为了确定当前点击Cell的位置,并且同时动态调整ComboBox的大小,这样可以让他完全覆盖在点击的Cell上,完美的盖住底下的Cell。但是如果我们的datagridView控件内容过多,长度过长。那么这个取位置的方法就要修改一下。
- this.comboBox1.Left =viewer.Location.X + this.viewer.GetCellDisplayRectangle(this.viewer.CurrentCell.ColumnIndex, this.viewer.CurrentCell.RowIndex, true).Left;
- this.comboBox1.Top = viewer.Location.Y + this.viewer.GetCellDisplayRectangle(this.viewer.CurrentCell.ColumnIndex, this.viewer.CurrentCell.RowIndex, true).Top;
当然了,大小不用修改。无论位置在哪 大小都是那么大。
第三点:
解释一下CurrentCellChanged事件,它是在我们当前选择的Cell发生变化时触发的。有一个很类似的事件CellValueChanged,它是在Cell值变化时触发的。现在的需求是只要点击对应列的Cell就弹出下拉菜单,所以这里必须选用前者。
用try和catch包裹这段代码的原因是程序刚刚执行初始化datagridView时会发生异常。初始化时要绑定数据,这个Cell是一个一个要赋值的,及时他没有值。自然CurrentCell就是变了,变了就触发CurrentCellChanged。但这个时候初始化还没有结束,取到的都是null。这也就是为什么我把异常处理中Messagebox.show()方法注释了的原因。不会有什么影响。
然后进入到dataGridView1的Scroll事件,加入以下代码:
- this.comboBox1.Visible = false;
- this.comboBox1.Width = 0;
然后进入到comboBox1的SelectionChangeCommitted事件,加入以下代码:
- dataGridView1.CurrentCell.Value = ((System.Windows.Forms.ComboBox)sender).SelectedItem.ToString();
然后进入到comboBox1的KeyPress事件,加入以下代码:
- this.comboBox1.Visible = false;
- this.comboBox1.Width = 0;
ComboBox1的KeyPress事件加入的代码主要解决编辑下拉框所在单元的数据时,如果不选用下拉框提供的
选项,而自己输入的问题。
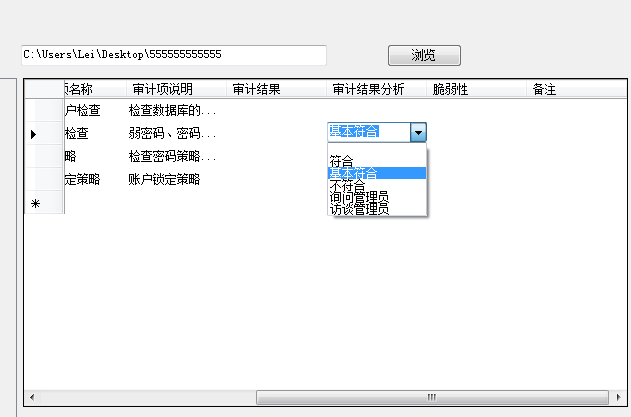
下面是在我的项目里应用这个方法实现的例子,感觉效果很不错。
注:以上蓝色部分和部分配图,代码为博主修改添加的内容。
原帖地址:http://www.cnblogs.com/dx0588/archive/2006/05/14/399902.html


