Cilium Socket LB 特性
Cilium Socket LB
一、环境信息
| 主机 | IP |
|---|---|
| ubuntu | 172.16.94.141 |
| 软件 | 版本 |
|---|---|
| docker | 26.1.4 |
| helm | v3.15.0-rc.2 |
| kind | 0.18.0 |
| kubernetes | 1.23.4 |
| ubuntu os | Ubuntu 20.04.6 LTS |
| kernel | 5.11.5 内核升级文档 |
二、Cilium SocketLB 模式认知
负载均衡的实现方式通常有如下两种:
- 客户端负载均衡,自行选择目标端点。这样做的好处是,在建立连接时预先支付负载均衡的成本,并且在连接的生命周期内不存在额外的开销。这种方法的缺点是这对应用程序不透明。
- 服务端负载均衡,通过一个中间服务将请求转换为对应服务 IP 来执行负载平衡。与客户端负载平衡相比,此方法的优点是透明。应用程序本身不涉及。然而,缺点是每个网络数据包都需要在请求和响应上更改其 IP 地址。
在 Cilium 1.6 中,引入了基于套接字的负载平衡(socket-based load-balancing),它结合了两种方法的优点:
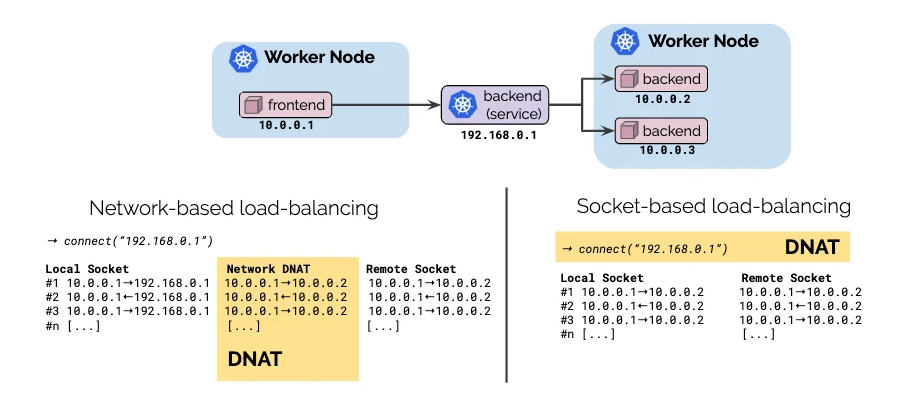
- Transparent: 负载平衡对应用程序保持 100% 透明。服务是使用标准 Kubernetes svc
- Highly efficient: 通过转换地址在socket层面执行负载平衡,LB的成本是在建立连接时预先支付的,并且在之后的连接持续时间内不需要额外的ip地址转换。性能与应用程序直接与后端对话相同。
三、传统 kube-proxy 实现 service 负载均衡
可以查看此文档 Cilium Native Routing with kubeProxy 模式 中,Service 网络通讯,数据包转发流程一致
四、Cilium Socket LB 如何实现东西向流量的负载均衡
kind 配置文件信息
root@kind:~# cat install.sh

#!/bin/bash
date
set -v

# 1.prep noCNI env
cat <<EOF | kind create cluster --name=cilium-socket-lb --image=kindest/node:v1.23.4 --config=-
kind: Cluster
apiVersion: kind.x-k8s.io/v1alpha4
networking:
  # kind 默认使用 rancher cni,cni 我们需要自己创建
  disableDefaultCNI: true
  # kind 安装 k8s 集群需要禁用 kube-proxy 安装,是 cilium 代替 kube-proxy 功能
  kubeProxyMode: "none"

nodes:
 - role: control-plane
 - role: worker
 - role: worker

containerdConfigPatches:
- |-
  [plugins."io.containerd.grpc.v1.cri".registry.mirrors."harbor.evescn.com"]
    endpoint = ["https://harbor.evescn.com"]
EOF

# 2.remove taints
controller_node_ip=`kubectl get node -o wide --no-headers | grep -E "control-plane|bpf1" | awk -F " " '{print $6}'`
#kubectl taint nodes $(kubectl get nodes -o name | grep control-plane) node-role.kubernetes.io/master:NoSchedule-
kubectl get nodes -o wide

# 3.install cni
helm repo add cilium https://helm.cilium.io > /dev/null 2>&1
helm repo update > /dev/null 2>&1

helm install cilium cilium/cilium \
   --set k8sServiceHost=$controller_node_ip \
   --set k8sServicePort=6443 \
   --version 1.13.0-rc5 \
   --namespace kube-system \
   --set debug.enabled=true \
   --set debug.verbose=datapath \
   --set monitorAggregation=none \
   --set ipam.mode=cluster-pool \
   --set cluster.name=cilium-socket-lb \
   --set kubeProxyReplacement=strict \
   --set tunnel=disabled \
   --set autoDirectNodeRoutes=true \
   --set ipv4NativeRoutingCIDR="10.0.0.0/8" \
   --set bpf.masquerade=true \
   --set installNoConntrackIptablesRules=true \
   --set socketLB.enabled=true


# 4.install necessary tools
for i in $(docker ps -a --format "table {{.Names}}" | grep cilium)
do
    echo $i
    docker cp /usr/bin/ping $i:/usr/bin/ping
    docker exec -it $i bash -c "sed -i -e 's/jp.archive.ubuntu.com\|archive.ubuntu.com\|security.ubuntu.com/old-releases.ubuntu.com/g' /etc/apt/sources.list"
    docker exec -it $i bash -c "apt-get -y update >/dev/null && apt-get -y install net-tools tcpdump lrzsz bridge-utils >/dev/null 2>&1"
done
--set 参数解释
-
--set kubeProxyReplacement=strict- 含义: 启用 kube-proxy 替代功能,并以严格模式运行。
- 用途: Cilium 将完全替代 kube-proxy 实现服务负载均衡,提供更高效的流量转发和网络策略管理。
-
--set tunnel=disabled- 含义: 禁用隧道模式。
- 用途: 禁用后,Cilium 将不使用 vxlan 技术,直接在主机之间路由数据包,即 direct-routing 模式。
-
--set autoDirectNodeRoutes=true- 含义: 启用自动直接节点路由。
- 用途: 使 Cilium 自动设置直接节点路由,优化网络流量。
-
--set ipv4NativeRoutingCIDR="10.0.0.0/8"- 含义: 指定用于 IPv4 本地路由的 CIDR 范围,这里是
10.0.0.0/8。 - 用途: 配置 Cilium 使其知道哪些 IP 地址范围应该通过本地路由进行处理,不做 snat , Cilium 默认会对所用地址做 snat。
- 含义: 指定用于 IPv4 本地路由的 CIDR 范围,这里是
-
--set bpf.masquerade- 含义: 启用 eBPF 功能。
- 用途: 使用 eBPF 实现数据路由,提供更高效和灵活的网络地址转换功能。
-
--set installNoConntrackIptablesRules=true:- 安装无连接跟踪的 iptables 规则,这样可以减少 iptables 规则集中的连接跟踪负担。
-
--set socketLB.enabled=true:- 启用 Socket Load Balancer(SLB),用于优化服务之间的负载均衡。
- 安装
k8s集群和cilium服务
root@kind:~# ./install.sh

Creating cluster "cilium-socket-lb" ...
 ✓ Ensuring node image (kindest/node:v1.23.4) 🖼
 ✓ Preparing nodes 📦 📦 📦
 ✓ Writing configuration 📜
 ✓ Starting control-plane 🕹️
 ✓ Installing StorageClass 💾
 ✓ Joining worker nodes 🚜
Set kubectl context to "kind-cilium-socket-lb"
You can now use your cluster with:

kubectl cluster-info --context kind-cilium-socket-lb

Not sure what to do next? 😅  Check out https://kind.sigs.k8s.io/docs/user/quick-start/
cilium 配置信息
root@kind:~# kubectl -n kube-system exec -it ds/cilium -- cilium status

KVStore:                 Ok   Disabled
Kubernetes:              Ok   1.23 (v1.23.4) [linux/amd64]
Kubernetes APIs:         ["cilium/v2::CiliumClusterwideNetworkPolicy", "cilium/v2::CiliumEndpoint", "cilium/v2::CiliumNetworkPolicy", "cilium/v2::CiliumNode", "core/v1::Namespace", "core/v1::Node", "core/v1::Pods", "core/v1::Service", "discovery/v1::EndpointSlice", "networking.k8s.io/v1::NetworkPolicy"]
KubeProxyReplacement:    Strict   [eth0 172.18.0.3 (Direct Routing)]
Host firewall:           Disabled
CNI Chaining:            none
CNI Config file:         CNI configuration file management disabled
Cilium:                  Ok   1.13.0-rc5 (v1.13.0-rc5-dc22a46f)
NodeMonitor:             Listening for events on 128 CPUs with 64x4096 of shared memory
Cilium health daemon:    Ok
IPAM:                    IPv4: 6/254 allocated from 10.0.0.0/24,
IPv6 BIG TCP:            Disabled
BandwidthManager:        Disabled
Host Routing:            BPF
Masquerading:            BPF   [eth0]   10.0.0.0/8 [IPv4: Enabled, IPv6: Disabled]
Controller Status:       35/35 healthy
Proxy Status:            OK, ip 10.0.0.231, 0 redirects active on ports 10000-20000
Global Identity Range:   min 256, max 65535
Hubble:                  Ok   Current/Max Flows: 4095/4095 (100.00%), Flows/s: 6.85   Metrics: Disabled
Encryption:              Disabled
Cluster health:          3/3 reachable   (2024-06-27T09:06:44Z)

root@kind:~# kubectl -n kube-system exec -it ds/cilium -- cilium status --verbose
......
KubeProxyReplacement Details:
  Status:                 Strict
  # 启用了 Socket LB 功能
  Socket LB:              Enabled
  Socket LB Tracing:      Enabled
......
KubeProxyReplacement: Strict [eth0 172.18.0.3 (Direct Routing)]- Cilium 完全接管所有 kube-proxy 功能,包括服务负载均衡、NodePort 和其他网络策略管理。这种配置适用于你希望最大限度利用 Cilium 的高级网络功能,并完全替代 kube-proxy 的场景。此模式提供更高效的流量转发和更强大的网络策略管理。
Host Routing: BPF- 使用 BPF 进行主机路由。
Masquerading: BPF [eth0] 10.0.0.0/8 [IPv4: Enabled, IPv6: Disabled]- 使用 BPF 进行 IP 伪装(NAT),接口 eth0,IP 范围 10.0.0.0/8 不回进行 NAT。IPv4 伪装启用,IPv6 伪装禁用。
Socket LB: Enabled- 启用了 Socket LB 功能,Service 服务访问时,之间使用后端 pod ip port 进行数据返回。
k8s 集群安装 Pod 测试网络
# cat cni.yaml

apiVersion: apps/v1
kind: DaemonSet
#kind: Deployment
metadata:
  labels:
    app: cni
  name: cni
spec:
  #replicas: 1
  selector:
    matchLabels:
      app: cni
  template:
    metadata:
      labels:
        app: cni
    spec:
      containers:
      - image: harbor.dayuan1997.com/devops/nettool:0.9
        name: nettoolbox
        securityContext:
          privileged: true

---
apiVersion: v1
kind: Service
metadata:
  name: serversvc
spec:
  type: NodePort
  selector:
    app: cni
  ports:
  - name: cni
    port: 80
    targetPort: 80
    nodePort: 32000
root@kind:~# kubectl apply -f cni.yaml
daemonset.apps/cni created
service/serversvc created

root@kind:~# kubectl run net --image=harbor.dayuan1997.com/devops/nettool:0.9
pod/net created
- 查看安装服务信息
root@kind:~# kubectl get pods -o wide
NAME        READY   STATUS    RESTARTS   AGE   IP           NODE                       NOMINATED NODE   READINESS GATES
cni-gzclc   1/1     Running   0          32s   10.0.2.6     cilium-socket-lb-worker2   <none>           <none>
cni-sd4vv   1/1     Running   0          32s   10.0.1.145   cilium-socket-lb-worker    <none>           <none>
net         1/1     Running   0          20s   10.0.2.40    cilium-socket-lb-worker2   <none>           <none>
东西流量测试
- 查看
Service信息
root@kind:~# kubectl get svc
NAME         TYPE        CLUSTER-IP      EXTERNAL-IP   PORT(S)        AGE
kubernetes   ClusterIP   10.96.0.1       <none>        443/TCP        31m
serversvc    NodePort    10.96.195.193   <none>        80:32000/TCP   43s
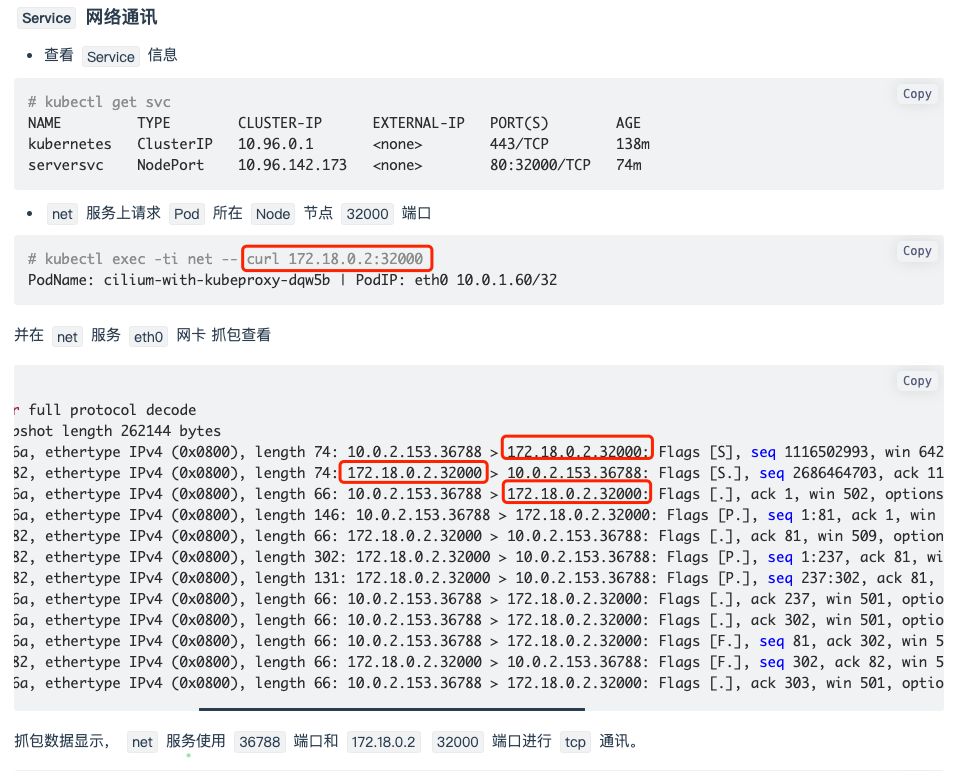
net服务上请求Pod所在Node节点32000端口
root@kind:~# kubectl exec -ti net -- curl 172.18.0.2:32000
PodName: cni-sd4vv | PodIP: eth0 10.0.1.145/32
并在 net 服务 eth0 网卡 抓包查看
net~$ tcpdump -pne -i eth0
tcpdump: verbose output suppressed, use -v[v]... for full protocol decode
listening on eth0, link-type EN10MB (Ethernet), snapshot length 262144 bytes
10:20:26.931025 1a:fc:47:2b:d4:54 > 7a:b0:1f:00:ee:0a, ethertype IPv4 (0x0800), length 74: 10.0.2.40.36664 > 10.0.1.145.80: Flags [S], seq 1753200349, win 64240, options [mss 1460,sackOK,TS val 1674156063 ecr 0,nop,wscale 7], length 0
10:20:26.931401 7a:b0:1f:00:ee:0a > 1a:fc:47:2b:d4:54, ethertype IPv4 (0x0800), length 74: 10.0.1.145.80 > 10.0.2.40.36664: Flags [S.], seq 2087706195, ack 1753200350, win 65160, options [mss 1460,sackOK,TS val 3868244688 ecr 1674156063,nop,wscale 7], length 0
10:20:26.931546 1a:fc:47:2b:d4:54 > 7a:b0:1f:00:ee:0a, ethertype IPv4 (0x0800), length 66: 10.0.2.40.36664 > 10.0.1.145.80: Flags [.], ack 1, win 502, options [nop,nop,TS val 1674156064 ecr 3868244688], length 0
10:20:26.931965 1a:fc:47:2b:d4:54 > 7a:b0:1f:00:ee:0a, ethertype IPv4 (0x0800), length 146: 10.0.2.40.36664 > 10.0.1.145.80: Flags [P.], seq 1:81, ack 1, win 502, options [nop,nop,TS val 1674156064 ecr 3868244688], length 80: HTTP: GET / HTTP/1.1
10:20:26.932279 7a:b0:1f:00:ee:0a > 1a:fc:47:2b:d4:54, ethertype IPv4 (0x0800), length 66: 10.0.1.145.80 > 10.0.2.40.36664: Flags [.], ack 81, win 509, options [nop,nop,TS val 3868244689 ecr 1674156064], length 0
10:20:26.932588 7a:b0:1f:00:ee:0a > 1a:fc:47:2b:d4:54, ethertype IPv4 (0x0800), length 302: 10.0.1.145.80 > 10.0.2.40.36664: Flags [P.], seq 1:237, ack 81, win 509, options [nop,nop,TS val 3868244689 ecr 1674156064], length 236: HTTP: HTTP/1.1 200 OK
10:20:26.932851 7a:b0:1f:00:ee:0a > 1a:fc:47:2b:d4:54, ethertype IPv4 (0x0800), length 113: 10.0.1.145.80 > 10.0.2.40.36664: Flags [P.], seq 237:284, ack 81, win 509, options [nop,nop,TS val 3868244690 ecr 1674156064], length 47: HTTP
10:20:26.933138 1a:fc:47:2b:d4:54 > 7a:b0:1f:00:ee:0a, ethertype IPv4 (0x0800), length 66: 10.0.2.40.36664 > 10.0.1.145.80: Flags [.], ack 237, win 501, options [nop,nop,TS val 1674156065 ecr 3868244689], length 0
10:20:26.933425 1a:fc:47:2b:d4:54 > 7a:b0:1f:00:ee:0a, ethertype IPv4 (0x0800), length 66: 10.0.2.40.36664 > 10.0.1.145.80: Flags [.], ack 284, win 501, options [nop,nop,TS val 1674156065 ecr 3868244690], length 0
10:20:26.936328 1a:fc:47:2b:d4:54 > 7a:b0:1f:00:ee:0a, ethertype IPv4 (0x0800), length 66: 10.0.2.40.36664 > 10.0.1.145.80: Flags [F.], seq 81, ack 284, win 501, options [nop,nop,TS val 1674156068 ecr 3868244690], length 0
10:20:26.936954 7a:b0:1f:00:ee:0a > 1a:fc:47:2b:d4:54, ethertype IPv4 (0x0800), length 66: 10.0.1.145.80 > 10.0.2.40.36664: Flags [F.], seq 284, ack 82, win 509, options [nop,nop,TS val 3868244694 ecr 1674156068], length 0
10:20:26.937084 1a:fc:47:2b:d4:54 > 7a:b0:1f:00:ee:0a, ethertype IPv4 (0x0800), length 66: 10.0.2.40.36664 > 10.0.1.145.80: Flags [.], ack 285, win 501, options [nop,nop,TS val 1674156069 ecr 3868244694], length 0
抓包数据显示, net 服务使用随机端口和 10.0.2.202 80 端口进行 tcp 通讯。
- 三次握手的过程,
srcIP为podIP地址,dstIP不再是node节点IP地址,在cilium socket LB的加持下,将serviceIP转换成了后端podIP地址。 - 通过
ebpf的劫持,没有必要将nat的过程传递到root namespace中去了,不再需要root namespace中的iptables规则了,节省了网络开销。 - 在数据包从源
pod中出去的时候,已经做了替换,进入root namespace的时候,就变成了一个简单的跨节点pod间的通信,相比基于iptable来说效率更高 - 不再依赖
iptables规则
那么 cilium 是如何查询 service 信息,并返回后端 Pod ip 地址给请求方的?其实 cilium 把数据保存在自身内部,使用 cilium 子命令可以查询到 service 信息
cilium查询service信息
root@kind:~# kubectl -n kube-system exec cilium-mphpk -- cilium service list
ID   Frontend           Service Type   Backend
1    10.96.36.130:443   ClusterIP      1 => 172.18.0.2:4244 (active)
2    10.96.0.1:443      ClusterIP      1 => 172.18.0.3:6443 (active)
3    10.96.0.10:53      ClusterIP      1 => 10.0.0.112:53 (active)
                                       2 => 10.0.0.63:53 (active)
4    10.96.0.10:9153    ClusterIP      1 => 10.0.0.63:9153 (active)
                                       2 => 10.0.0.112:9153 (active)
8    10.96.195.193:80   ClusterIP      1 => 10.0.2.6:80 (active)
                                       2 => 10.0.1.145:80 (active)
9    172.18.0.2:32000   NodePort       1 => 10.0.2.6:80 (active)
                                       2 => 10.0.1.145:80 (active)
10   0.0.0.0:32000      NodePort       1 => 10.0.2.6:80 (active)
                                       2 => 10.0.1.145:80 (active)
查看上面的 service 信息得到, 172.18.0.2:32000 后端有 2 个 ip 地址信息,并且后端端口为 80 , cilium 劫持到 Pod 需要访问 service 信息,即会查询该 service 对应的后端 Pod 地址和端口返回给客户端,让客户端使用此地址发起 http 请求
五、参考博客
https://bbs.huaweicloud.com/blogs/417788

 浙公网安备 33010602011771号