Linux 虚拟网络 IPIP
IPIP
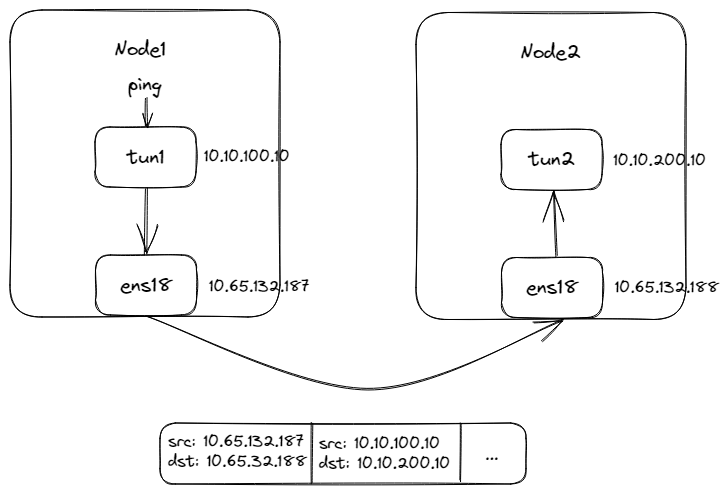
IPIP隧道是一种点对点的隧道协议,用于在IPv4网络上传输IPv4或IPv6数据包。IPIP隧道的工作原理是将源主机的IP数据包封装在一个新的IP数据包中,新的IP数据包的目的地址是隧道的另一端。在隧道的另一端,接收方将解封装原始IP数据包,并将其传递到目标主机。IPIP隧道可以在不同的网络之间建立连接,例如在IPv4网络和IPv6网络之间建立连接。
一、使用 Containerlab 模拟网络
a | 拓扑
b | 网络拓扑文件
# ipip.clab.yml
name: ipip
topology:
  nodes:
    gw1:
      kind: linux
      image: vyos/vyos:1.2.8
      cmd: /sbin/init
      binds:
        - /lib/modules:/lib/modules
        - ./startup-conf/gw1.cfg:/opt/vyatta/etc/config/config.boot

    gw2:
      kind: linux
      image: vyos/vyos:1.2.8
      cmd: /sbin/init
      binds:
        - /lib/modules:/lib/modules
        - ./startup-conf/gw2.cfg:/opt/vyatta/etc/config/config.boot

    server1:
      kind: linux
      image: harbor.dayuan1997.com/devops/nettool:0.9
      exec:
      - ip addr add 10.1.5.10/24 dev net0
      - ip route replace default via 10.1.5.1

    server2:
      kind: linux
      image: harbor.dayuan1997.com/devops/nettool:0.9
      exec:
      - ip addr add 10.1.8.10/24 dev net0
      - ip route replace default via 10.1.8.1


  links:
    - endpoints: ["gw1:eth1", "server1:net0"]
    - endpoints: ["gw2:eth1", "server2:net0"]
    - endpoints: ["gw1:eth2", "gw2:eth2"]
c | VyOS 配置文件
gw1.cfg
配置文件
# ./startup-conf/gw1.cfg
interfaces {
    ethernet eth1 {
        address 10.1.5.1/24
        duplex auto
        smp-affinity auto
        speed auto
    }
    ethernet eth2 {
        address 172.12.1.10/24
        duplex auto
        smp-affinity auto
        speed auto
    }
    loopback lo {
    }
    tunnel tun0 {
        # 配置 ipip 设置本端地址,远端地址
        address 1.1.1.1/24
        encapsulation ipip
        local-ip 172.12.1.10
        multicast disable
        remote-ip 172.12.1.11
    }
}
protocols {
    static {
        # 静态路由,指定到达 10.1.8.0/24 网络的下一条为 1.1.1.2, 1.1.1.2 和 1.1.1.1 组成了 ipip
        route 10.1.8.0/24 {
            next-hop 1.1.1.2 {
            }
        }
    }
}
system {
    config-management {
        commit-revisions 100
    }
    console {
        device ttyS0 {
            speed 9600
        }
    }
    host-name vyos
    login {
        user vyos {
            authentication {
                encrypted-password $6$QxPS.uk6mfo$9QBSo8u1FkH16gMyAVhus6fU3LOzvLR9Z9.82m3tiHFAxTtIkhaZSWssSgzt4v4dGAL8rhVQxTg0oAG9/q11h/
                plaintext-password ""
            }
            level admin
        }
    }
    ntp {
        server 0.pool.ntp.org {
        }
        server 1.pool.ntp.org {
        }
        server 2.pool.ntp.org {
        }
    }
    syslog {
        global {
            facility all {
                level info
            }
            facility protocols {
                level debug
            }
        }
    }
    time-zone UTC
}


/* Warning: Do not remove the following line. */
/* === vyatta-config-version: "dns-forwarding@1:mdns@1:ssh@1:webproxy@1:webgui@1:zone-policy@1:broadcast-relay@1:l2tp@1:cluster@1:snmp@1:pppoe-server@2:conntrack@1:wanloadbalance@3:webproxy@2:firewall@5:ntp@1:dhcp-server@5:dhcp-relay@2:system@10:nat@4:quagga@7:qos@1:ipsec@5:conntrack-sync@1:config-management@1:vrrp@2:pptp@1" === */
/* Release version: 1.2.8 */
gw2.cfg
配置文件
# ./startup-conf/gw2.cfg
interfaces {
    ethernet eth1 {
        address 10.1.8.1/24
        duplex auto
        smp-affinity auto
        speed auto
    }
    ethernet eth2 {
        address 172.12.1.11/24
        duplex auto
        smp-affinity auto
        speed auto
    }
    loopback lo {
    }
    tunnel tun0 {
        # 配置 ipip 设置本端地址,远端地址
        address 1.1.1.2/24
        encapsulation ipip
        local-ip 172.12.1.11
        multicast disable
        remote-ip 172.12.1.10
    }
}
protocols {
    static {
        # 静态路由,指定到达 10.1.8.0/24 网络的下一条为 1.1.1.1, 1.1.1.1 和 1.1.1.2 组成了 ipip
        route 10.1.5.0/24 {
            next-hop 1.1.1.1 {
            }
        }
    }
}
system {
    config-management {
        commit-revisions 100
    }
    console {
        device ttyS0 {
            speed 9600
        }
    }
    host-name vyos
    login {
        user vyos {
            authentication {
                encrypted-password $6$QxPS.uk6mfo$9QBSo8u1FkH16gMyAVhus6fU3LOzvLR9Z9.82m3tiHFAxTtIkhaZSWssSgzt4v4dGAL8rhVQxTg0oAG9/q11h/
                plaintext-password ""
            }
            level admin
        }
    }
    ntp {
        server 0.pool.ntp.org {
        }
        server 1.pool.ntp.org {
        }
        server 2.pool.ntp.org {
        }
    }
    syslog {
        global {
            facility all {
                level info
            }
            facility protocols {
                level debug
            }
        }
    }
    time-zone UTC
}


/* Warning: Do not remove the following line. */
/* === vyatta-config-version: "dns-forwarding@1:mdns@1:ssh@1:webproxy@1:webgui@1:zone-policy@1:broadcast-relay@1:l2tp@1:cluster@1:snmp@1:pppoe-server@2:conntrack@1:wanloadbalance@3:webproxy@2:firewall@5:ntp@1:dhcp-server@5:dhcp-relay@2:system@10:nat@4:quagga@7:qos@1:ipsec@5:conntrack-sync@1:config-management@1:vrrp@2:pptp@1" === */
/* Release version: 1.2.8 */
d | 部署服务
# tree -L 2 ./
./
├── ipip.clab.yml
└── startup-conf
    ├── gw1.cfg
    └── gw2.cfg

# clab deploy -t ipip.clab.yml
INFO[0000] Containerlab v0.54.2 started
INFO[0000] Parsing & checking topology file: clab.yaml
INFO[0000] Creating docker network: Name="clab", IPv4Subnet="172.20.20.0/24", IPv6Subnet="2001:172:20:20::/64", MTU=1500
INFO[0000] Creating lab directory: /root/wcni-kind/network/5-demo-cni/7-ipip/1-clab-ipip/clab-ipip
INFO[0000] Creating container: "gw2"
INFO[0000] Creating container: "server1"
INFO[0000] Creating container: "server2"
INFO[0000] Creating container: "gw1"
INFO[0001] Created link: gw2:eth1 <--> server2:net0
INFO[0001] Created link: gw1:eth1 <--> server1:net0
INFO[0001] Created link: gw1:eth2 <--> gw2:eth2
INFO[0001] Executed command "ip addr add 10.1.5.10/24 dev net0" on the node "server1". stdout:
INFO[0001] Executed command "ip route replace default via 10.1.5.1" on the node "server1". stdout:
INFO[0001] Executed command "ip addr add 10.1.8.10/24 dev net0" on the node "server2". stdout:
INFO[0001] Executed command "ip route replace default via 10.1.8.1" on the node "server2". stdout:
INFO[0001] Adding containerlab host entries to /etc/hosts file
INFO[0001] Adding ssh config for containerlab nodes
INFO[0001] 🎉 New containerlab version 0.55.0 is available! Release notes: https://containerlab.dev/rn/0.55/
Run 'containerlab version upgrade' to upgrade or go check other installation options at https://containerlab.dev/install/
+---+-------------------+--------------+------------------------------------------+-------+---------+----------------+----------------------+
| # |       Name        | Container ID |                  Image                   | Kind  |  State  |  IPv4 Address  |     IPv6 Address     |
+---+-------------------+--------------+------------------------------------------+-------+---------+----------------+----------------------+
| 1 | clab-ipip-gw1     | 7233e41cefc0 | vyos/vyos:1.2.8                          | linux | running | 172.20.20.5/24 | 2001:172:20:20::5/64 |
| 2 | clab-ipip-gw2     | 40e261a67337 | vyos/vyos:1.2.8                          | linux | running | 172.20.20.2/24 | 2001:172:20:20::2/64 |
| 3 | clab-ipip-server1 | 309377fc3ef8 | harbor.dayuan1997.com/devops/nettool:0.9 | linux | running | 172.20.20.3/24 | 2001:172:20:20::3/64 |
| 4 | clab-ipip-server2 | 76e300927841 | harbor.dayuan1997.com/devops/nettool:0.9 | linux | running | 172.20.20.4/24 | 2001:172:20:20::4/64 |
+---+-------------------+--------------+------------------------------------------+-------+---------+----------------+----------------------+
e | 查看 4 个容器路由表信息
## clab-ipip-server1 主机路由
# lo clab-ipip-server1 ip r s
default via 10.1.5.1 dev net0
10.1.5.0/24 dev net0 proto kernel scope link src 10.1.5.10
172.20.20.0/24 dev eth0 proto kernel scope link src 172.20.20.3

## clab-ipip-server2 主机路由
# lo clab-ipip-server2 ip r s
default via 10.1.8.1 dev net0
10.1.8.0/24 dev net0 proto kernel scope link src 10.1.8.10
172.20.20.0/24 dev eth0 proto kernel scope link src 172.20.20.4

## clab-ipip-gw1 主机路由
# lo clab-ipip-gw1 ip r s
default via 172.20.20.1 dev eth0
1.1.1.0/24 dev tun0 proto kernel scope link src 1.1.1.1
10.1.5.0/24 dev eth1 proto kernel scope link src 10.1.5.1
10.1.8.0/24 via 1.1.1.2 dev tun0 proto static metric 20
172.12.1.0/24 dev eth2 proto kernel scope link src 172.12.1.10
172.20.20.0/24 dev eth0 proto kernel scope link src 172.20.20.5

## clab-ipip-gw2 主机路由
# lo clab-ipip-gw2 ip r s
default via 172.20.20.1 dev eth0
1.1.1.0/24 dev tun0 proto kernel scope link src 1.1.1.2
10.1.5.0/24 via 1.1.1.1 dev tun0 proto static metric 20
10.1.8.0/24 dev eth1 proto kernel scope link src 10.1.8.1
172.12.1.0/24 dev eth2 proto kernel scope link src 172.12.1.11
172.20.20.0/24 dev eth0 proto kernel scope link src 172.20.20.2
f| 抓包分析
s1.cap包分析
server1 net0网卡
server1~$ ip a l
1: lo: <LOOPBACK,UP,LOWER_UP> mtu 65536 qdisc noqueue state UNKNOWN group default qlen 1000
link/loopback 00:00:00:00:00:00 brd 00:00:00:00:00:00
inet 127.0.0.1/8 scope host lo
valid_lft forever preferred_lft forever
inet6 ::1/128 scope host
valid_lft forever preferred_lft forever
42: eth0@if43: <BROADCAST,MULTICAST,UP,LOWER_UP> mtu 1500 qdisc noqueue state UP group default
link/ether 02:42:ac:14:14:03 brd ff:ff:ff:ff:ff:ff link-netnsid 0
inet 172.20.20.3/24 brd 172.20.20.255 scope global eth0
valid_lft forever preferred_lft forever
inet6 2001:172:20:20::3/64 scope global nodad
valid_lft forever preferred_lft forever
inet6 fe80::42:acff:fe14:1403/64 scope link
valid_lft forever preferred_lft forever
51: net0@if50: <BROADCAST,MULTICAST,UP,LOWER_UP> mtu 9500 qdisc noqueue state UP group default
link/ether aa:c1:ab:52:61:07 brd ff:ff:ff:ff:ff:ff link-netnsid 1
inet 10.1.5.10/24 scope global net0
valid_lft forever preferred_lft forever
inet6 fe80::a8c1:abff:fe52:6107/64 scope link
valid_lft forever preferred_lft forever
server1~$ ip n s
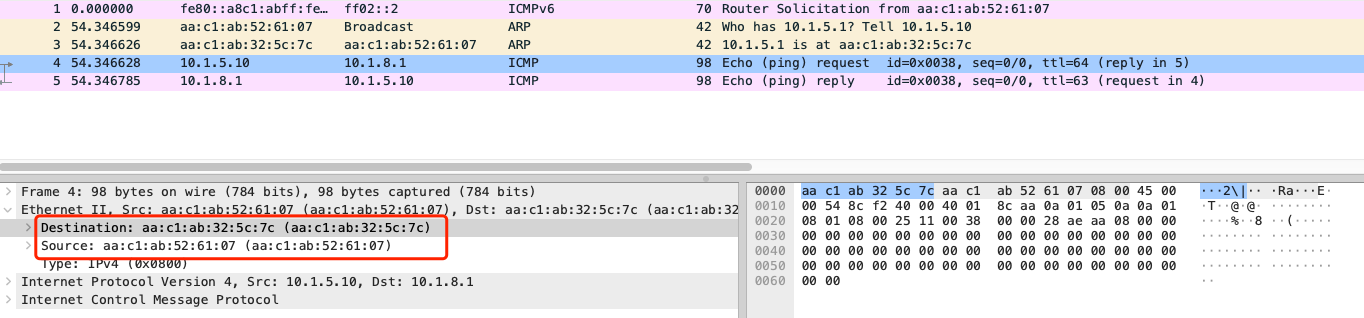
10.1.5.1 dev net0 lladdr aa:c1:ab:32:5c:7c STALE
icmp 包中,源 mac 地址:aa:c1:ab:52:61:07 目标 mac 地址:aa:c1:ab:32:5c:7c , 分别为 s1 主机的 net0 网卡的 mac 地址,和 gw1 路由器 10.1.5.1 ip 的 mac 地址
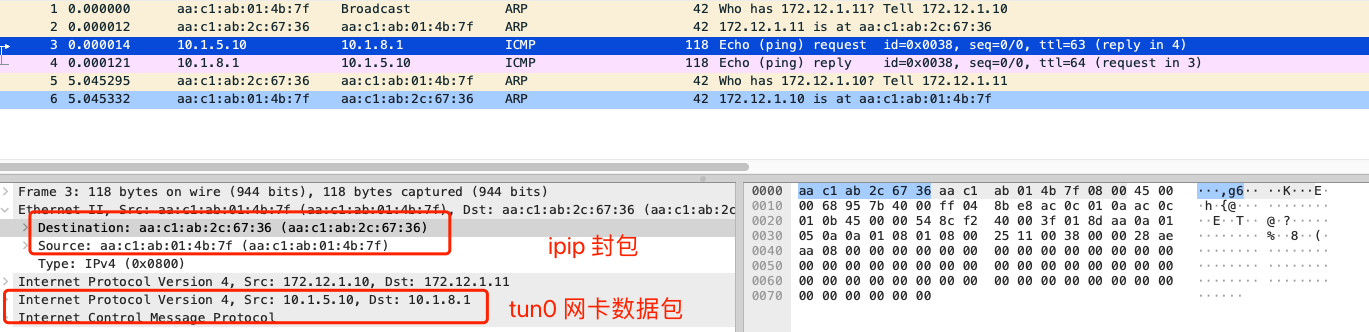
gw1.cap包分析
gw1 tun0网卡
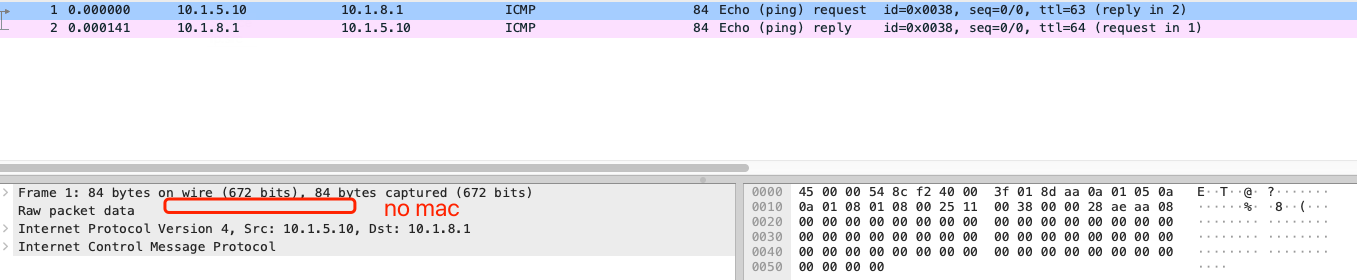
icmp 包中,没有 mac 信息,只有源 ip 目的 ip 信息,这也是 ipip 数据包的特性: IPIP 隧道的工作原理是将源主机的IP数据包封装在一个新的IP数据包中
gw1 eth2网卡
root@gw1:/# ip a l
1: lo: <LOOPBACK,UP,LOWER_UP> mtu 65536 qdisc noqueue state UNKNOWN group default qlen 1000
    link/loopback 00:00:00:00:00:00 brd 00:00:00:00:00:00
    inet 127.0.0.1/8 scope host lo
       valid_lft forever preferred_lft forever
    inet6 ::1/128 scope host
       valid_lft forever preferred_lft forever
3: tun0@NONE: <POINTOPOINT,NOARP,UP,LOWER_UP> mtu 9480 qdisc noqueue state UNKNOWN group default qlen 1000
    link/ipip 172.12.1.10 peer 172.12.1.11
    inet 1.1.1.1/24 brd 1.1.1.255 scope global tun0
       valid_lft forever preferred_lft forever
    inet6 fe80::200:5efe:ac0c:10a/64 scope link
       valid_lft forever preferred_lft forever
46: eth2@if47: <BROADCAST,MULTICAST,UP,LOWER_UP> mtu 9500 qdisc noqueue state UP group default
    link/ether aa:c1:ab:01:4b:7f brd ff:ff:ff:ff:ff:ff link-netnsid 2
    inet 172.12.1.10/24 brd 172.12.1.255 scope global eth2
       valid_lft forever preferred_lft forever
    inet6 fe80::a8c1:abff:fe01:4b7f/64 scope link
       valid_lft forever preferred_lft forever
50: eth1@if51: <BROADCAST,MULTICAST,UP,LOWER_UP> mtu 9500 qdisc noqueue state UP group default
    link/ether aa:c1:ab:32:5c:7c brd ff:ff:ff:ff:ff:ff link-netnsid 1
    inet 10.1.5.1/24 brd 10.1.5.255 scope global eth1
       valid_lft forever preferred_lft forever
    inet6 fe80::a8c1:abff:fe32:5c7c/64 scope link
       valid_lft forever preferred_lft forever
52: eth0@if53: <BROADCAST,MULTICAST,UP,LOWER_UP> mtu 1500 qdisc noqueue state UP group default
    link/ether 02:42:ac:14:14:05 brd ff:ff:ff:ff:ff:ff link-netnsid 0
    inet 172.20.20.5/24 brd 172.20.20.255 scope global eth0
       valid_lft forever preferred_lft forever
    inet6 2001:172:20:20::5/64 scope global nodad
       valid_lft forever preferred_lft forever
    inet6 fe80::42:acff:fe14:1405/64 scope link
       valid_lft forever preferred_lft forever

root@gw1:/# ip n s
172.20.20.1 dev eth0 lladdr 02:42:58:fa:8c:a6 STALE
10.1.5.10 dev eth1 lladdr aa:c1:ab:52:61:07 STALE
172.12.1.11 dev eth2 lladdr aa:c1:ab:2c:67:36 STALE
fe80::42:acff:fe14:1404 dev eth0 lladdr 02:42:ac:14:14:04 STALE
fe80::1 dev eth0 lladdr 02:42:58:fa:8c:a6 router STALE
2001:172:20:20::1 dev eth0 lladdr 02:42:58:fa:8c:a6 router STALE
fe80::42:acff:fe14:1403 dev eth0 lladdr 02:42:ac:14:14:03 STALE
fe80::a8c1:abff:fe52:6107 dev eth1 lladdr aa:c1:ab:52:61:07 STALE
icmp 包中,源 mac 地址:aa:c1:ab:01:4b:7f 目标 mac 地址:aa:c1:ab:2c:67:36 ,分别为 gw1 路由器的 eth2 网卡的 mac 地址,和 gw2 路由器 172.12.1.11 ip 的 mac 地址
查看网卡的 ipip 信息
root@gw1:/# ip -d link show
3: tun0@NONE: <POINTOPOINT,NOARP,UP,LOWER_UP> mtu 9480 qdisc noqueue state UNKNOWN mode DEFAULT group default qlen 1000
    link/ipip 172.12.1.10 peer 172.12.1.11 promiscuity 0 minmtu 68 maxmtu 65515
- 总结:查看上面抓包图片,可以分析到,在
ipip模式中,数据包的转发流程中:- 数据包在送到
ipip接口之前,mac地址,每经过一个节点,源mac和 目标mac均会发生改变。送到ipip接口之后,会去掉mac地址信息 - 数据包在送到
ipip接口之前,源ip和 目标ip不会发生改变。送到ipip接口之后,内层源ip和 目标ip不会发生改变,会在原数据包网络层上进行封包,多一次封装外层源ip和 目标ip ipip数据包内部的数据包,没有mac地址,并且tun0网卡本身也没有mac地址信息。对比vxlan数据包,vxlan包的内部包mac地址分别为gw1路由器的vxlan0网卡的mac地址,和gw2路由器1.1.1.2ip的mac地址
- 数据包在送到
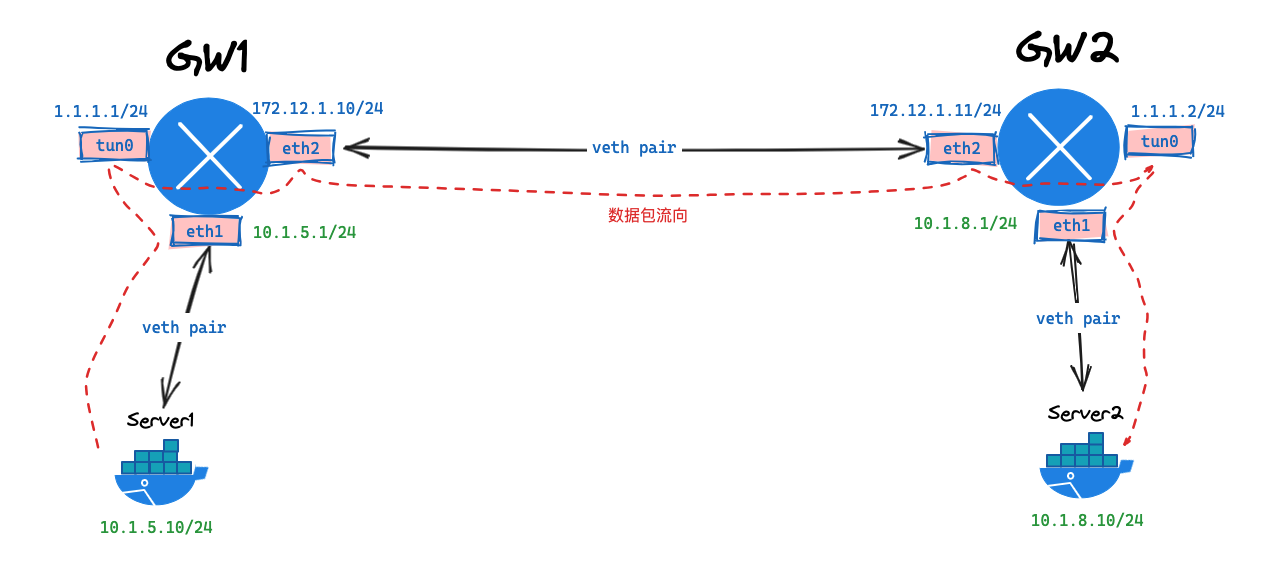
g | 数据包流向
- 数据从
server1服务器发出,通过查看本机路由表,送往gw1网关。路由:default via 10.1.5.1 dev net0 gw1网关查看自身路由后,会送往tun0接口,因为目的地址为10.1.8.10。路由:10.1.8.0/24 via 1.1.1.2 dev tun0 proto static metric 20tun0接口为ipip模式,会重新封装数据包,封装信息查看ipip配置信息link/ipip 172.12.1.10 peer 172.12.1.11 promiscuity 0 minmtu 68 maxmtu 65515- 数据包在封装过程中,发新的目的地址为
172.12.1.11,会查看路由表,送往eth2接口。路由:172.12.1.0/24 dev eth2 proto kernel scope link src 172.12.1.10 - 数据封装完成后,会送往
eth2 接口,并送往对端gw2主机。 - 对端
gw2主机接受到数据包后,发现这个是一个ipip数据包,接收端会将外层IP头部去掉,提取内层的IP数据包。 - 内层数据包会被交给
tun0接口进行处理,就像是接收到了一个普通的IP数据包一样。 - 解封装后发现内部的数据包,目的地址为
10.1.8.10,通过查看本机路由表,送往eth1网卡。路由:10.1.8.0/24 dev eth1 proto kernel scope link src 10.1.8.1 - 通过
eth1网卡,最终会把数据包送到server2主机
h | VyOS cli 配置
gw1cli接口配置
root@gw1:/# show configuration commands
set interfaces ethernet eth1 address '10.1.5.1/24'
set interfaces ethernet eth1 duplex 'auto'
set interfaces ethernet eth1 smp-affinity 'auto'
set interfaces ethernet eth1 speed 'auto'
set interfaces ethernet eth2 address '172.12.1.10/24'
set interfaces ethernet eth2 duplex 'auto'
set interfaces ethernet eth2 smp-affinity 'auto'
set interfaces ethernet eth2 speed 'auto'
set interfaces loopback lo
set interfaces tunnel tun0 address '1.1.1.1/24'
set interfaces tunnel tun0 encapsulation 'ipip'
set interfaces tunnel tun0 local-ip '172.12.1.10'
set interfaces tunnel tun0 multicast 'disable'
set interfaces tunnel tun0 remote-ip '172.12.1.11'
set protocols static route 10.1.8.0/24 next-hop 1.1.1.2
set system config-management commit-revisions '100'
set system console device ttyS0 speed '9600'
set system host-name 'vyos'
set system login user vyos authentication encrypted-password '$6$QxPS.uk6mfo$9QBSo8u1FkH16gMyAVhus6fU3LOzvLR9Z9.82m3tiHFAxTtIkhaZSWssSgzt4v4dGAL8rhVQxTg0oAG9/q11h/'
set system login user vyos authentication plaintext-password ''
set system login user vyos level 'admin'
set system ntp server 0.pool.ntp.org
set system ntp server 1.pool.ntp.org
set system ntp server 2.pool.ntp.org
set system syslog global facility all level 'info'
set system syslog global facility protocols level 'debug'
set system time-zone 'UTC'
gw2cli接口配置
root@gw2:/# show configuration commands
set interfaces ethernet eth1 address '10.1.8.1/24'
set interfaces ethernet eth1 duplex 'auto'
set interfaces ethernet eth1 smp-affinity 'auto'
set interfaces ethernet eth1 speed 'auto'
set interfaces ethernet eth2 address '172.12.1.11/24'
set interfaces ethernet eth2 duplex 'auto'
set interfaces ethernet eth2 smp-affinity 'auto'
set interfaces ethernet eth2 speed 'auto'
set interfaces loopback lo
set interfaces tunnel tun0 address '1.1.1.2/24'
set interfaces tunnel tun0 encapsulation 'ipip'
set interfaces tunnel tun0 local-ip '172.12.1.11'
set interfaces tunnel tun0 multicast 'disable'
set interfaces tunnel tun0 remote-ip '172.12.1.10'
set protocols static route 10.1.5.0/24 next-hop 1.1.1.1
set system config-management commit-revisions '100'
set system console device ttyS0 speed '9600'
set system host-name 'vyos'
set system login user vyos authentication encrypted-password '$6$QxPS.uk6mfo$9QBSo8u1FkH16gMyAVhus6fU3LOzvLR9Z9.82m3tiHFAxTtIkhaZSWssSgzt4v4dGAL8rhVQxTg0oAG9/q11h/'
set system login user vyos authentication plaintext-password ''
set system login user vyos level 'admin'
set system ntp server 0.pool.ntp.org
set system ntp server 1.pool.ntp.org
set system ntp server 2.pool.ntp.org
set system syslog global facility all level 'info'
set system syslog global facility protocols level 'debug'
set system time-zone 'UTC'
i | 销毁服务
# clab destroy -t ipip.clab.yml
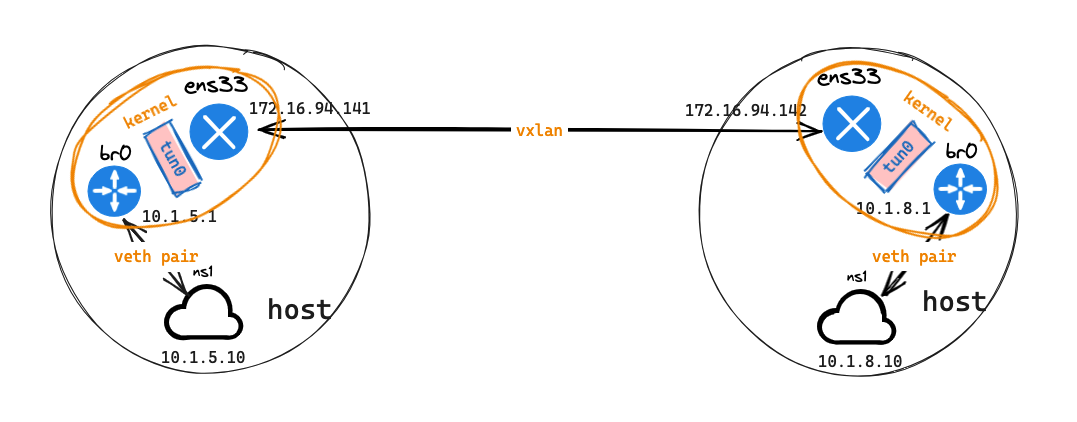
二、手动搭建 ipip 网络
a | 拓扑
b | 配置命令
- host 141 主机配置命令
# host 141
## 创建名称空间
ip netns add ns1

## 创建 br0 类型为网桥
ip l a br0 type bridge
ip l s br0 up

## 创建 1对 veth pair 网卡
ip l a int0 type veth peer name br-int0

## ns1 配置信息,网卡 int0 一端插到 ns1,一端插到 br0 网桥
ip l s int0 netns ns1
ip netns exec ns1 ip l s int0 up
ip netns exec ns1 ip a a 10.1.5.10/24 dev int0
ip netns exec ns1 ip r a default via 10.1.5.1 dev int0

## veth pair 网卡另一端插到 br0 网桥
ip l s br-int0 master br0
ip l s br-int0 up

## br0 网卡配置网关地址
ip a a 10.1.5.1/24 dev br0

## 创建 ipip
ip tunnel add tun0 mode ipip remote 172.16.94.142 local 172.16.94.141
ip addr a 1.1.1.1/24 dev tun0
ip link set tun0 up

## 添加路由
ip r a 10.1.8.0/24 via 1.1.1.2 dev tun0
- host 142 主机配置命令
# host 142
## 创建名称空间
ip netns add ns1

## 创建 br0 类型为网桥
ip l a br0 type bridge
ip l s br0 up

## 创建 1对 veth pair 网卡
ip l a int0 type veth peer name br-int0

## ns1 配置信息,网卡 int0 一端插到 ns1,一端插到 br0 网桥
ip l s int0 netns ns1
ip netns exec ns1 ip l s int0 up
ip netns exec ns1 ip a a 10.1.8.10/24 dev int0
ip netns exec ns1 ip r a default via 10.1.8.1

## veth pair 网卡另一端插到 br0 网桥
ip l s br-int0 master br0
ip l s br-int0 up

## br0 网卡是在为网关 宿主机添加路由 打通网络
ip a a 10.1.8.1/24 dev br0

## 创建 ipip
ip tunnel add tun0 mode ipip remote 172.16.94.141 local 172.16.94.142
ip addr a 1.1.1.2/24 dev tun0
ip link set tun0 up

## 添加路由
ip r a 10.1.5.0/24 via 1.1.1.1 dev tun0
c | 测试网络
# ip netns exec ns1 ping 10.1.8.10 -c 1
PING 10.1.8.10 (10.1.8.10) 56(84) bytes of data.
64 bytes from 10.1.8.10: icmp_seq=1 ttl=62 time=0.678 ms

--- 10.1.8.10 ping statistics ---
1 packets transmitted, 1 received, 0% packet loss, time 0ms
rtt min/avg/max/mdev = 0.678/0.678/0.678/0.000 ms
d | 抓包分析
142主机ens33网卡
#  tcpdump -pne -i ens33 'ip proto 4'
tcpdump: verbose output suppressed, use -v or -vv for full protocol decode
listening on ens33, link-type EN10MB (Ethernet), capture size 262144 bytes
09:51:43.088712 00:0c:29:81:cc:3a > 00:0c:29:1a:5c:d3, ethertype IPv4 (0x0800), length 118: 172.16.94.141 > 172.16.94.142: 10.1.5.10 > 10.1.8.10: ICMP echo request, id 2359, seq 1, length 64 (ipip-proto-4)
09:51:43.088968 00:0c:29:1a:5c:d3 > 00:0c:29:81:cc:3a, ethertype IPv4 (0x0800), length 118: 172.16.94.142 > 172.16.94.141: 10.1.8.10 > 10.1.5.10: ICMP echo reply, id 2359, seq 1, length 64 (ipip-proto-4)
icmp 包中,源 mac 地址:00:0c:29:81:cc:3a 目标 mac 地址:00:0c:29:1a:5c:d3, ,分别为 141 主机的 172.16.94.141 网卡的 mac 地址,和 142 主机 172.16.94.142 网卡的 mac 地址
142主机tun0网卡
#  tcpdump -pne -i tun0
tcpdump: verbose output suppressed, use -v or -vv for full protocol decode
listening on tun0, link-type RAW (Raw IP), capture size 262144 bytes
09:51:43.088712 ip: 10.1.5.10 > 10.1.8.10: ICMP echo request, id 2359, seq 1, length 64
09:51:43.088961 ip: 10.1.8.10 > 10.1.5.10: ICMP echo reply, id 2359, seq 1, length 64
142主机ns1名称空间int0网卡
# ip netns exec ns1 tcpdump -pne -i int0
09:51:43.088937 96:59:54:42:fa:1b > 2e:90:a2:6e:a8:36, ethertype IPv4 (0x0800), length 98: 10.1.5.10 > 10.1.8.10: ICMP echo request, id 2359, seq 1, length 64
09:51:43.088953 2e:90:a2:6e:a8:36 > 96:59:54:42:fa:1b, ethertype IPv4 (0x0800), length 98: 10.1.8.10 > 10.1.5.10: ICMP echo reply, id 2359, seq 1, length 64
icmp 包中,源 mac 地址:96:59:54:42:fa:1b 目标 mac 地址:2e:90:a2:6e:a8:36, ,分别为 142 主机的 br-int0 网卡的 mac 地址,和 142 主机 n1 名称空间 int0 网卡的 mac 地址
e | 资源回收
## 141
# ip netns del ns1 && ip l d br0 && reboot

## 142
# ip netns del ns1 && ip l d br0 && reboot

 浙公网安备 33010602011771号