14 SDK开发
SDK 开发概述
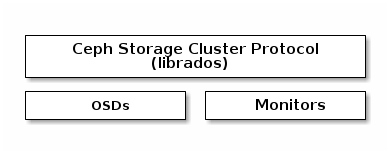
Introduction to librados
The Ceph Storage Cluster provides the basic storage service that allows
Ceph to uniquely deliver object, block, and file storage in one
unified system. However, you are not limited to using the RESTful, block, or
POSIX interfaces. Based upon RADOS, the librados API enables you to create your own interface to the
Ceph Storage Cluster.
The librados API enables you to interact with the two types of daemons in
the Ceph Storage Cluster:
- The Ceph Monitor, which maintains a master copy of the cluster map.
- The Ceph OSD Daemon (OSD), which stores data as objects on a storage node.
This guide provides a high-level introduction to using librados.
Refer to Architecture for additional details of the Ceph
Storage Cluster. To use the API, you need a running Ceph Storage Cluster.
See Installation (Quick) for details.
Step 1: Getting librados
Your client application must bind with librados to connect to the Ceph
Storage Cluster. You must install librados and any required packages to
write applications that use librados. The librados API is written in
C++, with additional bindings for C, Python, Java and PHP.
Getting librados for Python
The rados module provides librados support to Python
applications. You may install python3-rados for Debian, Ubuntu, SLE or
openSUSE or the python-rados package for CentOS/RHEL.
To install librados development support files for Python on Debian/Ubuntu
distributions, execute the following:
sudo apt-get install python3-rados
To install librados development support files for Python on RHEL/CentOS
distributions, execute the following:
sudo yum install python-rados
To install librados development support files for Python on SLE/openSUSE
distributions, execute the following:
sudo zypper install python3-rados
You can find the module under /usr/share/pyshared on Debian systems,
or under /usr/lib/python*/site-packages on CentOS/RHEL systems.
Step 2: Configuring a Cluster Handle
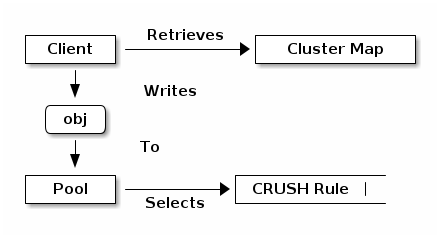
A Ceph Client, via librados, interacts directly with OSDs to store
and retrieve data. To interact with OSDs, the client app must invoke
librados and connect to a Ceph Monitor. Once connected, librados
retrieves the Cluster Map from the Ceph Monitor. When the client app
wants to read or write data, it creates an I/O context and binds to a
Pool. The pool has an associated CRUSH rule that defines how it
will place data in the storage cluster. Via the I/O context, the client
provides the object name to librados, which takes the object name
and the cluster map (i.e., the topology of the cluster) and computes the
placement group and OSD for locating the data. Then the client application
can read or write data. The client app doesn’t need to learn about the topology
of the cluster directly.
The Ceph Storage Cluster handle encapsulates the client configuration, including:
- The user ID for
rados_create()or user name forrados_create2()
(preferred). - The cephx authentication key
- The monitor ID and IP address
- Logging levels
- Debugging levels
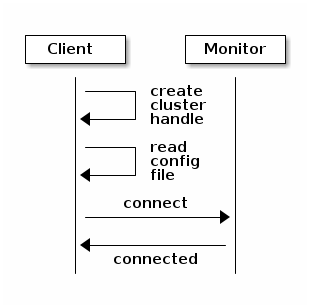
Thus, the first steps in using the cluster from your app are to 1) create
a cluster handle that your app will use to connect to the storage cluster,
and then 2) use that handle to connect. To connect to the cluster, the
app must supply a monitor address, a username and an authentication key
(cephx is enabled by default).
Tip
Talking to different Ceph Storage Clusters – or to the same cluster
with different users – requires different cluster handles.
RADOS provides a number of ways for you to set the required values. For
the monitor and encryption key settings, an easy way to handle them is to ensure
that your Ceph configuration file contains a keyring path to a keyring file
and at least one monitor address (e.g., mon_host). For example:
[global]
mon_host = 192.168.1.1
keyring = /etc/ceph/ceph.client.admin.keyring
Once you create the handle, you can read a Ceph configuration file to configure
the handle. You can also pass arguments to your app and parse them with the
function for parsing command line arguments (e.g., rados_conf_parse_argv()),
or parse Ceph environment variables (e.g., rados_conf_parse_env()). Some
wrappers may not implement convenience methods, so you may need to implement
these capabilities. The following diagram provides a high-level flow for the
initial connection.
Once connected, your app can invoke functions that affect the whole cluster
with only the cluster handle. For example, once you have a cluster
handle, you can:
- Get cluster statistics
- Use Pool Operation (exists, create, list, delete)
- Get and set the configuration
One of the powerful features of Ceph is the ability to bind to different pools.
Each pool may have a different number of placement groups, object replicas and
replication strategies. For example, a pool could be set up as a “hot” pool that
uses SSDs for frequently used objects or a “cold” pool that uses erasure coding.
The main difference in the various librados bindings is between C and
the object-oriented bindings for C++, Java and Python. The object-oriented
bindings use objects to represent cluster handles, IO Contexts, iterators,
exceptions, etc.
Python Example
Python uses the admin id and the ceph cluster name by default, and
will read the standard ceph.conf file if the conffile parameter is
set to the empty string. The Python binding converts C++ errors
into exceptions.
import rados

try:
        cluster = rados.Rados(conffile='')
except TypeError as e:
        print('Argument validation error: {}'.format(e))
        raise e

print("Created cluster handle.")

try:
        cluster.connect()
except Exception as e:
        print("connection error: {}".format(e))
        raise e
finally:
        print("Connected to the cluster.")
Execute the example to verify that it connects to your cluster.
python ceph-client.py
Step 3: Creating an I/O Context
Once your app has a cluster handle and a connection to a Ceph Storage Cluster,
you may create an I/O Context and begin reading and writing data. An I/O Context
binds the connection to a specific pool. The user must have appropriate
CAPS permissions to access the specified pool. For example, a user with read
access but not write access will only be able to read data. I/O Context
functionality includes:
- Write/read data and extended attributes
- List and iterate over objects and extended attributes
- Snapshot pools, list snapshots, etc.
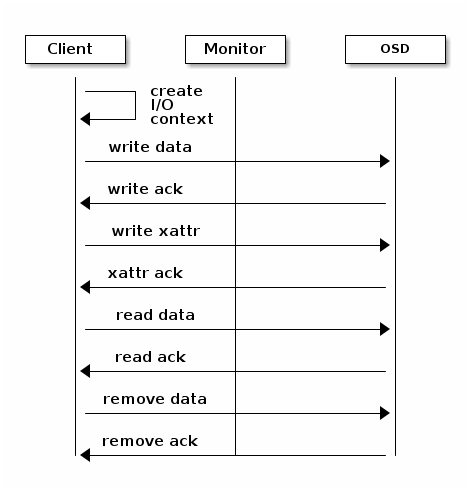
RADOS enables you to interact both synchronously and asynchronously. Once your
app has an I/O Context, read/write operations only require you to know the
object/xattr name. The CRUSH algorithm encapsulated in librados uses the
cluster map to identify the appropriate OSD. OSD daemons handle the replication,
as described in Smart Daemons Enable Hyperscale. The librados library also
maps objects to placement groups, as described in Calculating PG IDs.
The following examples use the default data pool. However, you may also
use the API to list pools, ensure they exist, or create and delete pools. For
the write operations, the examples illustrate how to use synchronous mode. For
the read operations, the examples illustrate how to use asynchronous mode.
Important
Use caution when deleting pools with this API. If you delete
a pool, the pool and ALL DATA in the pool will be lost.
Python Example
print("\n\nI/O Context and Object Operations")
print("=================================")

print("\nCreating a context for the 'data' pool")
if not cluster.pool_exists('data'):
        raise RuntimeError('No data pool exists')
ioctx = cluster.open_ioctx('data')

print("\nWriting object 'hw' with contents 'Hello World!' to pool 'data'.")
ioctx.write("hw", b"Hello World!")
print("Writing XATTR 'lang' with value 'en_US' to object 'hw'")
ioctx.set_xattr("hw", "lang", b"en_US")


print("\nWriting object 'bm' with contents 'Bonjour tout le monde!' to pool
'data'.")
ioctx.write("bm", b"Bonjour tout le monde!")
print("Writing XATTR 'lang' with value 'fr_FR' to object 'bm'")
ioctx.set_xattr("bm", "lang", b"fr_FR")

print("\nContents of object 'hw'\n------------------------")
print(ioctx.read("hw"))

print("\n\nGetting XATTR 'lang' from object 'hw'")
print(ioctx.get_xattr("hw", "lang"))

print("\nContents of object 'bm'\n------------------------")
print(ioctx.read("bm"))

print("\n\nGetting XATTR 'lang' from object 'bm'")
print(ioctx.get_xattr("bm", "lang"))


print("\nRemoving object 'hw'")
ioctx.remove_object("hw")

print("Removing object 'bm'")
ioctx.remove_object("bm")
Step 4: Closing Sessions
Once your app finishes with the I/O Context and cluster handle, the app should
close the connection and shutdown the handle. For asynchronous I/O, the app
should also ensure that pending asynchronous operations have completed.
Python Example
print("\nClosing the connection.")
ioctx.close()

print("Shutting down the handle.")
cluster.shutdown()
RDB 接口开发
Librbd (Python)
The rbd python module provides file-like access to RBD images.
Example: Creating and writing to an image
To use rbd, you must first connect to RADOS and open an IO
context:
cluster = rados.Rados(conffile='my_ceph.conf')
cluster.connect()
ioctx = cluster.open_ioctx('mypool')
Then you instantiate an :class:rbd.RBD object, which you use to create the
image:
rbd_inst = rbd.RBD()
size = 4 * 1024**3  # 4 GiB
rbd_inst.create(ioctx, 'myimage', size)
To perform I/O on the image, you instantiate an :class:rbd.Image object:
image = rbd.Image(ioctx, 'myimage')
data = b'foo' * 200
image.write(data, 0)
This writes ‘foo’ to the first 600 bytes of the image. Note that data
cannot be :type:unicode - Librbd does not know how to deal with
characters wider than a :c:type:char.
In the end, you will want to close the image, the IO context and the connection to RADOS:
image.close()
ioctx.close()
cluster.shutdown()
To be safe, each of these calls would need to be in a separate :finally
block:
cluster = rados.Rados(conffile='my_ceph_conf')
try:
    cluster.connect()
    ioctx = cluster.open_ioctx('my_pool')
    try:
        rbd_inst = rbd.RBD()
        size = 4 * 1024**3  # 4 GiB
        rbd_inst.create(ioctx, 'myimage', size)
        image = rbd.Image(ioctx, 'myimage')
        try:
            data = b'foo' * 200
            image.write(data, 0)
        finally:
            image.close()
    finally:
        ioctx.close()
finally:
    cluster.shutdown()
This can be cumbersome, so the Rados, Ioctx, and
Image classes can be used as context managers that close/shutdown
automatically (see PEP 343). Using them as context managers, the
above example becomes:
with rados.Rados(conffile='my_ceph.conf') as cluster:
    with cluster.open_ioctx('mypool') as ioctx:
        rbd_inst = rbd.RBD()
        size = 4 * 1024**3  # 4 GiB
        rbd_inst.create(ioctx, 'myimage', size)
        with rbd.Image(ioctx, 'myimage') as image:
            data = b'foo' * 200
            image.write(data, 0)
代码演示
[root@node0 ~]# cd /data/ceph-deploy/
[root@node0 ceph-deploy]# ls
ceph.bootstrap-mds.keyring  ceph.client.admin.keyring  ceph.mon.keyring  rdb
ceph.bootstrap-mgr.keyring  ceph.conf                  crushmap          s3client.py
ceph.bootstrap-osd.keyring  ceph.conf.bak              get-pip.py        swift_source.sh
ceph.bootstrap-rgw.keyring  ceph-deploy-ceph.log       k8s
[root@node0 ceph-deploy]# sudo yum install python-rados
- 查看代码
[root@node0 ceph-deploy]# cat rbd_ptyhon.py

import rados
import rbd

cluster = rados.Rados(conffile='ceph.conf')
try:
    cluster.connect()
    ioctx = cluster.open_ioctx('ceph-demo')
    try:
        rbd_inst = rbd.RBD()
        size = 4 * 1024**3  # 4 GiB
        rbd_inst.create(ioctx, 'rbd-demo-sdk', size)
        image = rbd.Image(ioctx, 'rbd-demo-sdk')
        try:
            data = b'foo' * 200
            image.write(data, 0)
        finally:
            image.close()
    finally:
        ioctx.close()
finally:
    cluster.shutdown()
- 查看当前 ceph-demo pool 数据
[root@node0 ceph-deploy]# ceph osd lspools
1 ceph-demo
2 .rgw.root
3 default.rgw.control
4 default.rgw.meta
5 default.rgw.log
6 default.rgw.buckets.index
7 default.rgw.buckets.data
8 cephfs_metadata
9 cephfs_data
11 kubernetes

[root@node0 ceph-deploy]# rbd -p ceph-demo ls
ceph-trash.img
crush-demo.img
mon-test
osd-test.img
rbd-test-new.img
rbd-test-new2.img
rbd-test.img
rdb-demo.img
vm1-clone.img
vm2-clone.img
vm3-clone.img
- 执行代码,查看新数据
[root@node0 ceph-deploy]# python rbd_python.py

[root@node0 ceph-deploy]# rbd -p ceph-demo ls
ceph-trash.img
crush-demo.img
mon-test
osd-test.img
rbd-demo-sdk        # 新增 rbd 块
rbd-test-new.img
rbd-test-new2.img
rbd-test.img
rdb-demo.img
vm1-clone.img
vm2-clone.img
vm3-clone.img
兼容 S3 对象存储接口
Features Support
The following table describes the support status for current Amazon S3 functional features:
| Feature | Status | Remarks |
|---|---|---|
| List Buckets | Supported | |
| Delete Bucket | Supported | |
| Create Bucket | Supported | Different set of canned ACLs |
| Bucket Lifecycle | Supported | |
| Policy (Buckets, Objects) | Supported | ACLs & bucket policies are supported |
| Bucket Website | Supported | |
| Bucket ACLs (Get, Put) | Supported | Different set of canned ACLs |
| Bucket Location | Supported | |
| Bucket Notification | Supported | See S3 Notification Compatibility |
| Bucket Object Versions | Supported | |
| Get Bucket Info (HEAD) | Supported | |
| Bucket Request Payment | Supported | |
| Put Object | Supported | |
| Delete Object | Supported | |
| Get Object | Supported | |
| Object ACLs (Get, Put) | Supported | |
| Get Object Info (HEAD) | Supported | |
| POST Object | Supported | |
| Copy Object | Supported | |
| Multipart Uploads | Supported | |
| Object Tagging | Supported | See Object Related Operations for Policy verbs |
| Storage Class | Supported | See Storage Classes |
Python S3 Examples
Creating a Connection
This creates a connection so that you can interact with the server.
import boto
import boto.s3.connection
access_key = 'put your access key here!'
secret_key = 'put your secret key here!'

conn = boto.connect_s3(
        aws_access_key_id = access_key,
        aws_secret_access_key = secret_key,
        host = 'objects.dreamhost.com',
        #is_secure=False, # uncomment if you are not using ssl
        calling_format = boto.s3.connection.OrdinaryCallingFormat(),
        )
Listing Owned Buckets
This gets a list of Buckets that you own.
This also prints out the bucket name and creation date of each bucket.
for bucket in conn.get_all_buckets():
        print "{name}\t{created}".format(
                name = bucket.name,
                created = bucket.creation_date,
        )
The output will look something like this:
mahbuckat1   2011-04-21T18:05:39.000Z
mahbuckat2   2011-04-21T18:05:48.000Z
mahbuckat3   2011-04-21T18:07:18.000Z
Creating a Bucket
This creates a new bucket called my-new-bucket
bucket = conn.create_bucket('my-new-bucket')
Listing a Bucket’s Content
This gets a list of objects in the bucket.
This also prints out each object’s name, the file size, and last
modified date.
for key in bucket.list():
        print "{name}\t{size}\t{modified}".format(
                name = key.name,
                size = key.size,
                modified = key.last_modified,
                )
The output will look something like this:
myphoto1.jpg 251262  2011-08-08T21:35:48.000Z
myphoto2.jpg 262518  2011-08-08T21:38:01.000Z
Deleting a Bucket
Note: The Bucket must be empty! Otherwise it won’t work!
conn.delete_bucket(bucket.name)
Forced Delete for Non-empty Buckets
Attention
not available in python
Creating an Object
This creates a file hello.txt with the string "Hello World!"
key = bucket.new_key('hello.txt')
key.set_contents_from_string('Hello World!')
Change an Object’s ACL
This makes the object hello.txt to be publicly readable, and
secret_plans.txt to be private.
hello_key = bucket.get_key('hello.txt')
hello_key.set_canned_acl('public-read')
plans_key = bucket.get_key('secret_plans.txt')
plans_key.set_canned_acl('private')
Download an Object (to a file)
This downloads the object perl_poetry.pdf and saves it in
/home/larry/documents/
key = bucket.get_key('perl_poetry.pdf')
key.get_contents_to_filename('/home/larry/documents/perl_poetry.pdf')
Delete an Object
This deletes the object goodbye.txt
bucket.delete_key('goodbye.txt')
Generate Object Download URLs (signed and unsigned)
This generates an unsigned download URL for hello.txt. This works
because we made hello.txt public by setting the ACL above.
This then generates a signed download URL for secret_plans.txt that
will work for 1 hour. Signed download URLs will work for the time
period even if the object is private (when the time period is up, the
URL will stop working).
hello_key = bucket.get_key('hello.txt')
hello_url = hello_key.generate_url(0, query_auth=False, force_http=True)
print hello_url

plans_key = bucket.get_key('secret_plans.txt')
plans_url = plans_key.generate_url(3600, query_auth=True, force_http=True)
print plans_url
The output of this will look something like:
http://objects.dreamhost.com/my-bucket-name/hello.txt
http://objects.dreamhost.com/my-bucket-name/secret_plans.txt?Signature=XXXXXXXXXXXXXXXXXXXXXXXXXXX&Expires=1316027075&AWSAccessKeyId=XXXXXXXXXXXXXXXXXXX
兼容 Swift 对象存储接口
Features Support
The following table describes the support status for current Swift functional features:
| Feature | Status | Remarks |
|---|---|---|
| Authentication | Supported | |
| Get Account Metadata | Supported | |
| Swift ACLs | Supported | Supports a subset of Swift ACLs |
| List Containers | Supported | |
| Delete Container | Supported | |
| Create Container | Supported | |
| Get Container Metadata | Supported | |
| Update Container Metadata | Supported | |
| Delete Container Metadata | Supported | |
| List Objects | Supported | |
| Static Website | Supported | |
| Create Object | Supported | |
| Create Large Object | Supported | |
| Delete Object | Supported | |
| Get Object | Supported | |
| Copy Object | Supported | |
| Get Object Metadata | Supported | |
| Update Object Metadata | Supported | |
| Expiring Objects | Supported | |
| Temporary URLs | Partial Support | No support for container-level keys |
| Object Versioning | Partial Support | No support for X-History-Location |
| CORS | Not Supported |
Python Swift Examples
Create a Connection
This creates a connection so that you can interact with the server:
import swiftclient
user = 'account_name:username'
key = 'your_api_key'

conn = swiftclient.Connection(
        user=user,
        key=key,
        authurl='https://objects.dreamhost.com/auth',
)
Create a Container
This creates a new container called my-new-container:
container_name = 'my-new-container'
conn.put_container(container_name)
Create an Object
This creates a file hello.txt from the file named my_hello.txt:
with open('hello.txt', 'r') as hello_file:
        conn.put_object(container_name, 'hello.txt',
                                        contents= hello_file.read(),
                                        content_type='text/plain')
List Owned Containers
This gets a list of containers that you own, and prints out the container name:
for container in conn.get_account()[1]:
        print container['name']
The output will look something like this:
mahbuckat1
mahbuckat2
mahbuckat3
List a Container’s Content
This gets a list of objects in the container, and prints out each
object’s name, the file size, and last modified date:
for data in conn.get_container(container_name)[1]:
        print '{0}\t{1}\t{2}'.format(data['name'], data['bytes'], data['last_modified'])
The output will look something like this:
myphoto1.jpg 251262  2011-08-08T21:35:48.000Z
myphoto2.jpg 262518  2011-08-08T21:38:01.000Z
Retrieve an Object
This downloads the object hello.txt and saves it in
./my_hello.txt:
obj_tuple = conn.get_object(container_name, 'hello.txt')
with open('my_hello.txt', 'w') as my_hello:
        my_hello.write(obj_tuple[1])
Delete an Object
This deletes the object hello.txt:
conn.delete_object(container_name, 'hello.txt')
Delete a Container
Note
The container must be empty! Otherwise the request won’t work!
conn.delete_container(container_name)

 浙公网安备 33010602011771号