04 对象存储网关
Object 对象存储简介
Ceph Object Store
- RESTful Interface (RESTFul api实现对象的管理上传、下载)
- S3- and Swift-compliant APIs(提供2种风格 api,s3 和 Swift-compliant)
- S3-style subdomains
- Unified S3/Swift namespace (S3/Swift扁平空间)
- User management (安全行:用户认证)
- Usage tracking (使用率追踪)
- Striped objects (分片上传,在重组)
- Cloud solution integration (和云平台集成)
- Multi-site deployment (多站点部署)
- Multi-site replication (多站点复制)
Usage tracking (使用率追踪)
$ rados df
POOL_NAME    USED OBJECTS CLONES COPIES MISSING_ON_PRIMARY UNFOUND DEGRADED RD_OPS      RD WR_OPS      WR USED COMPR UNDER COMPR
ceph-demo 603 MiB     103      0    206                  0       0        0   1521 6.5 MiB    362 309 MiB        0 B         0 B

total_objects    103
total_used       3.6 GiB
total_avail      146 GiB
total_space      150 GiB
对象存储网关架构
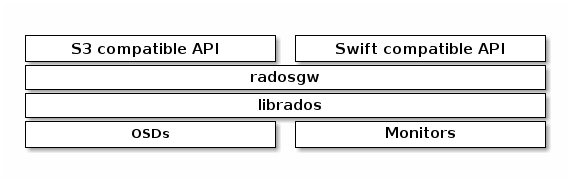
Ceph Object Gateway
Ceph Object Gateway is an object storage interface built on top of
librados to provide applications with a RESTful gateway to
Ceph Storage Clusters. Ceph Object Storage supports two interfaces:
- S3-compatible: Provides object storage functionality with an interface
that is compatible with a large subset of the Amazon S3 RESTful API. - Swift-compatible: Provides object storage functionality with an interface
that is compatible with a large subset of the OpenStack Swift API.
Ceph Object Storage uses the Ceph Object Gateway daemon (radosgw), which is
an HTTP server for interacting with a Ceph Storage Cluster. Since it
provides interfaces compatible with OpenStack Swift and Amazon S3, the Ceph
Object Gateway has its own user management. Ceph Object Gateway can store data
in the same Ceph Storage Cluster used to store data from Ceph File System clients
or Ceph Block Device clients. The S3 and Swift APIs share a common namespace, so
you may write data with one API and retrieve it with the other.
部署 RGW 存储网关
进入 ceph 配置信息目录
[root@node0 ~]# cd /data/ceph-deploy/
[root@node0 ceph-deploy]# ls
ceph.bootstrap-mds.keyring  ceph.bootstrap-osd.keyring  ceph.client.admin.keyring  ceph-deploy-ceph.log
ceph.bootstrap-mgr.keyring  ceph.bootstrap-rgw.keyring  ceph.conf                  ceph.mon.keyring
查看 rgw 帮助命令
[root@node0 ceph-deploy]# ceph-deploy rgw -h
usage: ceph-deploy rgw [-h] {create} ...

Ceph RGW daemon management

positional arguments:
  {create}
    create    Create an RGW instance

optional arguments:
  -h, --help  show this help message and exit

[root@node0 ceph-deploy]# ceph-deploy rgw create
usage: ceph-deploy rgw create [-h] HOST[:NAME] [HOST[:NAME] ...]
ceph-deploy rgw create: error: too few arguments
Ceph 集群添加 RGW 存储网关
[root@node0 ceph-deploy]# ceph-deploy rgw create node0
[ceph_deploy.conf][DEBUG ] found configuration file at: /root/.cephdeploy.conf
[ceph_deploy.cli][INFO  ] Invoked (2.0.1): /usr/bin/ceph-deploy rgw create node0
[ceph_deploy.cli][INFO  ] ceph-deploy options:
[ceph_deploy.cli][INFO  ]  username                      : None
[ceph_deploy.cli][INFO  ]  verbose                       : False
[ceph_deploy.cli][INFO  ]  rgw                           : [('node0', 'rgw.node0')]
[ceph_deploy.cli][INFO  ]  overwrite_conf                : False
[ceph_deploy.cli][INFO  ]  subcommand                    : create
[ceph_deploy.cli][INFO  ]  quiet                         : False
[ceph_deploy.cli][INFO  ]  cd_conf                       : <ceph_deploy.conf.cephdeploy.Conf instance at 0x7f635fb0bc68>
[ceph_deploy.cli][INFO  ]  cluster                       : ceph
[ceph_deploy.cli][INFO  ]  func                          : <function rgw at 0x7f636035e0c8>
[ceph_deploy.cli][INFO  ]  ceph_conf                     : None
[ceph_deploy.cli][INFO  ]  default_release               : False
[ceph_deploy.rgw][DEBUG ] Deploying rgw, cluster ceph hosts node0:rgw.node0
[node0][DEBUG ] connected to host: node0
[node0][DEBUG ] detect platform information from remote host
[node0][DEBUG ] detect machine type
[ceph_deploy.rgw][INFO  ] Distro info: CentOS Linux 7.9.2009 Core
[ceph_deploy.rgw][DEBUG ] remote host will use systemd
[ceph_deploy.rgw][DEBUG ] deploying rgw bootstrap to node0
[node0][DEBUG ] write cluster configuration to /etc/ceph/{cluster}.conf
[node0][WARNIN] rgw keyring does not exist yet, creating one
[node0][DEBUG ] create a keyring file
[node0][DEBUG ] create path recursively if it doesn't exist
[node0][INFO  ] Running command: ceph --cluster ceph --name client.bootstrap-rgw --keyring /var/lib/ceph/bootstrap-rgw/ceph.keyring auth get-or-create client.rgw.node0 osd allow rwx mon allow rw -o /var/lib/ceph/radosgw/ceph-rgw.node0/keyring
[node0][INFO  ] Running command: systemctl enable ceph-radosgw@rgw.node0
[node0][WARNIN] Created symlink from /etc/systemd/system/ceph-radosgw.target.wants/ceph-radosgw@rgw.node0.service to /usr/lib/systemd/system/ceph-radosgw@.service.
[node0][INFO  ] Running command: systemctl start ceph-radosgw@rgw.node0
[node0][INFO  ] Running command: systemctl enable ceph.target
[ceph_deploy.rgw][INFO  ] The Ceph Object Gateway (RGW) is now running on host node0 and default port 7480
查看集群信息
[root@node0 ceph-deploy]# ceph -s
  cluster:
    id:     97702c43-6cc2-4ef8-bdb5-855cfa90a260
    health: HEALTH_OK

  services:
    mon: 3 daemons, quorum node0,node1,node2 (age 6d)
    mgr: node0(active, since 6d), standbys: node1, node2
    osd: 3 osds: 3 up (since 6d), 3 in (since 6d)
    rgw: 1 daemon active (node0)

  task status:

  data:
    pools:   5 pools, 256 pgs
    objects: 322 objects, 305 MiB
    usage:   3.6 GiB used, 146 GiB / 150 GiB avail
    pgs:     256 active+clean

  io:
    client:   53 KiB/s rd, 0 B/s wr, 78 op/s rd, 49 op/s wr
查看端口,并测试接口
[root@node0 ceph-deploy]# ss -tnlp | grep 7480
LISTEN     0      128          *:7480                     *:*                   users:(("radosgw",pid=37972,fd=48))
LISTEN     0      128       [::]:7480                  [::]:*                   users:(("radosgw",pid=37972,fd=49))
[root@node0 ceph-deploy]# curl http://node0:7480
<?xml version="1.0" encoding="UTF-8"?>
  <ListAllMyBucketsResult xmlns="http://s3.amazonaws.com/doc/2006-03-01/">
  <Owner>
    <ID>anonymous</ID>
    <DisplayName></DisplayName>
  </Owner>
  <Buckets></Buckets>
</ListAllMyBucketsResult>
修改 RGW 默认端口
修改 ceph.conf 配置文件
[root@node0 ~]# cd /data/ceph-deploy/

[root@node0 ceph-deploy]# cat ceph.conf
[global]
fsid = 97702c43-6cc2-4ef8-bdb5-855cfa90a260
public_network = 192.168.100.0/24
cluster_network = 192.168.100.0/24
mon_initial_members = node0
mon_host = 192.168.100.130
auth_cluster_required = cephx
auth_service_required = cephx
auth_client_required = cephx

### 新增配置文件
[client.rgw.node0]
rgw_frontends = "civetweb port=80"
推送 ceph.conf 配置文件到集群节点
[root@node0 ceph-deploy]# ceph-deploy --overwrite-conf config push node0 node1 node2
[ceph_deploy.conf][DEBUG ] found configuration file at: /root/.cephdeploy.conf
[ceph_deploy.cli][INFO  ] Invoked (2.0.1): /usr/bin/ceph-deploy --overwrite-conf config push node0 node1 node2
[ceph_deploy.cli][INFO  ] ceph-deploy options:
[ceph_deploy.cli][INFO  ]  username                      : None
[ceph_deploy.cli][INFO  ]  verbose                       : False
[ceph_deploy.cli][INFO  ]  overwrite_conf                : True
[ceph_deploy.cli][INFO  ]  subcommand                    : push
[ceph_deploy.cli][INFO  ]  quiet                         : False
[ceph_deploy.cli][INFO  ]  cd_conf                       : <ceph_deploy.conf.cephdeploy.Conf instance at 0x7f0478c44290>
[ceph_deploy.cli][INFO  ]  cluster                       : ceph
[ceph_deploy.cli][INFO  ]  client                        : ['node0', 'node1', 'node2']
[ceph_deploy.cli][INFO  ]  func                          : <function config at 0x7f0478c60c80>
[ceph_deploy.cli][INFO  ]  ceph_conf                     : None
[ceph_deploy.cli][INFO  ]  default_release               : False
[ceph_deploy.config][DEBUG ] Pushing config to node0
[node0][DEBUG ] connected to host: node0
[node0][DEBUG ] detect platform information from remote host
[node0][DEBUG ] detect machine type
[node0][DEBUG ] write cluster configuration to /etc/ceph/{cluster}.conf
[ceph_deploy.config][DEBUG ] Pushing config to node1
[node1][DEBUG ] connected to host: node1
[node1][DEBUG ] detect platform information from remote host
[node1][DEBUG ] detect machine type
[node1][DEBUG ] write cluster configuration to /etc/ceph/{cluster}.conf
[ceph_deploy.config][DEBUG ] Pushing config to node2
[node2][DEBUG ] connected to host: node2
[node2][DEBUG ] detect platform information from remote host
[node2][DEBUG ] detect machine type
[node2][DEBUG ] write cluster configuration to /etc/ceph/{cluster}.conf
重启服务并验证
[root@node0 ceph-deploy]# ansible all -m shell -a "systemctl restart ceph-radosgw.target"
node1 | CHANGED | rc=0 >>

node2 | CHANGED | rc=0 >>

node0 | CHANGED | rc=0 >>

[root@node0 ceph-deploy]# ss -tnlp | grep rados
LISTEN     0      128          *:80                       *:*                   users:(("radosgw",pid=42562,fd=44))

[root@node0 ceph-deploy]# curl http://node0
<?xml version="1.0" encoding="UTF-8"?>
  <ListAllMyBucketsResult xmlns="http://s3.amazonaws.com/doc/2006-03-01/">
  <Owner>
    <ID>anonymous</ID>
    <DisplayName></DisplayName>
  </Owner>
  <Buckets></Buckets>
</ListAllMyBucketsResult>

[root@node0 ceph-deploy]# curl http://node0:7480
curl: (7) Failed connect to node0:7480; Connection refused
RGW S3 接口使用
创建用户
radosgw 用户分为:s3 风格 和 Swift 风格
# 使用 rodsgw 需要先创建用户
[root@node0 ceph-deploy]# radosgw-admin -h | grep user
  user create                create a new user
  user modify                modify user
  user info                  get user info
  user rm                    remove user
  user suspend               suspend a user
  user enable                re-enable user after suspension
  user check                 check user info
  user stats                 show user stats as accounted by quota subsystem
  user list                  list users
  caps add                   add user capabilities
  caps rm                    remove user capabilities
  subuser create             create a new subuser
  subuser modify             modify subuser
  subuser rm                 remove subuser
  bucket link                link bucket to specified user
  bucket unlink              unlink bucket from specified user
  usage show                 show usage (by user, by bucket, date range)
  usage trim                 trim usage (by user, by bucket, date range)
   --uid=<id>                user id
   --subuser=<name>          subuser name
   --email=<email>           user's email address
   --access=<access>         Set access permissions for sub-user, should be one
   --display-name=<name>     user's display name
   --max-buckets             max number of buckets for a user
   --admin                   set the admin flag on the user
   --system                  set the system flag on the user
   --op-mask                 set the op mask on the user
   --purge-data              when specified, user removal will also purge all the
                             user data
   --purge-keys              when specified, subuser removal will also purge all the
                             subuser keys
   --sync-stats              option to 'user stats', update user stats with current
                             stats reported by user's buckets indexes
   --reset-stats             option to 'user stats', reset stats in accordance with user buckets
   --caps=<caps>             list of caps (e.g., "usage=read, write; user=read")
   --quota-scope             scope of quota (bucket, user)
  --setuser USER    set uid to user or uid (and gid to user's gid)
s3 风格用户
[root@node0 ceph-deploy]# radosgw-admin user create --uid ceph-s3-user --display-name "Ceph S3 User Demo"
{
    "user_id": "ceph-s3-user",
    "display_name": "Ceph S3 User Demo",
    "email": "",
    "suspended": 0,
    "max_buckets": 1000,
    "subusers": [],
    "keys": [
        {
            "user": "ceph-s3-user",
            "access_key": "NGJ3JY6F45CTJJBWPGTJ",                       # 后续访问 radosgw 的凭证
            "secret_key": "nJNchCzcaADsxbm9GLe6cquvGTMe9rvjZqDdXz2C"    # 后续访问 radosgw 的凭证
        }
    ],
    "swift_keys": [],
    "caps": [],
    "op_mask": "read, write, delete",
    "default_placement": "",
    "default_storage_class": "",
    "placement_tags": [],
    "bucket_quota": {
        "enabled": false,
        "check_on_raw": false,
        "max_size": -1,
        "max_size_kb": 0,
        "max_objects": -1
    },
    "user_quota": {
        "enabled": false,
        "check_on_raw": false,
        "max_size": -1,
        "max_size_kb": 0,
        "max_objects": -1
    },
    "temp_url_keys": [],
    "type": "rgw",
    "mfa_ids": []
}
查看用户信息
[root@node0 ceph-deploy]# radosgw-admin user list
[
    "ceph-s3-user"
]
[root@node0 ceph-deploy]# radosgw-admin user info --uid ceph-s3-user
{
    "user_id": "ceph-s3-user",
    "display_name": "Ceph S3 User Demo",
    "email": "",
    "suspended": 0,
    "max_buckets": 1000,
    "subusers": [],
    "keys": [
        {
            "user": "ceph-s3-user",
            "access_key": "NGJ3JY6F45CTJJBWPGTJ",
            "secret_key": "nJNchCzcaADsxbm9GLe6cquvGTMe9rvjZqDdXz2C"
        }
    ],
    "swift_keys": [],
    "caps": [],
    "op_mask": "read, write, delete",
    "default_placement": "",
    "default_storage_class": "",
    "placement_tags": [],
    "bucket_quota": {
        "enabled": false,
        "check_on_raw": false,
        "max_size": -1,
        "max_size_kb": 0,
        "max_objects": -1
    },
    "user_quota": {
        "enabled": false,
        "check_on_raw": false,
        "max_size": -1,
        "max_size_kb": 0,
        "max_objects": -1
    },
    "temp_url_keys": [],
    "type": "rgw",
    "mfa_ids": []
}
创建 存储桶
# 查看资源池信息,部署 radosgw 后,回自动生成新的资源池信息
[root@node0 ceph-deploy]# ceph osd lspools
1 ceph-demo
2 .rgw.root
3 default.rgw.control
4 default.rgw.meta
5 default.rgw.log

# 编写客户端脚本

[root@node0 ceph-deploy]# cat s3client.py

import boto
import boto.s3.connection
access_key = 'NGJ3JY6F45CTJJBWPGTJ'
secret_key = 'nJNchCzcaADsxbm9GLe6cquvGTMe9rvjZqDdXz2C'

conn = boto.connect_s3(
        aws_access_key_id = access_key,
        aws_secret_access_key = secret_key,
        host = '192.168.100.130', port=80,
        is_secure=False,               # uncomment if you are not using ssl
        calling_format = boto.s3.connection.OrdinaryCallingFormat(),
        )

bucket = conn.create_bucket('ceph-s3-bucket')
for bucket in conn.get_all_buckets():
        print("{name}\t{created}".format(
                name = bucket.name,
                created = bucket.creation_date,
        ))

# 安装 python 包
[root@node0 ceph-deploy]# yum install python-boto

# 创建存储桶
[root@node0 ceph-deploy]# python s3client.py
ceph-s3-bucket  2022-10-21T01:39:31.690Z

# 查看最新的资源池信息
[root@node0 ceph-deploy]# !ceph
ceph osd lspools
1 ceph-demo
2 .rgw.root
3 default.rgw.control
4 default.rgw.meta
5 default.rgw.log
6 default.rgw.buckets.index

# 后续可以使用其他 对象存储工具进行连接,访问存储桶资源。 比如 minio mc 工具
s3cmd 管理对象存储
安装软件
radosgw 用户分为:s3 风格 和 Swift 风格
[root@node0 ceph-deploy]# yum -y install s3cmd
配置 s3cmd
[root@node0 ceph-deploy]# s3cmd --configure

Enter new values or accept defaults in brackets with Enter.
Refer to user manual for detailed description of all options.

Access key and Secret key are your identifiers for Amazon S3. Leave them empty for using the env variables.
Access Key: NGJ3JY6F45CTJJBWPGTJ
Secret Key: nJNchCzcaADsxbm9GLe6cquvGTMe9rvjZqDdXz2C
Default Region [US]:

Use "s3.amazonaws.com" for S3 Endpoint and not modify it to the target Amazon S3.
S3 Endpoint [s3.amazonaws.com]: 192.168.100.130

Use "%(bucket)s.s3.amazonaws.com" to the target Amazon S3. "%(bucket)s" and "%(location)s" vars can be used
if the target S3 system supports dns based buckets.
DNS-style bucket+hostname:port template for accessing a bucket [%(bucket)s.s3.amazonaws.com]: 192.168.100.130:80/%(bucket)s

Encryption password is used to protect your files from reading
by unauthorized persons while in transfer to S3
Encryption password:
Path to GPG program [/usr/bin/gpg]:

When using secure HTTPS protocol all communication with Amazon S3
servers is protected from 3rd party eavesdropping. This method is
slower than plain HTTP, and can only be proxied with Python 2.7 or newer
Use HTTPS protocol [Yes]: no

On some networks all internet access must go through a HTTP proxy.
Try setting it here if you can't connect to S3 directly
HTTP Proxy server name:

New settings:
  Access Key: NGJ3JY6F45CTJJBWPGTJ
  Secret Key: nJNchCzcaADsxbm9GLe6cquvGTMe9rvjZqDdXz2C
  Default Region: US
  S3 Endpoint: 192.168.100.130
  DNS-style bucket+hostname:port template for accessing a bucket: 192.168.100.130:80/%(bucket)s
  Encryption password:
  Path to GPG program: /usr/bin/gpg
  Use HTTPS protocol: False
  HTTP Proxy server name:
  HTTP Proxy server port: 0

Test access with supplied credentials? [Y/n] Y
Please wait, attempting to list all buckets...
Success. Your access key and secret key worked fine :-)

Now verifying that encryption works...
Not configured. Never mind.

Save settings? [y/N] y
Configuration saved to '/root/.s3cfg'
查看配置
[root@node0 ceph-deploy]# cat /root/.s3cfg
[default]
access_key = NGJ3JY6F45CTJJBWPGTJ
access_token =
add_encoding_exts =
add_headers =
bucket_location = US
ca_certs_file =
cache_file =
check_ssl_certificate = True
check_ssl_hostname = True
cloudfront_host = cloudfront.amazonaws.com
connection_max_age = 5
connection_pooling = True
content_disposition =
content_type =
default_mime_type = binary/octet-stream
delay_updates = False
delete_after = False
delete_after_fetch = False
delete_removed = False
dry_run = False
enable_multipart = True
encrypt = False
expiry_date =
expiry_days =
expiry_prefix =
follow_symlinks = False
force = False
get_continue = False
gpg_command = /usr/bin/gpg
gpg_decrypt = %(gpg_command)s -d --verbose --no-use-agent --batch --yes --passphrase-fd %(passphrase_fd)s -o %(output_file)s %(input_file)s
gpg_encrypt = %(gpg_command)s -c --verbose --no-use-agent --batch --yes --passphrase-fd %(passphrase_fd)s -o %(output_file)s %(input_file)s
gpg_passphrase =
guess_mime_type = True
host_base = 192.168.100.130
host_bucket = 192.168.100.130:80/%(bucket)s
human_readable_sizes = False
invalidate_default_index_on_cf = False
invalidate_default_index_root_on_cf = True
invalidate_on_cf = False
kms_key =
limit = -1
limitrate = 0
list_md5 = False
log_target_prefix =
long_listing = False
max_delete = -1
mime_type =
multipart_chunk_size_mb = 15
multipart_copy_chunk_size_mb = 1024
multipart_max_chunks = 10000
preserve_attrs = True
progress_meter = True
proxy_host =
proxy_port = 0
public_url_use_https = False
put_continue = False
recursive = False
recv_chunk = 65536
reduced_redundancy = False
requester_pays = False
restore_days = 1
restore_priority = Standard
secret_key = nJNchCzcaADsxbm9GLe6cquvGTMe9rvjZqDdXz2C
send_chunk = 65536
server_side_encryption = False
signature_v2 = False
signurl_use_https = False
simpledb_host = sdb.amazonaws.com
skip_existing = False
socket_timeout = 300
ssl_client_cert_file =
ssl_client_key_file =
stats = False
stop_on_error = False
storage_class =
throttle_max = 100
upload_id =
urlencoding_mode = normal
use_http_expect = False
use_https = False
use_mime_magic = True
verbosity = WARNING
website_endpoint = http://%(bucket)s.s3-website-%(location)s.amazonaws.com/
website_error =
website_index = index.html
查看命令帮助
[root@node0 ceph-deploy]# s3cmd --help
查看存储桶 命令
[root@node0 ceph-deploy]# s3cmd ls
2022-10-21 01:39  s3://ceph-s3-bucket
创建存储桶 命令
[root@node0 ceph-deploy]# s3cmd mb s3://s3cmd-demo
ERROR: S3 error: 403 (SignatureDoesNotMatch)

# 修改 .s3cfg 配置文件

[root@node0 ceph-deploy]# vim /root/.s3cfg

......
signature_v2 = True
......


[root@node0 ceph-deploy]# s3cmd mb s3://s3cmd-demo
Bucket 's3://s3cmd-demo/' created
[root@node0 ceph-deploy]# s3cmd ls
2022-10-21 01:39  s3://ceph-s3-bucket
2022-10-21 03:16  s3://s3cmd-demo
上传文件目录 命令
# 上传文件报错,需要修改 ceph.conf 配置文件新增配置
[root@node0 ceph-deploy]# s3cmd put /etc/fstab s3://s3cmd-demo/fstab-demo
upload: '/etc/fstab' -> 's3://s3cmd-demo/fstab-demo'  [1 of 1]
 465 of 465   100% in    0s     2.41 KB/s  done
ERROR: S3 error: 416 (InvalidRange)

# 新增 ceph.conf 配置文件
[root@node0 ceph-deploy]# cat ceph.conf
[global]
fsid = 97702c43-6cc2-4ef8-bdb5-855cfa90a260
public_network = 192.168.100.0/24
cluster_network = 192.168.100.0/24
mon_initial_members = node0
mon_host = 192.168.100.130
auth_cluster_required = cephx
auth_service_required = cephx
auth_client_required = cephx
mon_max_pg_per_osd=1000  # 新增配置项

[client.rgw.node0]
rgw_frontends = "civetweb port=80"

# 推送配置文件
[root@node0 ceph-deploy]# ceph-deploy --overwrite-conf config push node0 node1 node2

# 重启服务
[root@node0 ceph-deploy]# ansible all -m shell -a "systemctl restart ceph.target"

# 重新上传文件
[root@node0 ceph-deploy]# s3cmd put /etc/fstab s3://s3cmd-demo/fstab-demo
upload: '/etc/fstab' -> 's3://s3cmd-demo/fstab-demo'  [1 of 1]
 465 of 465   100% in    1s   278.94 B/s  done

# 查看文件
[root@node0 ceph-deploy]# s3cmd ls s3://s3cmd-demo
2022-10-21 03:29          465  s3://s3cmd-demo/fstab-demo

# 上传目录
[root@node0 ceph-deploy]# s3cmd put /etc/ s3://s3cmd-demo/etc/ --recursive
查看底层 pools 池数据存放
[root@node0 ceph-deploy]# ceph osd lspools
1 ceph-demo
2 .rgw.root
3 default.rgw.control
4 default.rgw.meta
5 default.rgw.log
6 default.rgw.buckets.index
7 default.rgw.buckets.data   # 新增 pools

[root@node0 ceph-deploy]# rados -p default.rgw.buckets.data ls
42c755f7-138c-4b0b-84bd-a966873c5e9c.4959.2_fstab-demo

# 底层 pv 和 osd 映射情况
[root@node0 ceph-deploy]# ceph osd map default.rgw.buckets.data 42c755f7-138c-4b0b-84bd-a966873c5e9c.4959.2_fstab-demo
osdmap e59 pool 'default.rgw.buckets.data' (7) object '42c755f7-138c-4b0b-84bd-a966873c5e9c.4959.2_fstab-demo' -> pg 7.2ea267 (7.7) -> up ([1,2,0], p1) acting ([1,2,0], p1)

[root@node0 ceph-deploy]# ceph osd tree
ID CLASS WEIGHT  TYPE NAME      STATUS REWEIGHT PRI-AFF
-1       0.14639 root default
-3       0.04880     host node0
 0   hdd 0.04880         osd.0      up  1.00000 1.00000
-5       0.04880     host node1
 1   hdd 0.04880         osd.1      up  1.00000 1.00000
-7       0.04880     host node2
 2   hdd 0.04880         osd.2      up  1.00000 1.00000
下载文件 命令
[root@node0 ceph-deploy]# s3cmd get s3://s3cmd-demo/etc/hostname /root/hostname
download: 's3://s3cmd-demo/etc/hostname' -> '/root/hostname'  [1 of 1]
 6 of 6   100% in    0s   365.54 B/s  done
[root@node0 ceph-deploy]# cat /root/hostname
node0
删除文件 命令
[root@node0 ceph-deploy]# s3cmd rm s3://s3cmd-demo/etc/ --recursive
Swift 风格 API 接口
创建用户
radosgw 用户分为:s3 风格 和 Swift 风格
- 查看当前系统用户
[root@node0 ceph-deploy]# radosgw-admin user list
[
    "ceph-s3-user"
]
- 命令格式
radosgw-admin subuser create --uid={uid} --subuser={uid} --access=[ read | write | readwrite | full ]
- 创建用户
[root@node0 ceph-deploy]# radosgw-admin subuser create --uid=ceph-s3-user --subuser=ceph-s3-user:swift --access=full
{
    "user_id": "ceph-s3-user",
    "display_name": "Ceph S3 User Demo",
    "email": "",
    "suspended": 0,
    "max_buckets": 1000,
    "subusers": [
        {
            "id": "ceph-s3-user:swift",
            "permissions": "full-control"
        }
    ],
    "keys": [
        {
            "user": "ceph-s3-user",
            "access_key": "NGJ3JY6F45CTJJBWPGTJ",
            "secret_key": "nJNchCzcaADsxbm9GLe6cquvGTMe9rvjZqDdXz2C"
        }
    ],
    "swift_keys": [
        {
            "user": "ceph-s3-user:swift",
            "secret_key": "Gk1Br59ysIOh5tnwBQVqDMAHlspQCvHYixoz4Erz"      # 后续配置 swift 使用的密钥信息
        }
    ],
    "caps": [],
    "op_mask": "read, write, delete",
    "default_placement": "",
    "default_storage_class": "",
    "placement_tags": [],
    "bucket_quota": {
        "enabled": false,
        "check_on_raw": false,
        "max_size": -1,
        "max_size_kb": 0,
        "max_objects": -1
    },
    "user_quota": {
        "enabled": false,
        "check_on_raw": false,
        "max_size": -1,
        "max_size_kb": 0,
        "max_objects": -1
    },
    "temp_url_keys": [],
    "type": "rgw",
    "mfa_ids": []
}
安装 swiftclient 工具
[root@node0 ceph-deploy]# yum install python-setuptools python-pip
[root@node0 ceph-deploy]# pip install --upgrade pip
[root@node0 ceph-deploy]# pip install python-swiftclient
使用 swiftclient 工具
- 查看 swift 帮助
[root@node0 ceph-deploy]# swift -v
......

Command-line interface to the OpenStack Swift API.

Positional arguments:
  <subcommand>
    delete               Delete a container or objects within a container.
    download             Download objects from containers.
    list                 Lists the containers for the account or the objects
                         for a container.
    post                 Updates meta information for the account, container,
                         or object; creates containers if not present.
    copy                 Copies object, optionally adds meta
    stat                 Displays information for the account, container,
                         or object.
    upload               Uploads files or directories to the given container.
    capabilities         List cluster capabilities.
    tempurl              Create a temporary URL.
    auth                 Display auth related environment variables.
    bash_completion      Outputs option and flag cli data ready for
                         bash_completion.

Examples:
  swift download --help

  swift -A https://api.example.com/v1.0 \
      -U user -K api_key stat -v

  swift --os-auth-url https://api.example.com/v2.0 \
      --os-tenant-name tenant \
      --os-username user --os-password password list

  swift --os-auth-url https://api.example.com/v3 --auth-version 3\
      --os-project-name project1 --os-project-domain-name domain1 \
      --os-username user --os-user-domain-name domain1 \
      --os-password password list

  swift --os-auth-url https://api.example.com/v3 --auth-version 3\
      --os-project-id 0123456789abcdef0123456789abcdef \
      --os-user-id abcdef0123456789abcdef0123456789 \
      --os-password password list

  swift --os-auth-url https://api.example.com/v3 --auth-version 3\
      --os-application-credential-id d78683c92f0e4f9b9b02a2e208039412 \
      --os-application-credential-secret APPLICATION_CREDENTIAL_SECRET \
      --os-auth-type v3applicationcredential list

  swift --os-auth-token 6ee5eb33efad4e45ab46806eac010566 \
      --os-storage-url https://10.1.5.2:8080/v1/AUTH_ced809b6a4baea7aeab61a \
      list
- 使用 swift 工具查看 存储桶信息
[root@node0 ceph-deploy]# swift -A http://192.168.100.130:80/auth -U ceph-s3-user:swift -K Gk1Br59ysIOh5tnwBQVqDMAHlspQCvHYixoz4Erz list
ceph-s3-bucket
s3cmd-demo
- 设置密钥信息等 为环境变量,进行命令行传参
[root@node0 ceph-deploy]# cat swift_source.sh
export ST_AUTH=http://192.168.100.130:80/auth
export ST_USER=ceph-s3-user:swift
export ST_KEY=Gk1Br59ysIOh5tnwBQVqDMAHlspQCvHYixoz4Erz

[root@node0 ceph-deploy]# source swift_source.sh


# 再次查看存储桶信息
[root@node0 ceph-deploy]# swift list
ceph-s3-bucket
s3cmd-demo
# 创建桶 命令
[root@node0 ceph-deploy]# swift post swift-demo
[root@node0 ceph-deploy]# swift list
ceph-s3-bucket
s3cmd-demo
swift-demo

# 其他 命令,可以查看帮助文档 swift -v

 浙公网安备 33010602011771号