vue 2 渲染过程 & 函数调用栈
测试例子
<!DOCTYPE html>
<html>
<head>
  <title>vue test</title>
</head>
<body>
<div id="app">
  <div v-for="i in message" :key="i">
    {{i}}
  </div>

  <!-- <button-counter :title="tt"></button-counter> -->
</div>

  <!-- Vue.js v2.6.11 -->
  <script src="https://cdn.jsdelivr.net/npm/vue/dist/vue.js"></script>
  <script>
    Vue.component('button-counter', {
      props: ['title'],
      data: function () {
        return {
          count: 0
        }
      },
      template: '<button v-on:click="count++">{{title}}: You clicked me {{ count }} times.</button>'
    });
    var app = new Vue({
      el: '#app',
      data: {
        message: ['a', 'b', 'c', 'd'],
        tt: 'on'
      },
      mounted() {
        window.addEventListener('test', (e) => {
          this.message = e.detail;
        }, false);
      },
    })

    console.log(app);
    // var event = new CustomEvent('test', { 'detail': 5 }); window.dispatchEvent(event);
  </script>
</body>
</html>
主要函数定义
- 716:Dep 发布者定义
- 767:Vnode 虚拟节点定义
- 922:Observer 劫持数据的函数定义
- 4419:Watcher 订阅者定义
- 5073:function Vue() 定义
数据劫持过程
Vue.prototype._init 中,在 callHook(vm, 'beforeCreate'); 后和 callHook(vm, 'created'); 之前调用 initState(vm) 进入劫持逻辑

最后 Object.defineProperty 的代码详细看一下
Object.defineProperty(obj, key, {

  enumerable: true,
  configurable: true,
  get: function reactiveGetter() {
    var value = getter ? getter.call(obj) : val;
    if (Dep.target) {
      dep.depend();
      if (childOb) {
        childOb.dep.depend();
        if (Array.isArray(value)) {
          dependArray(value);
        }
      }
    }
    return value
  },
  set: function reactiveSetter(newVal) {
    var value = getter ? getter.call(obj) : val;
    /* eslint-disable no-self-compare */
    if (newVal === value || (newVal !== newVal && value !== value)) {
      return
    }
    /* eslint-enable no-self-compare */
    if (customSetter) {
      customSetter();
    }
    // #7981: for accessor properties without setter
    if (getter && !setter) { return }
    if (setter) {
      setter.call(obj, newVal);
    } else {
      val = newVal;
    }
    childOb = !shallow && observe(newVal);
    dep.notify();
  }
});
挂载过程
Vue.prototype._init 中,在 callHook(vm, 'created'); 后做 vm.$mount(vm.$options.el); 的逻辑

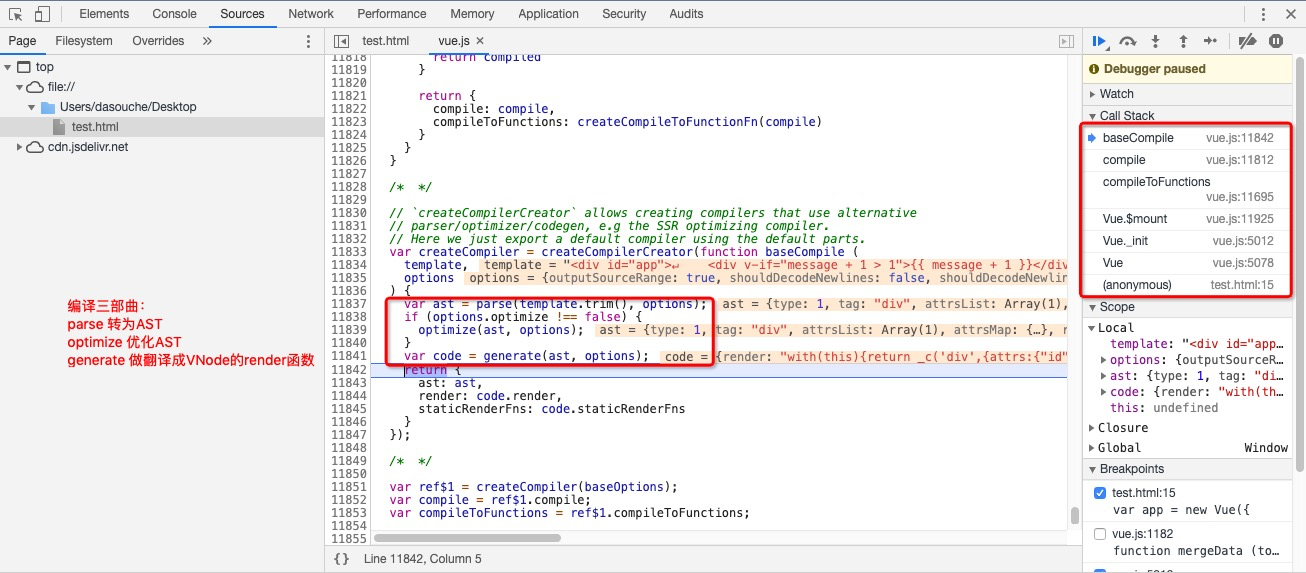
挂载的过程中解析模版,并对模版进行 parse,optmize,generate 三步动作,编译出来的东西是一个这样的结构
{
    ast: {
        type: 1
        tag: "div"
        attrsList: [{…}]
        attrsMap: {id: "app"}
        rawAttrsMap: {id: {…}}
        parent: undefined
        children: (3) [{…}, {…}, {…}]
        start: 0
        end: 126
        plain: false
        attrs: [{…}]
        static: false
        staticRoot: false
    },
    render: "with(this){return _c('div',{attrs:{"id":"app"}},[(message + 1 > 1)?_c('div',[_v(_s(message + 1))]):_e(),_v(" "),_c('button',{on:{"click":function($event){message += 1}}},[_v("阿道夫")])])}",
    staticRenderFns: []
}

// 所以渲染函数 vm.$options.render 就是下面着样子的

(function anonymous(
) {
with(this){return _c('div',{attrs:{"id":"app"}},[(message + 1 > 1)?_c('div',[_v(_s(message + 1))]):_e(),_v(" "),_c('button',{on:{"click":function($event){message += 1}}},[_v("阿道夫")])])}
})
最终在 mountComponent 函数里完成挂载的动作,这里 callHook(vm, 'beforeMount');,

function mountComponent(
  vm,
  el,
  hydrating // 初始化时这个值是undefined
) {
  vm.$el = el;
  //...
  callHook(vm, 'beforeMount');

  var updateComponent;
  // ...
  updateComponent = function () {
    vm._update(vm._render(), hydrating);
  };
}

// we set this to vm._watcher inside the watcher's constructor
// since the watcher's initial patch may call $forceUpdate (e.g. inside child
// component's mounted hook), which relies on vm._watcher being already defined
// 对该vm注册一个订阅者,Watcher 的 getter 为 updateComponent 函数,进行依赖搜集。
// Watcher 存在于每一个组件 vm 中
new Watcher(vm, updateComponent, noop, {
  before: function before() {
    if (vm._isMounted && !vm._isDestroyed) {
      callHook(vm, 'beforeUpdate');
    }
  }
}, true /* isRenderWatcher */);
hydrating = false;

// manually mounted instance, call mounted on self
// mounted is called for render-created child components in its inserted hook
if (vm.$vnode == null) {
  vm._isMounted = true;
  callHook(vm, 'mounted');
}
return vm;
注意上面代码建立 new Watcher() 订阅者,其内容就是触发 vm._update(vm._render(), hydrating);。new Watcher 时,自身调用 get,就彻底渲染,真实的节点也挂载到了html上。
update 过程
上文中在生命周期钩子 beforeMount 之后,建立了订阅者 new Watcher,执行函数 vm._update(vm._render(), hydrating);。
首先执行 _render 去获取到最新的 Vnode 虚拟节点

再去 _update 中调用 __patch__ 比对节点并且渲染到真实的 DOM 树中。

Vnode 比对过程
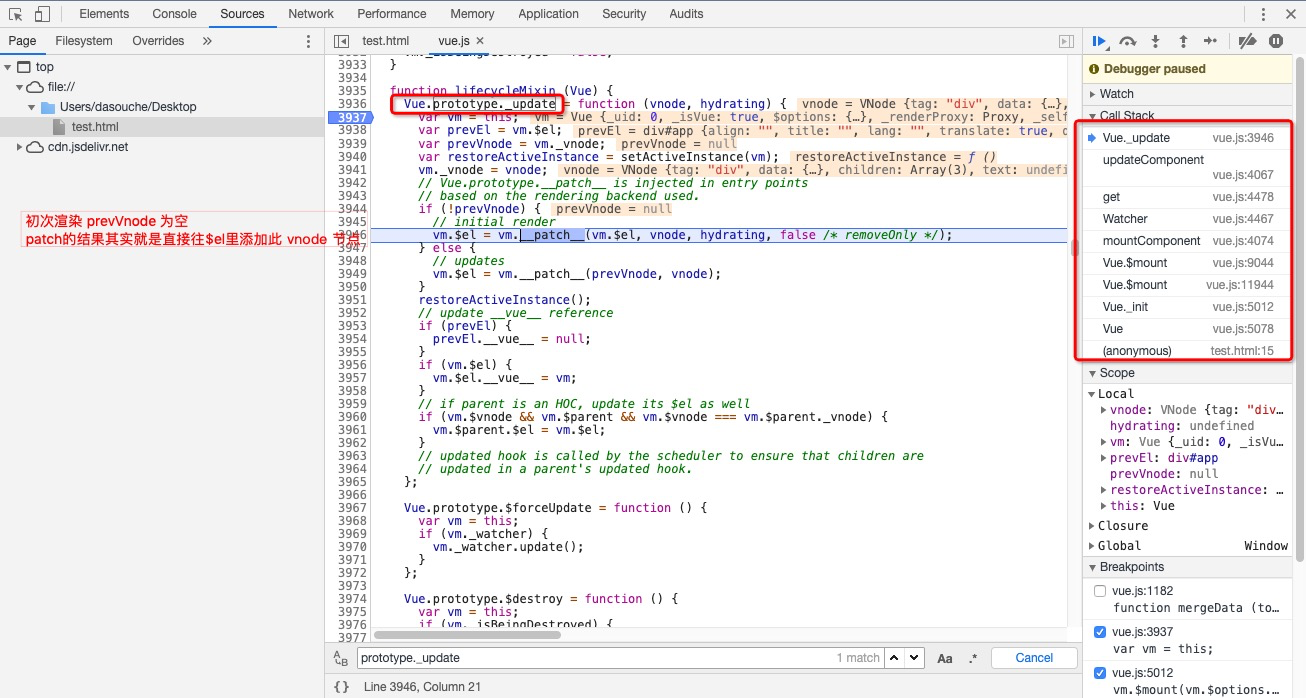
初次渲染时
Vue.prototype._update = function (vnode, hydrating) {
  var vm = this;
  var prevVnode = vm._vnode;
  vm._vnode = vnode;
  // Vue.prototype.__patch__ is injected in entry points
  // based on the rendering backend used.
  // 初次渲染走这里,直接 createElm 后再 removeVnodes,创建节点后删除原来的节点完事。
  if (!prevVnode) {
    // initial render
    vm.$el = vm.__patch__(vm.$el, vnode, hydrating, false /* removeOnly */);
  } else {
    // 后续更新走这个逻辑,去深搜比对节点并更新
    // updates
    vm.$el = vm.__patch__(prevVnode, vnode);
  }
  // ...
};
初始化时,就直接覆盖原节点


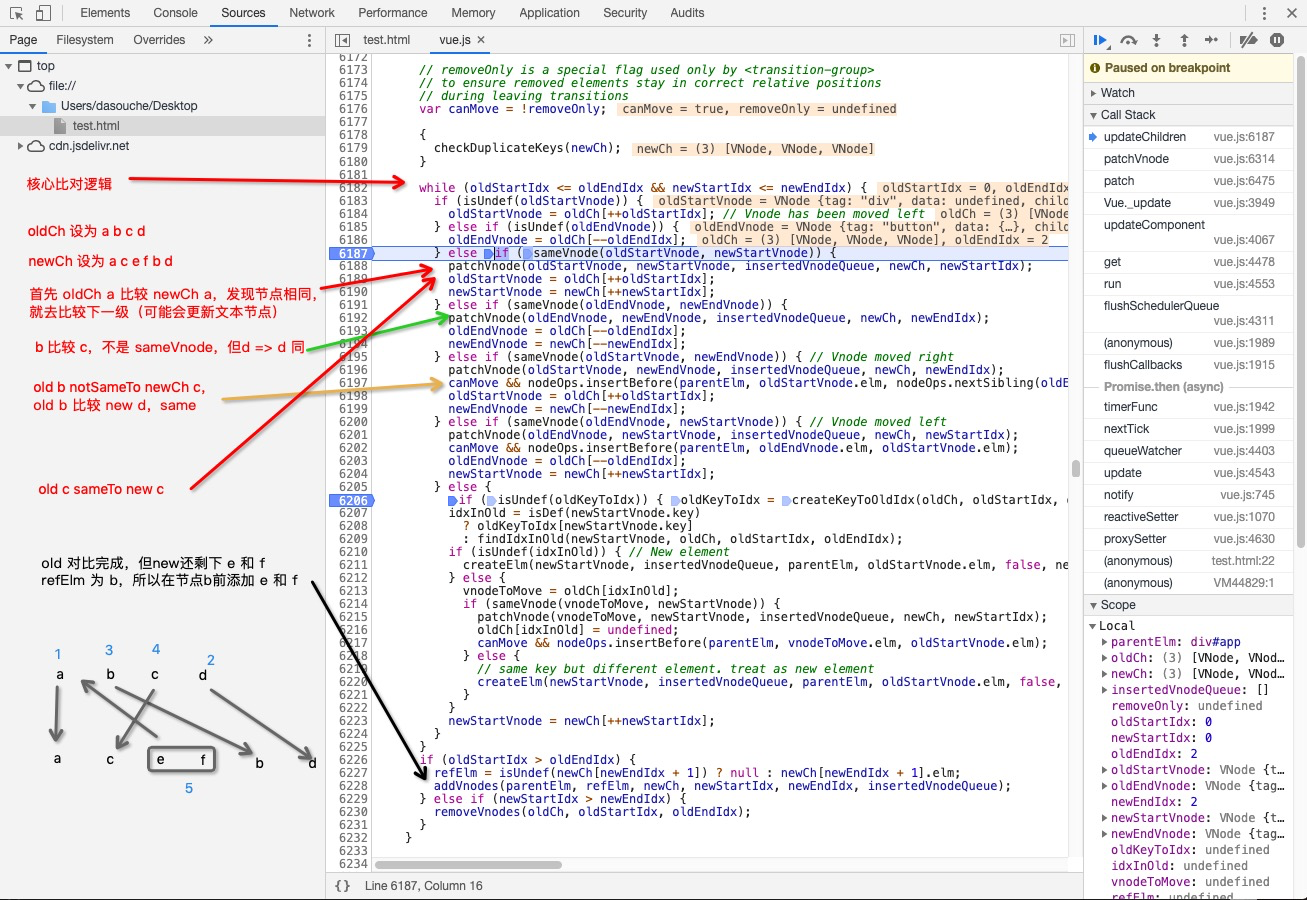
如果是update 过程
<div id="app">
  <!-- <div v-if="message > 0">{{ message + 1 }}</div> -->
  <div v-for="i in message">
    {{i}}
  </div>
</div>

<script>
  var app = new Vue({
    el: '#app',
    data: {
      message: ['a', 'b', 'c', 'd']
    },
    mounted() {
      window.addEventListener('test', (e) => {
        this.message = e.detail;
      }, false);
    }
  })

  // 接着控制台里输入
  // var event = new CustomEvent('test', { 'detail': ['a', 'c', 'e', 'f', 'b', 'd'] }); window.dispatchEvent(event);
  // 能把 message 改为这个数组
</script>

探讨key的作用,首先这是 sameVnode 函数,用于比对两个节点是否是同一个
function sameVnode(a, b) {
  // key,tag,isComment相同,并且data都不为空,并且节点类型不是input
  return (
    a.key === b.key && (
      (
        a.tag === b.tag &&
        a.isComment === b.isComment &&
        isDef(a.data) === isDef(b.data) &&
        sameInputType(a, b)
      ) || (
        isTrue(a.isAsyncPlaceholder) &&
        a.asyncFactory === b.asyncFactory &&
        isUndef(b.asyncFactory.error)
      )
    )
  )
}

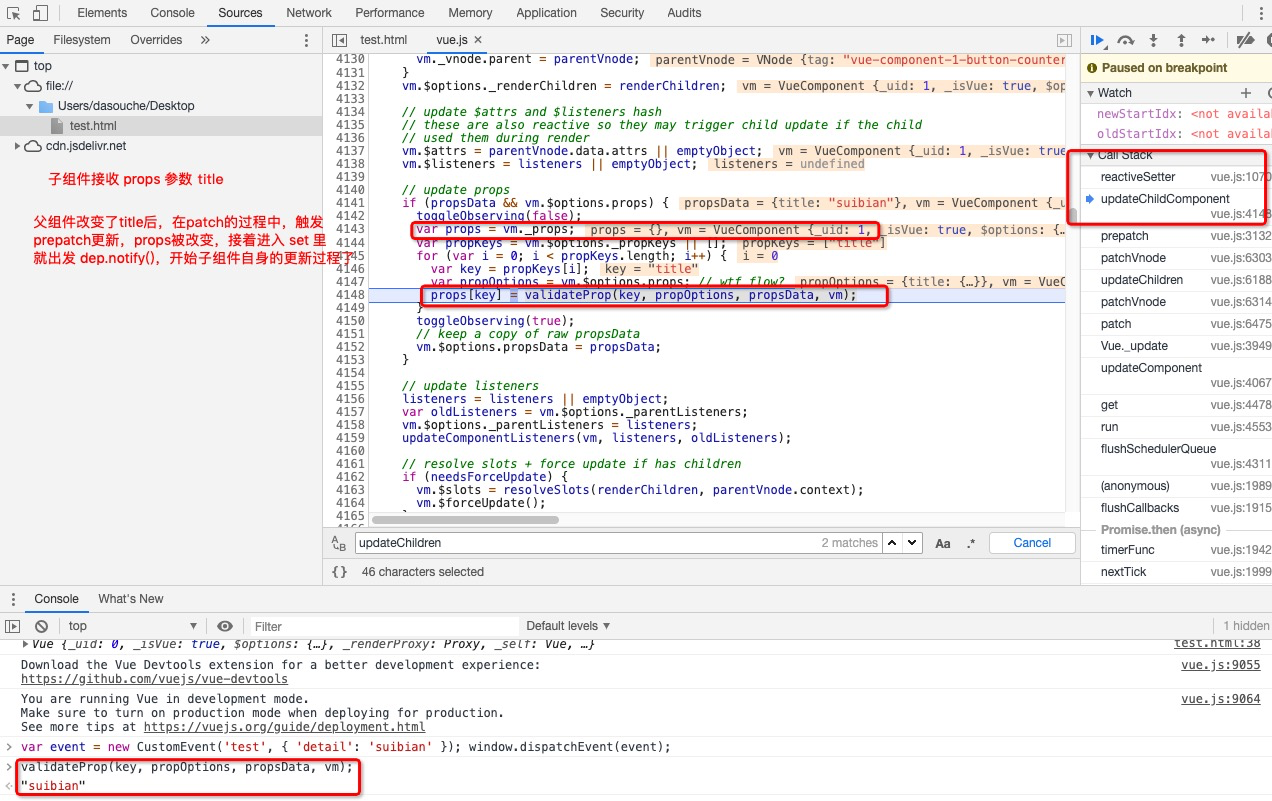
子组件渲染过程
若是子元素自身属性变了,那么直接调用子元素自身订阅者的更新函数 vm._update(vm._render(), hydrating);
若是父组件变动了的子组件的 props 属性,子 props上也存在发布者
_props:
    title: (...)
    get title: ƒ reactiveGetter()
    set title: function reactiveSetter (newVal) {
        var value = getter ? getter.call(obj) : val;
        /* eslint-disable no-self-compare */
        if (newVal === value || (newVal !== newVal && value !== value)) {
          return
        }
        /* eslint-enable no-self-compare */
        if (customSetter) {
          customSetter();
        }
        // #7981: for accessor properties without setter
        if (getter && !setter) { return }
        if (setter) {
          setter.call(obj, newVal);
        } else {
          val = newVal;
        }
        childOb = !shallow && observe(newVal);
        dep.notify();
    }
    __proto__: Object

渲染过程
追问:Dep.target 为什么会指向这个 Watcher 对象?
在 callHook(vm, 'beforeMount') 后,进入 mount 阶段,此时初始化 Watcher
function noop (a, b, c) {}

// lifecycle.js
let updateComponent
updateComponent = () => {
  vm._update(vm._render(), hydrating)
}

vm._watcher = new Watcher(vm, updateComponent, noop)
在初始化 Watcher 的函数里调用 this.get
var Watcher = function Watcher(vm, expOrFn, cb, options, isRenderWatcher) {
  this.vm = vm;
  //...
  this.cb = cb;
  //...
  this.expression = expOrFn.toString();
  //...
  this.getter = expOrFn;
  //...
  this.value = this.lazy ? undefined : this.get();
};
Watcher.prototype.get,注意 pushTarget,此时就和 Dep 发布者产生了联系,Dep 的 target 被设置为了这个 wacher,并且在每次监测对象被 get 时,就会往自身的 Dep 里推入这个 wacher。
// dep.js
export function pushTarget (_target: Watcher) {
  if (Dep.target) targetStack.push(Dep.target)
  Dep.target = _target
}
export function popTarget () {
  Dep.target = targetStack.pop()
}

// watcher.js
Watcher.prototype.get = function get() {
  pushTarget(this);
  var value;
  var vm = this.vm;
  //...
  value = this.getter.call(vm, vm);
  //...
  popTarget();
  this.cleanupDeps();
  //...
  return value;
};
上文 Watcher.prototype.get 中还要注意 this.getter.call(vm, vm), 执行的其实是上文表达式里的 vm._update(vm._render(), hydrating)。自然也就调用了
调用到了 vm._render() 方法,要返回一个VNode,调试发现 vm.$options.render 其实就是
Vue.prototype._render = function () {
  // ...
  var vm = this;
  var ref = vm.$options;
  var render = ref.render;
  vnode = render.call(vm._renderProxy, vm.$createElement);
  // ...
  return vnode
}

// 而render方法其实就是用于输出一个虚拟节点
(function anonymous(
) {
with(this){return _c('div',{attrs:{"id":"app"}},[(message + 1 > 1)?_c('div',[_v(_s(message + 1))]):_e(),_v(" "),_c('button',{on:{"click":function($event){message += 1}}},[_v("阿道夫")])])}
})
然后结果交给 vm._update
Vue.prototype._update = function(vnode, hydrating) {
  var vm = this;
  var prevEl = vm.$el;
  var prevVnode = vm._vnode;
  // ...
  vm._vnode = vnode;

  // ...
  vm.$el = vm.__patch__(prevVnode, vnode);


  // ...
};
结论是 mount 阶段 初始化 Watcher,然后在 wathcer初始化后调用 get,get里 pushTarget(this),并且执行自身的getter也就是表达式,表达式的内容就是 vm._update(vm._render(), hydrating) 故而就开始执行 render函数,render 函数就是就是输出虚拟节点的。


