SpringMVC
概述
SpringMVC是基于MVC模式开发的框架,用来优化Controller,具备IoC和AOP
[[Spring#分层解耦|MVC]]是一种开发模式,是模式-视图-控制器的简称,所有的web应用都是基于MVC开发的。
SpringMVC优化了Controller的action(Servlet),Spring框架用来整合SpringMVC和Mybatis
SpringMVC的优点:
- 轻量级,基于MVC
- 易于上手,容易理解,功能强大
- 具备IoC和AOP
- 完全基于注解开发
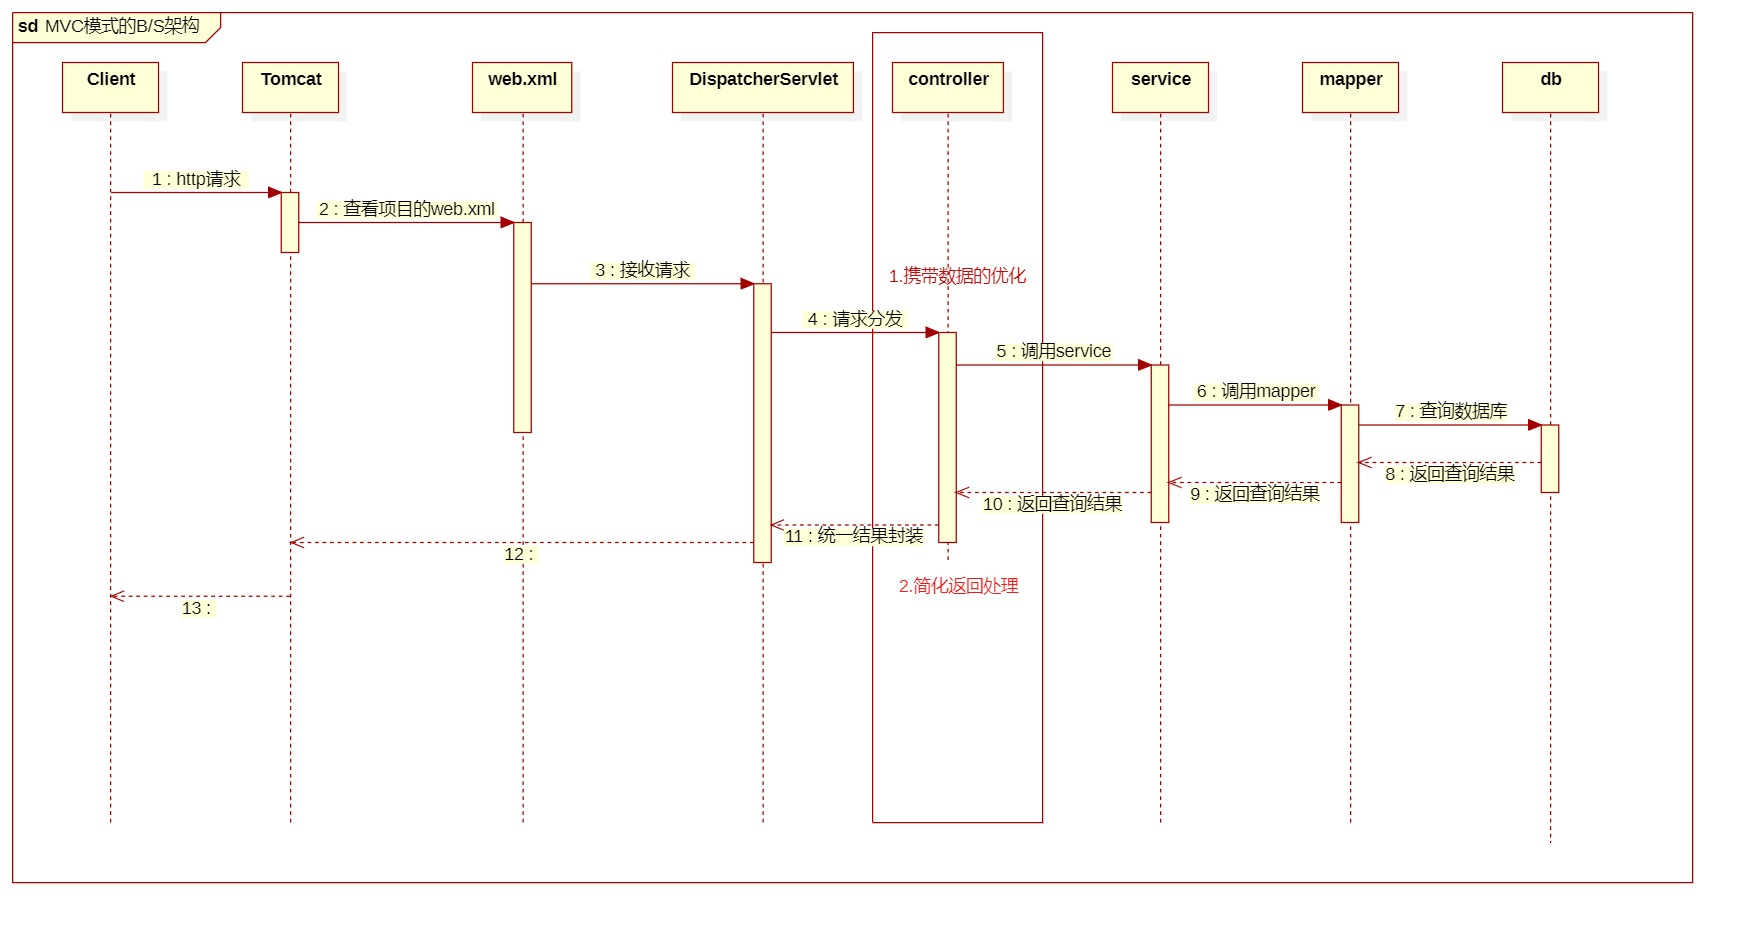
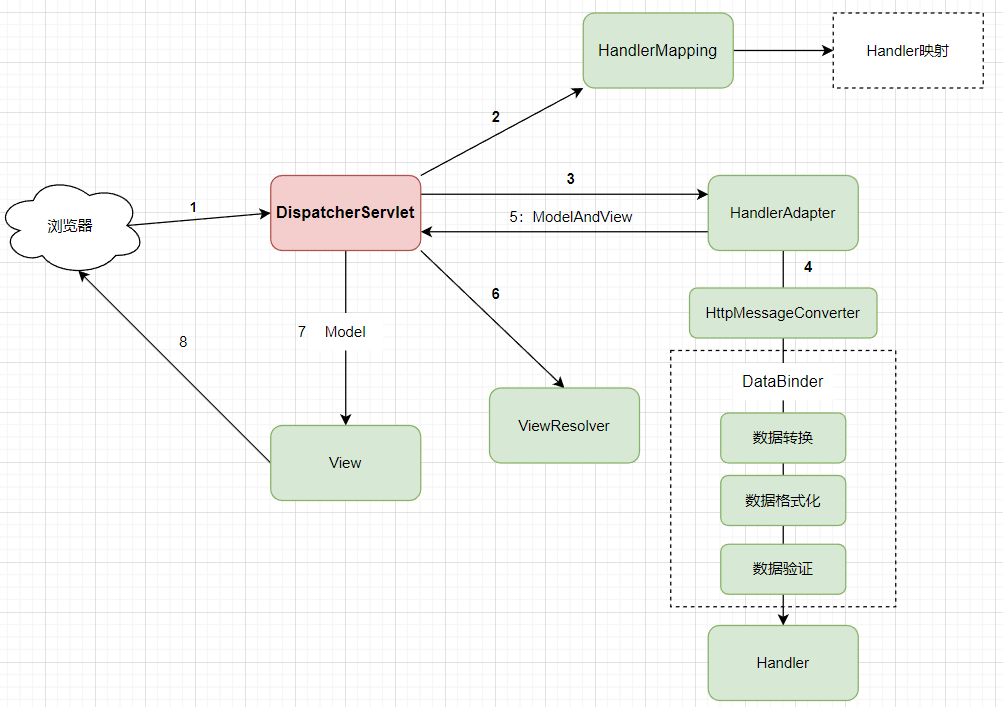
MVC的执行流程:
POM:
<dependencies>
    <dependency>
      <groupId>junit</groupId>
      <artifactId>junit</artifactId>
      <version>4.13.2</version>
      <scope>test</scope>
    </dependency>
    <dependency>
      <groupId>jakarta.servlet</groupId>
      <artifactId>jakarta.servlet-api</artifactId>
      <version>6.0.0</version>
    </dependency>
    <dependency>
      <groupId>org.springframework</groupId>
      <artifactId>spring-webmvc</artifactId>
      <version>6.0.8</version>
    </dependency>
  </dependencies>

  <build>
    <resources>
      <resource>
        <directory>src/main/java</directory>
        <includes>
          <include>**/*.xml</include>
          <include>**/*.properties</include>
        </includes>
      </resource>
      <resource>
        <directory>src/main/resources</directory>
        <includes>
          <include>**/*.xml</include>
          <include>**/*.properties</include>
        </includes>
      </resource>
    </resources>
  </build>
添加SpringMVC.xml配置文件,指定ComponentScan,添加视图解析器ViewResolver
<!--springMVC.xml-->
    <!--添加包扫描-->
    <context:component-scan base-package="com.eun" />
    <!--添加内部资源视图解析器-->
    <bean class="org.springframework.web.servlet.view.InternalResourceViewResolver" >
        <!--配置前缀-->
        <property name="prefix" value="/admin/" />
        <!--配置后缀-->
        <property name="suffix" value=".jsp" />
    </bean>
如果要跳转到webapp/admin/main.jsp,只需要在方法中return一个main即可,视图解析器自动完成地址拼接。
在JavaWeb中,web请求的执行流程是:
index.jsp <-----------------> Servlet
index页面发出的请求经过Servlet的处理后返回,但是SpringMVC的Controller是一个普通的方法,肯定需要经过一个Servlet:
index.jsp <-------> DispatcherServlet <------> Controller
DispatcherServlet收到请求,转发到SpringMVC的Controller,处理完毕返回给DispatcherServlet,DispatcherServlet再返回给index.jsp,所以SpringMVC的web请求也是Servlet处理的
DispatcherServlet要在web.xml中注册,这个类是在源码中定义的,只能通过配置xml的方式进行注册(或者@Bean)
注册springMVC:
	<!--web.xml-->
    <!--注册springMVC的框架-->
    <servlet>
        <servlet-name>springmvc</servlet-name>
        <servlet-class>org.springframework.web.servlet.DispatcherServlet</servlet-class>
    </servlet>
    <servlet-mapping>
        <servlet-name>springmvc</servlet-name>
        <url-pattern>*.action</url-pattern>
    </servlet-mapping>
拦截所有以.action结尾的请求,交给调用处理器处理,还需要将springmvc.xml的配置文件告知核心处理器:
    <!--注册springMVC的框架-->
    <servlet>
        <servlet-name>springmvc</servlet-name>
        <servlet-class>org.springframework.web.servlet.DispatcherServlet</servlet-class>
        <!--配置文件告知核心处理器-->
        <init-param>
            <param-name>contextConfigLocation</param-name>
            <param-value>classpath:springmvc.xml</param-value>
        </init-param>
    </servlet>
    <servlet-mapping>
        <servlet-name>springmvc</servlet-name>
        <url-pattern>*.action</url-pattern>
    </servlet-mapping>
index.jsp:
<%@ page contentType="text/html;charset=UTF-8" language="java" %>
<html>
<head>
    <title>Title</title>
</head>
<body>
    <br>
    <a href="${pageContext.request.contextPath}/demo.action">访问服务器</a>
</body>
</html>
Controller:
@Controller //交给Spring创建对象
public class DemoAction {
    /**
     * action中所有的功能实现都是由方法来完成的
     * 方法规范:
     *      1. 访问权限是public (doGet、doPost方法的访问权限必须是public)
     *      2. 返回值任意(doGet、doPost方法的返回值是void)
     *      3. 方法名称任意
     *      4. 参数任意(不必为HttpServletRequest)
     *      5. 必须使用@RequestMappering注解声明访问路径
     */

    @RequestMapping("/demo.action")
    //跳转到 /admin/main.jsp , 返回值为String
    public String demo(){
        System.out.println("服务器被访问到");
        return "main"; //可以直接跳转到这个页面上
    }
}
@RequestMapping
用来映射服务器端访问的路径
- 可以加在方法上,为该方法注册一个访问路径
- 可以加在类上,本类方法均具有此可访问路径
@RequestMapping("/zar")
@Controller //交给Spring创建对象
public class DemoAction {

    @RequestMapping("/demo.action")
    public String demo(){
        return "main";
    }
}
@RequestMapping区分GET或POST请求:
<body>
    <h2>Hello World!</h2>
    <form action="${pageContext.request.contextPath}//req.action" method="post">
        <input type="submit" value="post提交">
    </form>
    <form action="${pageContext.request.contextPath}/req.action" method="get">
        <input type="submit" value="get提交">
    </form>
</body>
在method中指定请求方式:
    @RequestMapping(value = "/req.action",method = RequestMethod.POST)
    public String postRequest(){
        System.out.println("post has been received");
        return "main";
    }

    @RequestMapping(value = "/req.action",method = RequestMethod.GET)
    public String getRequest(){
        System.out.println("get has been received");
        return "main";
    }
SpringMVC的优化
中文乱码问题解决:乱码
GET请求
GET请求通常在路径中使用?和&进行传参,请求参数直接拼接在URL后方。
前端可能是直接拼接的URL字符串,也可能是form表单以默认GET方式提交。
Controller接收到请求后有三种处理方式:
- @RequestParam提取参数
- 单个散参数
    @RequestMapping("/one.action")
    public String one(@RequestParam("name") String name,
                      @RequestParam("age") int age){
        System.out.println("name = " + name);
        System.out.println("age = " + age);
        return "main";
    }
如果请求的参数名和URL中参数名相同,就可以省略@RequestParam
- 数组/List散参数
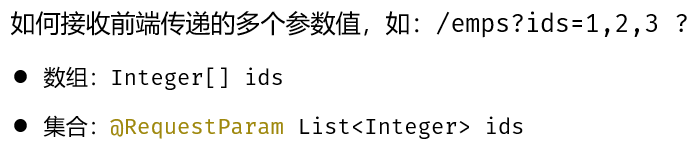
前端提交的数据格式:
url?id=1&id=2&id=3
接收方法:
public void test1(@RequestParam Integer[] id)
public void test2(@RequestParam List<Integer> id)
前端提交的数据格式:
url?ids=1,2,3
接收方法:
public void test3(@RequestParam Integer[] ids)
public void test4(@RequestParam List<Integer> ids)
- 对象封装参数
    @RequestMapping("/two.action")
    public String two(User user){
        System.out.println(user);
        return "main";
    }
请求参数名和实体类User的属性名相同,可以直接封装为对象
- 注入HttpServletRequest手动提取数据
POST请求
请求参数在请求体中提交
content-type:application/x-www-form-urlencoded
将请求参数以?和&拼接在请求体中
有三种处理方式:
- @RequestParam提取参数
- 对象封装参数
- 注入HttpServletRequest手动提取数据
@RequestParam的require属性默认为true,被注解的属性必须传入该值,或者使用defaultValue传入默认值
content-type:application/json
请求参数以JSON对象形式拼接在请求体中
有三种处理方式:
- @RequestBody封装为Map
@PostMapping("/test")
public String testRequestBody(@RequestBody User user){
   return user.getName()+user.getPassword();
}
- @RequestBody封装为实体类
@PostMapping("/test")
public String testRequestBody(@RequestBody Map<String,String>map) throws IOException {
    String username=map.get("username");
    String password=map.get("password");
    return username+password;
}
要求实体类属性名和JSON的key相同。
- 注入HttpServletRequest,使用SpringMVC的默认JSON数据解析器Jackson
	@PostMapping("/test")
	public String testRequestBody(HttpServletRequest request) throws IOException {
	    ObjectMapper objectMapper = new ObjectMapper();
	    User user = objectMapper.readValue(request.getInputStream(), User.class);
	    return user.getName()+user.getPassword();
	}
RESTful提交
获取请求参数的优化
散提交数据
    <h2>1.单个数据提交</h2>
        <form action="${pageContext.request.contextPath}/one.action" >
            姓名:<input type="text" name="name" > <br>
            年龄:<input type="text" name="age" > <br>
            <input type="submit" value="提交">
        </form>
默认以GET方式提交,数据拼接在URL之后
使用@RequestParam接收请求参数:
    @RequestMapping("/one.action")
    public String one(@RequestParam("name") String name,
                      @RequestParam("age") int age){
        System.out.println("name = " + name);
        System.out.println("age = " + age);
        return "main";
    }
如果请求的参数名和URL中参数名相同,就可以省略@RequestParam
对象封装数据
- GET请求
    <h2>2.对象封装提交</h2>
        <form action="${pageContext.request.contextPath}/two.action" >
            姓名:<input type="text" name="userName" > <br>
            年龄:<input type="text" name="userAge" > <br>
            <input type="submit" value="提交">
        </form>
    @RequestMapping("/two.action")
    public String two(User user){
        System.out.println(user);
        return "main";
    }
请求参数名和实体类User的属性名相同,可以直接封装为对象
-
POST请求、表单格式提交:与上例相同
-
POST请求、JSON格式提交:@RequestBody
POST方式提交,content-type : application/json
必须使用@RequestBody才能封装为实体类对象:
    @PostMapping("/two.action")
    public String two(@RequestBody User user){
        System.out.println(user);
        return "main";
    }
中文乱码问题解决:乱码
RESTful提交数据
GET /depts/1
@GetMapping("/depts/{id}")
public Dept getDeptById(@PathVariable("id") Integer id){

}
如果形参的名称和@GetMapping的占位符名称相同,可以省略("id")
手动提取数据
接收HttpServletRequest
响应数据的优化
带有@ResponseBody/@RestController
@RestController = @ResponseBody + @Controller
所有数据均以JSON格式返回。
不带@ResponseBody/@RestController
action方法的返回值是任意的,如果所有请求都不是ajax请求就不需要添加视图解析器
-
String:客户端资源的地址,自动拼接前缀和后缀;可以屏蔽自动拼接(跳转到其他目录下);可以指定返回的路径
-
Object:返回json格式的对象,自动将对象或集合转为json(使用jackson工具,需要添加依赖),一般用于Ajax请求
-
void:无返回值,一般用于Ajax请求
-
基本数据类型:一般用于Ajax请求
-
ModelAndView:返回数据和视图对象,很少使用
添加jackson工具
在springmvc.xml文件中添加注解驱动<mvc:annotationdriven />,解析@ResponseBody注解
    <!--包扫描-->
    <context:component-scan base-package="com.eun" />
    <!--注解驱动,处理Ajax请求-->
    <mvc:annotation-driven />
    @RequestMapping("/list.action")
    @ResponseBody //解析Ajax请求
    public List<Student> listStudent(){
        ArrayList<Student> students = new ArrayList<>();
        students.add(new Student("zhangsan",12));
        students.add(new Student("lisi",12));
        students.add(new Student("wangwu",12));
        return students; //springMVC将集合转为JSON数组
    }
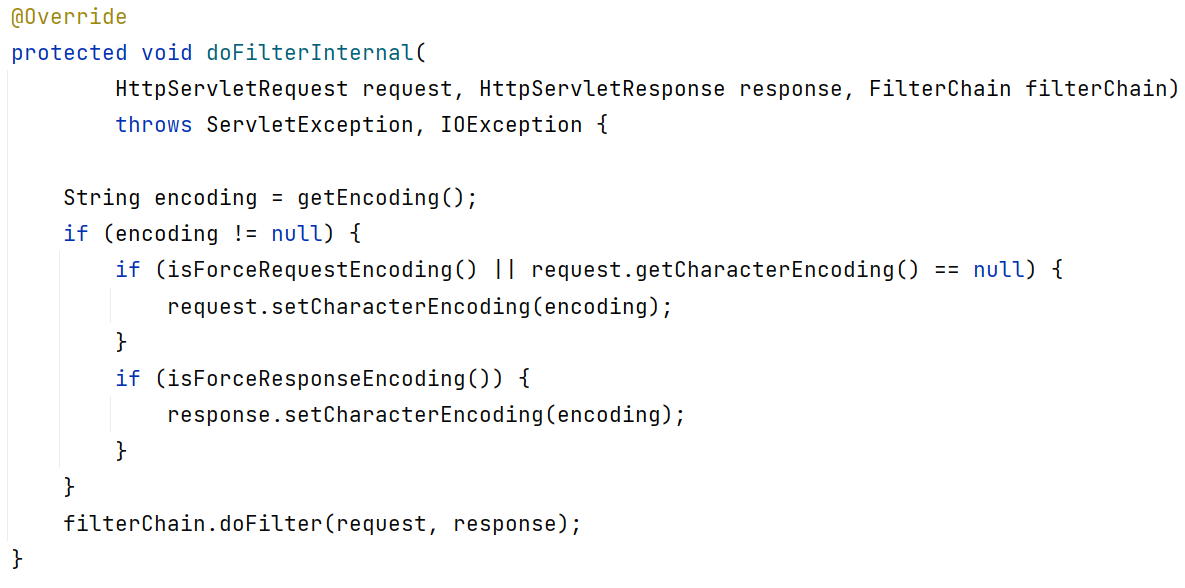
中文乱码解决
配置过滤器org.springframework.web.filter.CharacterEncodingFilter

    <filter>
        <filter-name>encode</filter-name>
        <filter-class>org.springframework.web.filter.CharacterEncodingFilter</filter-class>
        <init-param>
            <param-name>encoding</param-name>
            <param-value>UTF-8</param-value>
        </init-param>
        <init-param>
            <param-name>forceRequestEncoding</param-name>
            <param-value>true</param-value>
        </init-param>
        <init-param>
            <param-name>forceResponseEncoding</param-name>
            <param-value>true</param-value>
        </init-param>
    </filter>
    <filter-mapping>
        <filter-name>encode</filter-name>
        <url-pattern>/*</url-pattern>
    </filter-mapping>
四种跳转方式
- 请求转发:基于服务器端的跳转,地址栏不会变化,但是会有刷新多次提交的问题
index.jsp ----> action ----> main.jsp
- [[HTTP#响应协议|重定向]]:基于客户端的跳转
index.jsp <----> action
index.jsp ----> main.jsp
<body>
    <a href="${pageContext.request.contextPath}/one.action">1.请求转发页面(默认)</a> <br>
    <a href="${pageContext.request.contextPath}/two.action">2.请求转发action</a> <br>
    <a href="${pageContext.request.contextPath}/three.action">3.重定向页面</a> <br>
    <a href="${pageContext.request.contextPath}/four.action">4.重定向action</a> <br>
</body>
之前我们默认就是请求转发到页面
请求转发页面
    @RequestMapping("/one.action")
    public String one(){
        System.out.println("默认使用请求转发页面");
        return "main"; // 默认使用视图解析器拼接前后缀进行页面跳转
    }
请求转发action
    @RequestMapping("/two.action")
    public String two(){
        System.out.println("使用请求转发action跳转");
        return "/other.action";
    }
这样做是不行的,视图解析器会将其转变为:/admin//other.action/.jsp
视图解析器:

父类:
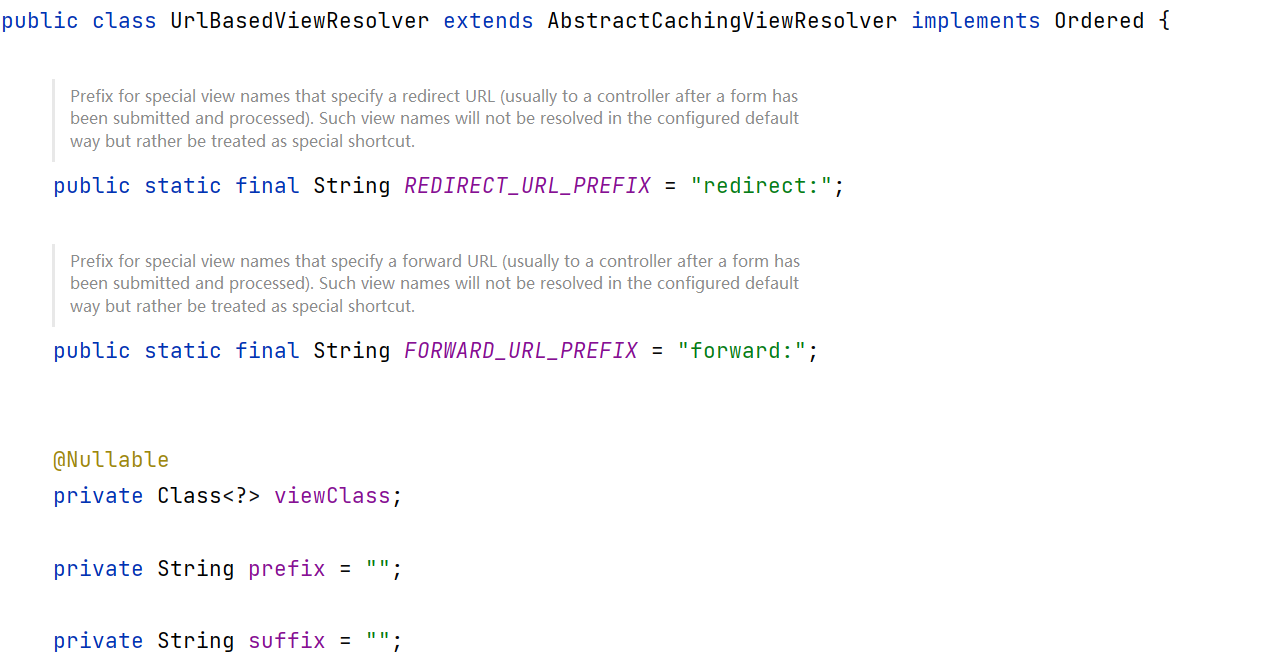
使用这两个关键字就会跳过前后缀的拼接:
    @RequestMapping("/two.action")
    public String two(){
        System.out.println("使用请求转发action跳转");
        return UrlBasedViewResolver.FORWARD_URL_PREFIX +  "/other.action";
        //"forward:/other.action" 会屏蔽前缀后缀的拼接
    }
重定向页面
    @RequestMapping("/three.action")
    public String three(){
        System.out.println("使用重定向跳转页面");
        return UrlBasedViewResolver.REDIRECT_URL_PREFIX + "/admin/main.jsp";
    }
重定向就需要补全资源路径,前后端分离的项目中,是否需要考虑跨域?
重定向action
    @RequestMapping("/four.action")
    public String four(){
        System.out.println("使用重定向action跳转页面");
        return UrlBasedViewResolver.REDIRECT_URL_PREFIX + "/other.action";
    }
springMVC的重定向自动添加项目名
总结:关键字可以忽略前后缀的拼接

 浙公网安备 33010602011771号