Ray Tracing In One Weekend
架构
2. Output an Image
- PPM文件格式

- 写PPM文件内容
#include <iostream>

int main() {

    // Image

    const int image_width = 256;
    const int image_height = 256;

    // Render

    std::cout << "P3\n" << image_width << ' ' << image_height << "\n255\n";

    for (int j = image_height - 1; j >= 0; --j) {
        std::cerr << "\rScanlines remaining: " << j << ' ' << std::flush;
        for (int i = 0; i < image_width; ++i) {
            auto r = double(i) / (image_width - 1);
            auto g = double(j) / (image_height - 1);
            auto b = 0.25;

            int ir = static_cast<int>(255.999 * r);
            int ig = static_cast<int>(255.999 * g);
            int ib = static_cast<int>(255.999 * b);

            std::cout << ir << ' ' << ig << ' ' << ib << '\n';
        }
    }

    std::cerr << "\nDone.\n";
}
- 生成.ppm文件
.\RayTracing.exe > image.ppm

3. The vec3 Class
- vec3.h定义了一个三维矢量,包括矢量的值和一系列数值操作,此外,将其重命名为point3与color。
#ifndef VEC3_H
#define VEC3_H

#include <cmath>
#include <iostream>

using std::sqrt;

class vec3 {
    public:
        vec3() : e{0,0,0} {}
        vec3(double e0, double e1, double e2) : e{e0, e1, e2} {}

        double x() const { return e[0]; }
        double y() const { return e[1]; }
        double z() const { return e[2]; }

        vec3 operator-() const { return vec3(-e[0], -e[1], -e[2]); }
        double operator[](int i) const { return e[i]; }
        double& operator[](int i) { return e[i]; }

        vec3& operator+=(const vec3 &v) {
            e[0] += v.e[0];
            e[1] += v.e[1];
            e[2] += v.e[2];
            return *this;
        }

        vec3& operator*=(const double t) {
            e[0] *= t;
            e[1] *= t;
            e[2] *= t;
            return *this;
        }

        vec3& operator/=(const double t) {
            return *this *= 1/t;
        }

        double length() const {
            return sqrt(length_squared());
        }

        double length_squared() const {
            return e[0]*e[0] + e[1]*e[1] + e[2]*e[2];
        }

    public:
        double e[3];
};

// Type aliases for vec3
using point3 = vec3;   // 3D point
using color = vec3;    // RGB color

#endif
- vec3 utility functions也被定义在头文件vec3.h中,包括一系列的运算。
// vec3 Utility Functions

inline std::ostream& operator<<(std::ostream &out, const vec3 &v) {
    return out << v.e[0] << ' ' << v.e[1] << ' ' << v.e[2];
}

inline vec3 operator+(const vec3 &u, const vec3 &v) {
    return vec3(u.e[0] + v.e[0], u.e[1] + v.e[1], u.e[2] + v.e[2]);
}

inline vec3 operator-(const vec3 &u, const vec3 &v) {
    return vec3(u.e[0] - v.e[0], u.e[1] - v.e[1], u.e[2] - v.e[2]);
}

inline vec3 operator*(const vec3 &u, const vec3 &v) {
    return vec3(u.e[0] * v.e[0], u.e[1] * v.e[1], u.e[2] * v.e[2]);
}

inline vec3 operator*(double t, const vec3 &v) {
    return vec3(t*v.e[0], t*v.e[1], t*v.e[2]);
}

inline vec3 operator*(const vec3 &v, double t) {
    return t * v;
}

inline vec3 operator/(vec3 v, double t) {
    return (1/t) * v;
}

inline double dot(const vec3 &u, const vec3 &v) {
    return u.e[0] * v.e[0]
         + u.e[1] * v.e[1]
         + u.e[2] * v.e[2];
}

inline vec3 cross(const vec3 &u, const vec3 &v) {
    return vec3(u.e[1] * v.e[2] - u.e[2] * v.e[1],
                u.e[2] * v.e[0] - u.e[0] * v.e[2],
                u.e[0] * v.e[1] - u.e[1] * v.e[0]);
}

inline vec3 unit_vector(vec3 v) {
    return v / v.length();
}
- Color Utility Functions被定义在color.h中,用于输出一个像素的RGB值
#ifndef COLOR_H
#define COLOR_H

#include "vec3.h"

#include <iostream>

void write_color(std::ostream &out, color pixel_color) {
    // Write the translated [0,255] value of each color component.
    out << static_cast<int>(255.999 * pixel_color.x()) << ' '
        << static_cast<int>(255.999 * pixel_color.y()) << ' '
        << static_cast<int>(255.999 * pixel_color.z()) << '\n';
}

#endif
- 使用头文件定义的类,改写cpp文件
#include "color.h"
#include "vec3.h"

#include <iostream>

int main() {

    // Image

    const int image_width = 256;
    const int image_height = 256;

    // Render

    std::cout << "P3\n" << image_width << ' ' << image_height << "\n255\n";

    for (int j = image_height-1; j >= 0; --j) {
        std::cerr << "\rScanlines remaining: " << j << ' ' << std::flush;
        for (int i = 0; i < image_width; ++i) {
            color pixel_color(double(i)/(image_width-1), double(j)/(image_height-1), 0.25);
            write_color(std::cout, pixel_color);
        }
    }

    std::cerr << "\nDone.\n";
}
4. Rays, a Simple Camera, and Background
- 将Ray类定义在ray.h文件中,主要内容是起点和方向俩个vec3类成员,以及查询t时刻的光线位置的成员函数
at。
#ifndef RAY_H
#define RAY_H

#include "vec3.h"

class ray {
    public:
        ray() {}
        ray(const point3& origin, const vec3& direction)
            : orig(origin), dir(direction)
        {}

        point3 origin() const  { return orig; }
        vec3 direction() const { return dir; }

        point3 at(double t) const {
            return orig + t*dir;
        }

    public:
        point3 orig;
        vec3 dir;
};

#endif
- 按照如下方式给出camera
- 下面是一个简单的着色尝试,按照camera上面像素的光线向量的单位矢量的y值作为蓝色与白色之间的插值进行着色。
#include "color.h"
#include "ray.h"
#include "vec3.h"

#include <iostream>

color ray_color(const ray& r) {
    vec3 unit_direction = unit_vector(r.direction());
    auto t = 0.5*(unit_direction.y() + 1.0);
    return (1.0-t)*color(1.0, 1.0, 1.0) + t*color(0.5, 0.7, 1.0);
}

int main() {

    // Image
    const auto aspect_ratio = 16.0 / 9.0;
    const int image_width = 400;
    const int image_height = static_cast<int>(image_width / aspect_ratio);

    // Camera

    auto viewport_height = 2.0;
    auto viewport_width = aspect_ratio * viewport_height;
    auto focal_length = 1.0;

    auto origin = point3(0, 0, 0);
    auto horizontal = vec3(viewport_width, 0, 0);
    auto vertical = vec3(0, viewport_height, 0);
    auto lower_left_corner = origin - horizontal/2 - vertical/2 - vec3(0, 0, focal_length);

    // Render

    std::cout << "P3\n" << image_width << " " << image_height << "\n255\n";

    for (int j = image_height-1; j >= 0; --j) {
        std::cerr << "\rScanlines remaining: " << j << ' ' << std::flush;
        for (int i = 0; i < image_width; ++i) {
            auto u = double(i) / (image_width-1);
            auto v = double(j) / (image_height-1);
            ray r(origin, lower_left_corner + u*horizontal + v*vertical - origin);
            color pixel_color = ray_color(r);
            write_color(std::cout, pixel_color);
        }
    }

    std::cerr << "\nDone.\n";
}
效果为:

5. Adding a Sphere
- 光线与球面的相交检测
对于一个球面,其implicit model为

可以表示成矢量形式

利用光线的传播形式计算交点:


得到一个二阶多项式方程:

因此,可以判断交点的个数,以及求解出交点位置。在本文中将只有一个焦点视作不相交。

- 定义一个相交检测函数
hit_sphere,并修改着色函数将相交处着色为红色。
bool hit_sphere(const point3& center, double radius, const ray& r) {
    vec3 oc = r.origin() - center;
    auto a = dot(r.direction(), r.direction());
    auto b = 2.0 * dot(oc, r.direction());
    auto c = dot(oc, oc) - radius*radius;
    auto discriminant = b*b - 4*a*c;
    return (discriminant > 0);
}

color ray_color(const ray& r) {
    if (hit_sphere(point3(0,0,-1), 0.5, r))
        return color(1, 0, 0);
    vec3 unit_direction = unit_vector(r.direction());
    auto t = 0.5*(unit_direction.y() + 1.0);
    return (1.0-t)*color(1.0, 1.0, 1.0) + t*color(0.5, 0.7, 1.0);
}

然而,这种检测将光线视作直线,所以需要进行合理性判断。
6. Surface Normals and Multiple Objects
- 在hit_sphere函数内部加入相交点的法线计算部分,进一步的利用法线坐标表示颜色来检测法线计算的效果
double hit_sphere(const point3& center, double radius, const ray& r) {
    vec3 oc = r.origin() - center;
    auto a = dot(r.direction(), r.direction());
    auto b = 2.0 * dot(oc, r.direction());
    auto c = dot(oc, oc) - radius*radius;
    auto discriminant = b*b - 4*a*c;
    if (discriminant < 0) {
        return -1.0;
    } else {
        return (-b - sqrt(discriminant) ) / (2.0*a);
    }
}

color ray_color(const ray& r) {
    auto t = hit_sphere(point3(0,0,-1), 0.5, r);
    if (t > 0.0) {
        vec3 N = unit_vector(r.at(t) - vec3(0,0,-1));
        return 0.5*color(N.x()+1, N.y()+1, N.z()+1);
    }
    vec3 unit_direction = unit_vector(r.direction());
    t = 0.5*(unit_direction.y() + 1.0);
    return (1.0-t)*color(1.0, 1.0, 1.0) + t*color(0.5, 0.7, 1.0);
}

- 对hit_sphere进行优化,使用half_b代替b则减少了数乘计算;同时使用vec3的成员函数进行内积运算,减少了对dot的使用,即减少了对中间vec3变量的需求。

double hit_sphere(const point3& center, double radius, const ray& r) {
    vec3 oc = r.origin() - center;
    auto a = r.direction().length_squared();
    auto half_b = dot(oc, r.direction());
    auto c = oc.length_squared() - radius*radius;
    auto discriminant = half_b*half_b - a*c;

    if (discriminant < 0) {
        return -1.0;
    } else {
        return (-half_b - sqrt(discriminant) ) / a;
    }
}
- 在hit.h头文件中定义了相交结果的结构体,此外定义了一个相交检测的抽象类,内部定义了相交检测的纯虚函数。该hit函数参数有光线,最大最小时间限定,与hit_record结构体,时间限定用于进一步判断相交是否有效,用于判断相交位置是否是最近位置,以减少法线计算的需求,hit_record则用于记录最近相交位置的信息。
#ifndef HITTABLE_H
#define HITTABLE_H

#include "ray.h"

struct hit_record {
    point3 p;
    vec3 normal;
    double t;
};

class hittable {
    public:
        virtual bool hit(const ray& r, double t_min, double t_max, hit_record& rec) const = 0;
};

#endif
- 此外在sphere.h头文件中定义了sphere类,记录了球体的基本数值信息,此外继承了hittable类,并重写了hit函数。
#ifndef SPHERE_H
#define SPHERE_H

#include "hittable.h"
#include "vec3.h"

class sphere : public hittable {
    public:
        sphere() {}
        sphere(point3 cen, double r) : center(cen), radius(r) {};

        virtual bool hit(
            const ray& r, double t_min, double t_max, hit_record& rec) const override;

    public:
        point3 center;
        double radius;
};

bool sphere::hit(const ray& r, double t_min, double t_max, hit_record& rec) const {
    vec3 oc = r.origin() - center;
    auto a = r.direction().length_squared();
    auto half_b = dot(oc, r.direction());
    auto c = oc.length_squared() - radius*radius;

    auto discriminant = half_b*half_b - a*c;
    if (discriminant < 0) return false;
    auto sqrtd = sqrt(discriminant);

    // Find the nearest root that lies in the acceptable range.
    auto root = (-half_b - sqrtd) / a;
    if (root < t_min || t_max < root) {
        root = (-half_b + sqrtd) / a;
        if (root < t_min || t_max < root)
            return false;
    }

    rec.t = root;
    rec.p = r.at(rec.t);
    rec.normal = (rec.p - center) / radius;

    return true;
}

#endif
- 为了检测光线是从内部还是外部相交,在hit_record中定义一个bool成员,此外定义一个内联成员函数用于判断内外关系,并更新法线和内外关系。相应的,修改sphere::hit。
struct hit_record {
    point3 p;
    vec3 normal;
    double t;
    bool front_face;

    inline void set_face_normal(const ray& r, const vec3& outward_normal) {
        front_face = dot(r.direction(), outward_normal) < 0;
        normal = front_face ? outward_normal :-outward_normal;
    }
};
bool sphere::hit(const ray& r, double t_min, double t_max, hit_record& rec) const {
    ...

    rec.t = root;
    rec.p = r.at(rec.t);
    vec3 outward_normal = (rec.p - center) / radius;
    rec.set_face_normal(r, outward_normal);

    return true;
}
- 在hittable_list.h头文件中维护一组物体列表的相交关系,定义了hittable_list类,其主要内容是一个shared_ptr
的vector,因为hittable是抽象类,所以这实际上是准备作为继承hittable类的其他类比如sphere等几何图形的shared_ptr,此外,hittable_list继承了hittable抽象类并重写了hit函数,在该函数中遍历vector中的shared_ptr并利用子类重写的hit函数判断列表中每一个指针对应的object的相交关系,同时维护最大时间tmax,来获得该列表内部的最近碰撞位置作为hittable_list的最近相交位置。
#ifndef HITTABLE_LIST_H
#define HITTABLE_LIST_H

#include "hittable.h"

#include <memory>
#include <vector>

using std::shared_ptr;
using std::make_shared;

class hittable_list : public hittable {
    public:
        hittable_list() {}
        hittable_list(shared_ptr<hittable> object) { add(object); }

        void clear() { objects.clear(); }
        void add(shared_ptr<hittable> object) { objects.push_back(object); }

        virtual bool hit(
            const ray& r, double t_min, double t_max, hit_record& rec) const override;

    public:
        std::vector<shared_ptr<hittable>> objects;
};

bool hittable_list::hit(const ray& r, double t_min, double t_max, hit_record& rec) const {
    hit_record temp_rec;
    bool hit_anything = false;
    auto closest_so_far = t_max;

    for (const auto& object : objects) {
        if (object->hit(r, t_min, closest_so_far, temp_rec)) {
            hit_anything = true;
            closest_so_far = temp_rec.t;
            rec = temp_rec;
        }
    }

    return hit_anything;
}

#endif
- 将公用常量、函数和头文件写到一个头文件中
#ifndef RTWEEKEND_H
#define RTWEEKEND_H

#include <cmath>
#include <limits>
#include <memory>


// Usings

using std::shared_ptr;
using std::make_shared;
using std::sqrt;

// Constants

const double infinity = std::numeric_limits<double>::infinity();
const double pi = 3.1415926535897932385;

// Utility Functions

inline double degrees_to_radians(double degrees) {
    return degrees * pi / 180.0;
}

// Common Headers

#include "ray.h"
#include "vec3.h"

#endif
- 主函数cpp文件更新为
#include "rtweekend.h"

#include "color.h"
#include "hittable_list.h"
#include "sphere.h"

#include <iostream>
color ray_color(const ray& r, const hittable& world) {
    hit_record rec;
    if (world.hit(r, 0, infinity, rec)) {
        return 0.5 * (rec.normal + color(1,1,1));
    }
    vec3 unit_direction = unit_vector(r.direction());
    auto t = 0.5*(unit_direction.y() + 1.0);
    return (1.0-t)*color(1.0, 1.0, 1.0) + t*color(0.5, 0.7, 1.0);
}

int main() {

    // Image

    const auto aspect_ratio = 16.0 / 9.0;
    const int image_width = 400;
    const int image_height = static_cast<int>(image_width / aspect_ratio);

    // World
    hittable_list world;
    world.add(make_shared<sphere>(point3(0,0,-1), 0.5));
    world.add(make_shared<sphere>(point3(0,-100.5,-1), 100));

    // Camera

    auto viewport_height = 2.0;
    auto viewport_width = aspect_ratio * viewport_height;
    auto focal_length = 1.0;

    auto origin = point3(0, 0, 0);
    auto horizontal = vec3(viewport_width, 0, 0);
    auto vertical = vec3(0, viewport_height, 0);
    auto lower_left_corner = origin - horizontal/2 - vertical/2 - vec3(0, 0, focal_length);

    // Render

    std::cout << "P3\n" << image_width << ' ' << image_height << "\n255\n";

    for (int j = image_height-1; j >= 0; --j) {
        std::cerr << "\rScanlines remaining: " << j << ' ' << std::flush;
        for (int i = 0; i < image_width; ++i) {
            auto u = double(i) / (image_width-1);
            auto v = double(j) / (image_height-1);
            ray r(origin, lower_left_corner + u*horizontal + v*vertical);
            color pixel_color = ray_color(r, world);
            write_color(std::cout, pixel_color);
        }
    }

    std::cerr << "\nDone.\n";
}

7. Antialiasing
- 生成随机数
#include <cstdlib>
...

inline double random_double() {
    // Returns a random real in [0,1).
    return rand() / (RAND_MAX + 1.0);
}

inline double random_double(double min, double max) {
    // Returns a random real in [min,max).
    return min + (max-min)*random_double();
}
- 在camera.h头文件中定义camera类,其主要内容是原点、左下角矢量、水平矢量、垂直矢量,并且定义了get_ray函数用于查询某个像素或者亚像素位置的光线。
#ifndef CAMERA_H
#define CAMERA_H

#include "rtweekend.h"

class camera {
    public:
        camera() {
            auto aspect_ratio = 16.0 / 9.0;
            auto viewport_height = 2.0;
            auto viewport_width = aspect_ratio * viewport_height;
            auto focal_length = 1.0;

            origin = point3(0, 0, 0);
            horizontal = vec3(viewport_width, 0.0, 0.0);
            vertical = vec3(0.0, viewport_height, 0.0);
            lower_left_corner = origin - horizontal/2 - vertical/2 - vec3(0, 0, focal_length);
        }

        ray get_ray(double u, double v) const {
            return ray(origin, lower_left_corner + u*horizontal + v*vertical - origin);
        }

    private:
        point3 origin;
        point3 lower_left_corner;
        vec3 horizontal;
        vec3 vertical;
};
#endif
- 为了反走样,在一个像素中采样多个值,具体实现方法是在确定像素的左上角,然后在两个方向上加上[0,1)的随机数,这个改变是发生在主函数之中,其实实现方法是累加在一个color上;此外,对于每个像素颜色的累加应该进行平均处理,这一部分是放在write_color内。
void write_color(std::ostream &out, color pixel_color, int samples_per_pixel) {
    auto r = pixel_color.x();
    auto g = pixel_color.y();
    auto b = pixel_color.z();

    // Divide the color by the number of samples.
    auto scale = 1.0 / samples_per_pixel;
    r *= scale;
    g *= scale;
    b *= scale;

    // Write the translated [0,255] value of each color component.
    out << static_cast<int>(256 * clamp(r, 0.0, 0.999)) << ' '
        << static_cast<int>(256 * clamp(g, 0.0, 0.999)) << ' '
        << static_cast<int>(256 * clamp(b, 0.0, 0.999)) << '\n';
}
#include "camera.h"

...

int main() {

    // Image

    const auto aspect_ratio = 16.0 / 9.0;
    const int image_width = 400;
    const int image_height = static_cast<int>(image_width / aspect_ratio);
    const int samples_per_pixel = 100;

    // World

    hittable_list world;
    world.add(make_shared<sphere>(point3(0,0,-1), 0.5));
    world.add(make_shared<sphere>(point3(0,-100.5,-1), 100));

    // Camera
    camera cam;

    // Render

    std::cout << "P3\n" << image_width << " " << image_height << "\n255\n";

    for (int j = image_height-1; j >= 0; --j) {
        std::cerr << "\rScanlines remaining: " << j << ' ' << std::flush;
        for (int i = 0; i < image_width; ++i) {
            color pixel_color(0, 0, 0);
            for (int s = 0; s < samples_per_pixel; ++s) {
                auto u = (i + random_double()) / (image_width-1);
                auto v = (j + random_double()) / (image_height-1);
                ray r = cam.get_ray(u, v);
                pixel_color += ray_color(r, world);
            }
            write_color(std::cout, pixel_color, samples_per_pixel);
        }
    }

    std::cerr << "\nDone.\n";
}
可见,效果好多了。

8. Diffuse Materials
- 生成单位圆内部的随机矢量:首先在vec3.h头文件内vec3类中定义生成随机矢量的静态成员函数,然后在头文件中定义生成单位圆内部的随机矢量,具体方法是在三个维度上生成[-1,1]范围内的随机数,然后检测长度,如果超出则重新生成。
class vec3 {
  public:
    ...
    inline static vec3 random() {
        return vec3(random_double(), random_double(), random_double());
    }

    inline static vec3 random(double min, double max) {
        return vec3(random_double(min,max), random_double(min,max), random_double(min,max));
    }
vec3 random_in_unit_sphere() {
    while (true) {
        auto p = vec3::random(-1,1);
        if (p.length_squared() >= 1) continue;
        return p;
    }
}
- 如果光线打到一个diffuse model上, 从相交位置向外法线方向的单位球内发射出一条随机光线,模拟diffuse材质,在下面给出的着色方案是入射光线在camera上生成的颜色是随机光线的半值,这是一个迭代过程。这个方案就是路径追踪,在此处光源对应着是没有与任何物体相交,然后通过出射方向单位矢量的y值确定RGB。
color ray_color(const ray& r, const hittable& world) {
    hit_record rec;

    if (world.hit(r, 0, infinity, rec)) {
        point3 target = rec.p + rec.normal + random_in_unit_sphere();
        return 0.5 * ray_color(ray(rec.p, target - rec.p), world);
    }

    vec3 unit_direction = unit_vector(r.direction());
    auto t = 0.5*(unit_direction.y() + 1.0);
    return (1.0-t)*color(1.0, 1.0, 1.0) + t*color(0.5, 0.7, 1.0);
}
- 进一步的,为了避免深度迭代,给定迭代次数depth限制,此时给出当超过迭代次数时,返回颜色为黑色,没有接收到光源。
color ray_color(const ray& r, const hittable& world, int depth) {
    hit_record rec;

    // If we've exceeded the ray bounce limit, no more light is gathered.
    if (depth <= 0)
        return color(0,0,0);

    if (world.hit(r, 0, infinity, rec)) {
        point3 target = rec.p + rec.normal + random_in_unit_sphere();
        return 0.5 * ray_color(ray(rec.p, target - rec.p), world, depth-1);
    }

    vec3 unit_direction = unit_vector(r.direction());
    auto t = 0.5*(unit_direction.y() + 1.0);
    return (1.0-t)*color(1.0, 1.0, 1.0) + t*color(0.5, 0.7, 1.0);
}

...

int main() {

    // Image

    const auto aspect_ratio = 16.0 / 9.0;
    const int image_width = 400;
    const int image_height = static_cast<int>(image_width / aspect_ratio);
    const int samples_per_pixel = 100;
    const int max_depth = 50;
    ...

    // Render

    std::cout << "P3\n" << image_width << " " << image_height << "\n255\n";

    for (int j = image_height-1; j >= 0; --j) {
        std::cerr << "\rScanlines remaining: " << j << ' ' << std::flush;
        for (int i = 0; i < image_width; ++i) {
            color pixel_color(0, 0, 0);
            for (int s = 0; s < samples_per_pixel; ++s) {
                auto u = (i + random_double()) / (image_width-1);
                auto v = (j + random_double()) / (image_height-1);
                ray r = cam.get_ray(u, v);
                pixel_color += ray_color(r, world, max_depth);
            }
            write_color(std::cout, pixel_color, samples_per_pixel);
        }
    }

    std::cerr << "\nDone.\n";
}

- gamma矫正:观察到颜色比较暗,是因为显示器经过了反向gamma,颜色普遍变黑。
void write_color(std::ostream &out, color pixel_color, int samples_per_pixel) {
    auto r = pixel_color.x();
    auto g = pixel_color.y();
    auto b = pixel_color.z();

    // Divide the color by the number of samples and gamma-correct for gamma=2.0.
    auto scale = 1.0 / samples_per_pixel;
    r = sqrt(scale * r);
    g = sqrt(scale * g);
    b = sqrt(scale * b);

    // Write the translated [0,255] value of each color component.
    out << static_cast<int>(256 * clamp(r, 0.0, 0.999)) << ' '
        << static_cast<int>(256 * clamp(g, 0.0, 0.999)) << ' '
        << static_cast<int>(256 * clamp(b, 0.0, 0.999)) << '\n';
}
效果为:

- Shadow Acne:此外,光线可能在极其接近相机的位置相交,所以留出一定的冗余
if (world.hit(r, 0.001, infinity, rec)) { - True Lambertian Reflection:上面的反射光线方向是在球体内部均匀,而True Lambertian Reflection是在球面上均匀,差异在于后者则相对均匀,而前者的反射光会有更多的可能向着法线方向弹射,导致阴影处的光线逃出的可能性更小,并且朝着camera这个方向散射的光更少(即camera这个方向与法线方向大致一致的可能性约束了成像亮度),并且。为此,改变光线散射的随机函数为球面单位矢量。
vec3 random_unit_vector() {
    return unit_vector(random_in_unit_sphere());
}
color ray_color(const ray& r, const hittable& world, int depth) {
    hit_record rec;

    // If we've exceeded the ray bounce limit, no more light is gathered.
    if (depth <= 0)
        return color(0,0,0);

    if (world.hit(r, 0.001, infinity, rec)) {
        point3 target = rec.p + rec.normal + random_unit_vector();
        return 0.5 * ray_color(ray(rec.p, target - rec.p), world, depth-1);
    }

    vec3 unit_direction = unit_vector(r.direction());
    auto t = 0.5*(unit_direction.y() + 1.0);
    return (1.0-t)*color(1.0, 1.0, 1.0) + t*color(0.5, 0.7, 1.0);
}
明显可见,更加亮了。

- hemispherical scattering 半球散射:不给散射位置施加法向偏移,而是在着色位置为圆心进行半球散射,半球面各方向散射概率一样。
vec3 random_in_hemisphere(const vec3& normal) {
    vec3 in_unit_sphere = random_in_unit_sphere();
    if (dot(in_unit_sphere, normal) > 0.0) // In the same hemisphere as the normal
        return in_unit_sphere;
    else
        return -in_unit_sphere;
}
color ray_color(const ray& r, const hittable& world, int depth) {
    hit_record rec;

    // If we've exceeded the ray bounce limit, no more light is gathered.
    if (depth <= 0)
        return color(0,0,0);

    if (world.hit(r, 0.001, infinity, rec)) {
        point3 target = rec.p + random_in_hemisphere(rec.normal);
        return 0.5 * ray_color(ray(rec.p, target - rec.p), world, depth-1);
    }

    vec3 unit_direction = unit_vector(r.direction());
    auto t = 0.5*(unit_direction.y() + 1.0);
    return (1.0-t)*color(1.0, 1.0, 1.0) + t*color(0.5, 0.7, 1.0);
}

9. Metal
- 在定义材质类时可以定义其参数,也可以定义其行为,这里选择了后者。在material.h头文件中定义了material类,这是一个抽象类,内部定义了纯虚函数scatter。这是为了通过继承他来实现其他材质的行为。纯虚函数的参数是入射光线、相交检测结果、衰减系数和反射光线,其中,衰减系数attenuation通过具体材质得到,反射光线scattered通过碰撞检测(漫散射类型)或者入射光线(镜面反射类型)来确定。因此,此处定义的材质行为scatter实则是确定反射光线与衰减率这两个与材质有关的因素。
#ifndef MATERIAL_H
#define MATERIAL_H

#include "rtweekend.h"

struct hit_record;

class material {
    public:
        virtual bool scatter(
            const ray& r_in, const hit_record& rec, color& attenuation, ray& scattered
        ) const = 0;
};

#endif
- 具体材质的定义是通过继承material类实现的,对某种材质的对象创建是通过shared_ptr与make_shared实现的,在这之后材质是绑定在物体上的,发生相交之后物体的材质会被记录在相交结果hit_record内部,最后发生相交之后使用hit_record内部记录的材质行为得出反射光线与衰减率,以供着色。因此,在hit_record中加入shared_ptr
mat_ptr成员。并在sphere类中加入shared_ptr成员,且在hit重写中加入shared_ptr的转移。
#include "rtweekend.h"

class material;

struct hit_record {
    point3 p;
    vec3 normal;
    shared_ptr<material> mat_ptr;
    double t;
    bool front_face;

    inline void set_face_normal(const ray& r, const vec3& outward_normal) {
        front_face = dot(r.direction(), outward_normal) < 0;
        normal = front_face ? outward_normal :-outward_normal;
    }
};
class sphere : public hittable {
    public:
        sphere() {}
        sphere(point3 cen, double r, shared_ptr<material> m)
            : center(cen), radius(r), mat_ptr(m) {};

        virtual bool hit(
            const ray& r, double t_min, double t_max, hit_record& rec) const override;

    public:
        point3 center;
        double radius;
        shared_ptr<material> mat_ptr;
};

bool sphere::hit(const ray& r, double t_min, double t_max, hit_record& rec) const {
    ...

    rec.t = root;
    rec.p = r.at(rec.t);
    vec3 outward_normal = (rec.p - center) / radius;
    rec.set_face_normal(r, outward_normal);
    rec.mat_ptr = mat_ptr;

    return true;
}
- 散射材质:继承material类,主要内容是衰减率,此外重写了scatter,将原先ray_color中的反射部分挪到此处,返回反射光线与衰减率。
class lambertian : public material {
    public:
        lambertian(const color& a) : albedo(a) {}

        virtual bool scatter(
            const ray& r_in, const hit_record& rec, color& attenuation, ray& scattered
        ) const override {
            auto scatter_direction = rec.normal + random_unit_vector();

            // Catch degenerate scatter direction
            if (scatter_direction.near_zero())
                scatter_direction = rec.normal;

            scattered = ray(rec.p, scatter_direction);
            attenuation = albedo;
            return true;
        }

    public:
        color albedo;
};
- metal材质:首先定义镜面反射函数,然后定义了metal材质。

vec3 reflect(const vec3& v, const vec3& n) {
    return v - 2*dot(v,n)*n;
}
class metal : public material {
    public:
        metal(const color& a) : albedo(a) {}

        virtual bool scatter(
            const ray& r_in, const hit_record& rec, color& attenuation, ray& scattered
        ) const override {
            vec3 reflected = reflect(unit_vector(r_in.direction()), rec.normal);
            scattered = ray(rec.p, reflected);
            attenuation = albedo;
            return (dot(scattered.direction(), rec.normal) > 0);
        }

    public:
        color albedo;
};
- 修改ray_color
color ray_color(const ray& r, const hittable& world, int depth) {
    hit_record rec;

    // If we've exceeded the ray bounce limit, no more light is gathered.
    if (depth <= 0)
        return color(0,0,0);

    if (world.hit(r, 0.001, infinity, rec)) {
        ray scattered;
        color attenuation;
        if (rec.mat_ptr->scatter(r, rec, attenuation, scattered))
            return attenuation * ray_color(scattered, world, depth-1);
        return color(0,0,0);
    }

    vec3 unit_direction = unit_vector(r.direction());
    auto t = 0.5*(unit_direction.y() + 1.0);
    return (1.0-t)*color(1.0, 1.0, 1.0) + t*color(0.5, 0.7, 1.0);
}
- 修改main
...

#include "material.h"

...

int main() {

    // Image

    const auto aspect_ratio = 16.0 / 9.0;
    const int image_width = 400;
    const int image_height = static_cast<int>(image_width / aspect_ratio);
    const int samples_per_pixel = 100;
    const int max_depth = 50;

    // World

    hittable_list world;

    auto material_ground = make_shared<lambertian>(color(0.8, 0.8, 0.0));
    auto material_center = make_shared<lambertian>(color(0.7, 0.3, 0.3));
    auto material_left   = make_shared<metal>(color(0.8, 0.8, 0.8));
    auto material_right  = make_shared<metal>(color(0.8, 0.6, 0.2));

    world.add(make_shared<sphere>(point3( 0.0, -100.5, -1.0), 100.0, material_ground));
    world.add(make_shared<sphere>(point3( 0.0,    0.0, -1.0),   0.5, material_center));
    world.add(make_shared<sphere>(point3(-1.0,    0.0, -1.0),   0.5, material_left));
    world.add(make_shared<sphere>(point3( 1.0,    0.0, -1.0),   0.5, material_right));

    // Camera

    camera cam;

    // Render

    std::cout << "P3\n" << image_width << " " << image_height << "\n255\n";

    for (int j = image_height-1; j >= 0; --j) {
        std::cerr << "\rScanlines remaining: " << j << ' ' << std::flush;
        for (int i = 0; i < image_width; ++i) {
            color pixel_color(0, 0, 0);
            for (int s = 0; s < samples_per_pixel; ++s) {
                auto u = (i + random_double()) / (image_width-1);
                auto v = (j + random_double()) / (image_height-1);
                ray r = cam.get_ray(u, v);
                pixel_color += ray_color(r, world, max_depth);
            }
            write_color(std::cout, pixel_color, samples_per_pixel);
        }
    }

    std::cerr << "\nDone.\n";
}
效果如下:

- 在镜面反射中加入Fuzzy Reflection

class metal : public material {
    public:
        metal(const color& a, double f) : albedo(a), fuzz(f < 1 ? f : 1) {}

        virtual bool scatter(
            const ray& r_in, const hit_record& rec, color& attenuation, ray& scattered
        ) const override {
            vec3 reflected = reflect(unit_vector(r_in.direction()), rec.normal);
            scattered = ray(rec.p, reflected + fuzz*random_in_unit_sphere());
            attenuation = albedo;
            return (dot(scattered.direction(), rec.normal) > 0);
        }

    public:
        color albedo;
        double fuzz;
};
int main() {
    ...
    // World

    auto material_ground = make_shared<lambertian>(color(0.8, 0.8, 0.0));
    auto material_center = make_shared<lambertian>(color(0.7, 0.3, 0.3));
    auto material_left   = make_shared<metal>(color(0.8, 0.8, 0.8), 0.3);
    auto material_right  = make_shared<metal>(color(0.8, 0.6, 0.2), 1.0);
    ...
}
效果如下:

10. Dielectrics
- Snell Law


转换成分量为:

考虑到cos值:

由此,在vec3.h头文件中定义折射函数:
vec3 refract(const vec3& uv, const vec3& n, double etai_over_etat) {
    auto cos_theta = fmin(dot(-uv, n), 1.0);
    vec3 r_out_perp =  etai_over_etat * (uv + cos_theta*n);
    vec3 r_out_parallel = -sqrt(fabs(1.0 - r_out_perp.length_squared())) * n;
    return r_out_perp + r_out_parallel;
}
- 在material.h头文件中定义dielectric类:
class dielectric : public material {
    public:
        dielectric(double index_of_refraction) : ir(index_of_refraction) {}

        virtual bool scatter(
            const ray& r_in, const hit_record& rec, color& attenuation, ray& scattered
        ) const override {
            attenuation = color(1.0, 1.0, 1.0);
            double refraction_ratio = rec.front_face ? (1.0/ir) : ir;

            vec3 unit_direction = unit_vector(r_in.direction());
            vec3 refracted = refract(unit_direction, rec.normal, refraction_ratio);

            scattered = ray(rec.p, refracted);
            return true;
        }

    public:
        double ir; // Index of Refraction
};
- 改变两个球的材质,效果如下:
auto material_center = make_shared<dielectric>(1.5);
auto material_left   = make_shared<dielectric>(1.5);

- 考虑到snell law,可能存在无法折射的情况,这个可以通过snell law的折射角正弦的值是否合规来判断。

class dielectric : public material {
    public:
        dielectric(double index_of_refraction) : ir(index_of_refraction) {}

        virtual bool scatter(
            const ray& r_in, const hit_record& rec, color& attenuation, ray& scattered
        ) const override {
            attenuation = color(1.0, 1.0, 1.0);
            double refraction_ratio = rec.front_face ? (1.0/ir) : ir;

            vec3 unit_direction = unit_vector(r_in.direction());
            double cos_theta = fmin(dot(-unit_direction, rec.normal), 1.0);
            double sin_theta = sqrt(1.0 - cos_theta*cos_theta);

            bool cannot_refract = refraction_ratio * sin_theta > 1.0;
            vec3 direction;

            if (cannot_refract)
                direction = reflect(unit_direction, rec.normal);
            else
                direction = refract(unit_direction, rec.normal, refraction_ratio);

            scattered = ray(rec.p, direction);
            return true;
        }

    public:
        double ir; // Index of Refraction
};
修改材质,效果如下。可见,没有明显变化,这是因为对于球形而言,其对称结构使得它一定会发生折射。
auto material_ground = make_shared<lambertian>(color(0.8, 0.8, 0.0));
auto material_center = make_shared<lambertian>(color(0.1, 0.2, 0.5));
auto material_left   = make_shared<dielectric>(1.5);
auto material_right  = make_shared<metal>(color(0.8, 0.6, 0.2), 0.0);

- 此外,即便能够发生折射,也不会是完全折射,存在一个菲涅尔项;此处计算出菲涅尔项,并于随机数做阈值来对比,这样在能够发生折射的情况下,随即判断是折射还是反射;可见,菲涅尔项越大,反射比重越多,对应的是反射概率越大。
class dielectric : public material {
    public:
        dielectric(double index_of_refraction) : ir(index_of_refraction) {}

        virtual bool scatter(
            const ray& r_in, const hit_record& rec, color& attenuation, ray& scattered
        ) const override {
            attenuation = color(1.0, 1.0, 1.0);
            double refraction_ratio = rec.front_face ? (1.0/ir) : ir;

            vec3 unit_direction = unit_vector(r_in.direction());
            double cos_theta = fmin(dot(-unit_direction, rec.normal), 1.0);
            double sin_theta = sqrt(1.0 - cos_theta*cos_theta);

            bool cannot_refract = refraction_ratio * sin_theta > 1.0;
            vec3 direction;
            if (cannot_refract || reflectance(cos_theta, refraction_ratio) > random_double())
                direction = reflect(unit_direction, rec.normal);
            else
                direction = refract(unit_direction, rec.normal, refraction_ratio);

            scattered = ray(rec.p, direction);
            return true;
        }

    public:
        double ir; // Index of Refraction

    private:
        static double reflectance(double cosine, double ref_idx) {
            // Use Schlick's approximation for reflectance.
            auto r0 = (1-ref_idx) / (1+ref_idx);
            r0 = r0*r0;
            return r0 + (1-r0)*pow((1 - cosine),5);
        }
};
效果如下:

- 当使用负值半径时,球的形状不变(相交性检测中使用\(r^2\)),但是内外法线方向会相反(法线归一化使用\(1/r\)),因此在hit_record中使用入射光线与法线方向来判断内外时,判断结果会相反,然而由球的定义法线转换后的实机法线与真实法线一致,所以hit_record中的法线是正确的但是内外判断是相反的,因此在材质中赋予同样的折射率比值时,内外介质就会相反,形成在玻璃环境中的空气球,但将它嵌套在一个玻璃球中时,就会形成空心玻璃球。
world.add(make_shared<sphere>(point3(-1.0, 0.0, -1.0), -0.4, material_left));
效果如下:

11. Positionable Camera
- 视域fov:固定相机在z=-1位置,通过调整相机的高或者宽来调整视域,此处以高为准,且将视域以角度形式表示。

class camera {
    public:
        camera(
            double vfov, // vertical field-of-view in degrees
            double aspect_ratio
        ) {
            auto theta = degrees_to_radians(vfov);
            auto h = tan(theta/2);
            auto viewport_height = 2.0 * h;
            auto viewport_width = aspect_ratio * viewport_height;

            auto focal_length = 1.0;

            origin = point3(0, 0, 0);
            horizontal = vec3(viewport_width, 0.0, 0.0);
            vertical = vec3(0.0, viewport_height, 0.0);
            lower_left_corner = origin - horizontal/2 - vertical/2 - vec3(0, 0, focal_length);
        }

        ray get_ray(double u, double v) const {
            return ray(origin, lower_left_corner + u*horizontal + v*vertical - origin);
        }

    private:
        point3 origin;
        point3 lower_left_corner;
        vec3 horizontal;
        vec3 vertical;
};
int main() {
    ...
    // World

    auto R = cos(pi/4);
    hittable_list world;

    auto material_left  = make_shared<lambertian>(color(0,0,1));
    auto material_right = make_shared<lambertian>(color(1,0,0));

    world.add(make_shared<sphere>(point3(-R, 0, -1), R, material_left));
    world.add(make_shared<sphere>(point3( R, 0, -1), R, material_right));

    // Camera

    camera cam(90.0, aspect_ratio);

    // Render

    std::cout << "P3\n" << image_width << " " << image_height << "\n255\n";

    for (int j = image_height-1; j >= 0; --j) {
    ...
效果如下:

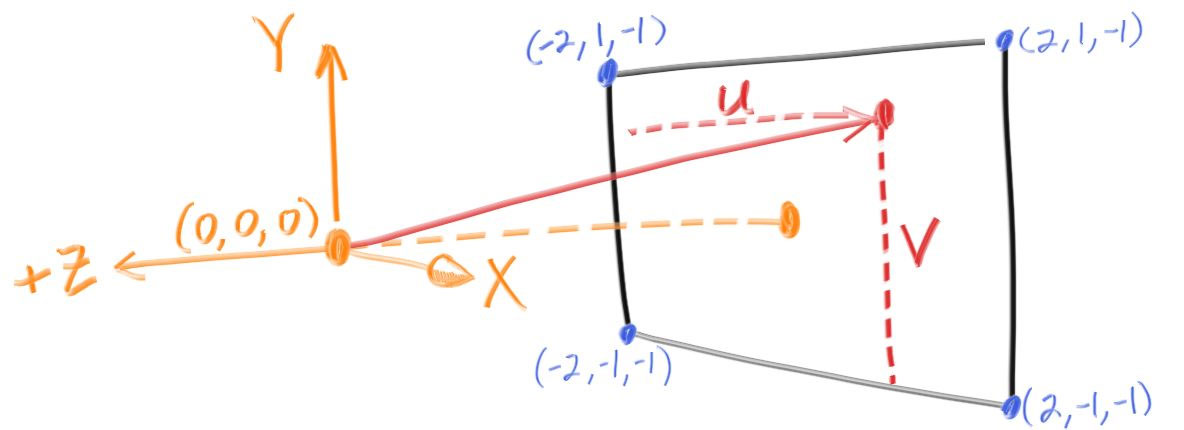
- 移动相机:相机由lookfrom、lookat两个位置和viewup一个矢量定义,如下。参照之前的相机定义,需要给定相机三个单位基矢量,uvw分别对应xyz。由图可知,w即(lookfrom-lookat),u可由w和viewup叉积得到,v可由w和u叉积得到。因此,对于camera类,在初始化时加入这三个参数,然后形成uvw,并基于此描述屏幕上的每一个位置,并基于此形成光线。

class camera {
    public:
        camera(
            point3 lookfrom,
            point3 lookat,
            vec3   vup,
            double vfov, // vertical field-of-view in degrees
            double aspect_ratio
        ) {
            auto theta = degrees_to_radians(vfov);
            auto h = tan(theta/2);
            auto viewport_height = 2.0 * h;
            auto viewport_width = aspect_ratio * viewport_height;

            auto w = unit_vector(lookfrom - lookat);
            auto u = unit_vector(cross(vup, w));
            auto v = cross(w, u);

            origin = lookfrom;
            horizontal = viewport_width * u;
            vertical = viewport_height * v;
            lower_left_corner = origin - horizontal/2 - vertical/2 - w;
        }

        ray get_ray(double s, double t) const {
            return ray(origin, lower_left_corner + s*horizontal + t*vertical - origin);
        }

    private:
        point3 origin;
        point3 lower_left_corner;
        vec3 horizontal;
        vec3 vertical;
};
hittable_list world;

auto material_ground = make_shared<lambertian>(color(0.8, 0.8, 0.0));
auto material_center = make_shared<lambertian>(color(0.1, 0.2, 0.5));
auto material_left   = make_shared<dielectric>(1.5);
auto material_right  = make_shared<metal>(color(0.8, 0.6, 0.2), 0.0);

world.add(make_shared<sphere>(point3( 0.0, -100.5, -1.0), 100.0, material_ground));
world.add(make_shared<sphere>(point3( 0.0,    0.0, -1.0),   0.5, material_center));
world.add(make_shared<sphere>(point3(-1.0,    0.0, -1.0),   0.5, material_left));
world.add(make_shared<sphere>(point3(-1.0,    0.0, -1.0), -0.45, material_left));
world.add(make_shared<sphere>(point3( 1.0,    0.0, -1.0),   0.5, material_right));

camera cam(point3(-2,2,1), point3(0,0,-1), vec3(0,1,0), 90, aspect_ratio);
效果如下

减小视角,效果如下
camera cam(point3(-2,2,1), point3(0,0,-1), vec3(0,1,0), 20, aspect_ratio);

12. Defocus Blur
- 上面的camera是小孔成像,即胶片的每一个像素指向小孔映照到外界;此外,小孔与胶片的距离是单位距离。
- 实际上,由相机得到的结果有两个差异:第一不是小孔而是光圈,第二不是单位距离而是有焦距;
- 这两个差异对于相机来说会造成散焦,在上述的理想camera的成像效果是最完美的,但是有时为了模拟散焦,需要考虑这两个因素。


- 首先,为模拟光圈,在vec3.h头文件中定义生成xy0平面上单位圆内部随机矢量的函数。
vec3 random_in_unit_disk() {
    while (true) {
        auto p = vec3(random_double(-1,1), random_double(-1,1), 0);
        if (p.length_squared() >= 1) continue;
        return p;
    }
}
- 然后,修改camera:在初始化参数中加入焦距和光圈直径,前者用于等比例调整底片的水平矢量、垂直矢量、-w向深度以及左下角位置(之前的采用-w方向单位焦距),后者用于维护光圈半径成员变量,此外将uvw也作为成员变量,方便getray;在getray中,首先生成xy0平面内的单位院内的随机矢量,并乘以光圈半径来统一范围,然后将其作为uvw坐标系下的坐标,分别乘以u与v(w=0),并相加得到起点位置相对于lookfrom的偏置,然后返回的光线在起点加上偏置,并且在方向矢量上减去偏置。
class camera {
    public:
        camera(
            point3 lookfrom,
            point3 lookat,
            vec3   vup,
            double vfov, // vertical field-of-view in degrees
            double aspect_ratio,
            double aperture,
            double focus_dist
        ) {
            auto theta = degrees_to_radians(vfov);
            auto h = tan(theta/2);
            auto viewport_height = 2.0 * h;
            auto viewport_width = aspect_ratio * viewport_height;

            w = unit_vector(lookfrom - lookat);
            u = unit_vector(cross(vup, w));
            v = cross(w, u);

            origin = lookfrom;
            horizontal = focus_dist * viewport_width * u;
            vertical = focus_dist * viewport_height * v;
            lower_left_corner = origin - horizontal/2 - vertical/2 - focus_dist*w;

            lens_radius = aperture / 2;
        }


        ray get_ray(double s, double t) const {
            vec3 rd = lens_radius * random_in_unit_disk();
            vec3 offset = u * rd.x() + v * rd.y();

            return ray(
                origin + offset,
                lower_left_corner + s*horizontal + t*vertical - origin - offset
            );
        }

    private:
        point3 origin;
        point3 lower_left_corner;
        vec3 horizontal;
        vec3 vertical;
        vec3 u, v, w;
        double lens_radius;
};
point3 lookfrom(3,3,2);
point3 lookat(0,0,-1);
vec3 vup(0,1,0);
auto dist_to_focus = (lookfrom-lookat).length();
auto aperture = 2.0;

camera cam(lookfrom, lookat, vup, 20, aspect_ratio, aperture, dist_to_focus);
使用单倍焦距,单位光圈(r=1),效果为:

单倍焦距、半倍光圈(r=0.5):

单倍焦距、1/4倍光圈(r=0.25):

从上面的图中可以直接看出光圈的效果。
使用两倍焦距:

13.Where Next?
多画几个球(好慢啊hh(╯°□°)╯︵ ┻━┻):
hittable_list random_scene() {
    hittable_list world;

    auto ground_material = make_shared<lambertian>(color(0.5, 0.5, 0.5));
    world.add(make_shared<sphere>(point3(0,-1000,0), 1000, ground_material));

    for (int a = -11; a < 11; a++) {
        for (int b = -11; b < 11; b++) {
            auto choose_mat = random_double();
            point3 center(a + 0.9*random_double(), 0.2, b + 0.9*random_double());

            if ((center - point3(4, 0.2, 0)).length() > 0.9) {
                shared_ptr<material> sphere_material;

                if (choose_mat < 0.8) {
                    // diffuse
                    auto albedo = color::random() * color::random();
                    sphere_material = make_shared<lambertian>(albedo);
                    world.add(make_shared<sphere>(center, 0.2, sphere_material));
                } else if (choose_mat < 0.95) {
                    // metal
                    auto albedo = color::random(0.5, 1);
                    auto fuzz = random_double(0, 0.5);
                    sphere_material = make_shared<metal>(albedo, fuzz);
                    world.add(make_shared<sphere>(center, 0.2, sphere_material));
                } else {
                    // glass
                    sphere_material = make_shared<dielectric>(1.5);
                    world.add(make_shared<sphere>(center, 0.2, sphere_material));
                }
            }
        }
    }

    auto material1 = make_shared<dielectric>(1.5);
    world.add(make_shared<sphere>(point3(0, 1, 0), 1.0, material1));

    auto material2 = make_shared<lambertian>(color(0.4, 0.2, 0.1));
    world.add(make_shared<sphere>(point3(-4, 1, 0), 1.0, material2));

    auto material3 = make_shared<metal>(color(0.7, 0.6, 0.5), 0.0);
    world.add(make_shared<sphere>(point3(4, 1, 0), 1.0, material3));

    return world;
}

int main() {

    // Image

    const auto aspect_ratio = 3.0 / 2.0;
    const int image_width = 1200;
    const int image_height = static_cast<int>(image_width / aspect_ratio);
    const int samples_per_pixel = 500;
    const int max_depth = 50;

    // World

    auto world = random_scene();

    // Camera

    point3 lookfrom(13,2,3);
    point3 lookat(0,0,0);
    vec3 vup(0,1,0);
    auto dist_to_focus = 10.0;
    auto aperture = 0.1;

    camera cam(lookfrom, lookat, vup, 20, aspect_ratio, aperture, dist_to_focus);

    // Render

    std::cout << "P3\n" << image_width << ' ' << image_height << "\n255\n";

    for (int j = image_height-1; j >= 0; --j) {
        ...
}

- 其他
- Lights — You can do this explicitly, by sending shadow rays to lights, or it can be done implicitly by making some objects emit light, biasing scattered rays
- toward them, and then downweighting those rays to cancel out the bias. Both work. I am in the minority in favoring the latter approach.
- Triangles — Most cool models are in triangle form. The model I/O is the worst and almost everybody tries to get somebody else’s code to do this.
- Surface Textures — This lets you paste images on like wall paper. Pretty easy and a good thing to do.
- Solid textures — Ken Perlin has his code online. Andrew Kensler has some very cool info at his blog.
- Volumes and Media — Cool stuff and will challenge your software architecture. I favor making volumes have the hittable interface and probabilistically have intersections based on density. Your rendering code doesn’t even have to know it has volumes with that method.
- Parallelism — Run N copies of your code on N cores with different random seeds. Average the N runs. This averaging can also be done hierarchically where N/2 pairs can be averaged to get N/4 images, and pairs of those can be averaged. That method of parallelism should extend well into the thousands of cores with very little coding.
来源
本文来自博客园,作者:ETHERovo,转载请注明原文链接:https://www.cnblogs.com/etherovo/p/17336667.html

 浙公网安备 33010602011771号