
初学银河麒麟linux笔记 第七章 VMWare虚拟机内的qt程序连接串口和网口
QT程序可以正常在虚拟机里的麒麟系统里运行了,但是无法连接网口和串口,这里进行配置
网口连接
与硬件的TCP连接,在虚拟机上设置桥接
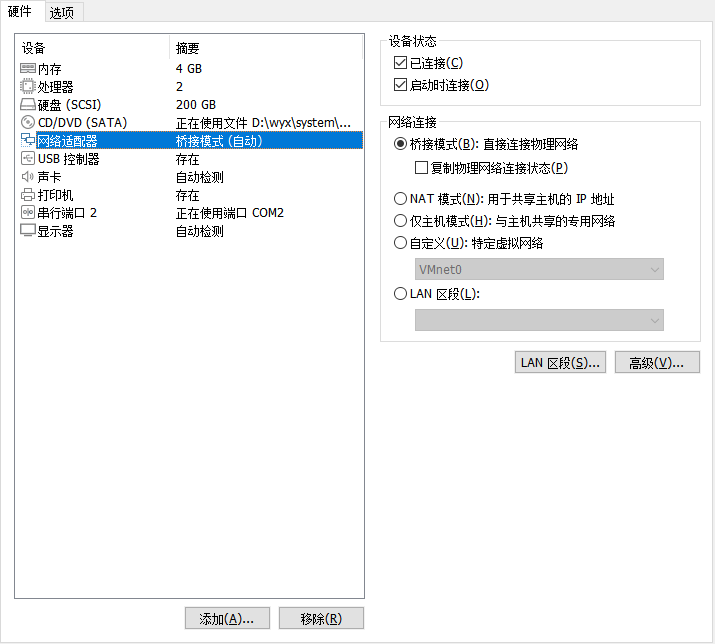
再重启就能连上了
串口连接
首先参考
https://blog.csdn.net/zxw1473474655/article/details/126102955
完成串口端口设置,但是QT程序里还是无法识别
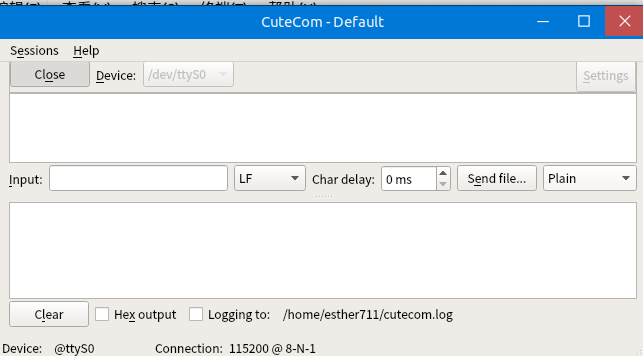
这里下载cutecom工具进行测试
直接在终端输入
sudo apt-get install cutecom
进行下载
然后打开终端,用
sudo cutecom
命令来打开,打开界面如下。
在主机中配置了虚拟串口,并将其中一个串口配置给虚拟机,在尝试使用了ttyS0和ttyS1后,发现ttyS1可以接到主机串口助手发来的数据

然后开始调试QT程序
windows的串口是com1~com n
而linux的串口是tty*,因此搜索串口的程序需要改动

void XXXX::SerialPortInit()
{
    QFile file(PORTFILENAME);
    if(file.exists())       // 如果文件存在删除,或清空
    {
        file.remove();
    }

    // 查看当前的串口,并保存到文件中
    int ret = system("ls /dev/tty* > serialport.dat");
    if(ret < 0)
    {
        QMessageBox::information(this, QString::fromUtf8("提示"), QString::fromUtf8("串口异常"));
    }

    // 读取文件中的串口并添加到combobox中
    if(!file.open(QIODevice::ReadOnly | QIODevice::Text))
    {
        QMessageBox::information(this, QString::fromUtf8("提示"), QString::fromUtf8("串口异常"));
        exit(0);
    }

    // 读取当前的串口并添加到combobox中
    while(!file.atEnd())
    {
        QByteArray line = file.readLine();
        line.remove(0, 5);
        ui->cmbPortName->addItem(QString::fromLocal8Bit(line).trimmed());
    }

    file.close();
    file.remove();
}
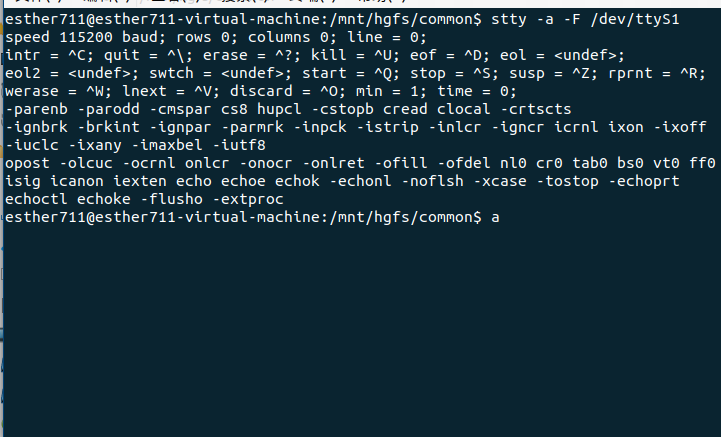
可以看到有很多串口都能使用,这里首先查看是否有ttyUSB前缀的串口,有的话直接打开连接。如果没有的话,这时需要在终端输入
dmesg | grep ttyS*
此时会显示

说明ttyS0和ttyS1可用,则可以选择对应的串口打开。
但麒麟系统的串口默认是ROOT权限,每次打开都需要终端手动开权限,因此这里采用
sudo usermod -a -G dialout $USER
改成普通用户都可使用,重启之后可正常使用串口。
程序优化
在权限更改完后,重新简化了串口选择程序,用QserialPort来筛选串口。
可参考
https://blog.csdn.net/weixin_42103688/article/details/121226704
将前面的程序替换为:
void XXXX::SerialPortInit() {
foreach(const QSerialPortInfo &info, QSerialPortInfo::availablePorts())
{
ui->cmbPortName->addItem(info.portName());
}
}
然后就可以只留下能使用的串口了
但是在使用过程中,发现用虚拟串口能正常发送、接收数据,用实际串口不行,猜测是波特率的原因。
程序里是通过QserialPort设置的波特率
my_serialport_read->clear();
my_serialport_read->setPortName(ui->cmbPortName->currentText());//当前串口

  if(my_serialport_read->open(QIODevice::ReadWrite))//打开串口
    {
      //设置波特率
       my_serialport_read->setBaudRate(ui->cmbBaudRate->currentText().toInt());
        //设置数据位
        my_serialport_read->setDataBits(QSerialPort::Data8);
        //设置校验位
        my_serialport_read->setParity(QSerialPort::NoParity)
//设置流控制
        my_serialport_read->setFlowControl(QSerialPort::NoFlowControl);
//设置停止位
       my_serialport_read->setStopBits(QSerialPort::OneStop);
}
程序能正常运行,但是设置的波特率却没有保留在串口上,经过终端查询
stty -a -F /dev/ttyS1
speed 也就是波特率没有被程序修改。这里查了不少资料也没发现是什么问题,由于时间紧迫,只好采取其他办法
通过下载以下LINUX下的QT串口助手源代码
https://codeload.github.com/wuhui2356/SerialPort/zip/refs/heads/master
发现其没有使用QserialPort,而是用的自带函数。但经验证可以修改linux串口的波特率。因此在串口打开函数中采用了这个方法修改波特率
QString serialPortStr = ui->cmbPortName->currentText().isEmpty() ? "" : ui->cmbPortName->currentText();
        QString rateStr = ui->cmbBaudRate->currentText().isEmpty() ? "" : ui->cmbBaudRate->currentText();
        QString checkBitStr ="NONE";
        QString dataBirStr ="8";
        QString stopBbitStr ="1";

        if(serialPortStr == "")
        {
            QMessageBox::information(this, QString::fromUtf8("提示"), QString::fromUtf8("未找到串口"));
            return;
        }
        if(!rateStr.isNull() && !checkBitStr.isNull() && !dataBirStr.isNull() && !stopBbitStr.isNull())
        {
            bool rateOK = false;
            bool dataOK = false;
            bool stopOK = false;
            serialPortStr = "/dev/" + serialPortStr;

//设置串口
 seriport->initSet(serialPortStr.toStdString(), rateStr.toInt(&rateOK), dataBirStr.toInt(&dataOK), stopBbitStr.toInt(&stopOK), checkBitStr.toStdString()[0]); if(!rateOK || !dataOK || !stopOK) { QMessageBox::information(this, QString::fromUtf8("提示"), QString::fromUtf8("串口异常")); exit(0); } } else { QMessageBox::information(this, QString::fromUtf8("提示"), QString::fromUtf8("串口异常")); exit(0); } int ret = seriport->openSerialPort();//打开串口
if(!rateOK || !dataOK || !stopOK)
{
QMessageBox::information(this, QString::fromUtf8("提示"), QString::fromUtf8("串口异常"));
exit(0);
}
}
else
{
QMessageBox::information(this, QString::fromUtf8("提示"), QString::fromUtf8("串口异常"));
exit(0);
}
//打开串口
int ret = seriport->openSerialPort();
     if(ret!=-1)
        {
         seriport->SetSpeed();//修改波特率
        }
     seriport->closeSerialPort();//关闭串口


     my_serialport_read->clear();
    my_serialport_read->setPortName(ui->cmbPortName->currentText());//当前串口

  if(my_serialport_read->open(QIODevice::ReadWrite))//再打开串口
    {
my_serialport_read->setBaudRate(ui->cmbBaudRate->currentText().toInt());
       //my_serialport_read->setBaudRate(QSerialPort::Baud4800,QSerialPort::AllDirections);//设置波特率和读写方向         //设置数据位
        my_serialport_read->setDataBits(QSerialPort::Data8);
        //设置校验位
        my_serialport_read->setParity(QSerialPort::NoParity);
        //设置流控制
        my_serialport_read->setFlowControl(QSerialPort::NoFlowControl);
        //设置停止位
        my_serialport_read->setStopBits(QSerialPort::OneStop);
}
这里调用了例程里的两个cpp文件,为了尽量减少改动,修改完波特率后关闭串口,后续还是采用用QserialPort调用串口。
经验证,可以与实际串口正常通信
//设置数据位


【推荐】国内首个AI IDE,深度理解中文开发场景,立即下载体验Trae
【推荐】编程新体验,更懂你的AI,立即体验豆包MarsCode编程助手
【推荐】抖音旗下AI助手豆包,你的智能百科全书,全免费不限次数
【推荐】轻量又高性能的 SSH 工具 IShell:AI 加持,快人一步
· 震惊!C++程序真的从main开始吗?99%的程序员都答错了
· 【硬核科普】Trae如何「偷看」你的代码?零基础破解AI编程运行原理
· 单元测试从入门到精通
· 上周热点回顾(3.3-3.9)
· Vue3状态管理终极指南:Pinia保姆级教程