einops 学习笔记:基础篇
参考:
einops(Einstein Operations)提供了一种语法来便捷地操纵张量。einops 支持大多数张量库(当然包括 numpy 和 pytorch)。einops 针对所有张量库的语法都完全一致。einops 不会影响反向传播的正常进行。这些特性意味着 einops 可以和现有的深度学习框架和代码库无缝集成。
本文的大部分内容是对上述官方文档的翻译,添加了一些自己的理解,调整了一些小节的顺序。
如何运行代码
如果要跟着下面的步骤实操,需要先下载 test_images.npy 文件(可以从 einops 的 GitHub 仓库 下载到),再将以下代码粘贴进一个 utils.py 文件:
import numpy as np

from PIL.Image import fromarray
from IPython import get_ipython


def display_np_arrays_as_images():
    def np_to_png(a):
        if 2 <= len(a.shape) <= 3:
            return fromarray(np.array(np.clip(a, 0, 1) * 255, dtype='uint8'))._repr_png_()
        else:
            return fromarray(np.zeros([1, 1], dtype='uint8'))._repr_png_()

    def np_to_text(obj, p, cycle):
        if len(obj.shape) < 2:
            print(repr(obj))
        if 2 <= len(obj.shape) <= 3:
            pass
        else:
            print('<array of shape {}>'.format(obj.shape))

    get_ipython().display_formatter.formatters['image/png'].for_type(np.ndarray, np_to_png)
    get_ipython().display_formatter.formatters['text/plain'].for_type(np.ndarray, np_to_text)


from IPython.display import display_html

_style_inline = """<style>
.einops-answer {
    color: transparent;
    padding: 5px 15px;
    background-color: #def;
}
.einops-answer:hover { color: blue; }
</style>
"""


def guess(x):
    display_html(
        _style_inline
        + "<h4>Answer is: <span class='einops-answer'>{x}</span> (hover to see)</h4>".format(x=tuple(x)),
        raw=True)
在与 utils.py 同级的目录中创建 Notebook,然后先执行以下代码段:
from utils import display_np_arrays_as_images
display_np_arrays_as_images()
这会将 numpy 的数组转换成图片显示出来。
准备
载入一些图片:
ims = numpy.load('./resources/test_images.npy', allow_pickle=False)
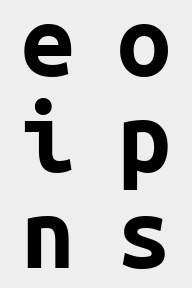
# 有 6 张 96x96、带有 3 个色彩通道的图片,打包进同一个张量
print(ims.shape, ims.dtype) # (6, 96, 96, 3) float64
这是 ims[0]:

这是 ims[1]:

rearrange 重排
rearrange 用于重新排列张量的各个 axis。
from einops import rearrange
# 交换 height 和 width 的顺序
rearrange(ims[0], 'h w c -> w h c')

composition
将加载的张量转换为一整张图片:
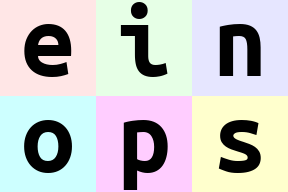
rearrange(ims, 'b h w c -> (b h) w c')

rearrange(ims, 'b h w c -> h (b w) c')

# [6, 96, 96, 3] -> [96, (6 * 96), 3]
rearrange(ims, 'b h w c -> h (b w) c').shape    # (96, 576, 3)
可以 compose 多于一个 axis:
rearrange(ims, 'b h w c -> (b h w c)').shape # (165888,)
decomposition
decomposition 是 composition 的逆操作。
# 指定 b1=2,则 b2 的值将自动推算(结果为6/2=3)
rearrange(ims, '(b1 b2) h w c -> b1 b2 h w c ', b1=2).shape     # (2, 3, 96, 96, 3)
可以将 composition 和 decomposition 结合:
rearrange(ims, '(b1 b2) h w c -> (b1 h) (b2 w) c ', b1=2)
另一个例子:
rearrange(ims, '(b1 b2) h w c -> (b2 h) (b1 w) c ', b1=2)
下面的操作将每张图的高度加倍,宽度减半,故名为 width-to-height 操作。
rearrange(ims, 'b h (w w2) c -> (h w2) (b w) c', w2=2)

横板的 height-to-width 操作:
rearrange(ims, 'b (h h2) w c -> h (b w h2) c', h2=2)

竖版的 height-to-width 操作:
rearrange(ims, 'b (h h2) w c -> (b h) (w h2) c', h2=2)
轴的顺序很重要
比较以下两行代码的结果:
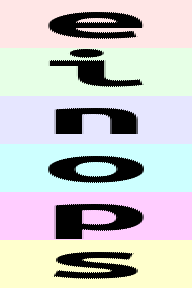
rearrange(ims, 'b h w c -> h (b w) c')
rearrange(ims, 'b h w c -> h (w b) c')

就像一串数字一样,最左侧的数字(最高位)是最重要的。einops 在组合时会先从低位(右侧)排列,排列完低位后再排列高位。对于上面的例子:
(b w)表示在水平方向上先排列w(表示每张图的所有水平像素),再排列b(表示每张图本身)。于是图片会一张一张地排出来。(w b)表示在水平方向上先排列b,再排列w。于是会先顺序排出e、i、n、o、p、s各自的第一列像素,然后排第二列,如此重复。
再看一个例子:
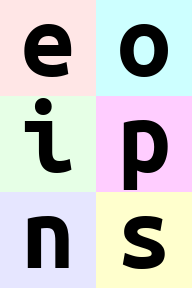
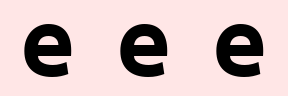
rearrange(ims, '(b1 b2) h w c -> h (b1 b2 w) c ', b1=2) # 输出 'einops'
rearrange(ims, '(b1 b2) h w c -> h (b2 b1 w) c ', b1=2) # 输出 'eoipns'
以上两行代码都将 w 放在最右侧,在输出水平方向的像素时,总是排完一张图,再排下一张。不同的是 b1 和 b2 的顺序。解构的模式是 (b1 b2),其中 b1=2,那么可以想象将原先的 b=6 重排成了一个 \(2\times 3\) 的矩阵:
- 第一行代码是先排列
b2(因为它在b1右边),再排列b1,而这与前面解构出的顺序是一致的,于是- 先固定
b1为第一行,输出该行的所有元素(ein) - 然后固定
b1为第二行,输出该行的所有元素(ops)
- 先固定
- 而第二行代码是先排列
b1,再排列b2,于是- 先固定
b2为第一列,然后输出该列的所有元素(eo) - 然后固定
b2为第二列,然后输出该列的所有元素(ip) - 然后固定
b2为第三列,然后输出该列的所有元素(ns)
- 先固定
堆叠和拼接张量
einops 还可以处理 list。将 ims 转换为一个 list:
x = list(ims)
此时 x 是一个带有 6 个元素的 list,每个元素是一个 numpy.ndarray,对应一个字母的图片。当用 einops 处理 x 时,输入的第一个维度是 list 本身的维度,对于 x,就是原先的 b。
堆叠张量:
rearrange(x, 'b h w c -> h w c b')
# 等价于
numpy.stack(x, axis=3)
拼接张量:
rearrange(x, 'b h w c -> h (b w) c')
# 等价于
numpy.concatenate(x, axis=1)
增加和删除轴
可以通过在输入中写 1 来减少轴,也可以通过在输出中写 1 来增加轴。
x = rearrange(ims, 'b h w c -> b 1 h w 1 c') # 类似 numpy.expand_dims
print(x.shape)
print(rearrange(x, 'b 1 h w 1 c -> b h w c').shape) # 类似 numpy.squeeze
输出如下:
(6, 1, 96, 96, 1, 3)
(6, 96, 96, 3)
下面的代码将在 h 和 w 方向上分别取 b 和 c 的最大值,形成一个 (6, 1, 1, 3) 的张量:
reduce(ims, 'b h w c -> b () () c', 'max')
reduce 缩减
如果要在某个轴的方向上求平均,传统的写法是
x.mean(-1)
但是这种代码可读性不佳。如果缺乏经验,那么我们难以立即知道 -1 指的是哪个轴。
在 einops 中,上面的代码可以写成:
reduce(x, 'b h w c -> b h w', 'mean')
如果某个轴在输入中出现,但在输出中没有出现,那么这个轴就是被执行 reduce 操作的轴。在上面的例子中,轴 c 被执行了求平均值操作。
在 batch 轴上执行求平均值操作:
# 等价于 ims.mean(axis=0)
reduce(ims, 'b h w c -> h w c', 'mean')
# 也等价于 reduce(ims, 'b h w c -> h w', 'mean')

有如下几种 reduce 操作:
mean求平均值min求最小值max求最大值sum求和prod求乘积
einops 的语法允许我们设计池化操作。下面的代码执行了 \(2\times 2\) 平均池化:
reduce(ims, 'b (h h2) (w w2) c -> h (b w) c', 'mean', h2=2, w2=2)

当然,这张图片的长和宽都减半了。
\(2\times 2\) 最大池化:
reduce(ims, 'b (h h2) (w w2) c -> h (b w) c', 'max', h2=2, w2=2)

相比平均池化,最大池化没有那么平滑。
另一个例子:
reduce(ims, '(b1 b2) h w c -> (b2 h) (b1 w)', 'mean', b1=2)
repeat 重复
在 w 轴的方向上重复:
repeat(ims[0], 'h w c -> h (repeat w) c', repeat=3)
像 rearrange 一样,repeat 同样对轴的顺序敏感。你可以通过改变括号内的轴的顺序来将一个像素重复三次,而不是将图片整体重复三次:
repeat(ims[0], 'h w c -> h (w repeat) c', repeat=3)

当然也可以在纵向上将一个像素重复三次:
repeat(ims[0], 'h w c -> (h repeat) w c', repeat=3)

同时在 w 和 h 轴的方向上重复:
repeat(ims[0], 'h w c -> (2 h) (2 w) c')

同样,通过调整顺序,可以将一个像素在 h 和 w 的方向上分别重复两次,这有点像 \(2\times 2\) 池化的逆操作。实际上 reduce 和 repeat 可以互相视为逆操作。
repeat(ims[0], 'h w c -> (h 2) (w 2) c')

在一个新的轴上重复:
print(ims[0].shape)     # (96, 96, 3)
repeat(ims[0], 'h w c -> h new_axis w c', new_axis=5).shape     # (96, 5, 96, 3)
新的张量是原先的 (96, 96, 3) 张量在第二个轴上重复了 5 次得到的。
更多花哨的展示
暂略。可以看官网原文:https://einops.rocks/1-einops-basics/#fancy-examples-in-random-order
总结
rearrange不改变张量中元素的总个数。reduce在保持基本重排语法不变的同时引入了缩减操作(mean, min, max, sum, prod)repeat包括了重复和平铺操作- composition 和 decomposition 是
einops的基石。它们能够也应该被联合起来使用。

 浙公网安备 33010602011771号