Ceph的安装和学习
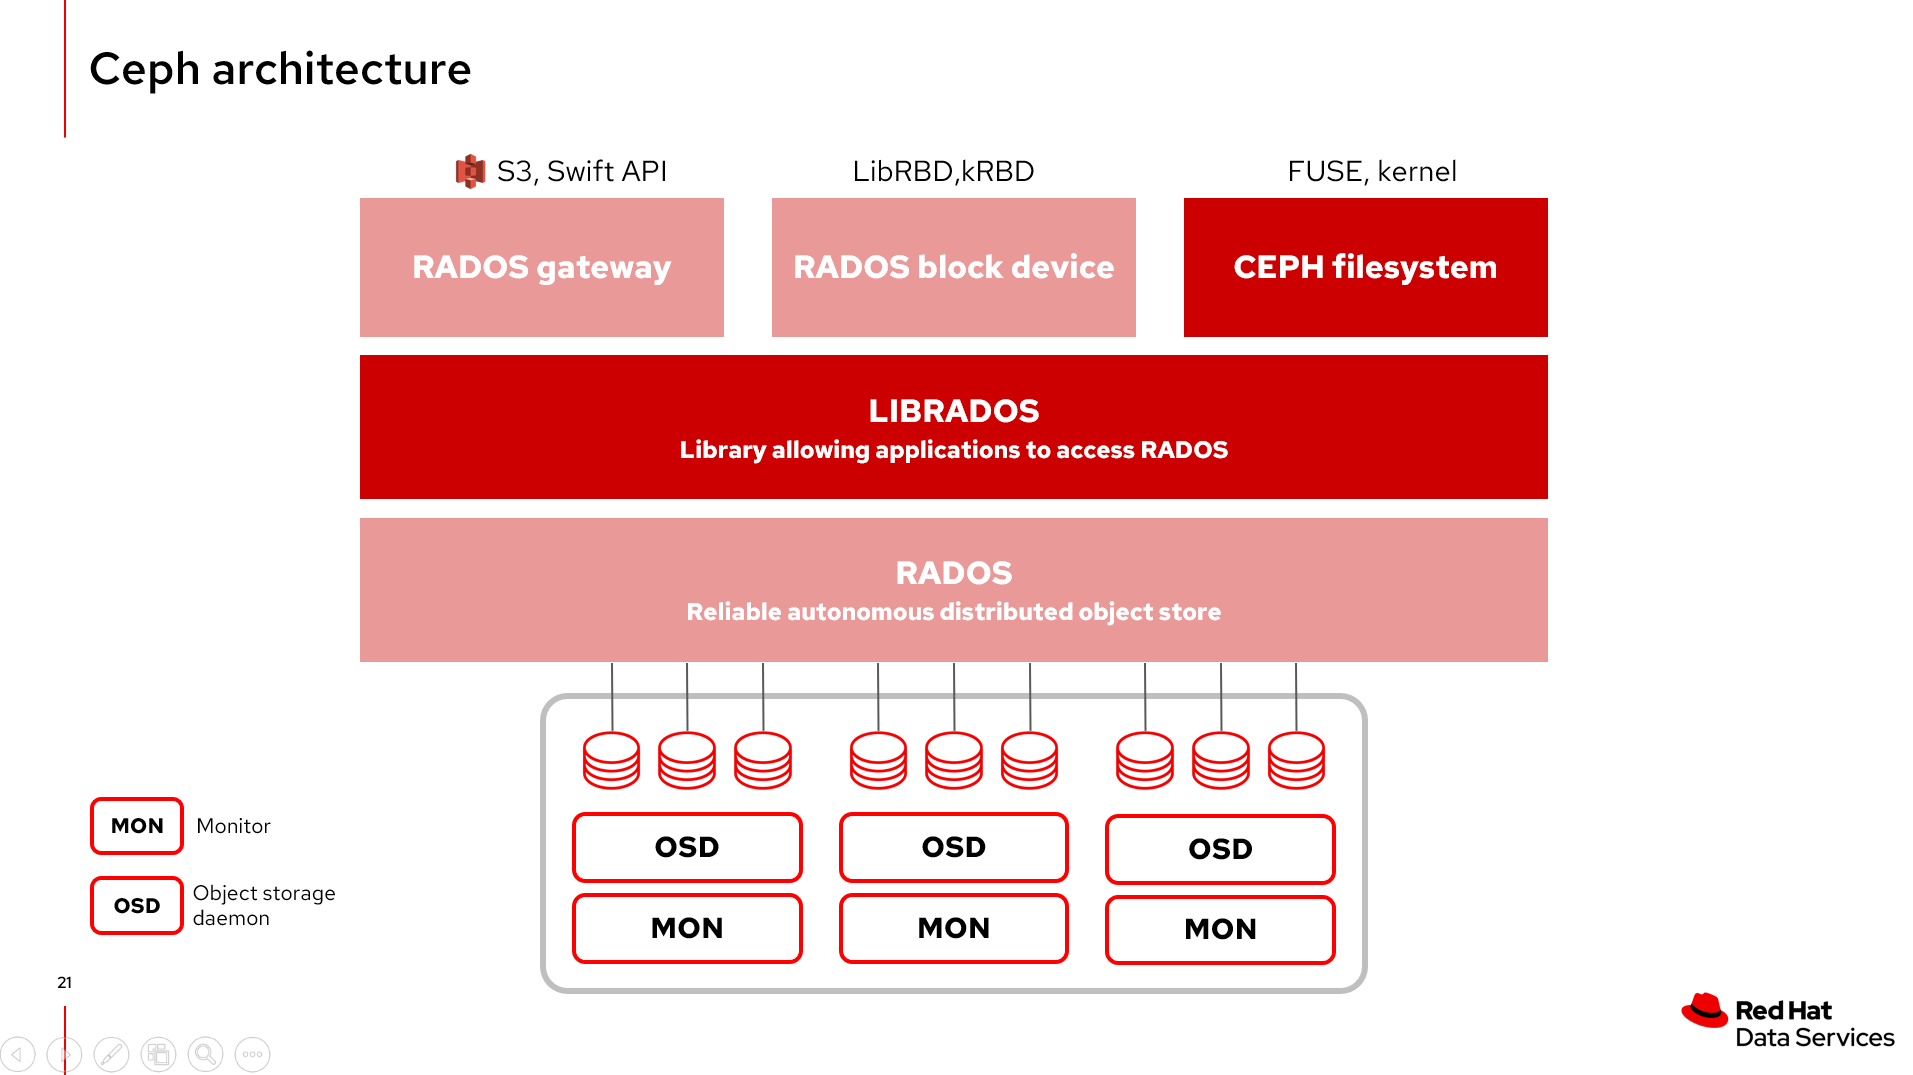
0.架构
帮助理解的架构图
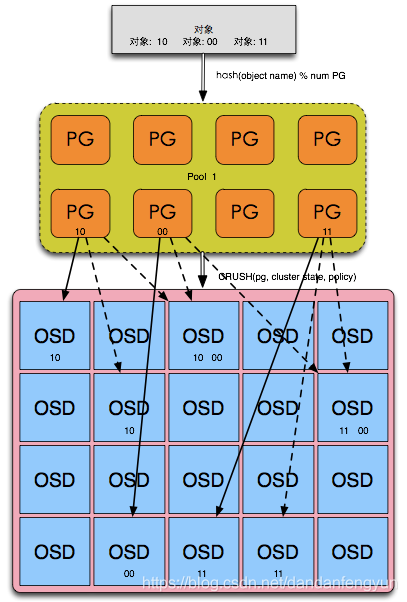
Pool, PG, OSD的关系
Pool是存储对象的逻辑分区,它规定了数据冗余的类型和对应的副本分布策略;支持两种类型:副本(replicated)和 纠删码( Erasure Code)。
PG( placement group)是一个放置策略组,它是对象的集合,该集合里的所有对象都具有相同的放置策略;简单点说就是相同PG内的对象都会放到相同的硬盘上; PG是 ceph的核心概念, 服务端数据均衡和恢复的最小粒度就是PG;
OSD是负责物理存储的进程,一般配置成和磁盘一一对应,一块磁盘启动一个OSD进程;
下面这张图形象的描绘了它们之间的关系:
- 一个Pool里有很多PG,
- 一个PG里包含一堆对象;一个对象只能属于一个PG;
- PG有主从之分,一个PG会有主副本和从副本,主从PG分布在不同的osd上。
1.安装单节点的Ceph
在节点上创建及配置bind DNS解析
# yum install -y bind bind-utils
/etc/named.conf
[root@ceph-node ~]# cat /etc/named.conf
//
// named.conf
//
// Provided by Red Hat bind package to configure the ISC BIND named(8) DNS
// server as a caching only nameserver (as a localhost DNS resolver only).
//
// See /usr/share/doc/bind*/sample/ for example named configuration files.
//
// See the BIND Administrator's Reference Manual (ARM) for details about the
// configuration located in /usr/share/doc/bind-{version}/Bv9ARM.html

options {
    listen-on port 53 { 127.0.0.1; 192.168.56.110; };
    listen-on-v6 port 53 { ::1; };
    directory     "/var/named";
    dump-file     "/var/named/data/cache_dump.db";
    statistics-file "/var/named/data/named_stats.txt";
    memstatistics-file "/var/named/data/named_mem_stats.txt";
    recursing-file  "/var/named/data/named.recursing";
    secroots-file   "/var/named/data/named.secroots";
    allow-query     { localhost;any; };

    /*
     - If you are building an AUTHORITATIVE DNS server, do NOT enable recursion.
     - If you are building a RECURSIVE (caching) DNS server, you need to enable
       recursion.
     - If your recursive DNS server has a public IP address, you MUST enable access
       control to limit queries to your legitimate users. Failing to do so will
       cause your server to become part of large scale DNS amplification
       attacks. Implementing BCP38 within your network would greatly
       reduce such attack surface
    */
    recursion yes;

    dnssec-enable yes;
    dnssec-validation yes;

    /* Path to ISC DLV key */
    bindkeys-file "/etc/named.root.key";

    managed-keys-directory "/var/named/dynamic";

    pid-file "/run/named/named.pid";
    session-keyfile "/run/named/session.key";
};

logging {
        channel default_debug {
                file "data/named.run";
                severity dynamic;
        };
};

zone "." IN {
    type hint;
    file "named.ca";
};


zone "example.com" IN {
    type    master;
    file    "/var/named/zonefile.db";
};

zone "56.168.192.in-addr.arpa" IN {
    type    master;
    file    "/var/named/reverse.db";
};

include "/etc/named.rfc1912.zones";
include "/etc/named.root.key";
/var/named/zonefile.db
[root@ceph-node ~]# cat /var/named/zonefile.db
$TTL 1D
@    IN SOA    @ example.com. (
                    0    ; serial
                    1D    ; refresh
                    1H    ; retry
                    1W    ; expire
                    3H )    ; minimum
    IN    NS    @
    IN    A    127.0.0.1
    IN    AAAA    ::1
ceph-node    IN    A    192.168.56.110
/var/named/reverse.db
[root@ceph-node ~]# cat /var/named/reverse.db
$TTL 1W
@    IN    SOA    ns1.example.com.    root (
            2019120205    ; serial
            3H        ; refresh (3 hours)
            30M        ; retry (30 minutes)
            2W        ; expiry (2 weeks)
            1W )        ; minimum (1 week)
    IN    NS    ns1.example.com.
;
; syntax is "last octet" and the host must have fqdn with trailing dot
110      IN      PTR     ceph-node.example.com.
;EOF
为了让cephadmin能直接运行ceph,rados等命令,需要将keyring的权限修改一下
# chmod 644 /etc/ceph/ceph.client.admin.keyring
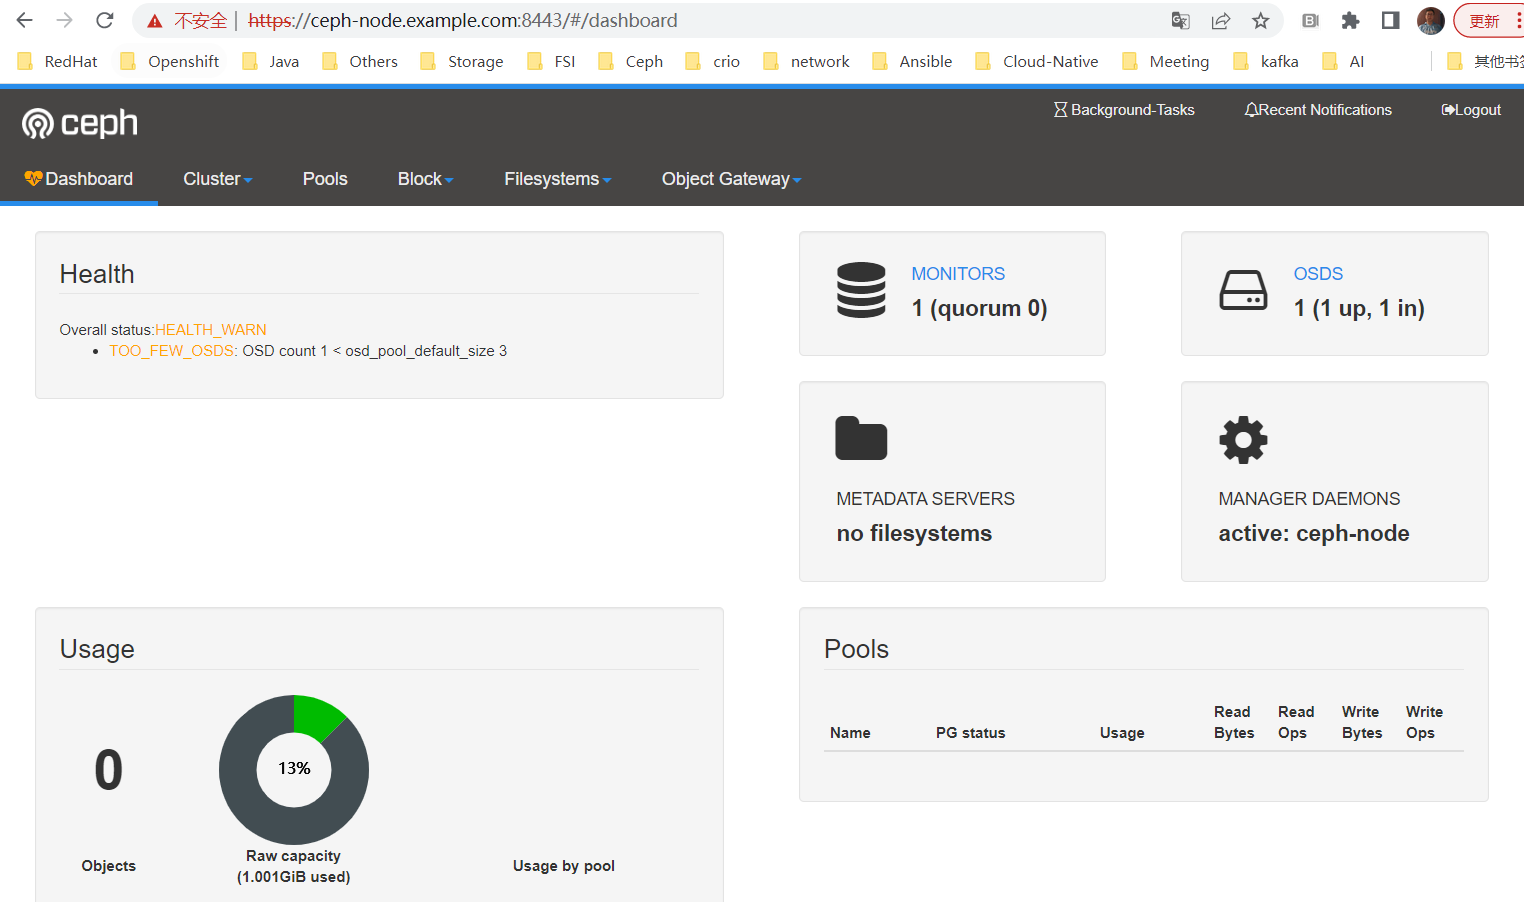
2.开启mimic Ceph dashboard
[root@ceph-node ~]# sudo ceph -v
ceph version 13.2.10 (564bdc4ae87418a232fc901524470e1a0f76d641) mimic (stable)

$ sudo ceph mgr module enable dashboard

$ sudo ceph dashboard create-self-signed-cert

[cephadmin@ceph-node storage_cluster]$ sudo ceph dashboard set-login-credentials admin welcome1
Username and password updated
访问dashboard
3. 添加新的节点node到集群
- 新节点的用户准备
$ useradd -m cephadmin -s /bin/bash
$ passwd cephadmin
$ echo "cephadmin ALL = (root) NOPASSWD:ALL" | sudo tee /etc/sudoers.d/cephadmin
$ sudo chmod 0440 /etc/sudoers.d/cephadmin
systemctl disable firewalld
systemctl stop firewalld

sed -i 's/SELINUX=enforcing/SELINUX=disabled/g' /etc/selinux/config

sed -i s'/Defaults    requiretty/#Defaults    requiretty'/g /etc/sudoers
- Add Ceph repo
- 主节点配置ssh
[cephadmin@ceph-node root]$ ssh-keygen
Generating public/private rsa key pair.
Enter file in which to save the key (/home/cephadmin/.ssh/id_rsa):
Created directory '/home/cephadmin/.ssh'.
Enter passphrase (empty for no passphrase):
Enter same passphrase again:
Your identification has been saved in /home/cephadmin/.ssh/id_rsa.
Your public key has been saved in /home/cephadmin/.ssh/id_rsa.pub.
The key fingerprint is:
SHA256:SMPU0jGahxkHdRpz+01Z+PghJMqkcdUSgOcAi6mzz4E cephadmin@ceph-node.example.com
The key's randomart image is:
+---[RSA 2048]----+
|     .==Oo=oo  ..|
|    ooo@o@ + o.o |
|   o .O.% o + oo |
|  .  . = + . +...|
| o    . S   . o..|
|  +             .|
| E .             |
|  o .            |
|   o             |
+----[SHA256]-----+

[cephadmin@ceph-node root]$ ssh-copy-id cephadmin@ceph-node1
/usr/bin/ssh-copy-id: INFO: Source of key(s) to be installed: "/home/cephadmin/.ssh/id_rsa.pub"
The authenticity of host 'ceph-node1 (192.168.56.111)' can't be established.
ECDSA key fingerprint is SHA256:QxTTL/y0HrTXK2GwOJxQ//TQMYpOdx9z40zvB2+GXI8.
ECDSA key fingerprint is MD5:c6:27:96:cd:3a:bc:2a:b0:b6:fc:93:00:2c:52:5e:71.
Are you sure you want to continue connecting (yes/no)? yes
/usr/bin/ssh-copy-id: INFO: attempting to log in with the new key(s), to filter out any that are already installed
/usr/bin/ssh-copy-id: INFO: 1 key(s) remain to be installed -- if you are prompted now it is to install the new keys
cephadmin@ceph-node1's password:

Number of key(s) added: 1

Now try logging into the machine, with:   "ssh 'cephadmin@ceph-node1'"
and check to make sure that only the key(s) you wanted were added.
- 配置时间同步
在两台机器上都安装
[root@ceph-node ~]# yum install -y chrony
主节点配置
[root@ceph-node ~]# cat /etc/chrony.conf
# Use public servers from the pool.ntp.org project.
# Please consider joining the pool (http://www.pool.ntp.org/join.html).
server ceph-node.example.com iburst
#server 1.centos.pool.ntp.org iburst
#server 2.centos.pool.ntp.org iburst
#server 3.centos.pool.ntp.org iburst

# Record the rate at which the system clock gains/losses time.
driftfile /var/lib/chrony/drift

# Allow the system clock to be stepped in the first three updates
# if its offset is larger than 1 second.
makestep 1.0 3

# Enable kernel synchronization of the real-time clock (RTC).
rtcsync

# Enable hardware timestamping on all interfaces that support it.
#hwtimestamp *

# Increase the minimum number of selectable sources required to adjust
# the system clock.
#minsources 2

# Allow NTP client access from local network.
allow 192.168.56.0/16

# Serve time even if not synchronized to a time source.
local stratum 10

# Specify file containing keys for NTP authentication.
#keyfile /etc/chrony.keys

# Specify directory for log files.
logdir /var/log/chrony

# Select which information is logged.
#log measurements statistics tracking
客户端配置
[root@ceph-node1 ~]# cat /etc/chrony.conf
# Use public servers from the pool.ntp.org project.
# Please consider joining the pool (http://www.pool.ntp.org/join.html).
server ceph-node.example.com iburst

# Record the rate at which the system clock gains/losses time.
driftfile /var/lib/chrony/drift

# Allow the system clock to be stepped in the first three updates
# if its offset is larger than 1 second.
makestep 1.0 3

# Enable kernel synchronization of the real-time clock (RTC).
rtcsync

# Enable hardware timestamping on all interfaces that support it.
#hwtimestamp *

# Increase the minimum number of selectable sources required to adjust
# the system clock.
#minsources 2

# Allow NTP client access from local network.
#allow 192.168.0.0/16

# Serve time even if not synchronized to a time source.
#local stratum 10

# Specify file containing keys for NTP authentication.
#keyfile /etc/chrony.keys

# Specify directory for log files.
logdir /var/log/chrony

# Select which information is logged.
#log measurements statistics tracking
[root@ceph-node1 ~]# systemctl start chronyd
[root@ceph-node1 ~]# systemctl enable chronyd
主节点修改ceph.conf
public_network = 192.168.56.0/24
cluster_network = 192.168.56.0/24
添加节点和OSD
sudo ceph-deploy install ceph-node1

sudo ceph-deploy disk list ceph-node1

sudo ceph-deploy disk zap ceph-node1 /dev/sdb

sudo ceph-deploy osd create --data /dev/sdb ceph-node1
[cephadmin@ceph-node storage_cluster]$ sudo ceph -s
  cluster:
    id:     90933ecf-4a54-475b-8222-b2c57868512a
    health: HEALTH_WARN
            OSD count 2 < osd_pool_default_size 3

  services:
    mon: 1 daemons, quorum ceph-node
    mgr: ceph-node(active)
    osd: 2 osds: 2 up, 2 in

  data:
    pools:   0 pools, 0 pgs
    objects: 0  objects, 0 B
    usage:   2.0 GiB used, 14 GiB / 16 GiB avail
    pgs:
4.创建Pool
[cephadmin@ceph-node storage_cluster]$ sudo ceph osd pool create test-pool 128
pool 'test-pool' created
[cephadmin@ceph-node storage_cluster]$ sudo ceph osd pool set-quota test-pool max_objects 50000
set-quota max_objects = 50000 for pool test-pool
[cephadmin@ceph-node storage_cluster]$ sudo ceph osd pool set-quota test-pool max_bytes $((200*1024*1024*1024))
set-quota max_bytes = 214748364800 for pool test-pool
[cephadmin@ceph-node storage_cluster]$ sudo rados df
POOL_NAME USED OBJECTS CLONES COPIES MISSING_ON_PRIMARY UNFOUND DEGRADED RD_OPS  RD WR_OPS  WR
test-pool  0 B       0      0      0                  0       0        0      0 0 B      0 0 B

total_objects    0
total_used       3.0 GiB
total_avail      21 GiB
total_space      24 GiB
再建立一个,哈哈,出错了
[cephadmin@ceph-node storage_cluster]$ sudo ceph osd pool create images 128
Error ERANGE:  pg_num 128 size 3 would mean 768 total pgs, which exceeds max 750 (mon_max_pg_per_osd 250 * num_in_osds 3)
也就是缺省参数mon_max_pg_per_osd是每个OSD中最大的归置组,默认为250个,因此最大为250*3=750
而归置组实际数目为128*3=384个,加上之前创建的384,一共是768了,因此超过了750的数目。
调整一下pg数目
[cephadmin@ceph-node storage_cluster]$ sudo ceph osd pool create images 64
pool 'images' created
[cephadmin@ceph-node storage_cluster]$ sudo ceph osd pool ls detail
pool 1 'test-pool' replicated size 3 min_size 2 crush_rule 0 object_hash rjenkins pg_num 128 pgp_num 128 last_change 28 flags hashpspool max_bytes 214748364800 max_objects 50000 stripe_width 0
pool 2 'images' replicated size 3 min_size 2 crush_rule 0 object_hash rjenkins pg_num 64 pgp_num 64 last_change 29 flags hashpspool stripe_width 0
创建对象
[cephadmin@ceph-node system]$ sudo rados -p test-pool put myobject /etc/hosts
[cephadmin@ceph-node system]$ sudo rados -p test-pool ls
hostfile
myobject
存入对象以后,查看status,可以看到application not enable
[cephadmin@ceph-node system]$ sudo ceph -s
  cluster:
    id:     90933ecf-4a54-475b-8222-b2c57868512a
    health: HEALTH_WARN
            Degraded data redundancy: 2/6 objects degraded (33.333%), 192 pgs undersized
            application not enabled on 1 pool(s)

  services:
    mon: 1 daemons, quorum ceph-node
    mgr: ceph-node(active)
    osd: 3 osds: 3 up, 3 in

  data:
    pools:   2 pools, 192 pgs
    objects: 2  objects, 418 B
    usage:   3.0 GiB used, 21 GiB / 24 GiB avail
    pgs:     2/6 objects degraded (33.333%)
             192 active+undersized
意思是每个pool需要指定应用采用的类型,rbd, cephfs或者object gateway
[cephadmin@ceph-node system]$ sudo ceph osd pool application enable test-pool rgw
enabled application 'rgw' on pool 'test-pool'

[cephadmin@ceph-node system]$ sudo ceph -s
  cluster:
    id:     90933ecf-4a54-475b-8222-b2c57868512a
    health: HEALTH_WARN
            Degraded data redundancy: 2/6 objects degraded (33.333%), 192 pgs undersized

  services:
    mon: 1 daemons, quorum ceph-node
    mgr: ceph-node(active)
    osd: 3 osds: 3 up, 3 in

  data:
    pools:   2 pools, 192 pgs
    objects: 2  objects, 418 B
    usage:   3.0 GiB used, 21 GiB / 24 GiB avail
    pgs:     2/6 objects degraded (33.333%)
             192 active+undersized
5.主机的服务
ceph在两台虚拟机上会启动几个关键的服务,ceph-mon, ceph-mgr和ceph-osd,具体参看如下
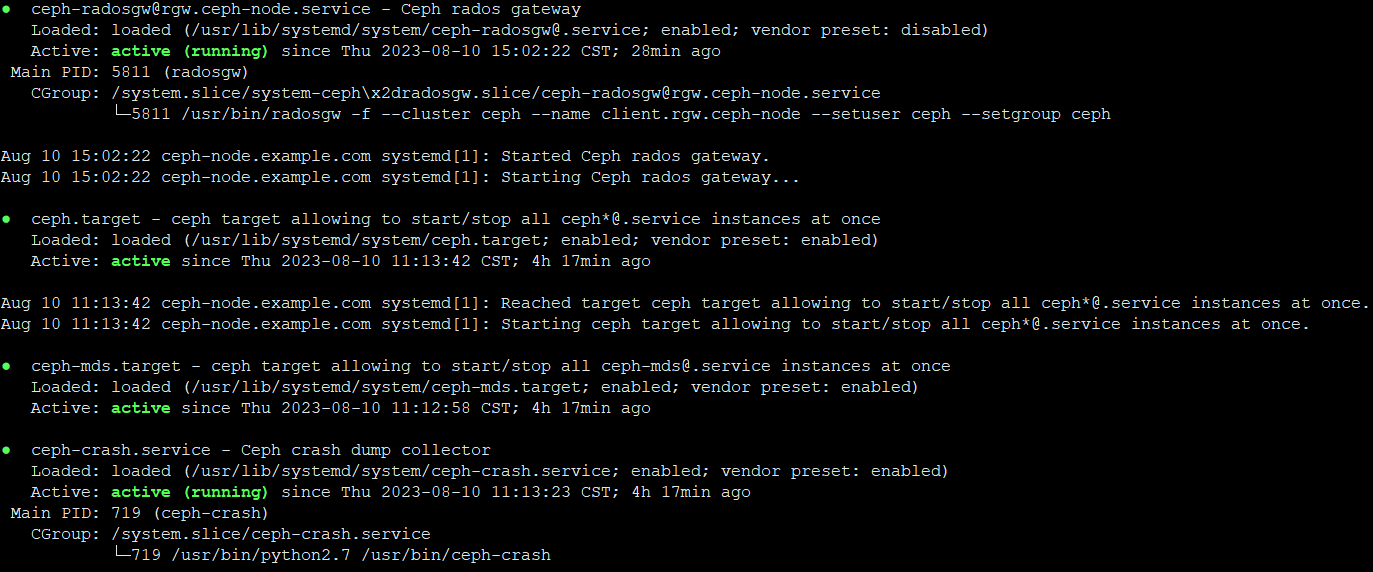
[cephadmin@ceph-node system]$ systemctl status ceph-mon@ceph-node
● ceph-mon@ceph-node.service - Ceph cluster monitor daemon
   Loaded: loaded (/usr/lib/systemd/system/ceph-mon@.service; enabled; vendor preset: disabled)
   Active: active (running) since Wed 2023-08-09 11:19:41 CST; 3h 9min ago
 Main PID: 1016 (ceph-mon)
   CGroup: /system.slice/system-ceph\x2dmon.slice/ceph-mon@ceph-node.service
           └─1016 /usr/bin/ceph-mon -f --cluster ceph --id ceph-node --setuser ceph --setgroup ceph


[cephadmin@ceph-node system]$ systemctl status ceph-mgr@ceph-node
● ceph-mgr@ceph-node.service - Ceph cluster manager daemon
   Loaded: loaded (/usr/lib/systemd/system/ceph-mgr@.service; enabled; vendor preset: disabled)
   Active: active (running) since Wed 2023-08-09 11:19:41 CST; 3h 9min ago
 Main PID: 1017 (ceph-mgr)
   CGroup: /system.slice/system-ceph\x2dmgr.slice/ceph-mgr@ceph-node.service
           └─1017 /usr/bin/ceph-mgr -f --cluster ceph --id ceph-node --setuser ceph --setgroup ceph


[cephadmin@ceph-node system]$ systemctl status ceph-osd@0
● ceph-osd@0.service - Ceph object storage daemon osd.0
   Loaded: loaded (/usr/lib/systemd/system/ceph-osd@.service; enabled-runtime; vendor preset: disabled)
   Active: active (running) since Wed 2023-08-09 11:19:53 CST; 3h 9min ago
  Process: 1286 ExecStartPre=/usr/lib/ceph/ceph-osd-prestart.sh --cluster ${CLUSTER} --id %i (code=exited, status=0/SUCCESS)
 Main PID: 1293 (ceph-osd)
   CGroup: /system.slice/system-ceph\x2dosd.slice/ceph-osd@0.service
           └─1293 /usr/bin/ceph-osd -f --cluster ceph --id 0 --setuser ceph --setgroup ceph

[cephadmin@ceph-node system]$ systemctl status ceph-osd@2
● ceph-osd@2.service - Ceph object storage daemon osd.2
   Loaded: loaded (/usr/lib/systemd/system/ceph-osd@.service; enabled-runtime; vendor preset: disabled)
   Active: active (running) since Wed 2023-08-09 11:19:53 CST; 3h 9min ago
  Process: 1285 ExecStartPre=/usr/lib/ceph/ceph-osd-prestart.sh --cluster ${CLUSTER} --id %i (code=exited, status=0/SUCCESS)
 Main PID: 1295 (ceph-osd)
   CGroup: /system.slice/system-ceph\x2dosd.slice/ceph-osd@2.service
           └─1295 /usr/bin/ceph-osd -f --cluster ceph --id 2 --setuser ceph --setgroup ceph
查看本机所有相关服务的命令
# systemctl status ceph\*.service ceph\*.target
6.集群状态
[cephadmin@ceph-node system]$ sudo ceph -s
  cluster:
    id:     90933ecf-4a54-475b-8222-b2c57868512a
    health: HEALTH_WARN
            Degraded data redundancy: 192 pgs undersized

  services:
    mon: 1 daemons, quorum ceph-node
    mgr: ceph-node(active)
    osd: 3 osds: 3 up, 3 in

  data:
    pools:   2 pools, 192 pgs
    objects: 0  objects, 0 B
    usage:   3.0 GiB used, 21 GiB / 24 GiB avail
    pgs:     192 active+undersized
仔细查了一下active+undersized的含义,主要是指副本数小于目前可用的osd数目,目前每个池设置的副本数为3, OSD的数目为3,但OSD是起动在两个节点上的。
我把pool的size修改成2以后,就变成了active-clean状态了。因此应该是说OSD的虚机节点少于3个。
查看健康详细状况
[cephadmin@ceph-node system]$ sudo ceph health detail
HEALTH_WARN Degraded data redundancy: 192 pgs undersized
PG_DEGRADED Degraded data redundancy: 192 pgs undersized
    pg 1.25 is stuck undersized for 2148.451513, current state active+undersized, last acting [2,1]
    pg 1.26 is stuck undersized for 2148.449879, current state active+undersized, last acting [2,1]
    pg 1.27 is stuck undersized for 2149.024933, current state active+undersized, last acting [1,2]
    pg 1.28 is stuck undersized for 2149.039391, current state active+undersized, last acting [1,2]
    pg 1.29 is stuck undersized for 2148.452042, current state active+undersized, last acting [2,1]
    pg 1.2a is stuck undersized for 2148.451278, current state active+undersized, last acting [2,1]
    pg 1.2b is stuck undersized for 2148.449369, current state active+undersized, last acting [2,1]
    pg 1.2c is stuck undersized for 2148.448546, current state active+undersized, last acting [2,1]
    pg 1.2d is stuck undersized for 2149.038923, current state active+undersized, last acting [1,2]
    pg 1.60 is stuck undersized for 2148.440802, current state active+undersized, last acting [0,1]
    pg 1.61 is stuck undersized for 2148.437982, current state active+undersized, last acting [0,1]
    pg 1.62 is stuck undersized for 2148.449705, current state active+undersized, last acting [2,1]
    pg 1.63 is stuck undersized for 2148.449005, current state active+undersized, last acting [2,1]
    pg 1.64 is stuck undersized for 2148.438782, current state active+undersized, last acting [0,1]
    pg 1.65 is stuck undersized for 2148.452331, current state active+undersized, last acting [2,1]
    pg 1.66 is stuck undersized for 2148.437400, current state active+undersized, last acting [0,1]
    pg 1.67 is stuck undersized for 2149.034058, current state active+undersized, last acting [1,0]
。。。。。
7. 安装RGW
[root@ceph-node ~]# yum install -y ceph-radosgw


[root@ceph-node storage_cluster]# ceph-deploy rgw create ceph-node
[ceph_deploy.conf][DEBUG ] found configuration file at: /root/.cephdeploy.conf
[ceph_deploy.cli][INFO  ] Invoked (2.0.1): /usr/bin/ceph-deploy rgw create ceph-node
[ceph_deploy.cli][INFO  ] ceph-deploy options:
[ceph_deploy.cli][INFO  ]  username                      : None
[ceph_deploy.cli][INFO  ]  verbose                       : False
[ceph_deploy.cli][INFO  ]  rgw                           : [('ceph-node', 'rgw.ceph-node')]
[ceph_deploy.cli][INFO  ]  overwrite_conf                : False
[ceph_deploy.cli][INFO  ]  subcommand                    : create
[ceph_deploy.cli][INFO  ]  quiet                         : False
[ceph_deploy.cli][INFO  ]  cd_conf                       : <ceph_deploy.conf.cephdeploy.Conf instance at 0x1d0bd40>
[ceph_deploy.cli][INFO  ]  cluster                       : ceph
[ceph_deploy.cli][INFO  ]  func                          : <function rgw at 0x1c79e60>
[ceph_deploy.cli][INFO  ]  ceph_conf                     : None
[ceph_deploy.cli][INFO  ]  default_release               : False
[ceph_deploy.rgw][DEBUG ] Deploying rgw, cluster ceph hosts ceph-node:rgw.ceph-node
[ceph-node][DEBUG ] connected to host: ceph-node
[ceph-node][DEBUG ] detect platform information from remote host
[ceph-node][DEBUG ] detect machine type
[ceph_deploy.rgw][INFO  ] Distro info: CentOS Linux 7.4.1708 Core
[ceph_deploy.rgw][DEBUG ] remote host will use systemd
[ceph_deploy.rgw][DEBUG ] deploying rgw bootstrap to ceph-node
[ceph-node][DEBUG ] write cluster configuration to /etc/ceph/{cluster}.conf
[ceph-node][WARNIN] rgw keyring does not exist yet, creating one
[ceph-node][DEBUG ] create a keyring file
[ceph-node][DEBUG ] create path recursively if it doesn't exist
[ceph-node][INFO  ] Running command: ceph --cluster ceph --name client.bootstrap-rgw --keyring /var/lib/ceph/bootstrap-rgw/ceph.keyring auth get-or-create client.rgw.ceph-node osd allow rwx mon allow rw -o /var/lib/ceph/radosgw/ceph-rgw.ceph-node/keyring
[ceph-node][INFO  ] Running command: systemctl enable ceph-radosgw@rgw.ceph-node
[ceph-node][WARNIN] Created symlink from /etc/systemd/system/ceph-radosgw.target.wants/ceph-radosgw@rgw.ceph-node.service to /usr/lib/systemd/system/ceph-radosgw@.service.
[ceph-node][INFO  ] Running command: systemctl start ceph-radosgw@rgw.ceph-node
[ceph-node][INFO  ] Running command: systemctl enable ceph.target
[ceph_deploy.rgw][INFO  ] The Ceph Object Gateway (RGW) is now running on host ceph-node and default port 7480
开启RGW的管理功能
[root@ceph-node storage_cluster]# radosgw-admin user create --uid=user01 --display-name=user01 --system
{
    "user_id": "user01",
    "display_name": "user01",
    "email": "",
    "suspended": 0,
    "max_buckets": 1000,
    "auid": 0,
    "subusers": [],
    "keys": [
        {
            "user": "user01",
            "access_key": "HNMIJRY4WUOYT6L810W6",
            "secret_key": "HmJ4AkcSCJEowwFnGvLOhuk36qnBI83DwKUiwQno"
        }
    ],
    "swift_keys": [],
    "caps": [],
    "op_mask": "read, write, delete",
    "system": "true",

。。。。。。。。

[root@ceph-node storage_cluster]#  ceph dashboard set-rgw-api-access-key HNMIJRY4WUOYT6L810W6
Option RGW_API_ACCESS_KEY updated

[root@ceph-node storage_cluster]# ceph dashboard set-rgw-api-secret-key HmJ4AkcSCJEowwFnGvLOhuk36qnBI83DwKUiwQno
Option RGW_API_SECRET_KEY updated

[root@ceph-node storage_cluster]# ceph dashboard set-rgw-api-host 192.168.56.110
Option RGW_API_HOST updated

[root@ceph-node storage_cluster]# ceph dashboard set-rgw-api-port 7480
Option RGW_API_PORT updated

8. RGW的使用
1.创建用户
[cephadmin@ceph-node storage_cluster]$ radosgw-admin user create --uid="testuser" --display-name="First User"
{
    "user_id": "testuser",
    "display_name": "First User",
    "email": "",
    "suspended": 0,
    "max_buckets": 1000,
    "auid": 0,
    "subusers": [],
    "keys": [
        {
            "user": "testuser",
            "access_key": "CD36LE2ZIYNFJMBW15RK",
            "secret_key": "zAANPUbPAK8RTPSVGFr4xmU2WJqqds9vRoU4fENk"
        }
    ],
。。。。
}

创建swift用户
[cephadmin@ceph-node storage_cluster]$ radosgw-admin subuser create --uid=testuser --subuser=testuser:swift --access=full
{
    "user_id": "testuser",
    "display_name": "First User",
    "email": "",
    "suspended": 0,
    "max_buckets": 1000,
    "auid": 0,
    "subusers": [
        {
            "id": "testuser:swift",
            "permissions": "full-control"
        }
    ],
    "keys": [
        {
            "user": "testuser",
            "access_key": "CD36LE2ZIYNFJMBW15RK",
            "secret_key": "zAANPUbPAK8RTPSVGFr4xmU2WJqqds9vRoU4fENk"
        }
    ],
    "swift_keys": [
        {
            "user": "testuser:swift",
            "secret_key": "7snINqlCxdZin8vwf5n5ChlxYjEIXHooQPB3bbA5"
        }
    ],
。。。。。。

列出用户信息

[cephadmin@ceph-node storage_cluster]$ radosgw-admin user info --uid=testuser
{
    "user_id": "testuser",
    "display_name": "First User",
    "email": "",
    "suspended": 0,
    "max_buckets": 1000,
    "auid": 0,
    "subusers": [
        {
            "id": "testuser:swift",
            "permissions": "full-control"
        }
    ],
2.安装python脚本测试s3接口
 yum install python-boto


[root@ceph-node ~]# cat s3test.py
import boto.s3.connection

access_key = 'CD36LE2ZIYNFJMBW15RK'
secret_key = 'zAANPUbPAK8RTPSVGFr4xmU2WJqqds9vRoU4fENk'
conn = boto.connect_s3(
        aws_access_key_id=access_key,
        aws_secret_access_key=secret_key,
        host='ceph-node', port=7480,
        is_secure=False, calling_format=boto.s3.connection.OrdinaryCallingFormat(),
       )

bucket = conn.create_bucket('my-new-bucket')
for bucket in conn.get_all_buckets():
    print "{name} {created}".format(
        name=bucket.name,
        created=bucket.creation_date,
    )


[root@ceph-node ~]# python s3test.py
my-new-bucket 2023-08-14T06:09:41.739Z
3. 安装s3cmd测试s3接口
[root@ceph-node ~]# yum install -y  s3cmd

[root@ceph-node ~]# s3cmd --configure
一路回车后修改.s3cfg

access_key = CD36LE2ZIYNFJMBW15RK
host_base = ceph-node:7480
host_bucket = ceph-node/bucketname
secret_key = zAANPUbPAK8RTPSVGFr4xmU2WJqqds9vRoU4fENk
use_https = False
基本使用
列举出所有buckets(bucket相当于根文件夹)
s3cmd ls
创建 bucket,且 bucket 名称是唯一的,不能重复
s3cmd mb s3://my-bucket-name
删除空 bucket
s3cmd rb s3://my-bucket-name
列举 bucket 中的内容
s3cmd ls s3://my-bucket-name
上传文件到某个 bucket
s3cmd put file.txt s3://my-bucket-name/file.txt
上传并将权限设置为所有人可读
s3cmd put --acl-public file.txt s3://my-bucket-name/file.txt,文件对应的可访问URL: http://192.168.1.11:80/my-bucket-name/file.txt
从某个bucket下载文件,并进行保存为某文件
s3cmd get s3://my-bucket-name/file.txt xxx
删除某个文件
s3cmd del s3://my-bucket-name/file.txt
设置bucket的public权限
s3cmd setacl s3://myexamplebucket.calvium.com/ --acl-public --recursive
获得某个bucket所占用的空间大小
s3cmd du -H s3://my-bucket-name
Swift客户端测试
[root@ceph-node ~]# curl https://bootstrap.pypa.io/get-pip.py -o get-pip.py
  % Total    % Received % Xferd  Average Speed   Time    Time     Time  Current
                                 Dload  Upload   Total   Spent    Left  Speed
100 2544k  100 2544k    0     0   5360      0  0:08:06  0:08:06 --:--:--  8507
[root@ceph-node ~]# python get-pip.py
ERROR: This script does not work on Python 2.7 The minimum supported Python version is 3.7. Please use https://bootstrap.pypa.io/pip/2.7/get-pip.py instead.
[root@ceph-node ~]# curl https://bootstrap.pypa.io/pip/2.7/get-pip.py -o get-pip1.py
  % Total    % Received % Xferd  Average Speed   Time    Time     Time  Current
                                 Dload  Upload   Total   Spent    Left  Speed
100 1863k  100 1863k    0     0  21276      0  0:01:29  0:01:29 --:--:-- 34877

[root@ceph-node ~]# python get-pip1.py
DEPRECATION: Python 2.7 reached the end of its life on January 1st, 2020. Please upgrade your Python as Python 2.7 is no longer maintained. pip 21.0 will drop support for Python 2.7 in January 2021. More details about Python 2 support in pip can be found at https://pip.pypa.io/en/latest/development/release-process/#python-2-support pip 21.0 will remove support for this functionality.
Collecting pip<21.0
  Downloading pip-20.3.4-py2.py3-none-any.whl (1.5 MB)
     |████████████████████████████████| 1.5 MB 444 kB/s
Collecting wheel
  Downloading wheel-0.37.1-py2.py3-none-any.whl (35 kB)
Installing collected packages: pip, wheel
Successfully installed pip-20.3.4 wheel-0.37.1
[root@ceph-node ~]# pip install --upgrade setuptools
DEPRECATION: Python 2.7 reached the end of its life on January 1st, 2020. Please upgrade your Python as Python 2.7 is no longer maintained. pip 21.0 will drop support for Python 2.7 in January 2021. More details about Python 2 support in pip can be found at https://pip.pypa.io/en/latest/development/release-process/#python-2-support pip 21.0 will remove support for this functionality.
Collecting setuptools
  Downloading setuptools-44.1.1-py2.py3-none-any.whl (583 kB)
     |████████████████████████████████| 583 kB 284 kB/s
Installing collected packages: setuptools
  Attempting uninstall: setuptools
    Found existing installation: setuptools 0.9.8
    Uninstalling setuptools-0.9.8:
      Successfully uninstalled setuptools-0.9.8
Successfully installed setuptools-44.1.1

[root@ceph-node ~]# pip install --upgrade python-swiftclient
DEPRECATION: Python 2.7 reached the end of its life on January 1st, 2020. Please upgrade your Python as Python 2.7 is no longer maintained. pip 21.0 will drop support for Python 2.7 in January 2021. More details about Python 2 support in pip can be found at https://pip.pypa.io/en/latest/development/release-process/#python-2-support pip 21.0 will remove support for this functionality.
Collecting python-swiftclient
  Downloading python_swiftclient-3.13.1-py2.py3-none-any.whl (87 kB)
     |████████████████████████████████| 87 kB 237 kB/s
Collecting futures>=3.0.0; python_version == "2.7"
  Downloading futures-3.4.0-py2-none-any.whl (16 kB)
Requirement already satisfied, skipping upgrade: requests>=1.1.0 in /usr/lib/python2.7/site-packages (from python-swiftclient) (2.6.0)
Requirement already satisfied, skipping upgrade: six>=1.9.0 in /usr/lib/python2.7/site-packages (from python-swiftclient) (1.9.0)
Installing collected packages: futures, python-swiftclient
Successfully installed futures-3.4.0 python-swiftclient-3.13.1

[root@ceph-node ~]# swift -A http://ceph-node:7480/auth/1.0 -U testuser:swift -K '7snINqlCxdZin8vwf5n5ChlxYjEIXHooQPB3bbA5' list
my-new-bucket
8.确定后端存储采用filestore还是bluestore
[root@ceph-node storage_cluster]# ceph osd count-metadata osd_objectstore
{
    "bluestore": 3
}

[root@ceph-node storage_cluster]# ceph osd metadata 1 | grep objectstore
    "osd_objectstore": "bluestore",
9.采用root能够运行ceph -s ,而cephadmin 运行报错
[cephadmin@ceph-clusterb storage_cluster]$ ceph -s
2023-09-07 11:26:25.317 7ff280a4a700 -1 auth: unable to find a keyring on /etc/ceph/ceph.client.admin.keyring,/etc/ceph/ceph.keyring,/etc/ceph/keyring,/etc/ceph/keyring.bin,: (2) No such file or directory
2023-09-07 11:26:25.317 7ff280a4a700 -1 monclient: ERROR: missing keyring, cannot use cephx for authentication
[errno 2] error connecting to the cluster
由于ceph.client.admin.keyring的读写权限问题导致
[cephadmin@ceph-clusterb storage_cluster]$ ll /etc/ceph/ceph.client.admin.keyring
-rw-------. 1 root root 151 Sep  7 10:47 /etc/ceph/ceph.client.admin.keyring


[cephadmin@ceph-clusterb storage_cluster]$ sudo chmod +r /etc/ceph/ceph.client.admin.keyring
[cephadmin@ceph-clusterb storage_cluster]$ ceph -s
  cluster:
    id:     84b6bd00-6082-41a0-9e64-19e2b5eec605
    health: HEALTH_WARN
            OSD count 1 < osd_pool_default_size 3

  services:
    mon: 1 daemons, quorum ceph-clusterb
    mgr: ceph-clusterb(active)
    osd: 1 osds: 1 up, 1 in

  data:
    pools:   0 pools, 0 pgs
    objects: 0  objects, 0 B
    usage:   1.0 GiB used, 19 GiB / 20 GiB avail
    pgs:
参考文章
https://technologyrss.com/how-to-install-ceph-cluster-on-centos-7-using-single-server/
https://ralph.blog.imixs.com/2020/02/28/howto-install-ceph-on-centos-7/
https://www.cnblogs.com/punchlinux/p/17053827.html
https://www.virtualtothecore.com/adventures-with-ceph-storage-part-7-add-a-node-and-expand-the-cluster-storage/
https://juejin.cn/post/7086381284733222948
https://www.51cto.com/article/641024.html

 浙公网安备 33010602011771号