RocketMQ源码详解 | Broker篇 · 其二:文件系统
概述
在 Broker 的通用请求处理器将一个消息进行分发后,就来到了 Broker 的专门处理消息存储的业务处理器部分。本篇文章,我们将要探讨关于 RocketMQ 高效的原因之一:文件结构的良好设计与对 Page Cache 的极致"压榨"。
文件系统的结构设计
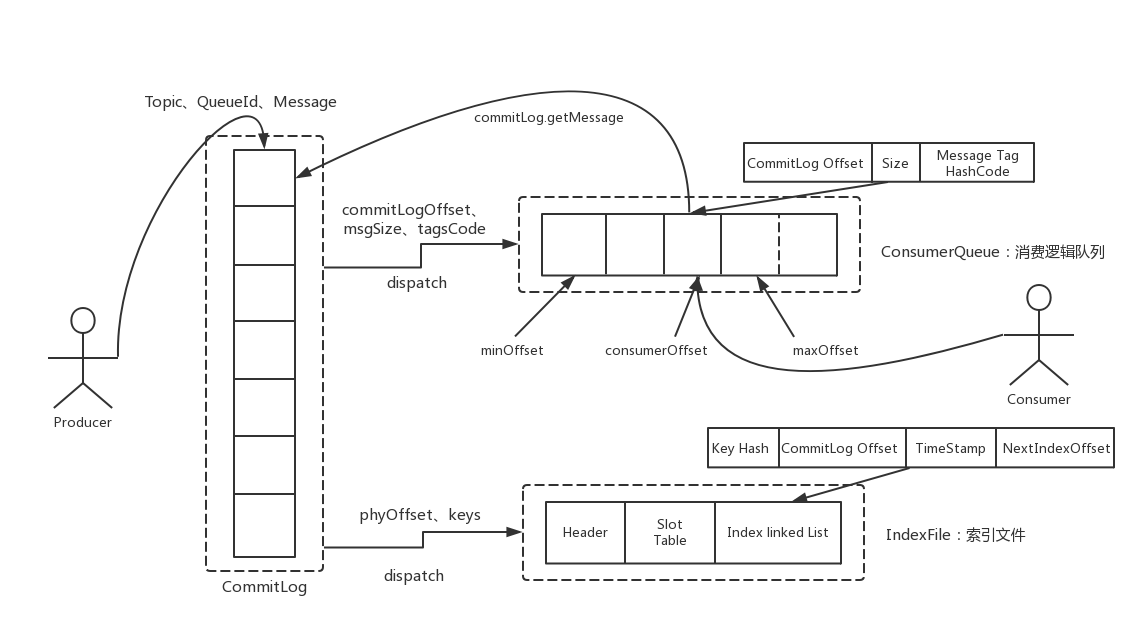
在 RocketMQ 的 Broker 中,有一类叫做 CommitLog 的文件,所有在该 Broker 上的 Topic 上的消息都会顺序的写入到这个文件中。
该消息的元信息存储着消息所在的 Topic 与 Queue。当消费者要进行消费时,会通过 ConsumerQueue 文件来找到自己想要消费的队列。
该队列不存储具体的消息,而是存储消息的基本信息与偏移量。消费者通过偏移量去 CommitLog 中找到自己需要消费的信息然后取出,就可以进行消费。
并且,Broker 还可以对 CommitLog 来建立 Hash 索引文件 IndexFile,这样就可以通过 消息的 key 来找到消息。
官网上的这张图很好的表示了三类文件之间的关系。当然这章我们还是先只来看 CommitLog,其他两个留给下一章。

消息管理的结构层次
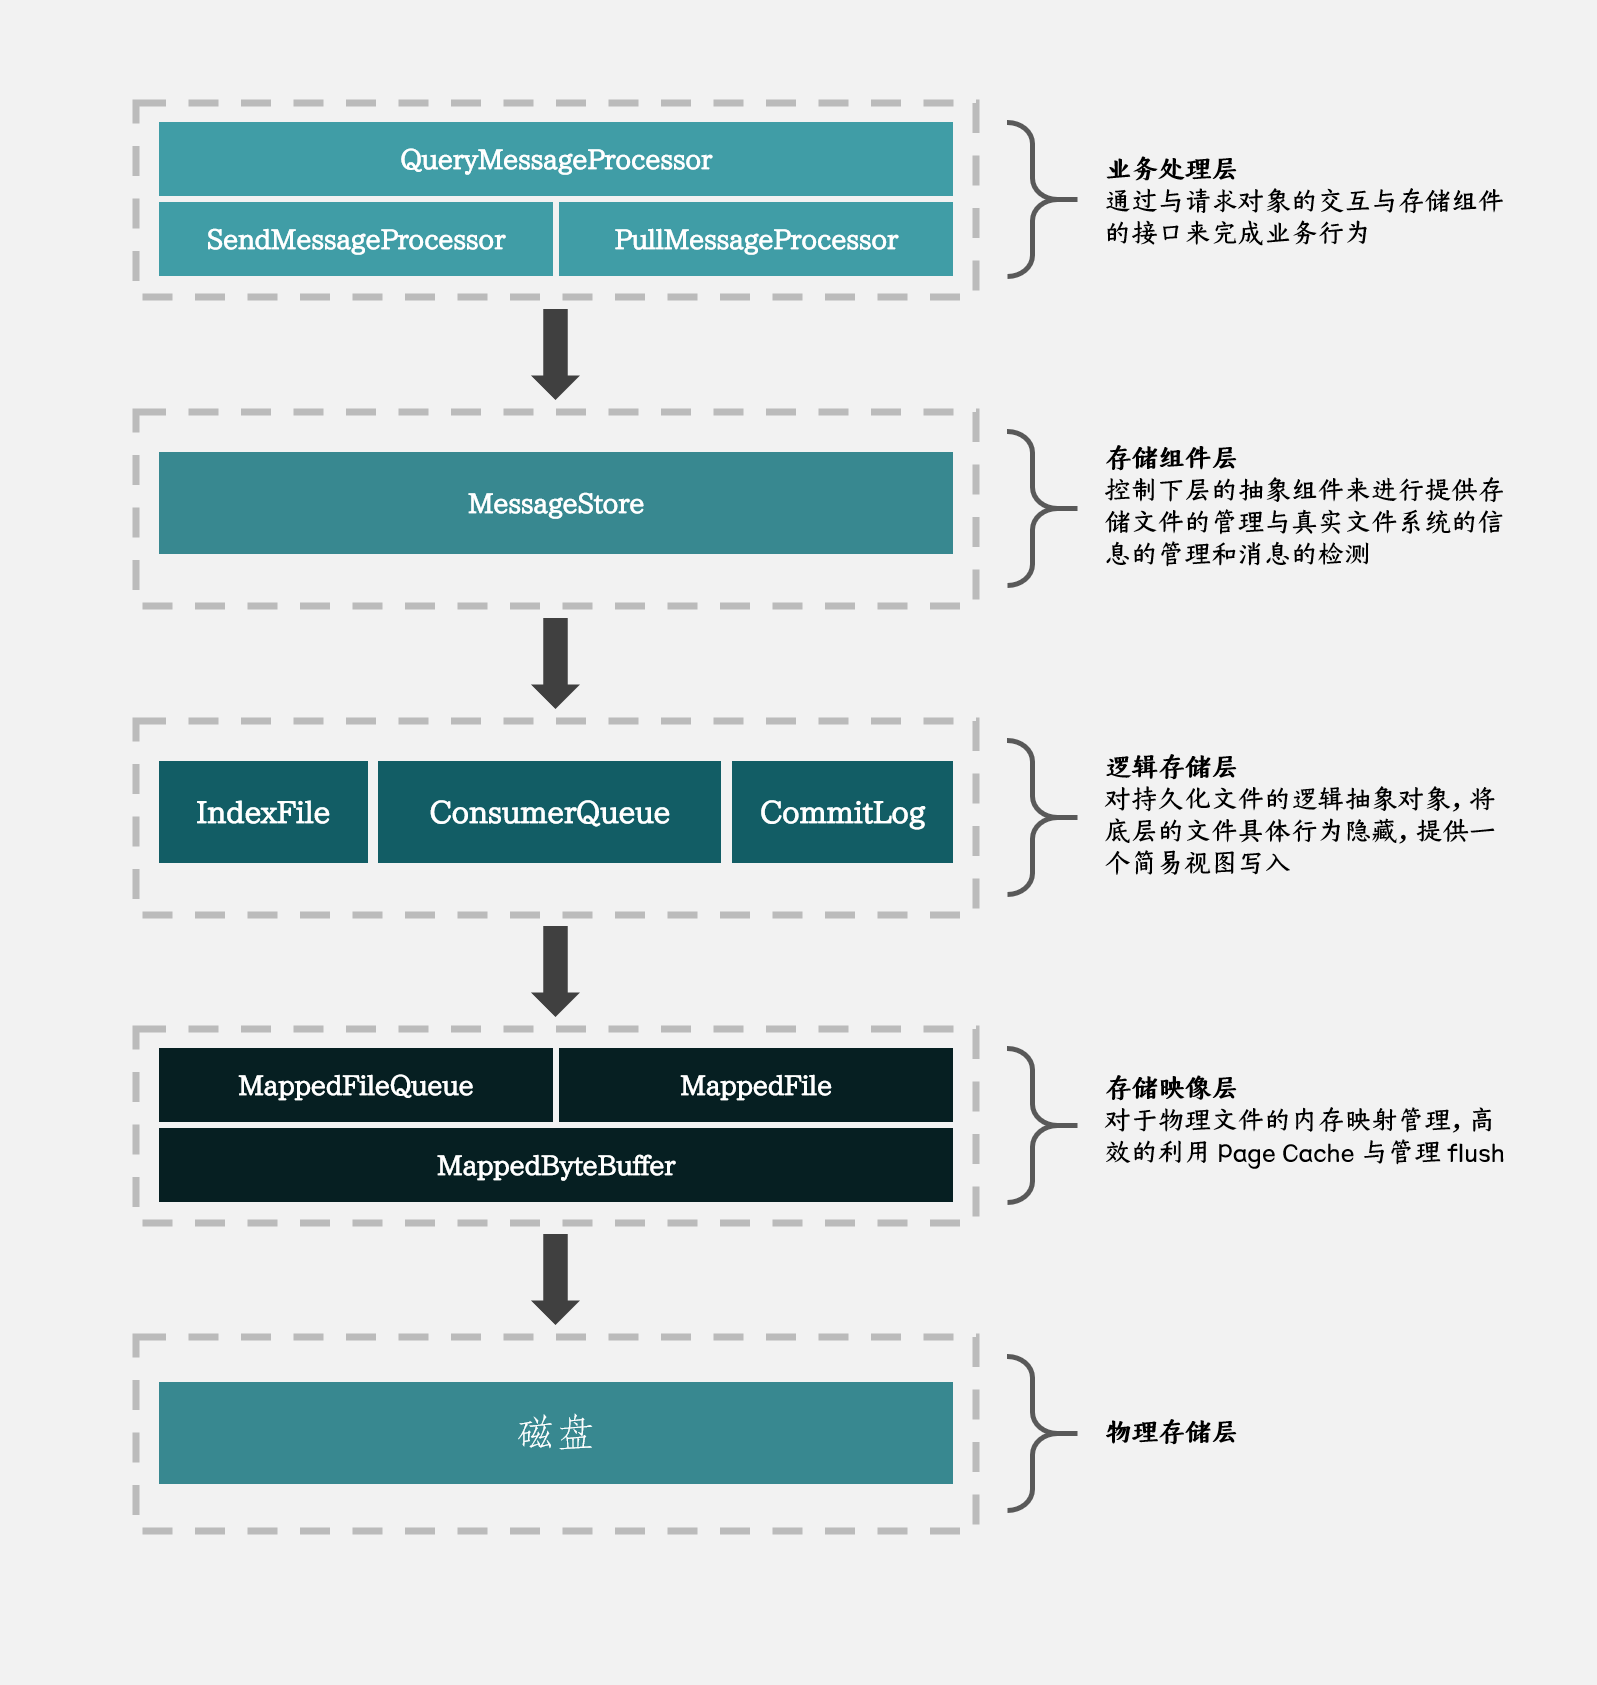
在学习 Broker 对于消息的处理时,我们可以跟着下面这张图走,这样可以对 Broker 的文件系统有一个清晰的了解

上图的主要思路来源于 该图 ,由于找不到原作者,故进行了重制与拓展
业务处理层
在 上一篇文章 中,我们看到在 BrokerController 中,SendMessageProcessor 注册了以下请求码
this.remotingServer.registerProcessor(RequestCode.SEND_MESSAGE, sendProcessor, this.sendMessageExecutor);
this.remotingServer.registerProcessor(RequestCode.SEND_MESSAGE_V2, sendProcessor, this.sendMessageExecutor);
this.remotingServer.registerProcessor(RequestCode.SEND_BATCH_MESSAGE, sendProcessor, this.sendMessageExecutor);
this.remotingServer.registerProcessor(RequestCode.CONSUMER_SEND_MSG_BACK, sendProcessor, this.sendMessageExecutor);
同时,在处理业务请求时,通用请求处理器是,通过调用 AsyncNettyRequestProcessor 的 asyncProcessRequest 方法来处理连接和命令的,虽然也有同步的调用,但实际上大部分的业务处理 handler 都实现了异步的请求处理方法。
@Override
public void asyncProcessRequest(ChannelHandlerContext ctx, RemotingCommand request, RemotingResponseCallback responseCallback) throws Exception {
  asyncProcessRequest(ctx, request).thenAcceptAsync(responseCallback::callback, this.brokerController.getSendMessageExecutor());
}
在 SendMessageProcessor 中,它首先是构造了一个异步处理方法(asyncProcessRequest),然后由自己的线程池去执行(thenAcceptAsync)。
根据上一章最后的那张线程模型的图,我们能知道构造这个异步方法和该方法的调用,都是通过自己的线程池来执行的,所以和同步执行的区别不是很大。
进入到异步方法的构造
public CompletableFuture<RemotingCommand> asyncProcessRequest(ChannelHandlerContext ctx,
                                                              RemotingCommand request) throws RemotingCommandException {
  final SendMessageContext mqtraceContext;
  switch (request.getCode()) {
    case RequestCode.CONSUMER_SEND_MSG_BACK:
      return this.asyncConsumerSendMsgBack(ctx, request);
    default:
      // 重建请求头
      SendMessageRequestHeader requestHeader = parseRequestHeader(request);
      if (requestHeader == null) {
        return CompletableFuture.completedFuture(null);
      }
      // 构建 MQ trace 上下文
      mqtraceContext = buildMsgContext(ctx, requestHeader);
      this.executeSendMessageHookBefore(ctx, request, mqtraceContext);

      if (requestHeader.isBatch()) {
        return this.asyncSendBatchMessage(ctx, request, mqtraceContext, requestHeader);
      } else {
        return this.asyncSendMessage(ctx, request, mqtraceContext, requestHeader);
      }
  }
}
在这里对不同的请求进行分别处理,我们现在在意的是 SEND_MESSAGE ,所以先进入到 asyncSendMessage
// 重组
final RemotingCommand response = preSend(ctx, request, requestHeader);
// 构建响应头
final SendMessageResponseHeader responseHeader = (SendMessageResponseHeader)response.readCustomHeader();

if (response.getCode() != -1) {
  return CompletableFuture.completedFuture(response);
}

final byte[] body = request.getBody();

// 获取队列与 Topic 配置
int queueIdInt = requestHeader.getQueueId();
TopicConfig topicConfig = this.brokerController.getTopicConfigManager().selectTopicConfig(requestHeader.getTopic());

if (queueIdInt < 0) {
  queueIdInt = randomQueueId(topicConfig.getWriteQueueNums());
}

// 以内部消息的格式存储
MessageExtBrokerInner msgInner = new MessageExtBrokerInner();
msgInner.setTopic(requestHeader.getTopic());
msgInner.setQueueId(queueIdInt);

// 对于重试消息和延迟消息的处理
if (!handleRetryAndDLQ(requestHeader, response, request, msgInner, topicConfig)) {
  return CompletableFuture.completedFuture(response);
}

msgInner.setBody(body);
/*        pass:这里设置了一堆其他属性        */

CompletableFuture<PutMessageResult> putMessageResult = null;
String transFlag = origProps.get(MessageConst.PROPERTY_TRANSACTION_PREPARED);
if (transFlag != null && Boolean.parseBoolean(transFlag)) {
  if (this.brokerController.getBrokerConfig().isRejectTransactionMessage()) {
    response.setCode(ResponseCode.NO_PERMISSION);
    response.setRemark(
      "the broker[" + this.brokerController.getBrokerConfig().getBrokerIP1()
      + "] sending transaction message is forbidden");
    return CompletableFuture.completedFuture(response);
  }
  putMessageResult = this.brokerController.getTransactionalMessageService().asyncPrepareMessage(msgInner);
} else {
  putMessageResult = this.brokerController.getMessageStore().asyncPutMessage(msgInner);
}
// 对于写入结果,构造响应
return handlePutMessageResultFuture(putMessageResult, response, request, msgInner, responseHeader, mqtraceContext, ctx, queueIdInt);
在这里,它做了这几件事:
- 将消息通过内部消息(
MessageExtBrokerInner)的格式保存 - 将重试消息、延时消息、事务消息由其他方法处理
- 除了完请求后,构造响应结果并返回
然后,我们进入了 Rocket 的存储组件层
存储组件层
这一层主要是负责操作下一层的逻辑文件对象来响应上一层的下发的请求。
工作的类是 MessageStore,主要的实现是 DefaultMessageStore
接着对"放入消息"这个命令来进行响应
// 检查持久化层的状态
PutMessageStatus checkStoreStatus = this.checkStoreStatus();
if (checkStoreStatus != PutMessageStatus.PUT_OK) {
  return CompletableFuture.completedFuture(new PutMessageResult(checkStoreStatus, null));
}

// 检查消息正确
PutMessageStatus msgCheckStatus = this.checkMessage(msg);
if (msgCheckStatus == PutMessageStatus.MESSAGE_ILLEGAL) {
  return CompletableFuture.completedFuture(new PutMessageResult(msgCheckStatus, null));
}

// 存储消息到 CommitLog
CompletableFuture<PutMessageResult> putResultFuture = this.commitLog.asyncPutMessage(msg);

putResultFuture.thenAccept((result) -> {
  /*  pass:更新度量信息 */
});
return putResultFuture;
到达了这一层后,首先对当前的持久化能力进行检查:
- 是否已经关闭
- 是否为从 Broker
- 是否可写(磁盘满、写索引错误等问题)
- page cache 是否 busy 或被禁用
然后是消息的限制进行检查。
在检查完成后进入下一层
逻辑存储层
逻辑存储层中,CommitLog 是 RocketMQ 中持久化文件的抽象逻辑对象,它将底层的存储结构与细节隐藏,可以当作是一个文件来写入。
ConsumerQueue 则是一个 queue 在 CommitLog 中的消息的指针结构的文件抽象。IndexFile 是索引文件。
这一层比较复杂,我们分段来读
// 设置存储时间
msg.setStoreTimestamp(System.currentTimeMillis());
// 设置 CRC32
msg.setBodyCRC(UtilAll.crc32(msg.getBody()));
// 返回结果
AppendMessageResult result = null;

// 持久化的度量信息管理服务
StoreStatsService storeStatsService = this.defaultMessageStore.getStoreStatsService();

String topic = msg.getTopic();
int queueId = msg.getQueueId();

final int tranType = MessageSysFlag.getTransactionValue(msg.getSysFlag());
// 非事务或为提交消息
if (tranType == MessageSysFlag.TRANSACTION_NOT_TYPE
    || tranType == MessageSysFlag.TRANSACTION_COMMIT_TYPE) {
  // 需要延迟投递的话
  if (msg.getDelayTimeLevel() > 0) {
    if (msg.getDelayTimeLevel() > this.defaultMessageStore.getScheduleMessageService().getMaxDelayLevel()) {
      msg.setDelayTimeLevel(this.defaultMessageStore.getScheduleMessageService().getMaxDelayLevel());
    }

    topic = TopicValidator.RMQ_SYS_SCHEDULE_TOPIC;
    queueId = ScheduleMessageService.delayLevel2QueueId(msg.getDelayTimeLevel());

    // Backup real topic, queueId
    MessageAccessor.putProperty(msg, MessageConst.PROPERTY_REAL_TOPIC, msg.getTopic());
    MessageAccessor.putProperty(msg, MessageConst.PROPERTY_REAL_QUEUE_ID, String.valueOf(msg.getQueueId()));
    msg.setPropertiesString(MessageDecoder.messageProperties2String(msg.getProperties()));

    msg.setTopic(topic);
    msg.setQueueId(queueId);
  }
}

InetSocketAddress bornSocketAddress = (InetSocketAddress) msg.getBornHost();
if (bornSocketAddress.getAddress() instanceof Inet6Address) {
  msg.setBornHostV6Flag();
}

InetSocketAddress storeSocketAddress = (InetSocketAddress) msg.getStoreHost();
if (storeSocketAddress.getAddress() instanceof Inet6Address) {
  msg.setStoreHostAddressV6Flag();
}

PutMessageThreadLocal putMessageThreadLocal = this.putMessageThreadLocal.get();
// 进行编码,返回结果不为空则说明出现异常
PutMessageResult encodeResult = putMessageThreadLocal.getEncoder().encode(msg);
if (encodeResult != null) {
  return CompletableFuture.completedFuture(encodeResult);
}
首先在第一部分,RocketMQ 对消息的信息进行进一步补充,也就是将上面讲过的 MessageExtBrokerInner 补充完整以存储。如持久化时间、完整性校验。
同时对于事务消息与延时消息也要补充额外的信息,例如对于延迟消息,要装入真实 Topic 的信息(延时消息的实现是通过更换 Topic 的"戏法"来实现的)
你可能会疑惑,事务消息和延时消息不是已经在业务处理层被其他方法处理到了吗?实际上,那些方法最终还是会调用这个方法来做持久化
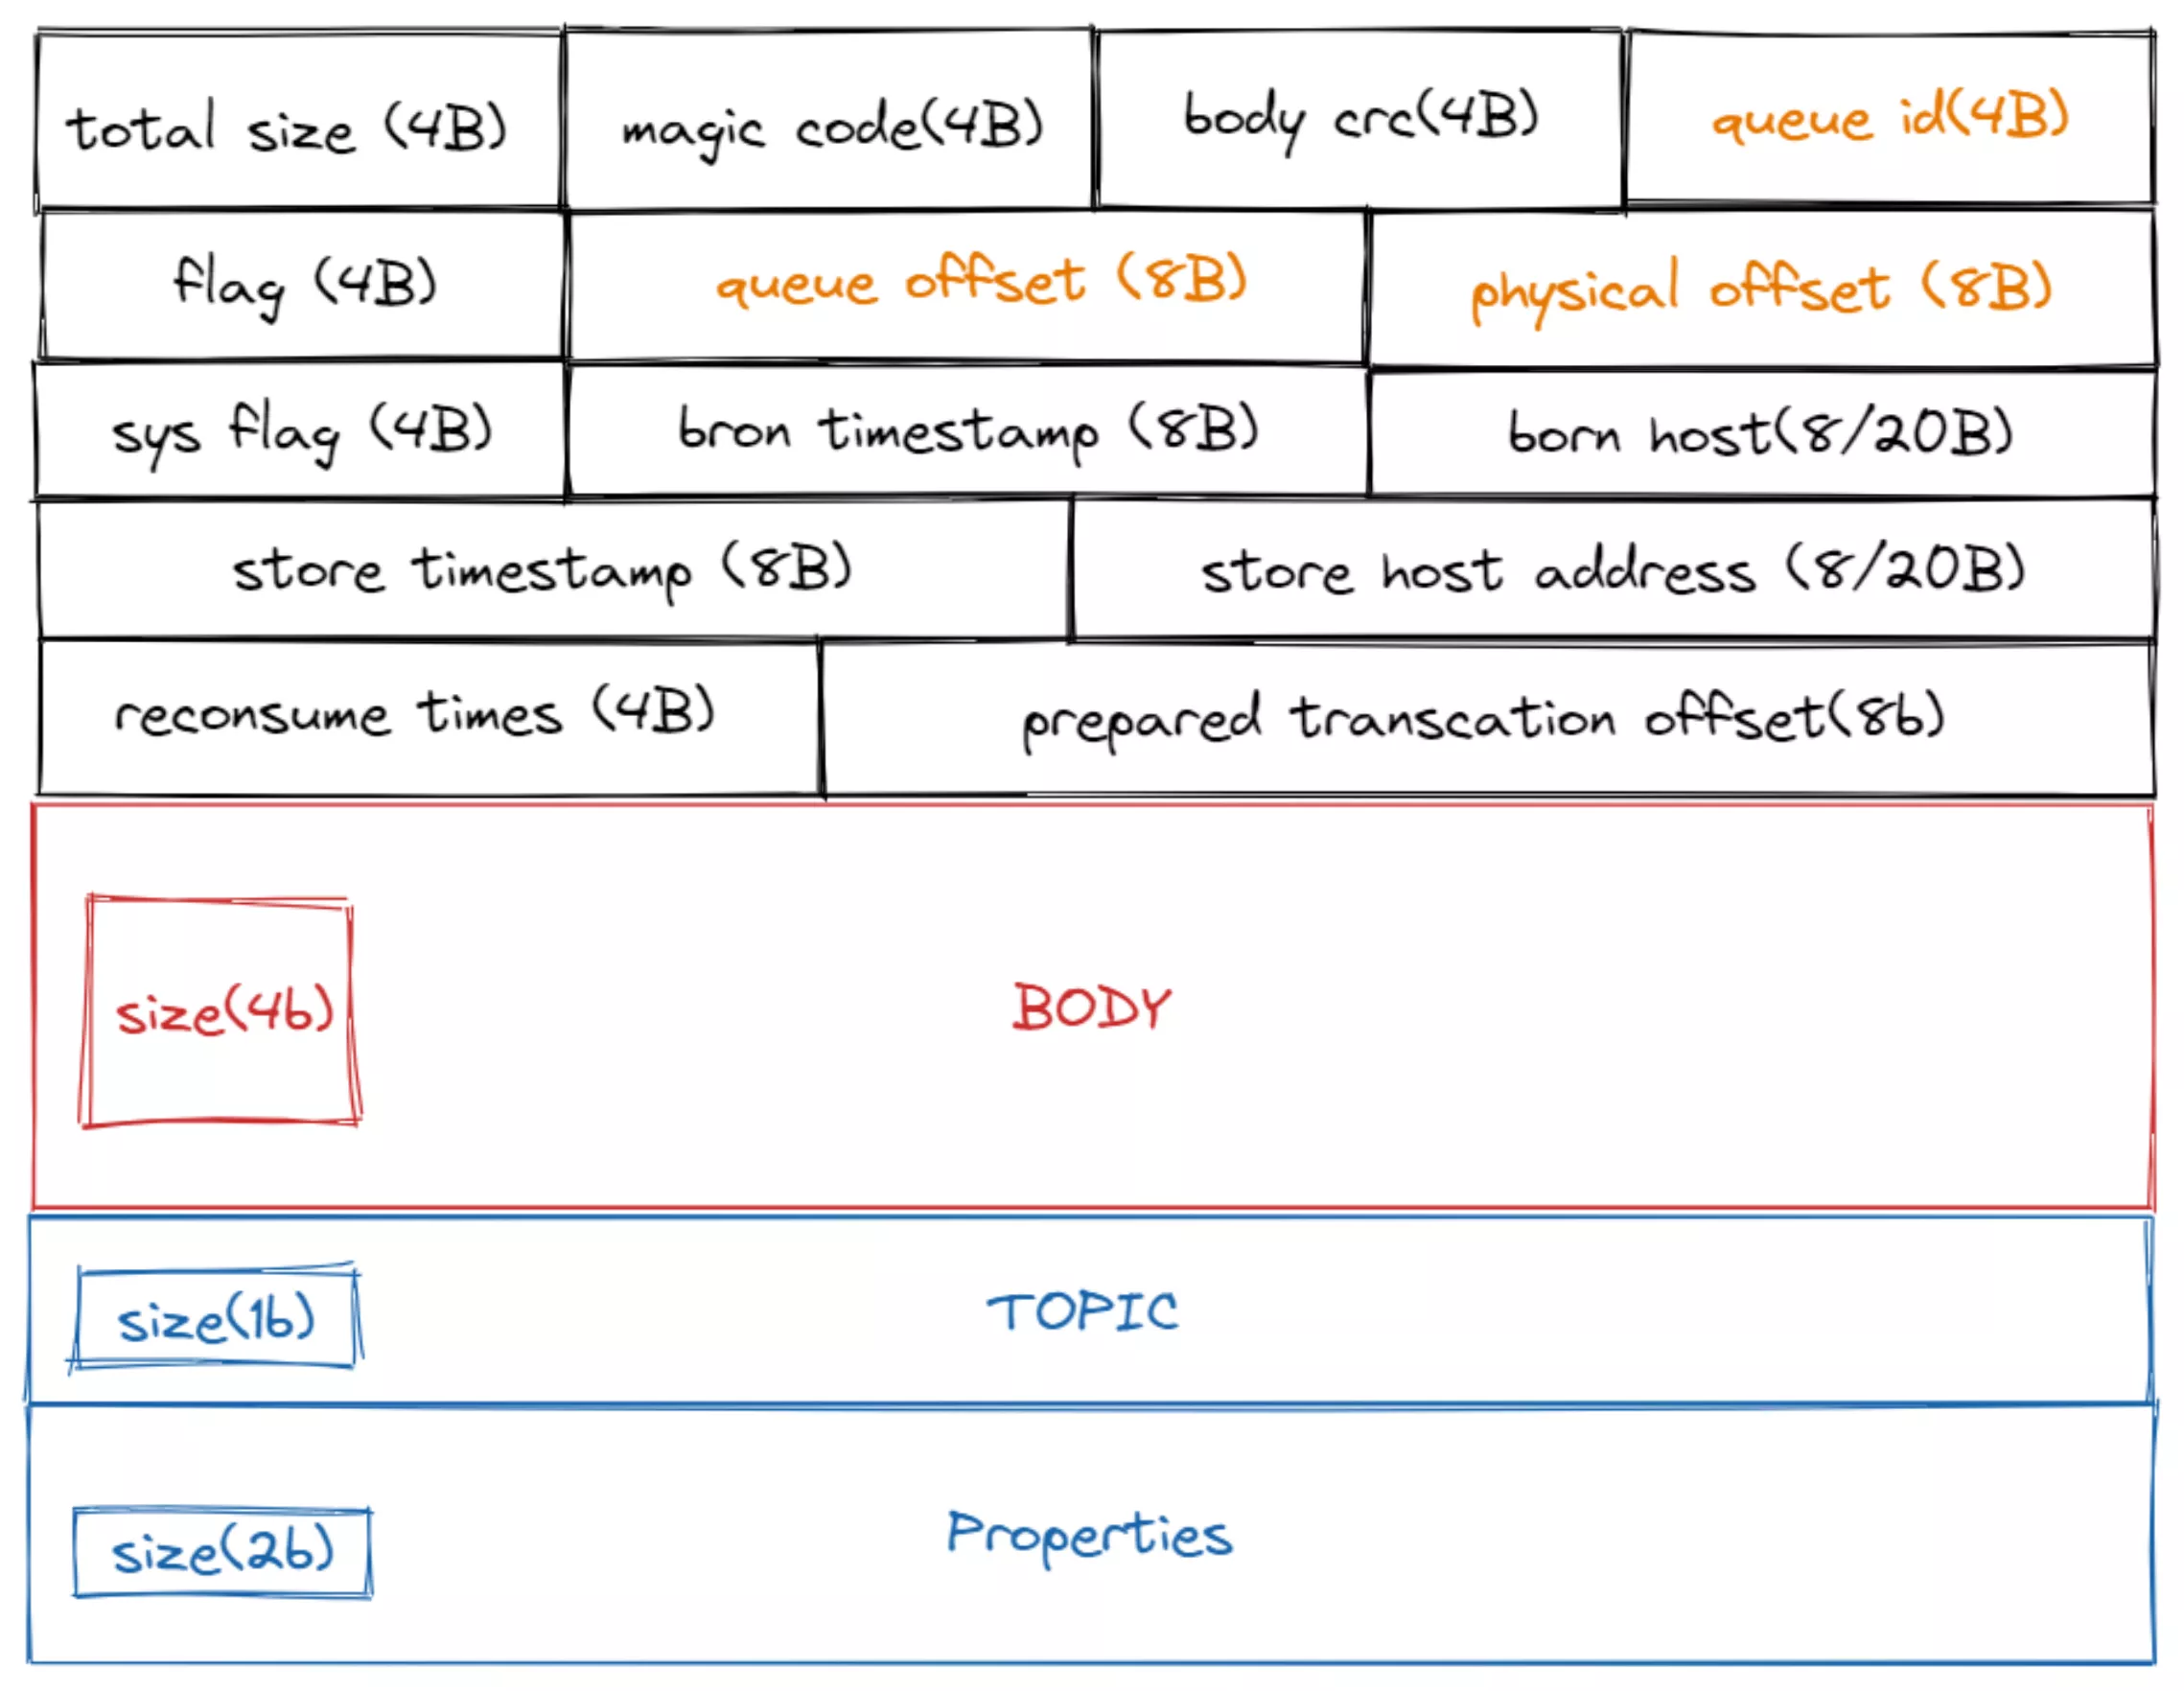
在消息的具体的信息都补充完成后,就会开始进行编码为字节数组,具体的代码在 MessageExtEncoder#encode
编码完成后的 byte 数组,就是一条消息在磁盘上的真实物理结构

| 字段 | 含义 |
|---|---|
| total size | 该消息的总长度 |
| magic code | 魔数 |
| body crc | 消息的 body 部分的 CRC32 |
| queue id | 该消息所属的 queue id |
| flag | 区分是普通 RPC 还是 oneway RPC 的标志 |
| queue offset | 在所属 queue 内的偏移量 |
| physical offset | 在 commitLog 中的物理上的实际偏移量 |
| sys flag | 见下表 |
| born timestamp | 生产时间 |
| born host | 生产所在主机IP(可能是 IPV4 或 IPV6) |
| store timestamp | 持久化时间 |
| store host | 持久化所在 Broekr |
| reconsume time | 重消费次数 |
| prepared transcation offset | 一个事务中 prepared 消息的 offset |
sys flag
| 变量名 | 含义 |
|---|---|
| COMPRESSED_FLAG | 压缩消息。消息为批量的时候,就会进行压缩,默认使用5级的 zip |
| MULTI_TAGS_FLAG | 有多个 tag。 |
| TRANSACTION_NOT_TYPE | 事务为未知状态。当 Broker 回查 Producer 的时候,如果为 Commit 应该提交,为 Rollback 应该回滚,为 Unknown 时应该继续回查 |
| TRANSACTION_PREPARED_TYPE | 事务的运行状态。当前消息是事务的一部分 |
| TRANSACTION_COMMIT_TYPE | 事务的提交消息。要求提交事务 |
| TRANSACTION_ROLLBACK_TYPE | 事务的回滚消息。要求回滚事务 |
| BORNHOST_V6_FLAG | 生成该消息的 host 是否 ipv6 的地址 |
| STOREHOSTADDRESS_V6_FLAG | 持久化该消息的 host 是否是 ipv6 的地址 |
然后接着来看第二部分
// 文件写入,加锁
putMessageLock.lock(); // 自旋锁或可重入锁的选择取决于存储引擎配置
try {
  // 获取最新的 MappedFile
  MappedFile mappedFile = this.mappedFileQueue.getLastMappedFile();
  long beginLockTimestamp = this.defaultMessageStore.getSystemClock().now();
  this.beginTimeInLock = beginLockTimestamp;

  // 通过设置时间戳保证全局有序
  msg.setStoreTimestamp(beginLockTimestamp);

  // 不存在或已满则创建
  if (null == mappedFile || mappedFile.isFull()) {
    mappedFile = this.mappedFileQueue.getLastMappedFile(0); // Mark: NewFile may be cause noise
  }
  if (null == mappedFile) {
    log.error("create mapped file1 error, topic: " + msg.getTopic() + " clientAddr: " + msg.getBornHostString());
    beginTimeInLock = 0;
    return CompletableFuture.completedFuture(new PutMessageResult(PutMessageStatus.CREATE_MAPEDFILE_FAILED, null));
  }

  // 追加写到消息
  result = mappedFile.appendMessage(msg, this.appendMessageCallback, putMessageContext);

  // 写结果处理
  switch (result.getStatus()) {
    case PUT_OK:
      break;
    case END_OF_FILE:
      // 到文件尾部则创建文件且写入消息
      unlockMappedFile = mappedFile;
      // 创建文件
      mappedFile = this.mappedFileQueue.getLastMappedFile(0);
      if (null == mappedFile) {
        // XXX: warn and notify me
        beginTimeInLock = 0;
        return CompletableFuture.completedFuture(new PutMessageResult(PutMessageStatus.CREATE_MAPEDFILE_FAILED, result));
      }
      // 创建完成后重新写入
      result = mappedFile.appendMessage(msg, this.appendMessageCallback, putMessageContext);
      break;

    case XXX:
    /*    pass:对于异常结果设置响应码,且直接返回   */
  }
  elapsedTimeInLock = this.defaultMessageStore.getSystemClock().now() - beginLockTimestamp;
  beginTimeInLock = 0;
} finally {
  putMessageLock.unlock();
}

/* pass:打Log  */

PutMessageResult putMessageResult = new PutMessageResult(PutMessageStatus.PUT_OK, result);

// 更新度量数据
storeStatsService.getSinglePutMessageTopicTimesTotal(msg.getTopic()).incrementAndGet();
storeStatsService.getSinglePutMessageTopicSizeTotal(topic).addAndGet(result.getWroteBytes());

// 刷盘请求
CompletableFuture<PutMessageStatus> flushResultFuture = submitFlushRequest(result, msg);
// 副本策略
CompletableFuture<PutMessageStatus> replicaResultFuture = submitReplicaRequest(result, msg);
return flushResultFuture.thenCombine(replicaResultFuture, (flushStatus, replicaStatus) -> {
	/* pass:对于刷盘问题和副本问题设置响应码 */
});
当要存放的消息组装好后,就对文件写入加锁,且交给下一层写入。写入完成后如果成功则会进行刷盘检查和使用副本策略。
存储映像层
存储映像层中,MappedFile 是对一个物理文件的抽象,MappedFileQueue 是一组文件的队列,MappedByteBuffer 则是一个映射到物理文件所对应的 page cache 的一块内存。
在上一层中,它尝试从当前的 mappedFileQueue 获取或创建最新的 MappedFile,然后将 byte 数组交给其写入。
我们再来看看这层是怎么处理写入的。
// 获取写指针
int currentPos = this.wrotePosition.get();

if (currentPos < this.fileSize) {
  ByteBuffer byteBuffer = writeBuffer != null ? writeBuffer.slice() : this.mappedByteBuffer.slice();
  byteBuffer.position(currentPos);
  AppendMessageResult result;
  // 将 byteBuffer 交给 AppendMessageCallback 写入
  if (messageExt instanceof MessageExtBrokerInner) {
    result = cb.doAppend(this.getFileFromOffset(), byteBuffer, this.fileSize - currentPos,
                         (MessageExtBrokerInner) messageExt, putMessageContext);
  } else if (messageExt instanceof MessageExtBatch) {
    result = cb.doAppend(this.getFileFromOffset(), byteBuffer, this.fileSize - currentPos,
                         (MessageExtBatch) messageExt, putMessageContext);
  } else {
    return new AppendMessageResult(AppendMessageStatus.UNKNOWN_ERROR);
  }
  // 更新写位置
  this.wrotePosition.addAndGet(result.getWroteBytes());
  // 更新持久化时间戳
  this.storeTimestamp = result.getStoreTimestamp();
  return result;
}
log.error("MappedFile.appendMessage return null, wrotePosition: {} fileSize: {}", currentPos, this.fileSize);
return new AppendMessageResult(AppendMessageStatus.UNKNOWN_ERROR);
在这层,该 MappedFile 首先会获取 writeBuffer 或 mappedByteBuffer 作为 ByteBuffer ,然后尝试进行写入
writeBuffer 和 mappedByteBuffer
writeBuffer 是一块直接内存,也就是说它并不受 Java 堆去管理,当然也不会被 GC 限制。
而 mappedByteBuffer 则是一块映射到 CommitLog 文件的内存(具体可以了解 mmap )。
准确来讲,它占用了 page cache 的一部分,也就是说写入这里的文件可以免去 从用户空间到内核空间一次拷贝成本,这叫做 零拷贝(zero-copy) 。
而如果通过 writeBuffer 写入,则需要再写入对应 CommitLog 文件的 Channel (如果我们的 writeBuffer 不是堆外内存,那还会发生一次从堆到堆外的拷贝),写入 Channel 实际上是写入了 page cache,也就是 mappedByteBuffer 映射的那部分。
所以说,如果在 Channel 写入,那我们是可以在 mappedByteBuffer 上读取到的。
但是 page cache 中的内存终究只是一块内存,断电宕机就会丢失,所以是一定会写回到硬盘中。Linux 中具有多种写回策略,这里就不列举了。
提到这个是因为 writeBuffer 和 mappedByteBuffer 的写回问题。
我们知道他们在写入后是写入到同一块 page cache,但是在 flush 回磁盘的时候,他们则是"各写各的",这点在 FileChannel 上的注释有提到。
在后文介绍刷盘策略的时候,同步刷盘时是只对这两块 buffer 中的一块进行 flush(因为我们只对一块写入)
了解了这两块 ByteBuffer 的作用后,我们再接着看是具体怎么写入的
public AppendMessageResult doAppend(
  // 文件开始写的偏移量
  final long fileFromOffset,
  // 和文件映射好的一块 DirectBuffer
  final ByteBuffer byteBuffer,
  // 最大空隙
  final int maxBlank,
  // 需要写入的消息
  final MessageExtBrokerInner msgInner,
  PutMessageContext putMessageContext) {
  // 物理上的开始写时偏移量
  long wroteOffset = fileFromOffset + byteBuffer.position();

  // id = 持久化时时间戳 + 持久化所在host + 物理偏移量
  Supplier<String> msgIdSupplier = () -> {
    int sysflag = msgInner.getSysFlag();
    int msgIdLen = (sysflag & MessageSysFlag.STOREHOSTADDRESS_V6_FLAG) == 0 ? 4 + 4 + 8 : 16 + 4 + 8;
    ByteBuffer msgIdBuffer = ByteBuffer.allocate(msgIdLen);
    MessageExt.socketAddress2ByteBuffer(msgInner.getStoreHost(), msgIdBuffer);
    msgIdBuffer.clear();//because socketAddress2ByteBuffer flip the buffer
    msgIdBuffer.putLong(msgIdLen - 8, wroteOffset);
    return UtilAll.bytes2string(msgIdBuffer.array());
  };

  // 获取逻辑队列的消费偏移量
  String key = putMessageContext.getTopicQueueTableKey();
  long queueOffset = CommitLog.this.topicQueueTable.computeIfAbsent(key, k -> 0L);

  // 特殊处理事务消息
  final int tranType = MessageSysFlag.getTransactionValue(msgInner.getSysFlag());
  switch (tranType) {
      // Prepared 消息和 Rollback 消息不会被消费,不会进入 consumer queue
    case MessageSysFlag.TRANSACTION_PREPARED_TYPE:
    case MessageSysFlag.TRANSACTION_ROLLBACK_TYPE:
      queueOffset = 0L;
      break;
    case MessageSysFlag.TRANSACTION_NOT_TYPE:
    case MessageSysFlag.TRANSACTION_COMMIT_TYPE:
    default:
      break;
  }

  ByteBuffer preEncodeBuffer = msgInner.getEncodedBuff();
  final int msgLen = preEncodeBuffer.getInt(0);

  // 确保有充足的空间,没有则进来新建文件
  if ((msgLen + END_FILE_MIN_BLANK_LENGTH) > maxBlank) {
    this.msgStoreItemMemory.clear();
    this.msgStoreItemMemory.putInt(maxBlank);
    this.msgStoreItemMemory.putInt(CommitLog.BLANK_MAGIC_CODE);
    final long beginTimeMills = CommitLog.this.defaultMessageStore.now();
    // 将总长与魔数写入尾部
    byteBuffer.put(this.msgStoreItemMemory.array(), 0, 8);
    return new AppendMessageResult(AppendMessageStatus.END_OF_FILE, wroteOffset,
                                   maxBlank, /* only wrote 8 bytes, but declare wrote maxBlank for compute write position */
                                   msgIdSupplier, msgInner.getStoreTimestamp(),
                                   queueOffset, CommitLog.this.defaultMessageStore.now() - beginTimeMills);
  }

  int pos = 4 + 4 + 4 + 4 + 4;
  // 6 填充之前没有写的 queue 中偏移量
  preEncodeBuffer.putLong(pos, queueOffset);
  pos += 8;
  // 7 commit log 上的偏移量(当前文件的全局偏移量 + 文件内偏移量)
  preEncodeBuffer.putLong(pos, fileFromOffset + byteBuffer.position());
  int ipLen = (msgInner.getSysFlag() & MessageSysFlag.BORNHOST_V6_FLAG) == 0 ? 4 + 4 : 16 + 4;
  // 8 SYSFLAG, 9 BORNTIMESTAMP, 10 BORNHOST, 11 STORETIMESTAMP
  pos += 8 + 4 + 8 + ipLen;
  preEncodeBuffer.putLong(pos, msgInner.getStoreTimestamp());


  final long beginTimeMills = CommitLog.this.defaultMessageStore.now();

  // 正式将数据写入文件(准确来讲,是缓冲区或 page cache)
  byteBuffer.put(preEncodeBuffer);

  msgInner.setEncodedBuff(null);
  AppendMessageResult result = new AppendMessageResult(AppendMessageStatus.PUT_OK, wroteOffset, msgLen, msgIdSupplier,
                                                       msgInner.getStoreTimestamp(), queueOffset, CommitLog.this.defaultMessageStore.now() - beginTimeMills);

  switch (tranType) {
    case MessageSysFlag.TRANSACTION_PREPARED_TYPE:
    case MessageSysFlag.TRANSACTION_ROLLBACK_TYPE:
      break;
    case MessageSysFlag.TRANSACTION_NOT_TYPE:
    case MessageSysFlag.TRANSACTION_COMMIT_TYPE:
      // The next update ConsumeQueue information
      CommitLog.this.topicQueueTable.put(key, ++queueOffset);
      break;
    default:
      break;
  }
  return result;
}
在获取后计算写入的偏移量与要填充的信息(在上一层的持久化格式的创建中并没有填充所有的内容),统计根据计算后的偏移量来观察是否需要新建文件,不需要的话可以直接写入。这样就完成了写入。
在写入完成后,我们回到逻辑存储层,那里会继续更新度量信息和进行刷盘策略和副本同步策略
刷盘策略
在写入完成后,逻辑存储层 会对根据当前的刷盘策略来做对应的操作
public CompletableFuture<PutMessageStatus> submitFlushRequest(AppendMessageResult result, MessageExt messageExt) {
  // 同步刷盘策略
  if (FlushDiskType.SYNC_FLUSH == this.defaultMessageStore.getMessageStoreConfig().getFlushDiskType()) {
    final GroupCommitService service = (GroupCommitService) this.flushCommitLogService;
    if (messageExt.isWaitStoreMsgOK()) {
      // 写入位置结束点 与 刷盘超时时间
      GroupCommitRequest request = new GroupCommitRequest(result.getWroteOffset() + result.getWroteBytes(),
                                                          this.defaultMessageStore.getMessageStoreConfig().getSyncFlushTimeout());
      service.putRequest(request);
      return request.future();
    } else {
      service.wakeup();
      return CompletableFuture.completedFuture(PutMessageStatus.PUT_OK);
    }
  } else /* 异步刷盘 */ {
    if (!this.defaultMessageStore.getMessageStoreConfig().isTransientStorePoolEnable()) {
      flushCommitLogService.wakeup();
    } else {
      commitLogService.wakeup();
    }
    return CompletableFuture.completedFuture(PutMessageStatus.PUT_OK);
  }
}
在以上代码中,会根据策略来选择不同的刷盘服务,所有的刷盘服务都继承自 FlushCommitLogService :
-
GroupCommitService
同步的刷盘策略
-
FlushRealTimeService
异步的刷盘策略
-
CommitRealTimeService
只 commit 策略
同步
我们先来看第一个刷盘策略的实现
在这个策略的实现中,具有两个请求存放队列
private volatile LinkedList<GroupCommitRequest> requestsWrite = new LinkedList<>();
private volatile LinkedList<GroupCommitRequest> requestsRead = new LinkedList<>();
在请求到达的时候,会放入 write 队列
public synchronized void putRequest(final GroupCommitRequest request) {
  lock.lock();
  try {
    // 加入到请求队列
    this.requestsWrite.add(request);
  } finally {
    lock.unlock();
  }
  // 唤醒提交线程
  this.wakeup();
}
从源码看得出,这里的刷盘并不是由当前线程自己去刷盘,而是阻塞直到另一个专门的刷盘线程来刷盘后再继续运行。
我们再来看刷盘线程的运行
public void run() {
  while (!this.isStopped()) {
    try {
      // 在这里会进行等待,并交换读写队列
      // 这样设计可以避免单个队列的加锁并发问题
      this.waitForRunning(10);
      // 尝试提交
      this.doCommit();
    } catch (Exception e) {
      CommitLog.log.warn(this.getServiceName() + " service has exception. ", e);
    }
  }

  // shutdown,处理最后的请求
  try {
    Thread.sleep(10);
  } catch (InterruptedException e) {
    CommitLog.log.warn("GroupCommitService Exception, ", e);
  }
  synchronized (this) {
    this.swapRequests();
  }
  this.doCommit();
}
这里主要还是等待然后尝试提交。这里之所以说是尝试,是因为其 waitForRunning 方法的实现
protected void waitForRunning(long interval) {
  // 如果能 cas,说明已经有线程提交了请求
  if (hasNotified.compareAndSet(true, false)) {
    this.onWaitEnd();
    return;
  }

  waitPoint.reset();

  try {
    // 否则 wait 直到请求到来被唤醒或睡够了
    waitPoint.await(interval, TimeUnit.MILLISECONDS);
  } catch (InterruptedException e) {
    log.error("Interrupted", e);
  } finally {
    hasNotified.set(false);
    this.onWaitEnd();
  }
}
它的最大等待时间只有 10 毫秒,且当结束时会调用 this.onWaitEnd() 方法,这会让 requestRead 队列和 requestWrite 队列交换。这样可以减少在运行时的同步问题。
同时需要注意的是 waitForRunning 方法是在其父类 ServiceThread 中实现的,而 onWaitEnd 方法是留给其子类实现的一个方法
然后进入到 doCommit 方法
private void doCommit() {
  if (!this.requestsRead.isEmpty()) {
    for (GroupCommitRequest req : this.requestsRead) {
      // 判断 已经flush到的位置 是否大于 请求中需要flush到的位置
      // 如果是的话,当然就不需要 flush 了
      boolean flushOK = CommitLog.this.mappedFileQueue.getFlushedWhere() >= req.getNextOffset();
      // 下一个文件中可能有消息,所以最多可以 flush 两次
      for (int i = 0; i < 2 && !flushOK; i++) {
        // 进行 flush
        CommitLog.this.mappedFileQueue.flush(0);

        flushOK = CommitLog.this.mappedFileQueue.getFlushedWhere() >= req.getNextOffset();
      }
      // flush complete, so wakeup
      req.wakeupCustomer(flushOK ? PutMessageStatus.PUT_OK : PutMessageStatus.FLUSH_DISK_TIMEOUT);
    }

    long storeTimestamp = CommitLog.this.mappedFileQueue.getStoreTimestamp();
    if (storeTimestamp > 0) {
      CommitLog.this.defaultMessageStore.getStoreCheckpoint().setPhysicMsgTimestamp(storeTimestamp);
    }

    // 换一个新的队列
    this.requestsRead = new LinkedList<>();
  } else {
    // 因为个别消息设置为 async flush,所以会来到这个地方
    CommitLog.this.mappedFileQueue.flush(0);
  }
}
代码和注释讲的都比较的清楚了,主要的是对 mappedFileQueue 的最新的一个 mappedFile 进行 flush,而这个方法同样会被其他刷盘策略使用,所以我们等看完了其他刷盘策略后再了解
异步
接着看异步的刷盘策略,异步刷盘相较同步要简单一些,只是简单的将异步刷盘线程唤醒
while (!this.isStopped()) {
	/* pass:基本变量的获取 */

  // 当当前时间超最久需要 flush 时间,则将 flush 所需页设定为0 (立即 flush)
  if (currentTimeMillis >= (this.lastFlushTimestamp + flushPhysicQueueThoroughInterval)) {
    this.lastFlushTimestamp = currentTimeMillis;
    flushPhysicQueueLeastPages = 0;
  }

  try {
    // 是否开启定时刷新
    if (flushCommitLogTimed) {
      Thread.sleep(interval);
    } else {
      // 如果关闭则需要会在写入后自行通知来唤醒当前线程
      this.waitForRunning(interval);
    }

    if (printFlushProgress) {
      this.printFlushProgress();
    }

    long begin = System.currentTimeMillis();

    // 进行 flush
    CommitLog.this.mappedFileQueue.flush(flushPhysicQueueLeastPages);

    long storeTimestamp = CommitLog.this.mappedFileQueue.getStoreTimestamp();
    if (storeTimestamp > 0) {
      CommitLog.this.defaultMessageStore.getStoreCheckpoint().setPhysicMsgTimestamp(storeTimestamp);
    }
    long past = System.currentTimeMillis() - begin;
    if (past > 500) {
      log.info("Flush data to disk costs {} ms", past);
    }
  } catch (Throwable e) {
    CommitLog.log.warn(this.getServiceName() + " service has exception. ", e);
    this.printFlushProgress();
  }
}

// 在 shutdown 前,确保所有的消息都被 flush
boolean result = false;
for (int i = 0; i < RETRY_TIMES_OVER && !result; i++) {
  result = CommitLog.this.mappedFileQueue.flush(0);
}
这里的刷盘策略可以用一句话概括:(距离上次刷盘超过了一定时间) 或 (在 page cache 中的脏页超过指定数量) 则进行刷盘
至于只 commit 策略,它的策略和异步刷盘策略差不多,只是刷盘后更新的指针与使用的刷盘方法不一样。
也就是说最大的区别在于,它并没有刷盘,只是将 writeBuffer 中的内容 write 到了 channel (page cache) 而已。
刷盘实现
接下来看同步策略和异步策略的具体刷盘方法
public boolean flush(final int flushLeastPages) {
  boolean result = true;
  MappedFile mappedFile = this.findMappedFileByOffset(this.flushedWhere, this.flushedWhere == 0);
  if (mappedFile != null) {
    long tmpTimeStamp = mappedFile.getStoreTimestamp();

    // 对找到的最新 MappedFile flush
    int offset = mappedFile.flush(flushLeastPages);

    long where = mappedFile.getFileFromOffset() + offset;
    result = where == this.flushedWhere;
    this.flushedWhere = where;
    if (0 == flushLeastPages) {
      this.storeTimestamp = tmpTimeStamp;
    }
  }

  return result;
}
这里通过偏移量找到 MappedFile,然后调用其的 flush 方法并更新指针
public int flush(final int flushLeastPages) {
  if (this.isAbleToFlush(flushLeastPages)) {
    if (this.hold()) {
      int value = getReadPosition();

      try {
        // 只 flush fileChannel 和 mappedByteBuffer 其一
        if (writeBuffer != null || this.fileChannel.position() != 0) {
          this.fileChannel.force(false);
        } else {
          this.mappedByteBuffer.force();
        }
      } catch (Throwable e) {
        log.error("Error occurred when force data to disk.", e);
      }

      // 更新已经 flush 的偏移量
      this.flushedPosition.set(value);
      this.release();
    } else {
      log.warn("in flush, hold failed, flush offset = " + this.flushedPosition.get());
      this.flushedPosition.set(getReadPosition());
    }
  }
  return this.getFlushedPosition();
}
首先,先判断是否运行写入,判断主要是根据当前在 page cache 中脏页的页数是否超过传入的 flushLeastPages。
最后则是对于 writeBuffer 和 mappedByteBuffer 任一调用 force 方法刷盘。


【推荐】还在用 ECharts 开发大屏?试试这款永久免费的开源 BI 工具!
【推荐】国内首个AI IDE,深度理解中文开发场景,立即下载体验Trae
【推荐】编程新体验,更懂你的AI,立即体验豆包MarsCode编程助手
【推荐】轻量又高性能的 SSH 工具 IShell:AI 加持,快人一步