docker镜像导入导出
与docker镜像或容器导入导出的命令主要有4个:docker save、docker load、docker export和docker import。
镜像的导入导出
镜像的导入导出要用docker save和docker load。
Usage:    docker save [OPTIONS] IMAGE [IMAGE...]
Save one or more images to a tar archive (streamed to STDOUT by default)
Options:
  -o, --output string   Write to a file, instead of STDOUT

Usage:    docker load [OPTIONS]
Load an image from a tar archive or STDIN
Options:
  -i, --input string   Read from tar archive file, instead of STDIN
  -q, --quiet          Suppress the load output
如下以Ubuntu:16.04为例说明使用方法。
$ docker images | grep ubuntu
ubuntu                                                                   16.04               a3551444fc85        2 weeks ago         119MB
$ docker save ubuntu:16.04 >ubuntu_test.tar
$ docker rmi ubuntu:16.04
Untagged: ubuntu:16.04
Untagged: ubuntu@sha256:6aa6090ee9c1a525cbad1bb6c2ec9278914db754a3a3c5dc9e7d8daa5ee40dce
$ docker images | grep ubuntu
$ docker load -i ubuntu_test.tar
Loaded image: ubuntu:16.04
$ docker images | grep ubuntu
ubuntu                                                                   16.04               a3551444fc85        2 weeks ago         119MB
导出的镜像tar包结构:

容器的导入导出
容器导入导出使用docker import和docker export。
Usage:    docker import [OPTIONS] file|URL|- [REPOSITORY[:TAG]]
Import the contents from a tarball to create a filesystem image
Options:
  -c, --change list      Apply Dockerfile instruction to the created image
  -m, --message string   Set commit message for imported image

Usage:    docker export [OPTIONS] CONTAINER
Export a container's filesystem as a tar archive
Options:
  -o, --output string   Write to a file, instead of STDOUT
docker import和export操作的对象是容器的文件系统。
使用示例如下:
首先启动Ubuntu容器
docker run -it --name="ubuntu_test_container" ubuntu:16.04 /bin/sh
#
另一终端操作:
$ docker ps
CONTAINER ID        IMAGE               COMMAND             CREATED             STATUS              PORTS               NAMES
9acca5fbb513        ubuntu:16.04        "/bin/sh"           48 seconds ago      Up 47 seconds                           ubuntu_test_container
$ docker export ubuntu_test_container >ubuntu_test_container.tar
$ docker stop ubuntu_test_container
ubuntu_test_container
$ docker rm ubuntu_test_container
ubuntu_test_container
wang@ubuntu-wang:~/vmlinuxq/docker_dir$ docker ps -a | grep ubuntu
$
$ docker import ubuntu_test_container.tar ubuntu_test_container:test
sha256:c55718d49b25f8779bbba8acb1f046792d920280edbabdeda2136170f15e9b49
$ docker images | grep ubuntu
ubuntu_test_container                                                    test                c55718d49b25        16 seconds ago      86.1MB
ubuntu                                                                   16.04               a3551444fc85        2 weeks ago         119MB
从上面的命令可以看出,docker import将container导入后会成为一个image,而不是恢复为一个container。
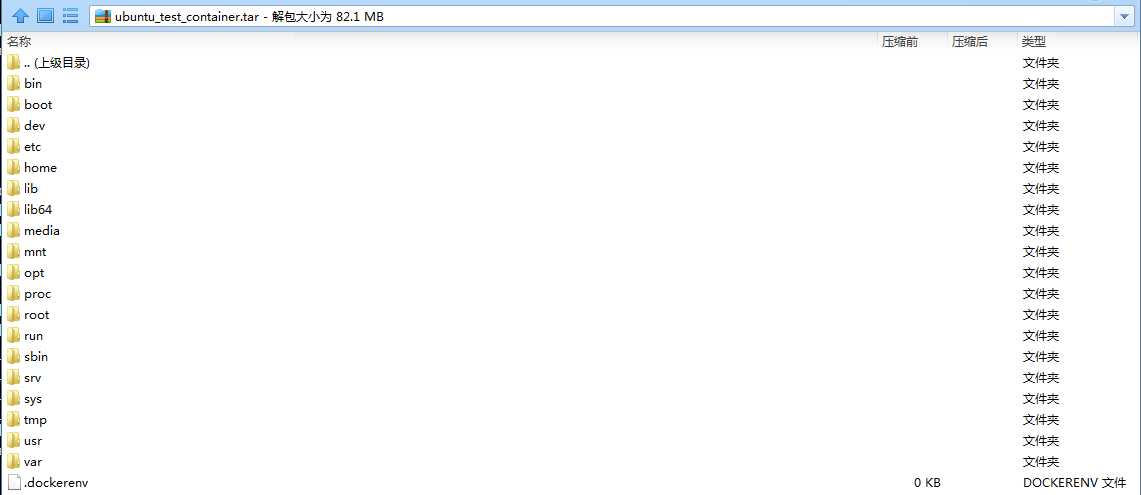
导出的tar包结构如下:

注:容器导出的tar包是文件系统,且大小比镜像导出的tar小。
tar包自动导入
用户既可以使用 docker load 来导入镜像tar到本地镜像库,也可以使用 docker import 来导入一个容器tar到本地镜像库。这两者的区别在于容器tar将丢弃所有的历史记录和元数据信息(即仅保存容器当时的快照状态),而镜像tar将保存完整记录,体积也要大。此外,从容器tar导入时可以重新指定标签等元数据信息。
镜像和容器导出的tar包组织结构完全不同,可根据tar中标志性文件区分两种类型tar包并分别使用相应的docker load或docker import导入镜像。
可选择如下文件作为两种类型tar包的区分:
镜像tar包:manifest.json repositories
容器tar包:.dockerenv
shell脚本docker_upload.sh实现如下:
#/bin/sh

if [ $# != 1 ]; then
    echo "Usage: $0 *.tar"
    exit -1
fi

TAR_FILE=$1

tar tvf ${TAR_FILE} | grep -e 'manifest' -e 'repositories' -q

if [ $? == 0 ]; then
    docker load -i ${TAR_FILE} || echo "-------->tar format is error!"
else
    tar tvf ${TAR_FILE} | grep 'dockerenv' -q && docker import  ${TAR_FILE} || echo "-------->tar format is error!"
fi

exit 0
其只需要一个参数tar名即可。
使用log如下:
$ docker images | grep ubuntu
ubuntu_test_container                                                    test                c55718d49b25        16 seconds ago      86.1MB
ubuntu                                                                   16.04               a3551444fc85        2 weeks ago         119MB
$ docker rmi ubuntu_test_container:test
Untagged: ubuntu_test_container:test
Deleted: sha256:c55718d49b25f8779bbba8acb1f046792d920280edbabdeda2136170f15e9b49
Deleted: sha256:f9b4a355fcdbd19af98724b4b6cfb19ae0434b495bb92e7e78f67d288d84322e
$ docker rmi ubuntu:16.04
Untagged: ubuntu:16.04
$ docker images | grep ubuntu
$
$ chmod +x docker_upload.sh
/docker_upload.sh ubuntu_test_container.tar
sha256:96bd3e320b8abd008df6fa29a2e6ba0e7fcf57591a9d2bafc97d4a0c8578fc52
wang@ubuntu-wang:~/vmlinuxq/docker_dir$ docker images
REPOSITORY                                                               TAG                 IMAGE ID            CREATED             SIZE
<none>                                                                   <none>              96bd3e320b8a        20 seconds ago      86.1MB
$ ./docker_upload.sh ubuntu_test.tar
Loaded image: ubuntu:16.04
$ docker images | grep ubuntu
ubuntu                                                                   16.04               a3551444fc85        2 weeks ago         119MB
注:因为参数只有一个tar名,所以导入容器时搜索到的镜像和tag都是<none>。
参考:
1.https://jingsam.github.io/2017/08/26/docker-save-and-docker-export.html


 浙公网安备 33010602011771号