css26 CSS Layout - The display Property
https://www.w3schools.com/css/css_display_visibility.asp
CSS Layout - The display Property
The display property is the most important CSS property for controlling layout.
The display Property
The display property is used to specify how an element is shown on a web page.
Every HTML element has a default display value, depending on what type of element it is. The default display value for most elements is block or inline.
The display property is used to change the default display behavior of HTML elements.
Block-level Elements
A block-level element ALWAYS starts on a new line and takes up the full width available (stretches out to the left and right as far as it can).

Examples of block-level elements:
- <div>
- <h1> - <h6>
- <p>
- <form>
- <header>
- <footer>
- <section>
Inline Elements
An inline element DOES NOT start on a new line and only takes up as much width as necessary.

Examples of inline elements:
- <span>
- <a>
- <img>
The display Property Values
The display property has many values:
| Value | Description |
|---|---|
| inline | Displays an element as an inline element |
| block | Displays an element as a block element |
| contents | Makes the container disappear, making the child elements children of the element the next level up in the DOM |
| flex | Displays an element as a block-level flex container |
| grid | Displays an element as a block-level grid container |
| inline-block | Displays an element as an inline-level block container. The element itself is formatted as an inline element, but you can apply height and width values |
| inline-flex | Displays an element as an inline-level flex container |
| inline-grid | Displays an element as an inline-level grid container |
| inline-table | The element is displayed as an inline-level table |
| list-item | Let the element behave like a <li> element |
| run-in | Displays an element as either block or inline, depending on context |
| table | Let the element behave like a <table> element |
| table-caption | Let the element behave like a <caption> element |
| table-column-group | Let the element behave like a <colgroup> element |
| table-header-group | Let the element behave like a <thead> element |
| table-footer-group | Let the element behave like a <tfoot> element |
| table-row-group | Let the element behave like a <tbody> element |
| table-cell | Let the element behave like a <td> element |
| table-column | Let the element behave like a <col> element |
| table-row | Let the element behave like a <tr> element |
| none | The element is completely removed |
| initial | Sets this property to its default value |
| inherit | Inherits this property from its parent element |
Display: none;
display: none; is commonly used with JavaScript to hide and show elements without deleting and recreating them. Take a look at our last example on this page if you want to know how this can be achieved.
The <script> element uses display: none; as default.


Override The Default Display Value
As mentioned, every element has a default display value. However, you can override this.
Changing an inline element to a block element, or vice versa, can be useful for making the page look a specific way, and still follow the web standards.
A common example is making inline <li> elements for horizontal menus:
Example
li {
display: inline;
}
<!DOCTYPE html>
<html>
<head>
<style>
li {
  display: inline;
}
</style>
</head>
<body>

<p>Display a list of links as a horizontal menu:</p>

<ul>
  <li><a href="/html/default.asp" target="_blank">HTML</a></li>
  <li><a href="/css/default.asp" target="_blank">CSS</a></li>
  <li><a href="/js/default.asp" target="_blank">JavaScript</a></li>
</ul>

</body>
</html>

Note: Setting the display property of an element only changes how the element is displayed, NOT what kind of element it is. So, an inline element with display: block; is not allowed to have other block elements inside it.
The following example displays <span> elements as block elements:
Example
span {
display: block;
}
<!DOCTYPE html>
<html>
<head>
<style>
span {
  display: block;
}
</style>
</head>
<body>

<h1>Display span elements as block elements</h1>

<span>A display property with</span> <span>a value of "block" results in</span> <span>a line break between each span elements.</span>

</body>
</html>

The following example displays <a> elements as block elements:
Example
a {
display: block;
}
<!DOCTYPE html>
<html>
<head>
<style>
a {
  display: block;
}
</style>
</head>
<body>

<h1>Display links as block elements</h1>

<a href="/html/default.asp" target="_blank">HTML</a>
<a href="/css/default.asp" target="_blank">CSS</a>
<a href="/js/default.asp" target="_blank">JavaScript</a>

</body>
</html>

Hide an Element - display:none or visibility:hidden?

Hiding an element can be done by setting the display property to none. The element will be hidden, and the page will be displayed as if the element is not there:
Example
h1.hidden {
display: none;
}
<!DOCTYPE html>
<html>
<head>
<style>
h1.hidden {
  display: none;
}
</style>
</head>
<body>

<h1>This is a visible heading</h1>
<h1 class="hidden">This is a hidden heading</h1>
<p>Notice that the h1 element with display: none; does not take up any space.</p>

</body>
</html>

visibility:hidden; also hides an element.
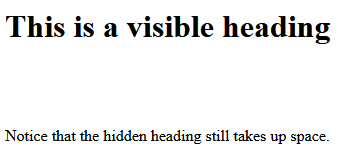
However, the element will still take up the same space as before. The element will be hidden, but still affect the layout:
Example
h1.hidden {
visibility: hidden;
}
<!DOCTYPE html>
<html>
<head>
<style>
h1.hidden {
  visibility: hidden;
}
</style>
</head>
<body>

<h1>This is a visible heading</h1>
<h1 class="hidden">This is a hidden heading</h1>
<p>Notice that the hidden heading still takes up space.</p>

</body>
</html>

More Examples
Differences between display: none; and visibility: hidden;
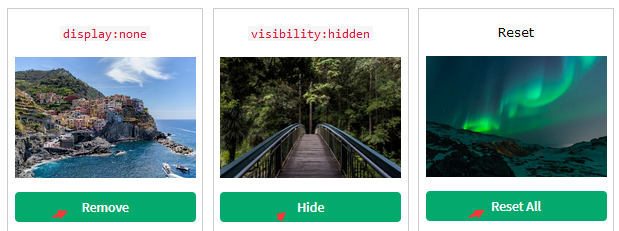
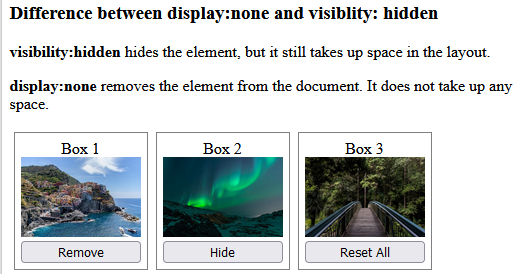
This example demonstrates display: none; versus visibility: hidden;
<!DOCTYPE html>
<html>
<head>
<style>
.imgbox {
  float: left;
  text-align: center;
  width: 120px;
  border: 1px solid gray;
  margin: 4px;
  padding: 6px;
}

button {
  width: 100%;
}
</style>
</head>
<body>

<h3>Difference between display:none and visiblity: hidden</h3>
<p><strong>visibility:hidden</strong> hides the element, but it still takes up space in the layout.</p>
<p><strong>display:none</strong> removes the element from the document. It does not take up any space.</p>

<div class="imgbox" id="imgbox1">Box 1<br>
  <img src="img_5terre.jpg" alt="Italy" style="width:100%">
  <button onclick="removeElement()">Remove</button>
</div>

<div class="imgbox" id="imgbox2">Box 2<br>
  <img src="img_lights.jpg" alt="Lights" style="width:100%">
  <button onclick="changeVisibility()">Hide</button>
</div>

<div class="imgbox">Box 3<br>
  <img src="img_forest.jpg" alt="Forest" style="width:100%">
  <button onclick="resetElement()">Reset All</button>
</div>

<script>
function removeElement() {
  document.getElementById("imgbox1").style.display = "none";
}

function changeVisibility() {
  document.getElementById("imgbox2").style.visibility = "hidden";
}

function resetElement() {
  document.getElementById("imgbox1").style.display = "block";
  document.getElementById("imgbox2").style.visibility = "visible";
}
</script>

</body>
</html>

Showing more display types
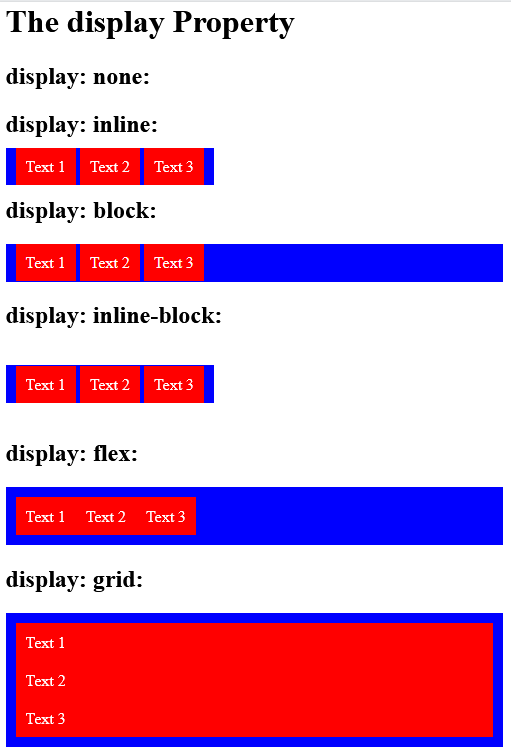
This example demonstrates some more display types.
<!DOCTYPE html>
<html>
<head>
<style>
p {
  background-color: blue;
  padding: 10px;
}

span {
  background-color: red;
  color: white;
  padding: 10px;
}

p.ex1 {display: none;}
p.ex2 {display: inline;}
p.ex3 {display: block;}
p.ex4 {display: inline-block;}
p.ex5 {display: flex;}
p.ex6 {display: grid;}
</style>
</head>
<body>
<h1>The display Property</h1>

<h2>display: none:</h2>
<p class="ex1">
  <span>Text 1</span>
  <span>Text 2</span>
  <span>Text 3</span>
</p>

<h2>display: inline:</h2>
<p class="ex2">
  <span>Text 1</span>
  <span>Text 2</span>
  <span>Text 3</span>
</p>

<h2>display: block:</h2>
<p class="ex3">
  <span>Text 1</span>
  <span>Text 2</span>
  <span>Text 3</span>
</p>

<h2>display: inline-block:</h2>
<p class="ex4">
  <span>Text 1</span>
  <span>Text 2</span>
  <span>Text 3</span>
</p>

<h2>display: flex:</h2>
<p class="ex5">
  <span>Text 1</span>
  <span>Text 2</span>
  <span>Text 3</span>
</p>

<h2>display: grid:</h2>
<p class="ex6">
  <span>Text 1</span>
  <span>Text 2</span>
  <span>Text 3</span>
</p>

</body>
</html>

Using CSS together with JavaScript to show content
This example demonstrates how to use CSS and JavaScript to show an element on click.
<!DOCTYPE html>
<html>
<head>
<style>
#panel, .flip {
  font-size: 16px;
  padding: 10px;
  text-align: center;
  background-color: #4CAF50;
  color: white;
  border: solid 1px #a6d8a8;
  margin: auto;
}

#panel {
  display: none;
}
</style>
</head>
<body>

<p class="flip" onclick="myFunction()">Click to show panel</p>

<div id="panel">
  <p>This panel contains a div element, which is hidden by default (display: none).</p>
  <p>It is styled with CSS and we use JavaScript to show it (display: block).</p>
  <p>How it works: Notice that the p element with class="flip" has an onclick attribute attached to it. When the user clicks on the p element, a function called myFunction() is executed, which changes the style of the div with id="panel" from display:none (hidden) to display:block (visible).</p>
  <p>You will learn more about JavaScript in our JavaScript Tutorial.</p>
</div>

<script>
function myFunction() {
  document.getElementById("panel").style.display = "block";
}
</script>

</body>
</html>

CSS Display/Visibility Properties
| Property | Description |
|---|---|
| display | Specifies how an element should be displayed |
| visibility | Specifies whether or not an element should be visible |


 浙公网安备 33010602011771号