aws命令行cli创建VPC网络、公有子网、私有子网、nat网关+EIP
- 在AWS部署海外节点, 图简单使用web控制台创建VPC和k8s集群出错(k8s), 使用cli命令行工具创建成功
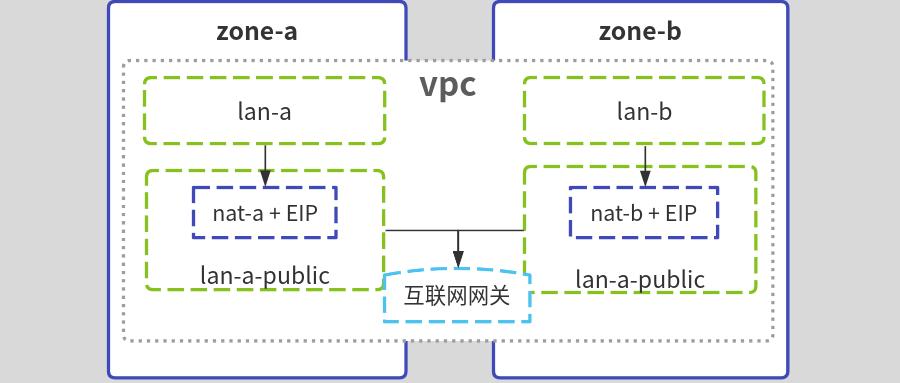
- 本实例为复盘, 记录aws命令行工具cli创建VPC网络, a区和b区分别创建公有子网、私有子网、nat网关+EIP、再创建ssh跳板机作为管理入口
- 建议使用terraform管理云资源
公网出口nat网关创建在公有子网, 如下图:

#安装配置aws cli
#install
cd /tmp
curl -kL "https://awscli.amazonaws.com/awscli-exe-linux-x86_64.zip" -o "awscliv2.zip"
unzip awscliv2.zip
sudo ./aws/install
aws --version

#配置aws key
aws configure

#查看配置
aws configure list
#创建专用网络vpc
#env
Region=ap-southeast-1  #新加坡
vpc_name=test-vpc
vpc_cidr=10.20.0.0/16

aws ec2 create-vpc \
--region $Region \
--cidr-block ${vpc_cidr} \
--tag-specifications "ResourceType=vpc,Tags=[{Key=Name,Value=${vpc_name}}]" \
 |tee /tmp/vpc.log

#get id
VpcId=$(jq -r ".Vpc.VpcId" /tmp/vpc.log)
OwnerId=$(jq -r ".Vpc.OwnerId" /tmp/vpc.log)
#在a区创建私有子网和公有子网
#env
zone_a=ap-southeast-1a

lan_a=subnet-a
lan_a_cidr=10.20.0.0/21

lan_a_public=subnet-a-public
lan_a_public_cidr=10.20.81.0/24

aws ec2 create-subnet \
--region $Region \
--availability-zone ${zone_a} \
--vpc-id ${VpcId} --cidr-block ${lan_a_cidr} \
--tag-specifications "ResourceType=subnet,Tags=[{Key=Name,Value=${lan_a}}]" \
 |tee /tmp/lan1.log

aws ec2 create-subnet \
--region $Region \
--availability-zone ${zone_a} \
--vpc-id ${VpcId} --cidr-block ${lan_a_public_cidr} \
--tag-specifications "ResourceType=subnet,Tags=[{Key=Name,Value=${lan_a_public}}]" \
 |tee /tmp/lan2.log

#get id
lan_a_id=$(jq -r ".Subnet.SubnetId" /tmp/lan1.log)
lan_a_public_id=$(jq -r ".Subnet.SubnetId" /tmp/lan2.log)
#在b区创建私有子网和公有子网
#env
zone_b=ap-southeast-1b

lan_b=subnet-b
lan_b_cidr=10.20.8.0/21

lan_b_public=subnet-b-public
lan_b_public_cidr=10.20.82.0/24

aws ec2 create-subnet \
--region $Region \
--availability-zone ${zone_b} \
--vpc-id ${VpcId} --cidr-block ${lan_b_cidr} \
--tag-specifications "ResourceType=subnet,Tags=[{Key=Name,Value=${lan_a}}]" \
 |tee /tmp/lan3.log

aws ec2 create-subnet \
--region $Region \
--availability-zone ${zone_b} \
--vpc-id ${VpcId} --cidr-block ${lan_b_public_cidr} \
--tag-specifications "ResourceType=subnet,Tags=[{Key=Name,Value=${lan_a_public}}]" \
 |tee /tmp/lan4.log

#get id
lan_b_id=$(jq -r ".Subnet.SubnetId" /tmp/lan2.log)
lan_b_public_id=$(jq -r ".Subnet.SubnetId" /tmp/lan4.log)
#创建互联网网关, 作为公有子网出口
igw_name=${vpc_name}-public-gatway
aws ec2 create-internet-gateway \
--region $Region \
--tag-specifications "ResourceType=internet-gateway,Tags=[{Key=Name,Value=${igw_name}}]" \
 |tee /tmp/igw.log

igw_id=$(jq -r ".InternetGateway.InternetGatewayId" /tmp/igw.log)

#互联网网关,关联到vpc
aws ec2 attach-internet-gateway \
--region $Region \
--vpc-id ${VpcId} \
--internet-gateway-id ${igw_id}

#创建公有子网的路由表
route_name=route-public
aws ec2 create-route-table \
--region $Region \
--vpc-id ${VpcId} \
--tag-specifications "ResourceType=route-table,Tags=[{Key=Name,Value=${route_name}}]" \
 |tee /tmp/route.public.log
#get id
route_public_id=$(jq -r ".RouteTable.RouteTableId" /tmp/route.public.log)

#添加路由规则,流量指向互联网网关
aws ec2 create-route \
--region $Region \
--route-table-id ${route_public_id} \
--destination-cidr-block 0.0.0.0/0 \
--gateway-id ${igw_id}

#路由表与2个公有子网关联
aws ec2 associate-route-table  \
--region $Region \
--route-table-id ${route_public_id} \
--subnet-id "${lan_a_public_id}"
#
aws ec2 associate-route-table  \
--region $Region \
--route-table-id ${route_public_id} \
--subnet-id "${lan_b_public_id}"
#创建2个nat网关+EIP, 分别作为a区和b区私有子网出口
#申请2个弹性IP地址,标记为eip-nat-a,eip-nat-b
aws ec2 allocate-address --region $Region |tee /tmp/eip1.log
eip1_id=$(jq -r ".AllocationId" /tmp/eip1.log)
aws ec2 create-tags --resources ${eip1_id} --tags Key=Name,Value=eip-nat-a

aws ec2 allocate-address --region $Region |tee /tmp/eip2.log
eip2_id=$(jq -r ".AllocationId" /tmp/eip2.log)
aws ec2 create-tags --resources ${eip2_id} --tags Key=Name,Value=eipnat-b

#分别创建a、b区nat网关nat-a,nat-b, 关联eip和公有子网
aws ec2 create-nat-gateway \
--region $Region \
--subnet-id ${lan_a_public_id} \
--allocation-id ${eip1_id} \
--tag-specifications "ResourceType=natgateway,Tags=[{Key=Name,Value=nat-a}]" \
 |tee /tmp/nat1.log

aws ec2 create-nat-gateway \
--region $Region \
--subnet-id ${lan_b_public_id} \
--allocation-id ${eip2_id} \
--tag-specifications "ResourceType=natgateway,Tags=[{Key=Name,Value=nat-b}]" \
 |tee /tmp/nat2.log

nat1_id=$(jq -r ".NatGateway.NatGatewayId" /tmp/nat1.log)
nat2_id=$(jq -r ".NatGateway.NatGatewayId" /tmp/nat2.log)

#创建路由表, 把私有子网和nat网关关联,作为访问公网出口
#创建a区私有子网路由表
route_name=route-a
aws ec2 create-route-table \
--region $Region \
--vpc-id ${VpcId} \
--tag-specifications "ResourceType=route-table,Tags=[{Key=Name,Value=${route_name}}]" \
 |tee /tmp/route.a.log
#get id
route_a_id=$(jq -r ".RouteTable.RouteTableId" /tmp/route.a.log)

#添加路由规则,流量指向nat-a网关
aws ec2 create-route \
--region $Region \
--route-table-id ${route_a_id} \
--destination-cidr-block 0.0.0.0/0 \
--gateway-id ${nat1_id}

#路由表与lan-a子网关联
aws ec2 associate-route-table  \
--region $Region \
--route-table-id ${route_a_id} \
--subnet-id ${lan_a_id}

#创建b区私有子网路由表
route_name=route-b
aws ec2 create-route-table \
--region $Region \
--vpc-id ${VpcId} \
--tag-specifications "ResourceType=route-table,Tags=[{Key=Name,Value=${route_name}}]" \
 |tee /tmp/route.b.log
#get id
route_b_id=$(jq -r ".RouteTable.RouteTableId" /tmp/route.a.log)

#添加路由规则,流量指向nat-a网关
aws ec2 create-route \
--region $Region \
--route-table-id ${route_b_id} \
--destination-cidr-block 0.0.0.0/0 \
--gateway-id ${nat2_id}

#路由表与lan-a子网关联
aws ec2 associate-route-table  \
--region $Region \
--route-table-id ${route_b_id} \
--subnet-id ${lan_b_id}
#公有子网中启动ec2实例测试
#创建一个密钥对
aws ec2 create-key-pair --region $Region \
--key-name MySshKey --query "KeyMaterial" \
--output text > MySshKey.pem
chmod 400 MySshKey.pem

#创建安全组,并容许ssh访问
gname=SSHAccess
aws ec2 create-security-group \
--region $Region --vpc-id ${VpcId} \
--group-name $gname --description "SSH access" \
 |tee /tmp/gid.log

gid=$(jq -r ".GroupId" /tmp/gid.log)

aws ec2 authorize-security-group-ingress \
--group-id $gid --protocol tcp --port 22 --cidr 0.0.0.0/0

#启动ec2
aws ec2 run-instances \
--region $Region --count 1 \
--instance-type t2.micro \
--subnet-id ${lan_a_public_id} \
--security-group-ids $gid \
--key-name MySshKey \
--image-id ami-04ff9e9b51c1f62ca  \
 |tee /tmp/ec2.log

ec2_id=$(jq -r ".Instances[0].InstanceId" /tmp/ec2.log)

#查看ec2启动状态
aws ec2 describe-instances --instance-id ${ec2_id} \
--query "Reservations[*].Instances[*].{State:State.Name,Address:PublicIpAddress}"

#等待实例状态为running,若没公网IP,可以申请EIP后绑定
aws ec2 allocate-address --region $Region |tee /tmp/eip3.log
eip3=$(jq -r ".PublicIp" /tmp/eip2.log)
eip3_id=$(jq -r ".AllocationId" /tmp/eip2.log)
aws ec2 associate-address --instance-id ${ec2_id} --allocation-id ${eip3_id}

#ssh登录
ssh -i MySshKey.pem  ubuntu@${eip3}
#若为测试, 则删除创建的实例
#ec2
aws ec2 terminate-instances --instance-ids ${ec2_id}
#security-group
aws ec2 delete-security-group --group-id $gid
#ssh key
aws ec2 delete-key-pair --region $Region --key-name MySshKey
#解除EIP关联
aws ec2 disassociate-address --association-id ${eip1_id} --region $Region
aws ec2 disassociate-address --association-id ${eip2_id} --region $Region
aws ec2 disassociate-address --association-id ${eip3_id} --region $Region
#删除EIP
aws ec2 release-address --allocation-id ${eip1_id} --region $Region
aws ec2 release-address --allocation-id ${eip2_id} --region $Region
aws ec2 release-address --allocation-id ${eip3_id} --region $Region
#删除子网
aws ec2 delete-subnet --region $Region --subnet-id ${lan_a_id}
aws ec2 delete-subnet --region $Region --subnet-id ${lan_a_public_id}
aws ec2 delete-subnet --region $Region --subnet-id ${lan_b_id}
aws ec2 delete-subnet --region $Region --subnet-id ${lan_b_public_id}
#删除nat网关
aws ec2 delete-nat-gateway --nat-gateway-id ${nat1_id} --region $Region
aws ec2 delete-nat-gateway --nat-gateway-id ${nat2_id} --region $Region
#删除路由表
aws ec2 delete-route-table --region $Region --route-table-id ${route_b_id}
aws ec2 delete-route-table --region $Region --route-table-id ${route_a_id}
#互联网网关与VPC分离
aws ec2 detach-internet-gateway --region $Region --internet-gateway-id ${igw_id} --vpc-id ${VpcId}
#删除互联网网关
aws ec2 delete-internet-gateway --region $Region --internet-gateway-id ${igw_id}
#删除vpc
aws ec2 delete-vpc --region $Region --vpc-id ${VpcId}

#若删除失败, 可到web控制台操作
#参考
本文来自博客园,作者:blog-elvin-vip,转载请注明原文链接:https://www.cnblogs.com/elvi/p/16542406.html

