GUI之AWT学习
1. AWT
java.awt包提供了基本的GUI设计工具,主要包括组件(Component)、容器(Container)和布局管理器(LayoutManager);
Java的图形用户界面的最基本组成部分是组件(Component),组件不能独立地显示出来,必须将组件放在一定的容器中才可以显示出来;
Container是一个类,实际上是Component的子类,因此容器本身也是一个组件,具有组件的所有性质,但是它的主要功能是用来放置其他组件和容器;
2.常用的容器
2.1 窗口Frame
import java.awt.*;

public class demo{
    public static void main(String[] args) {
        Frame f = new Frame("title");
//        设置可见性
        f.setVisible(true);
//        设置窗口大小
        f.setSize(400,400);
//        设置背景颜色
        f.setBackground(Color.blue);
//        弹出的初始位置
        f.setLocation(200,200);
//        设置大小固定
        f.setResizable(false);
    }
}
最后弹出出一个蓝色的窗口。
尝试封装一个MyFrame方法实现弹出多个窗口
import java.awt.*;

public class testFrame {
    public static void main(String[] args) {
        MyFrame f1 = new MyFrame(100,100,200,200,Color.blue);
        MyFrame f2 = new MyFrame(300,100,200,200,Color.yellow);
        MyFrame f3 = new MyFrame(100,300,200,200,Color.green);
        MyFrame f4 = new MyFrame(300,300,200,200,Color.red);
    }
}
//继承Frame类
class MyFrame extends Frame{
    static int id=0;//区分不同窗口
    public MyFrame(int x,int y,int w,int h,Color color){
        super("MyFrame"+(++id));
        setVisible(true);
        setSize(w,h);
        setLocation(x,y);
        setBackground(color);
    }
}
同时存在四个窗口
2.2 面板Panel
与Frame不同,它不能作为最外层的容器单独存在,它首先必须作为一个组件放在其他容器中,然后再把它当作容器,把其他组件放在它里面(类似div)
import java.awt.*;
import java.awt.event.WindowAdapter;
import java.awt.event.WindowEvent;

public class panelTest {
    public static void main(String[] args) {
        Frame f = new Frame();
        Panel p = new Panel();
//        设置布局
        f.setLayout(null);
        f.setSize(400,400);
        f.setLocation(200,200);
        f.setBackground(new Color(36, 71, 160));
//        设置panel坐标,相对于frame
        p.setBounds(50,50,200,200);
        p.setBackground(new Color(255,255,2));
//        将panel添加到frame
        f.add(p);
        f.setVisible(true);
//        监听事件,监听窗口关闭(WindowListener)
        f.addWindowListener(new WindowAdapter() {
//            窗口点击关闭时需要做的事情
            @Override
            public void windowClosing(WindowEvent e) {
//                结束程序
                System.exit(0);
            }
        });
    }
}
结果如下

2.3 布局管理器LayoutManager
2.3.1 FlowLayout流式布局
import java.awt.*;
import java.awt.event.WindowAdapter;
import java.awt.event.WindowEvent;

public class Layout1 {
    public static void main(String[] args) {
        Frame frame = new Frame();
//        按钮组件
        Button button1 = new Button("button1");
        Button button2 = new Button("button2");
        Button button3 = new Button("button3");
//        设置为流式布局
        frame.setLayout(new FlowLayout(FlowLayout.CENTER));
        frame.setSize(300,300);
//        添加按钮
        frame.add(button1);
        frame.add(button2);
        frame.add(button3);
        frame.setVisible(true);
        frame.addWindowListener(new WindowAdapter() {
            @Override
            public void windowClosing(WindowEvent e) {
                System.exit(0);
            }
        });
    }
}
会出现居中的三个并排按钮。
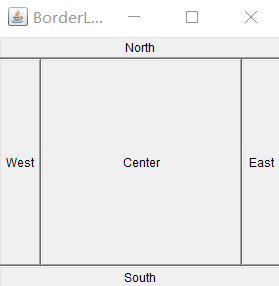
2.3.2 BorderLayout
BorderLayout布局管理器把容器分成五个区域:North,South,East,West和Center,每个区域只能放置一个组件;
import java.awt.*;
import java.awt.event.WindowAdapter;
import java.awt.event.WindowEvent;

public class Layout2 {
    public static void main(String[] args) {
        Frame frame = new Frame("BorderLayout");
        Button button1 = new Button("East");
        Button button2 = new Button("West");
        Button button3 = new Button("South");
        Button button4 = new Button("North");
        Button button5 = new Button("Center");
//        将按钮添加到五个位置
        frame.add(button1,BorderLayout.EAST);
        frame.add(button2,BorderLayout.WEST);
        frame.add(button3,BorderLayout.SOUTH);
        frame.add(button4,BorderLayout.NORTH);
        frame.add(button5,BorderLayout.CENTER);
        frame.setSize(300,300);
        frame.setVisible(true);
        frame.addWindowListener(new WindowAdapter() {
            @Override
            public void windowClosing(WindowEvent e) {
                System.exit(0);
            }
        });
    }
}
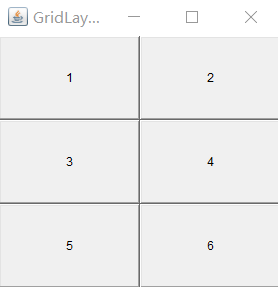
2.3.3 GridLayout
GridLayout布局管理器使容器中的各个组件呈网格状布局,平均占据容器的空间,即使容器的大小发生变化,每个组件还是平均占据容器的空间。
import java.awt.*;

public class Layout3 {
    public static void main(String[] args) {
        Frame frame = new Frame("GridLayout");
        Button button1 = new Button("1");
        Button button2 = new Button("2");
        Button button3 = new Button("3");
        Button button4 = new Button("4");
        Button button5 = new Button("5");
        Button button6 = new Button("6");
//        设置为三行两列的表格
        frame.setLayout(new GridLayout(3,2));
        frame.setSize(300,300);
        frame.add(button1);
        frame.add(button2);
        frame.add(button3);
        frame.add(button4);
        frame.add(button5);
        frame.add(button6);
        frame.setVisible(true);
    }
}
3 事件监听
也就是当某个事情发生时干什么
import java.awt.*;
import java.awt.event.ActionEvent;
import java.awt.event.ActionListener;

public class TestActionEvent {
    public static void main(String[] args) {
        Frame frame = new Frame();
        Button button = new Button();
//        按下按钮触发事件
        MyActionListener myActionListener = new MyActionListener();
//        addActionListener需要一个ActionListener,可以自己构造一个ActionListener实现想要的操作

        button.addActionListener(myActionListener);
        frame.setSize(200,200);
        frame.add(button);
        frame.setVisible(true);
    }
}

class MyActionListener implements ActionListener{
    @Override
    public void actionPerformed(ActionEvent e) {
        System.out.println("123");
    }
}
点击按钮会输出123
关于多个按钮只使用一个监听类
import java.awt.*;
import java.awt.event.ActionEvent;
import java.awt.event.ActionListener;

public class TestAction2 {
    public static void main(String[] args) {
        Frame frame = new Frame();
        Button button1 = new Button("1");
        Button button2 = new Button("2");
        MyAction2 myAction2 = new MyAction2();
        button1.addActionListener(myAction2);
        button2.addActionListener(myAction2);
//            设置按钮的信息
        button1.setActionCommand("1");
        button2.setActionCommand("2");
        frame.setSize(300,300);
        frame.setLayout(new FlowLayout());
        frame.add(button1);
        frame.add(button2);
        frame.setVisible(true);

    }
}

class MyAction2 implements ActionListener{
    @Override
    public void actionPerformed(ActionEvent e) {
//        e.getActionCommand();可以获得设置的按钮信息
        if (e.getActionCommand().equals("1")) {
            System.out.println(1);
        }else if (e.getActionCommand().equals("2")) {
            System.out.println(2);
        }
    }
}
点击不同按钮就可以输出不同数字
4 输入框TextFiled监听
可以获取输入的字符
import java.awt.*;
import java.awt.event.ActionEvent;
import java.awt.event.ActionListener;

public class Text1 {
    public static void main(String[] args) {
        new MyFrame1();
    }
}

class MyFrame1 extends Frame{
    public MyFrame1(){
        TextField textField = new TextField();
        add(textField);
//        监听输入的文字
        MyActionListener1 myActionListener1 = new MyActionListener1();
//        按下回车就会触发输入框事件
        textField.addActionListener(myActionListener1);
//        textField.setEchoChar('*');//可以设置替换编码
        setSize(200,200);
        setVisible(true);
    }
}

class MyActionListener1 implements ActionListener{
    @Override
    public void actionPerformed(ActionEvent e) {
//        e.getSource();可以返回一个对象
        TextField field = (TextField) e.getSource();
//        获得输入框中的文本
        System.out.println(field.getText());
//        设置回车后清空
        field.setText("");
    }
}
会弹出输入框,输入后按回车可以获得并输出刚刚输入的字符
5. 简易计算器
利用输入框跟按钮监听实现的简易计算器
import java.awt.*;
import java.awt.event.ActionEvent;
import java.awt.event.ActionListener;
public class Calc {
    public static void main(String[] args) {
        new Calculator().loadFrame();
    }
}
//计算器类
class Calculator extends Frame{
    TextField field1,field2,field3;
    public void loadFrame(){
        field1 = new TextField(10);//字符数
        field2 = new TextField(10);
        field3 = new TextField(20);
        Button button = new Button("=");
        Label label = new Label("+");

        button.addActionListener(new CalculatorListener());
        setLayout(new FlowLayout());
        setSize(600,300);
        add(field1);
        add(label);
        add(field2);
        add(button);
        add(field3);
        setVisible(true);
    }
    //监听器类
    //使用内部类可以直接访问外部类的属性和方法
    private class CalculatorListener implements ActionListener{
        //    获取计算器这个对象,在一个类中组合另一个类
        @Override
        public void actionPerformed(ActionEvent e) {
//        Integer.parseInt()可以将String字符类型数据转换为Integer整型数据
            int n1 = Integer.parseInt(field1.getText());
            int n2 = Integer.parseInt(field2.getText());
            field3.setText(""+(n1+n2));
//        清除前两个框
            field1.setText("");
            field2.setText("");
        }
    }
}
前两个框输入数字点击等号会得到结果。

6. 画笔paint
静态的显示图像
import java.awt.*;

public class Pen {
    public static void main(String[] args) {
        new MyPen().loadFrame();
    }
}

class MyPen extends Frame{
    @Override
    public void paint(Graphics g) {
//        画笔设置颜色
        g.setColor(Color.red);
        g.drawOval(100,100,100,100);//画圆
        g.fillOval(300,300,100,100);//实心圆
    }
    public void loadFrame(){
        setSize(800,800);
        setVisible(true);
    }
}

7. 鼠标监听
为画笔添加鼠标监听事件
import java.awt.*;
import java.awt.event.MouseAdapter;
import java.awt.event.MouseEvent;
import java.util.ArrayList;
import java.util.Iterator;

public class testMouth {
    public static void main(String[] args) {
        new MyMouth("draw");
    }
}

class MyMouth extends Frame{
//    监听鼠标位置,需要集合来存储这个点
    ArrayList<Point> points;

    public MyMouth(String title){
        super(title);
        points = new ArrayList<>();//用于存鼠标点击的点
        this.addMouseListener(new MyML());
        setSize(700,800);
        setVisible(true);
    }

    @Override
    public void paint(Graphics g) {
//        监听鼠标的事件
//        将保存的每个点都画出来
        for (Point point : points) {
            g.setColor(Color.blue);
            g.fillOval(point.x, point.y, 5, 5);
        }
    }

    private class MyML extends MouseAdapter{
//        监听鼠标按压事件
        @Override
        public void mousePressed(MouseEvent e) {
            MyMouth frame = (MyMouth) e.getSource();
            new Point(e.getX(),e.getY());
            points.add(new Point(e.getX(),e.getY()));//添加点
//            每次点击鼠标都重画一次
            frame.repaint();
        }
    }
}
这样每点击一次就会出现一个点。
8. 窗口监听
例如之前的关闭窗口
import java.awt.*;
import java.awt.event.WindowAdapter;
import java.awt.event.WindowEvent;

public class testWindow {
    public static void main(String[] args) {
        new WindowFrame();
    }
}

class WindowFrame extends Frame{

    public WindowFrame() {
        setSize(300,300);
        addWindowListener(new MyWL());
        setVisible(true);
    }

    class MyWL extends WindowAdapter{
        @Override
        public void windowClosing(WindowEvent e) {
            System.exit(0);//退出
        }
    }
}
9.键盘监听
import java.awt.*;
import java.awt.event.KeyAdapter;
import java.awt.event.KeyEvent;

public class testKey {
    public static void main(String[] args) {
        new KeyFrame();
    }
}

class KeyFrame extends Frame{
    public KeyFrame() {
        super();
        setSize(300,400);
        setVisible(true);
        this.addKeyListener(new KeyAdapter() {
//            键盘按下事件
            @Override
            public void keyPressed(KeyEvent e) {
                int keyCode = e.getKeyCode();//可以获得键盘按下的是哪一个键
                System.out.println(keyCode);
                if (keyCode == KeyEvent.VK_UP){
                    System.out.println("按下了上建");
                }

            }
        });
    }
}
可以输出每个键的KeyCode并且按下键的时候会额外输出一句话

 浙公网安备 33010602011771号