14 Spring的核心机制及容器
1 .依籁注入
创建一个Java Project,命名为FactoryExample。在src文件夹下建立包“face”,在该包下建立接口
“Human.java”,代码如下:
package face;
public interface Human {
void eat();
void walk();
Chinese.java代码如下:
package iface;
import face.Human;
public class Chinese implements Human{
public void eat() {
System.out.println("中国人很会吃!");
}
public void walk() {
System.out.println("中国人健步如飞!");
}
}
American.java代码如下:
package iface;
import face.Human;
public class American implements Human{
public void eat() {
System.out.println("美国人吃西餐!");
}
public void walk() {
System.out.println("美国人经常坐车!");
}
}
在src下建包“factory”,在该包内建立工厂类Factory.java,代码如下:
package factory;
import iface.American;
import iface.Chinese;
import face.Human;
public class Factory {
public Human getHuman(String name){
if(name.equals("Chinese")){
return new Chinese();
}else if(name.equals("American")){
return new American();
}else{
throw new IllegalArgumentException("参数不正确");
}
}
}
在src下建包test,在该包内建立Test测试类,代码如下:
package test;
import face.Human;
import factory.Factory;
public class Test {
public static void main(String[] args) {
Human human=null;
human=new Factory().getHuman("Chinese");
human.eat();
human.walk();
human=new Factory().getHuman("American");
human.eat();
human.walk();
}
}
程序为Java应用程序,直接运行可看出结果,如图7.2所示
2. 依赖注入的应用
1. 为项目添加Spring开发能力
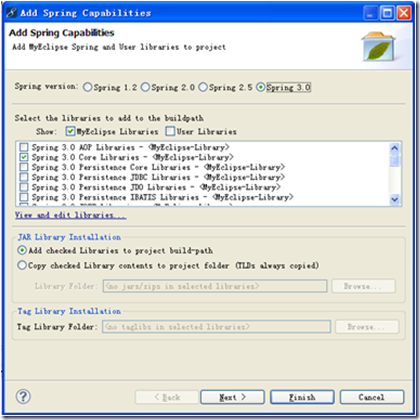
右击项目名,依次选择【MyEclipse】→【Add Spring Capabilities…】,将出现如图7.3所示的对话框,选中要应用的Spring版本及所需的类库文件。注意,本书用的Spring版本为Spring 3.0。
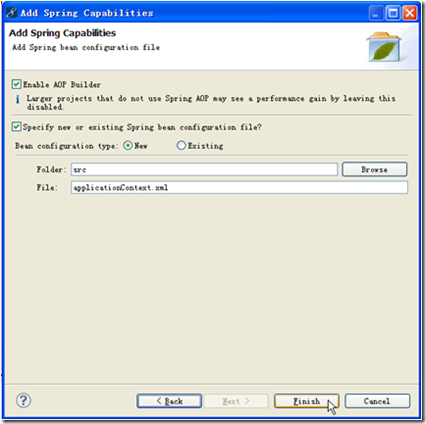
选择结束后,单击【Next】按钮,出现如图7.4所示的界面,用于创建Spring的配置文件
2. 修改配置文件applicationContext.xml
修改后,其代码如下:
<?xml version="1.0" encoding="UTF-8"?>
<beans
xmlns="http://www.springframework.org/schema/beans"
xmlns:xsi="http://www.w3.org/2001/XMLSchema-instance"
xmlns:p="http://www.springframework.org/schema/p"
xsi:schemaLocation="http://www.springframework.org/schema/beans http://www.springframework.org/schema/beans/spring-beans-3.0.xsd">
<bean id="chinese" class="iface.Chinese"></bean>
<bean id="american" class="iface.American"></bean>
</beans>
3. 修改测试类
配置完成后,就可以修改Test类的代码如下(注意重新导入一下spring.jar)
package test;
import org.springframework.context.ApplicationContext;
import org.springframework.context.support.FileSystemXmlApplicationContext;
import face.Human;
public class Test {
public static void main(String[] args) {
ApplicationContext ctx=
new FileSystemXmlApplicationContext("src/applicationContext.xml");
Human human = null;
human = (Human) ctx.getBean("chinese");
human.eat();
human.walk();
human = (Human) ctx.getBean("american");
human.eat();
human.walk();
}
}
注入的两种方式
1.设置注入(factoryExample1)
人类的接口Human.java,代码如下:
public interface Human {
void speak();
}
语言接口Language.java,代码如下:
public interface Language {
public String kind();
}
下面是Human实现类Chinese.java代码:
public class Chinese implements Human{
private Language lan;
public void speak() {
System.out.println(lan.kind());
}
public void setLan(Language lan) {
this.lan = lan;
}
}
下面是Language实现类English.java代码:
public class English implements Language{
public String kind() {
return "中国人也会说英语!";
}
}
下面通过Spring的配置文件来完成其对象的注入。看其代码:
<?xml version="1.0" encoding="UTF-8"?>
<beans
xmlns="http://www.springframework.org/schema/beans"
xmlns:xsi="http://www.w3.org/2001/XMLSchema-instance"
xmlns:p="http://www.springframework.org/schema/p"
xsi:schemaLocation="http://www.springframework.org/schema/beans http://www.springframework.org/schema/beans/spring-beans-3.0.xsd">
<!-- 定义第一个Bean,注入Chinese类对象 -->
<bean id="chinese" class="Chinese">
<!-- property元素用来注定需要容器注入的属性,lan属性需要容器注入
ref就指向lan注入的id -->
<property name="lan" ref="english"></property>
</bean>
<!-- 注入english -->
<bean id="english" class="English"></bean>
</beans>
每个Bean的id属性是该Bean的唯一标识,程序通过id属性访问Bean。而且Bean与Bean的依赖关系也通过id属性关联。
测试代码如下:
import org.springframework.context.ApplicationContext;
import org.springframework.context.support.FileSystemXmlApplicationContext;
public class Test {
public static void main(String[] args) {
ApplicationContext ctx = new FileSystemXmlApplicationContext("src/applicationContext.xml");
Human human = null;
human = (Human) ctx.getBean("chinese");
human.speak();
}
}
2. 构造注入
例如,只要对前面的代码Chinese类进行简单的修改:
public class Chinese implements Human{
private Language lan;
public Chinese(){};
// 构造注入所需要的带参数的构造函数
public Chinese(Language lan){
this.lan=lan;
}
public void speak() {
System.out.println(lan.kind());
}
}
配置文件也需要作简单的修改:
<?xml version="1.0" encoding="UTF-8"?>
<beans
……
<!-- 定义第一个Bean,注入Chinese类对象 -->
<bean id="chinese" class="Chinese">
<!-- 使用构造注入,为Chinese实例注入Language实例 -->
<constructor-arg ref="english"></constructor-arg>
</bean>
<!-- 注入english -->
<bean id="english" class="English"></bean>
</beans>
其中,“constructor-arg”用来表示通过构造方式来进行依赖注入,“index="0"”表示构造方法中的第一个参数,如果只有一个参数,可以省略不写,如果有多个参数,就直接重复配置“constructor-arg”即可,不过要改变“index”的值,例如,如果在“HelloWorld”类中还有一个参数“mess”,并且通过构造方法为其注入值:
public HelloWorld(String message,String mess){
this.message=message;
this.mess=mess;
}
那么,只需在配置文件config.xml中加上一个“constructor-arg”:
<constructor-arg index="1">
<value>HelloYabber</value>
</constructor-
在开发过程中,set注入和构造注入都是会经常用到的,这两种依赖注入的方式并没有绝对的好坏,只是使用的场合有所不同而已。使用构造注入可以在构建对象的同时一并完成依赖关系的建立,所以,如果要建立的对象的关系很多,使用构造注入就会在构造方法上留下很多的参数,是非常不易阅读的,这时建议使用set注入。然而,用set注入由于提供了setXx()方法,所以不能保证相关的数据在执行时不被更改设定,因此,如果想要让一些数据变为只读或私有,使用构造注入会是个很好的选择。
2. spring 容器
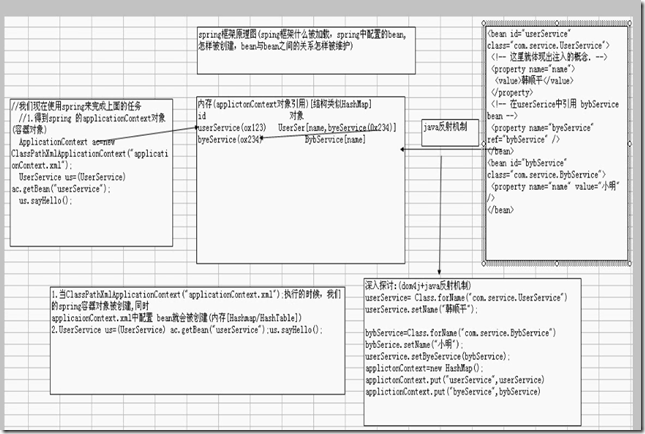
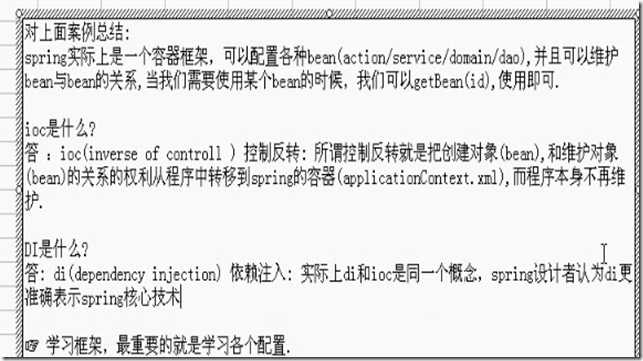
Spring 是作为一容器存在的,应用中的所有组件都处于spirng的管理之下,都被spring 以bean方式管理.spring 负债创建bean的实例,并管理其生命周期.spring有两个核心接口:
BeanFactory和ApplicationContext,其中applicationContext是beanFactory的子接口.它们都可代表Spring容器.spring容器是生成Bean的工厂,所有的组件都被当前bean处理,如数据
源、hibernate的sessionfactory、事务管理器等。bean是spring容器的基本单位,所以先讲基本知识及相关应用。
14.2.1 Bean的定义
Bean是描述Java的软件组件模型,其定义在Spring配置文件的根元素<beans>下,<bean>元素是<beans>元素的子元素,在根元素<beans>下可以包含多个<bean>子元素。每个<bean>可以完成一个简单的功能,也可以完成一个复杂的功能,<bean>之间可以互相协同工作,完成复杂的关系。
在HelloWorld实例中,config.xml中的Bean的配置如下:
<bean id="HelloWorld" class="org.model.HelloWorld">
<property name="message" >
<value>Hello Yabber!</value>
</property>
</bean>
在Bean中有一个id属性及class属性,这个id唯一标识了该Bean。在配置文件中,不能有重复的Bean的id,因为在代码中通过BeanFactory或ApplicationContext来获取Bean的实例时,都要用它来作为唯一索引:
HelloWorld helloWorld=(HelloWorld) ac.getBean("HelloWorld");
14.2.2Bean的基本属性
1.Bean的id属性
为Bean指定别名可以用name属性来完成,如果需要为Bean指定多个别名,可以在name属性中使用逗号(,)、分号(;)或空格来分隔多个别名,在程序中可以通过任意一个别名访问该Bean实例。例如,id为“HelloWorld”的Bean,其别名为:
<bean id="HelloWorld" name="a;b;c" class="org.model.HelloWorld">
<property name="message" >
<value>Hello Yabber!</value>
</property>
</bean>
则在程序中可以利用“a”、“b”、“c”任意一个来获取Bean的实例:
HelloWorld helloWorld=(HelloWorld) ac.getBean("a");或
HelloWorld helloWorld=(HelloWorld) ac.getBean("b");或
HelloWorld helloWorld=(HelloWorld) ac.getBean("c");
以上三种方法均可完成Bean实例的获取
2.Bean的class属性
可以看出,每个Bean都会指定class属性,class属性指明了Bean的来源,即Bean的实际路径,注意,这里要写出完整的包名+类名。例如:
<bean id="HelloWorld" name="a;b;c" class="org.model.HelloWorld">
class属性非常简单,这里就不过多介绍了。
3.Bean的scope属性
scope属性用于指定Bean的作用域,Spring支持5种作用域,这5种作用域如下:
singleton:单例模式,当定义该模式时,在容器分配Bean的时候,它总是返回同一个实例。该模式是默认的,即不定义scope时的模式。
prototype:原型模式,即每次通过容器的getBean方法获取Bean的实例时,都将产生信息的Bean实例
request:对于每次HTTP请求中,使用request定义的Bean都将产生一个新实例,即每次HTTP请求将会产生不同的Bean实例。只有在Web应用中使用Spring时,该作用域有效。
session:对于每次HTTP Session请求中,使用session定义的Bean都将产生一个新实例,即每次HTTP Session请求将会产生不同的Bean实例。只有在Web应用中使用Spring时,该作用域有效。
global session:每个全局的Http Session对应一个Bean实例。典型情况下,仅在使用portlet context的时候有效。只有在Web应用中使用Spring时,该作用域才有效。
比较常用的是前两种作用域,即singleton及prototype。下面举例说明这两种作用域的差别。
仍然是对HelloWorld程序进行修改,在配置文件config.xml中这样配置:
<?xml version="1.0" encoding="UTF-8"?>
<beans xmlns="http://www.springframework.org/schema/beans"
xmlns:xsi="http://www.w3.org/2001/XMLSchema-instance"
xsi:schemaLocation="http://www.springframework.org/schema/beans
http://www.springframework.org/schema/beans/spring-beans-2.5.xsd">
<bean id="HelloWorld1" class="org.model.HelloWorld"></bean>
<bean id="HelloWorld2" class="org.model.HelloWorld" scope="prototype"></bean>
</beans>
在“HelloWorld1”Bean中没有定义“scope”属性,即默认的“singleton”单例模式。“HelloWorld2”Bean中指定作用域为“prototype”,即原型模式。
HelloWorld.java类不变,编写测试类代码。
<?xml version="1.0" encoding="UTF-8"?>
<beans xmlns="http://www.springframework.org/schema/beans"
xmlns:xsi="http://www.w3.org/2001/XMLSchema-instance"
xsi:schemaLocation="http://www.springframework.org/schema/beans
http://www.springframework.org/schema/beans/spring-beans-2.5.xsd">
<bean id="HelloWorld1" class="org.model.HelloWorld"></bean>
<bean id="HelloWorld2" class="org.model.HelloWorld" scope="prototype"></bean>
</beans>编写测试类代码:
package org.test;
import org.model.HelloWorld;
import org.springframework.context.ApplicationContext;
import org.springframework.context.support.FileSystemXmlApplicationContext;
public class BeanTest {
public static void main(String[] args) {
ApplicationContext ac=new FileSystemXmlApplicationContext("/WebRoot/WEB-INF/classes/config.xml");
HelloWorld helloWorld1=(HelloWorld) ac.getBean("HelloWorld1");
HelloWorld helloWorld2=(HelloWorld) ac.getBean("HelloWorld1");
HelloWorld helloWorld3=(HelloWorld) ac.getBean("HelloWorld2");
HelloWorld helloWorld4=(HelloWorld) ac.getBean("HelloWorld2");
System.out.println(helloWorld1==helloWorld2);
System.out.println(helloWorld3==helloWorld4);
}
}log4j:WARN No appenders could be found for logger (org.springframework.context.support.FileSystemXmlApplicationContext).
log4j:WARN Please initialize the log4j system properly.
true
false
4.Bean的propetry4.Bean的property
在Spring的依赖注入中,是应用Bean的子元素<property>来为属性进行设值的:
<bean id="HelloWorld" class="org.model.HelloWorld">
<property name="message" >
<value>Hello World!</value>
</property>
</bean>
如果要为属性设置“null”,有两种方法。第一种直接用value元素指定:
<bean id="HelloWorld" class="org.model.HelloWorld">
<property name="message" >
<value>null</value>
</property>
</bean>
第二种方法直接用<null/>:
<bean id="HelloWorld" class="org.model.HelloWorld">
<property name="message" >
<null/>
</property>
</bean
3.Bean的生命周期
1.Bean的定义
Bean的定义在前面的实例中已经应用很多了,从基本的HelloWorld程序中就可以基本看出Bean的定义,这里就不再列举其定义形式,但值得一提的是,在一个大的应用中,会有很多的Bean需要在配置文件中定义,这样配置文件就会很大,变得不易阅读及维护,这时可以把相关的Bean放置在一个配置文件中,创建多个配置文件
2.Bean的初始化
在Spring中,Bean完成全部属性的设置后,Spring 中的bean的初始化回调有两种方法,一种是在配置文件中声明“init-method="init"”,然后在HelloWorld类中写一个init()方法来初始化;另一种是实现InitializingBean 接口,然后覆盖其afterPropertiesSet()方法。知道了初始化过程中会应用这两种方法,就可以在Bean的初始化过程中让其执行特定行为。
下面介绍这两种方法的使用方式。第一种方式如下:
(1)在HelloWorld类中增加一个init()方法。代码如下:
package org.model;
public class HelloWorld {
private String message;
public String getMessage() {
return message;
}
public void setMessage(String message) {
this.message = message;
}
public void init(){
//利用该方法修改message的值
this.setMessage("Hello Yabber");
}
}
(2)修改配置文件config.xml,指定Bean中要初始化的方法为init(),代码如下:
<?xml version="1.0" encoding="UTF-8"?>
<beans xmlns="http://www.springframework.org/schema/beans"
xmlns:xsi="http://www.w3.org/2001/XMLSchema-instance"
xsi:schemaLocation="http://www.springframework.org/schema/beans
http://www.springframework.org/schema/beans/spring-beans-2.5.xsd">
<bean id="HelloWorld" class="org.model.HelloWorld" init-method="init">
<property name="message">
<value>HelloWorld</value>
</property>
</bean>
</beans>
(3)编写测试类,输出HelloWorld中message的值,代码如下:
package org.test;
import org.model.HelloWorld;
import org.springframework.context.ApplicationContext;
import org.springframework.context.support.FileSystemXmlApplicationContext;
public class Test {
public static void main(String[] args) {
ApplicationContext ac=
new FileSystemXmlApplicationContext("/WebRoot/WEB-INF/classes/config.xml");
HelloWorld helloWorld=(HelloWorld) ac.getBean("HelloWorld");
System.out.println(helloWorld.getMessage());
}
}
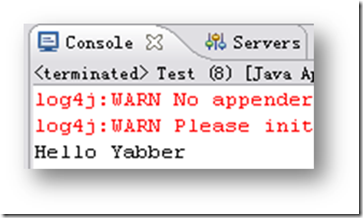
运行该程序,控制台输出如图14.2所示。
可以发现,初始化方法的调用是在Bean初始化的后期执行的,改变了message的赋值,故输出为“Hello Yabber”。
第二种方式,实现InitializingBean接口,并覆盖其“afterPropertiesSet()”方法。
(1)修改HelloWorld.java,让其实现InitializingBean接口,并覆盖其“afterPropertiesSet()”方法。代码实现为:
package org.model;
import org.springframework.beans.factory.InitializingBean;
public class HelloWorld implements InitializingBean{
private String message;
public String getMessage() {
return message;
}
public void setMessage(String message) {
this.message = message;
}
public void afterPropertiesSet() throws Exception {
this.setMessage("Hello Yabber");
}
}
(2)修改config.xml配置文件,代码如下:
<?xml version="1.0" encoding="UTF-8"?>
<beans xmlns="http://www.springframework.org/schema/beans"
xmlns:xsi="http://www.w3.org/2001/XMLSchema-instance"
xsi:schemaLocation="http://www.springframework.org/schema/beans
http://www.springframework.org/schema/beans/spring-beans-2.5.xsd">
<bean id="HelloWorld" class="org.model.HelloWorld">
<property name="message">
<value>HelloWorld</value>
</property>
</bean>
</beans>
运行结果相同都会输出“hello world”
3.Bean的应用
Bean的应用非常简单,在Spring中有两种使用Bean的方式。
第一种,使用BeanFactory:
//在ClassPath下寻找,由于配置文件就是放在ClassPath下,故可以直接找到
ClassPathResource res=new ClassPathResource("config.xml");
XmlBeanFactory factory=new XmlBeanFactory(res);
HelloWorld helloWorld=(HelloWorld)factory.getBean("HelloWorld");
System.out.println(helloWorld.getMessage());
第二种,使用ApplicationContext:
ApplicationContext ac=
new FileSystemXmlApplicationContext("/WebRoot/WEB-INF/classes/config.xml");
HelloWorld helloWorld=(HelloWorld) ac.getBean("HelloWorld");
System.out.println(helloWorld.getMessage());
首先介绍第一种方式。
(1)在HelloWorld类中增加一个cleanup()方法。代码如下:
package org.model;
public class HelloWorldDestroy{
private String message;
public String getMessage() {
return message;
}
public void setMessage(String message) {
this.message = message;
}
public void cleanup(){
this.setMessage("HelloWorld!");
System.out.println("销毁之前要调用!");
}
}
(2)修改config.xml配置文件,代码如下:
<?xml version="1.0" encoding="UTF-8"?>
<beans xmlns="http://www.springframework.org/schema/beans"
xmlns:xsi="http://www.w3.org/2001/XMLSchema-instance"
xsi:schemaLocation="http://www.springframework.org/schema/beans
http://www.springframework.org/schema/beans/spring-beans-2.5.xsd">
<bean id="HelloWorld" class="org.model.HelloWorldDestroy" destroy-method="cleanup">
<property name="message">
<value>HelloWorld</value>
</property>
</bean>
</beans>
(3)编写测试类,输出message的值,代码如下:
package org.test;
import org.model.HelloWorldDestroy;
import org.springframework.context.support.AbstractApplicationContext;
import org.springframework.context.support.FileSystemXmlApplicationContext;
public class Test {
public static void main(String[] args) {
AbstractApplicationContext ac=
new FileSystemXmlApplicationContext("/WebRoot/WEB-INF/classes/config.xml");
HelloWorldDestroy helloWorld=(HelloWorldDestroy) ac.getBean("HelloWorld");
System.out.println(helloWorld.getMessage());
//为Spring容器注册关闭钩子,程序将会在推出JVM之前关闭Spring容器
ac.registerShutdownHook();
}
}
第二种方式,实现DisposableBean接口,并覆盖其destroy()方法。
(1)修改HelloWorldDestroy.java,让其实现DisposableBean接口,并覆盖其“destroy ()”方法。代码实现为:
package org.model;
import org.springframework.beans.factory.DisposableBean;
public class HelloWorldDestroy implements DisposableBean{
private String message;
public String getMessage() {
return message;
}
public void setMessage(String message) {
this.message = message;
}
public void destroy() throws Exception {
System.out.println("该句在销毁之前要显示!");
}
}
(2)配置文件config.xml修改为:
<?xml version="1.0" encoding="UTF-8"?>
<beans xmlns="http://www.springframework.org/schema/beans"
xmlns:xsi="http://www.w3.org/2001/XMLSchema-instance"
xsi:schemaLocation="http://www.springframework.org/schema/beans
http://www.springframework.org/schema/beans/spring-beans-2.5.xsd">
<bean id="HelloWorld" class="org.model.HelloWorldDestroy">
<property name="message">
<value>HelloWorld</value>
</property>
</bean>
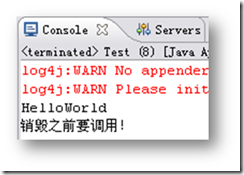
</beans>结果同第一种结果
4.Bean的管理
Spring对Bean的管理有两种方式,分别使用BeanFactory管理Bean和使用ApplicationContext管理Bean
1.BeanFactory
在Spring中有几种BeanFactory的实现,其中最常用的是org.springframework.bean. factory.xml.XmlBeanFactory。它根据XML文件中的定义装载Bean。
要创建XmlBeanFactory,需要传递一个ClassPathResource对象给构造方法。例如,下面的代码片段获取一个BeanFactory对象:
//在ClassPath下寻找,由于配置文件就是放在ClassPath下,故可以直接找到
ClassPathResource res=new ClassPathResource("config.xml");
BeanFactory factory=new XmlBeanFactory(res);
为了从BeanFactory得到Bean,只要简单地调用getBean()方法,把需要的Bean的名字当做参数传递进去就行了。由于得到的是Object类型,所以要进行强制类型转化:
HelloWorld helloWorld=(HelloWorld)factory.getBean("HelloWorld");
2.ApplicationContext
BeanFactory对简单应用来说已经很好了,但是为了获得Spring框架的强大功能,需要使用Spring更加高级的容器ApplicationContext(应用上下文)。表面上看,ApplicationContext和BeanFactory差不多,两者都是载入Bean的定义信息,装配Bean,根据需要分发Bean,但是ApplicationContext提供了更多的功能:
应用上下文提供了文本信息解析工具,包括对国际化的支持。
应用上下文提供了载入文本资源的通用方法,如载入图片。
应用上下文可以向注册为监听器的Bean发送事件。
在ApplicationContext的诸多实现中,有三个常用的实现:
ClassPathXmlApplicationContext:从类路径中的XML文件载入上下文定义信息,把上下文定义文件当成类路径资源。
FileSystemXmlApplicationContext:从文件系统中的XML文件载入上下文定义信息。
XmlWebApplicationContext:从Web系统中的XML文件载入上下文定义信息。
例如:
ApplicationContext context=new FileSystemXmlApplicationContext ("c:/server.xml");
ApplicationContext context=new ClassPathApplicationContext ("server.xml ");
ApplicationContext context= WebApplicationContextUtils.getWebApplicationContext (request.getSession().getServletContext ());
FileSystemXmlApplicationContext和ClassPathXmlApplicationContext的区别是:FileSystemXmlApplicationContext只能在指定的路径中寻找server.xml 文件,而ClassPathXml ApplicationContext可以在整个类路径中寻找foo.xml
5.Bean的依依赖关系
Bean的依赖关系是指当为一个Bean的属性赋值时要应用到另外的Bean,这种情况也称Bean的引用。
例如,有这样的一个类DateClass.java:
package org.model;
import java.util.Date;
public class DateClass {
private Date date;
public Date getDate() {
return date;
}
public void setDate(Date date) {
this.date = date;
}
}
在配置文件中为其注入“date”值时,引用了其他Bean,代码为:
<?xml version="1.0" encoding="UTF-8"?>
<beans xmlns="http://www.springframework.org/schema/beans"
xmlns:xsi="http://www.w3.org/2001/XMLSchema-instance"
xsi:schemaLocation="http://www.springframework.org/schema/beans
http://www.springframework.org/schema/beans/spring-beans-2.5.xsd">
<bean id="getDate" class="org.model.DateClass">
<property name="date">
<ref local="d"/>
</property>
</bean>
<bean id="d" class="java.util.Date"></bean>
</beans>
编辑测试程序Test.java:
package org.test;
import org.model.DateClass;
import org.springframework.context.ApplicationContext;
import org.springframework.context.support.FileSystemXmlApplicationContext;
public class Test {
public static void main(String[]args){
ApplicationContext ac=
new FileSystemXmlApplicationContext("/WebRoot/WEB-INF/classes/config.xml");
DateClass dc=(DateClass)ac.getBean("getDate");
System.out.println(dc.getDate());
}
}
运行程序,控制台输出如图14.4所示。
控制台打印出了本机的当前时间,在“getDate”的Bean中引用了“d”Bean,也就为DateClass类中的属性“date”赋值为“d”Bean,即该Bean的对象,故打印出了当前时间。
从上例可以看出,Spring中是用“ref”来指定依赖关系的,用“ref”指定依赖关系有3中方法:local、bean和parent。前面的例子中应用了“local”方法指定,其实也可以应用其他两种方法,例如上例的配置文件若应用“bean”可以修改为:
还可以直接应用property中的ref属性,例如上例可以修改为:
<?xml version="1.0" encoding="UTF-8"?>
<beans xmlns="http://www.springframework.org/schema/beans"
xmlns:xsi="http://www.w3.org/2001/XMLSchema-instance"
xsi:schemaLocation="http://www.springframework.org/schema/beans
http://www.springframework.org/schema/beans/spring-beans-2.5.xsd">
<bean id="getDate" class="org.model.DateClass">
<property name="date" ref="d"></property>
</bean>
<bean id="d" class="java.util.Date"></bean>
</beans>
补充:韩 项目myspring1或自:hsp_spring_1
6 Bean的自动装配
通过自动装配,开发人员可以减少属性的操作
bean元素的自动装配是通过autowire属性来指定的,共有5种取值,也就是自动装配的5种模式,即byname,bytype,costurctor,autodetect和no
1.byName模式
使用byName模式在Bean的初始化时会通过Bean的属性名字进行自动装配,在Spring的配置文件中,查找一个与将要装配的属性同样名字的Bean。
例如,DateClass.java为:
package org.model;
import java.util.Date;
public class DateClass {
private Date date;
public Date getDate() {
return date;
}
public void setDate(Date date) {
this.date = date;
}
}
配置文件config.xml中可以用“byName”自动装配模式来为属性“date”自动装配值,配置文件可以配置为:
<?xml version="1.0" encoding="UTF-8"?>
<beans xmlns="http://www.springframework.org/schema/beans"
xmlns:xsi="http://www.w3.org/2001/XMLSchema-instance"
xsi:schemaLocation="http://www.springframework.org/schema/beans
http://www.springframework.org/schema/beans/spring-beans-2.5.xsd">
<bean id="getDate" class="org.model.DateClass" autowire="byName">
</bean>
<bean id="date" class="java.util.Date"></bean>
</beans>
可以发现,在“getDate”Bean中没有为属性指定值,但指定了“autowire="byName"”。编辑测试类Test.java:
package org.test;
import org.model.DateClass;
import org.springframework.context.ApplicationContext;
import org.springframework.context.support.FileSystemXmlApplicationContext;
public class Test {
public static void main(String[]args){
ApplicationContext ac=
new FileSystemXmlApplicationContext("/WebRoot/WEB-INF/classes/config.xml");
DateClass dc=(DateClass)ac.getBean("getDate");
System.out.println(dc.getDate());
}
}
运行后查看结果,输出为:
Wed Jul 28 16:56:40 CST 2009
2.使用byType模式
byType模式指如果配置文件中正好有一个与属性类型一样的Bean,就自动装配这个属性,如果有多于一个这样的Bean,就抛出一个异常。例如在上例中,DateClass类的属性date为“Date”类型,而在配置文件中也有一个“Date”类型的Bean,这时若配置了自动装配的byType模式,就会自动装配DateClass类中的属性date值。例如,把上例的配置文件稍微修改,其他的不改变:
<?xml version="1.0" encoding="UTF-8"?>
<beans xmlns="http://www.springframework.org/schema/beans"
xmlns:xsi="http://www.w3.org/2001/XMLSchema-instance"
xsi:schemaLocation="http://www.springframework.org/schema/beans
http://www.springframework.org/schema/beans/spring-beans-2.5.xsd">
<bean id="getDate" class="org.model.DateClass" autowire="byType">
</bean>
<bean id="date" class="java.util.Date"></bean>
</beans>
3.使用constructor模式
constructor模式指的是根据构造方法的参数进行自动装配。例如,把DateClass.java修改为:
package org.model;
import java.util.Date;
public class DateClass {
private Date date;
public DateClass(Date date){
this.date=date;
}
public Date getDate() {
return date;
}
public void setDate(Date date) {
this.date = date;
}
}
4.使用autodetect模式
autodetect模式指的是通过检查类的内部来选择使用constructor或byType模式。例如,把使用constructor模式的实例的配置文件修改为:
<?xml version="1.0" encoding="UTF-8"?>
<beans xmlns="http://www.springframework.org/schema/beans"
xmlns:xsi="http://www.w3.org/2001/XMLSchema-instance"
xsi:schemaLocation="http://www.springframework.org/schema/beans
http://www.springframework.org/schema/beans/spring-beans-2.5.xsd">
<bean id="getDate" class="org.model.DateClass" autowire="autodetect">
</bean>
<bean id="date" class="java.util.Date"></bean>
</beans>
5.使用no模式
使用no模式就是不使用自动装配,这时为属性赋值就必须通过ref来引用其他Bean。例如,DateClass.java修改为:
package org.model;
import java.util.Date;
public class DateClass {
private Date date;
public DateClass(Date date){
this.date=date;
}
public Date getDate() {
return date;
}
public void setDate(Date date) {
this.date = date;
}
}
配置文件修改为:
<?xml version="1.0" encoding="UTF-8"?>
<beans xmlns="http://www.springframework.org/schema/beans"
xmlns:xsi="http://www.w3.org/2001/XMLSchema-instance"
xsi:schemaLocation="http://www.springframework.org/schema/beans
http://www.springframework.org/schema/beans/spring-beans-2.5.xsd">
<bean id="getDate" class="org.model.DateClass" autowire="no">
<property name="date">
<ref bean="date"/>
</property>
</bean>
<bean id="date" class="java.util.Date"></bean>
</beans>
3. Bean中对集合的注入
3.1 对list的注入
对list集合的注入非常简单,如果类中有list类型的属性,在为其依赖注入值的时候就需要在配置文件中的<property>元素下应用其子元素<list>。下面举例说明。
创建类ListBean.java,其有一个List类型的属性,代码如下:
package org.model;
import java.util.List;
public class ListBean {
private List list;
public List getList() {
return list;
}
public void setList(List list) {
this.list = list;
}
}
配置文件中Bean的配置为:
<?xml version="1.0" encoding="UTF-8"?>
<beans xmlns="http://www.springframework.org/schema/beans"
xmlns:xsi="http://www.w3.org/2001/XMLSchema-instance"
xsi:schemaLocation="http://www.springframework.org/schema/beans
http://www.springframework.org/schema/beans/spring-beans-2.5.xsd">
<bean id="listBean" class="org.model.ListBean">
<property name="list">
<list>
<value>java</value>
<value>c++</value>
<value>php</value>
</list>
</property>
</bean>
</beans>
编写测试类,对ListBean类的“list”属性进行输入,测试是否注入成功。
package org.test;
import java.util.Iterator;
import java.util.List;
import org.model.ListBean;
import org.springframework.context.ApplicationContext;
import org.springframework.context.support.FileSystemXmlApplicationContext;
public class Test {
public static void main(String[]args){
ApplicationContext ac=
new FileSystemXmlApplicationContext("/WebRoot/WEB-INF/classes/config.xml");
ListBean listbean=(ListBean)ac.getBean("listBean");
List l=listbean.getList();
System.out.println(l);
}
}
运行程序,控制台信息为:
[java, c++, php]
3.2 对set的注入
创建类SetBean.java,代码编写为:
package org.model;
import java.util.Set;
public class SetBean {
private Set set;
public Set getSet() {
return set;
}
public void setSet(Set set) {
this.set = set;
}
}
配置文件config.xml编写为:
<?xml version="1.0" encoding="UTF-8"?>
<beans xmlns="http://www.springframework.org/schema/beans"
xmlns:xsi="http://www.w3.org/2001/XMLSchema-instance"
xsi:schemaLocation="http://www.springframework.org/schema/beans
http://www.springframework.org/schema/beans/spring-beans-2.5.xsd">
<bean id="setbean" class="org.model.SetBean">
<property name="set">
<set>
<value>java</value>
<value>c++</value>
<value>php</value>
</set>
</property>
</bean>
</beans>
编写测试类,代码如下:
package test;
import org.model.SetBean;
import org.springframework.context.ApplicationContext;
import org.springframework.context.support.FileSystemXmlApplicationContext;
public class Test {
public static void main(String[]args){
ApplicationContext ac=
new FileSystemXmlApplicationContext("/WebRoot/WEB-INF/classes/config.xml");
SetBean setbean=(SetBean)ac.getBean("setbean");
System.out.println(setbean.getSet());
}
}
运行程序,输出结果为:
[java, c++, php]
3 对Map的注入
创建类MapBean.java,代码编写为:
package org.model;
import java.util.Map;
public class MapBean {
private Map map;
public Map getMap() {
return map;
}
public void setMap(Map map) {
this.map = map;
}
}
配置文件config.xml文件配置为:
<?xml version="1.0" encoding="UTF-8"?>
<beans xmlns="http://www.springframework.org/schema/beans"
xmlns:xsi="http://www.w3.org/2001/XMLSchema-instance"
xsi:schemaLocation="http://www.springframework.org/schema/beans
http://www.springframework.org/schema/beans/spring-beans-2.5.xsd">
<bean id="mapbean" class="org.model.MapBean">
<property name="map">
<map>
<entry key="java">
<value>Java EE实用教程</value>
</entry>
<entry key="c++">
<value>c++实用教程</value>
</entry>
<entry key="php">
<value>PHP实用教程</value>
</entry>
</map>
</property>
</bean>
</beans>
编写测试类:
package org.test;
import java.util.Map;
import org.model.MapBean;
import org.springframework.context.ApplicationContext;
import org.springframework.context.support.FileSystemXmlApplicationContext;
public class Test {
public static void main(String[]args){
ApplicationContext ac=
new FileSystemXmlApplicationContext("/WebRoot/WEB-INF/classes/config.xml");
MapBean mapbean=(MapBean)ac.getBean("mapbean");
Map map=mapbean.getMap();
System.out.println(map);
}
}
运行程序,控制台输出结果为:
{java=Java EE实用教程, c++=c++实用教程, php=PHP实用教程}
5 两种后处理器
spring框架提供了良好的扩展性,它允许通过两种后处理器对IOC容器进行扩展,这两种后处理器分别是Bean后处理器及容器后处理器
1. bean后处理器是一个特殊的bean,该bean不对外提供服务,所以无须定义ID属性,它主要是对容器中的其他Bean执行后处理
Bean后处理器必须实现BeanPostProcessor接口,并覆盖该接口中的两个方法:objectpostprocessafterliitializtion(Object bean,String beanname)throws BeansEXCEPTIONEY
objectposprocessbeforeInitialization方法这两种方法中的第一个参数是系统即将进行后处理的Bean实例,第二参数是该bean实例的名称,其中,第一种方法在目标Bean初妈化之前被调
用,第二种方法是在初始化之后被调用.
下面举例说明Bean后处理器的应用。
建立项目,添加Spring核心类库后,在src下建立包“org.beanpost”,在该包下建立类MyBeanPost.java,代码编写如下:
package org.beanpost;
import org.springframework.beans.BeansException;
import org.springframework.beans.factory.config.BeanPostProcessor;
public class MyBeanPost implements BeanPostProcessor{
public Object postProcessAfterInitialization(Object bean, String beanname)
throws BeansException {
System.out.println("Bean后处理器在初始化之前对"+beanname+"进行处理");
return bean;
}
public Object postProcessBeforeInitialization(Object bean, String beanname)
throws BeansException {
System.out.println("Bean后处理在初始化之后对"+beanname+"进行处理");
return bean;
}
}
编写HelloWorld.java类,代码如下:
package org.model; //该类放在org.model包中
public class HelloWorld {
private String message;
public String getMessage() {
return message;
}
public void setMessage(String message) {
this.message = message;
}
//该方法会在初始化过程中被执行
public void init(){
System.out.println("该句在Bean初始化过程中执行");
}
}
编写配置文件config.xml文件:
<?xml version="1.0" encoding="UTF-8"?>
<beans xmlns="http://www.springframework.org/schema/beans"
xmlns:xsi="http://www.w3.org/2001/XMLSchema-instance"
xsi:schemaLocation="http://www.springframework.org/schema/beans
http://www.springframework.org/schema/beans/spring-beans-2.5.xsd">
<!-- 配置初始化方法属性,在初始化过程中就会执行init方法 -->
<bean id="HelloWorld" class="org.model.HelloWorld" init-method="init">
<property name="message" >
<value>Hello World!</value>
</property>
</bean>
<!-- 该Bean可以配置id属性,也可以不配置id属性 -->
<bean class="org.beanpost.MyBeanPost"></bean>
</beans>
编写测试类,完成Bean的实例化,代码如下:
package org.test;
import org.model.HelloWorld;
import org.springframework.context.ApplicationContext;
import org.springframework.context.support.FileSystemXmlApplicationContext;
public class HelloWorldTest {
public static void main(String[] args) {
ApplicationContext ac=
new FileSystemXmlApplicationContext("/WebRoot/WEB-INF/classes/config.xml");
HelloWorld helloWorld=(HelloWorld) ac.getBean("HelloWorld");
System.out.println(helloWorld.getMessage());
}
}
使用ApplicationContext作为容器,无须手动注册BeanPostProcessor,因此如需要使用Bean后处理器,Spring容器建议使用ApplicationContext容器。运行程序,观察控制台打印出的信息。
Bean后处理在初始化之后对HelloWorld进行处理
该句在Bean初始化过程中执行
Bean后处理器在初始化之前对HelloWorld进行处理
Hello World!
Spring的AOP及事务支持
Spring的其他功能


