importlib模块与基于中间件实现的编程思想
importlib 模块介绍
我们平时导入 python 模块一般是使用 from .. import .. 的导入语句
from django.shortcuts import HttpResponse
现在我来介绍一种新的导入模块方法。
使用 importlib 可以根据模块字符串路径来导入模块。
使用:
import importlib


model_path = 'notify.email'
model = importlib.import_module(model_path)  # 可以得到模块对象,之间 model.类名 可以获取该模块中的类


print(model)  # <module 'notify.email' from 'E:\\\\notify\\email.py'>

obj = model.Email()  # 实例化模块中的类对象
obj.send('很nice')  # 调用类中的方法
基于中间件实现的编程思想
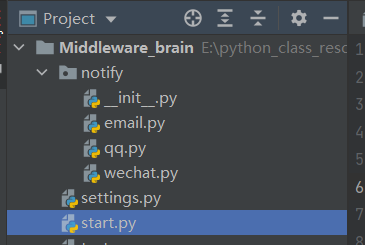
文件路径:

--notify : 是存放了多个功能模块的包
--settings.py : 配置文件,里面的 MIDDLEWARE 列表存放 notify 中部分类的字符串路径
--start.py : 启动文件
notify
''' __init__.py(核心)'''

import settings
import importlib


def send_all(content):
    # 循环 settings 文件中的注册表
    for path_str in settings.MIDDLEWARE:
        # 1、把模块路径和类名分割出来
        model_path, class_name = path_str.rsplit('.', maxsplit=1)
        # 2、使用 importlib 模块来导入列表中的模块
        model = importlib.import_module(model_path)
        # 3、用反射机制来取出模块中类的地址
        cls = getattr(model, class_name)
        # 4、实例化对象并调用各自的send方法发送
        obj = cls()
        obj.send(content)  # 鸭子类型(多态)
'''wechat.py'''
class Wechat:
    def __init__(self):
        pass

    def send(self, content):
        print(f'微信发送:{content}')


'''qq.py'''
class QQ:
    def __init__(self):
        pass

    def send(self, content):
        print(f'QQ发送:{content}')


'''eamil.py'''
class Email:
    def __init__(self):
        pass

    def send(self, content):
        print(f'email发送:{content}')
settings.py:
MIDDLEWARE = [
    'notify.wechat.Wechat',
    'notify.qq.QQ',
    'notify.email.Email',
]
start.py:
import notify


while True:
    content = input('请书写发送通告:')

    notify.send_all(content)
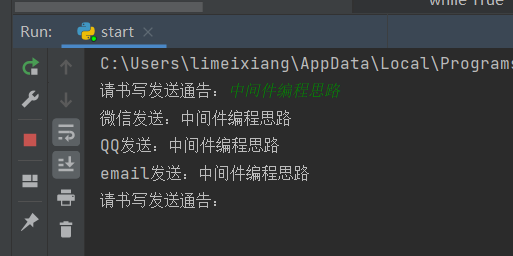
执行效果

如果需要添加其它通讯工具
- 在 notify 中添加该通讯工具的模块,书写类,类中必须有 send() 方法(多态),鸭子类型
- 在 settings.py 中添加该模块的字符串路径
如果不想调用哪个模块,直接在 settings.py 中注释掉它的路径
MIDDLEWARE = [
    'notify.wechat.Wechat',
    'notify.qq.QQ',
    #'notify.email.Email',
]


【推荐】国内首个AI IDE,深度理解中文开发场景,立即下载体验Trae
【推荐】编程新体验,更懂你的AI,立即体验豆包MarsCode编程助手
【推荐】抖音旗下AI助手豆包,你的智能百科全书,全免费不限次数
【推荐】轻量又高性能的 SSH 工具 IShell:AI 加持,快人一步
· winform 绘制太阳,地球,月球 运作规律
· 震惊!C++程序真的从main开始吗?99%的程序员都答错了
· 【硬核科普】Trae如何「偷看」你的代码?零基础破解AI编程运行原理
· AI与.NET技术实操系列(五):向量存储与相似性搜索在 .NET 中的实现
· 超详细:普通电脑也行Windows部署deepseek R1训练数据并当服务器共享给他人