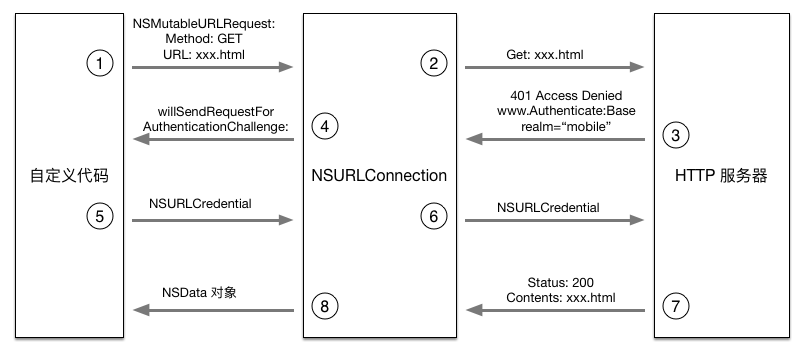
保护网络传输的实现
一、验证应用与正确的服务器通信 (验证 Protection Space)
在 willSendRequestForAuthenticationChallenge 回调方法中,检查 challenge,确定是否想要响应服务器的认证 challenge,同时发出适当的 challenge 响应。
防止:如果发现处于恶意网络之上,传输被重新路由到第三方的服务器上,那么保护空间验证就会因不匹配主机而失败,后续的通信也会终止。
创建保护空间,讲奇遇 challenge 中包含的信息做对比。
NSURLProtectionSpace *defaultSpace = [[NSURLProtectionSpace alloc] initWithHost:@"xxx.com" port:443 protocol:NSURLProtectionSpaceHTTPS realm:@"mobile" authenticationMethod:NSURLAuthenticationMethodDefault];
支持的 NSURLProtectionSpace 协议:
- NSURLProtectionHTTP: 80/8080
- NSURLProtectionHTTPS: 443
- NSURLProtectionFTP: 21/22
basic challenge 响应的过程:

1.1 方式一:此方式的 Protection Space 验证,需要包含备份认证服务器或其它备选服务器,包含多个 Pretection Space 可以实现一定程度的灵活。
- (void)connection:(NSURLConnection *)connection willSendRequestForAuthenticationChallenge:(NSURLAuthenticationChallenge *)challenge {

    NSURLProtectionSpace *defaultSpace = [[NSURLProtectionSpace alloc] initWithHost:@"xxx.com" port:443 protocol:NSURLProtectionSpaceHTTPS realm:@"mobile" authenticationMethod:NSURLAuthenticationMethodDefault];

    NSURLProtectionSpace *trustSpace = [[NSURLProtectionSpace alloc] initWithHost:@"xxx.com" port:443 protocol:NSURLProtectionSpaceHTTPS realm:@"mobile" authenticationMethod:NSURLAuthenticationMethodClientCertificate];

    NSArray *validSpaces = [NSArray arrayWithObjects:defaultSpace, trustSpace, nil];

    if (![validSpaces containsObject:challenge.protectionSpace]) {
        NSString *errorMessage = @"We're unable to establish a secure connection. Please check your network connection and try again.";

        dispatch_async(dispatch_get_main_queue(), ^{
           // show alertView
        });
        [challenge.sender cancelAuthenticationChallenge:challenge];
    }

}
1.2 方式二:实现后端灵活性,只验证 challenge 的某些属性,比如主机、端口、协议是否与遇险定义号的匹配。
- (void)connection:(NSURLConnection *)connection willSendRequestForAuthenticationChallenge:(NSURLAuthenticationChallenge *)challenge {

    if (![challenge.protectionSpace.host isEqualToString:@"xxx.com"] ||
        (challenge.protectionSpace.port != 443) ||
        ![challenge.protectionSpace.protocol isEqualToString:NSURLProtectionSpaceHTTPS]) {
        NSString *errorMessage = @"We're unable to establish a secure connection. Please check your network connection and try again.";

        dispatch_async(dispatch_get_main_queue(), ^{
            // show alertView
        });

        [challenge.sender cancelAuthenticationChallenge:challenge];
    }
}
二、使用 HTTP 认证
2.1 标准认证
HTTP Basic、HTTP Digest、NTLM 使用用户名与密码认证 challenge,三者认证响应的逻辑类似,以下以 HTTP Basic 为例子。
- (void)connection:(NSURLConnection *)connection willSendRequestForAuthenticationChallenge:(NSURLAuthenticationChallenge *)challenge {
    if (challenge.protectionSpace.authenticationMethod == NSURLAuthenticationMethodHTTPBasic) {
        if (challenge.previousFailureCount == 0) {
            NSURLCredential *cred = [[NSURLCredential alloc] initWithUser:userName password:password persistence:NSURLCredentialPersistenceForSession];

            [challenge.sender useCredential:cred forAuthenticationChallenge:challenge];
        }
        else { // 之前有发生过认证失败,需要根据具体情况处理,一般是封锁住用户
            [challenge.sender cancelAuthenticationChallenge:challenge];

            // 警告用户认证失败
            NSString *message = @"Invalid username / passeord.";
            dispatch_async(dispatch_get_main_queue(), ^{
               // 显示视图提示
            });
        }
    }
}
如果 challenge 认证失败,需要提示用户,并取消 challenge 认证,因为 willSendRequestForAuthenticationChallenge 可能会被多次调用。根据配置,如果用户的认证信息不合法而又没有恰当地进行检查,那就有可能在用户提交过一次不合法的认证信息后,账户被锁定。如果进来的 challenge 认证方法并不是应用能处理的类型,则不发出响应。
2.2 快速认证
让用户注册设备,然后使用 PIN 进行验证,没次认证的时候无需使用用户名和密码。为了确保快速认证的安全性,在设备注册成功后,服务器响应就需要包含一个用户证书(使用 Base64 编码成 PKCS P12),客户端应用保存下这个证书,并在随后启动时检查。
2.2.1: 注册设备完成保存服务器返回来的客户端证书
服务器注册成功返回的证书数据
{
  "result": "SUCCESS",
  "message": "Authentication Successful",
  "certificate": "<BASE64 Encoded Certificate>"
}
注册成功后,解码 Base64 的 .p12 这书,并存储到 keychain 中。
- (void)connectionDidFinishLoading:(NSURLConnection *)connection {
    NSError *error = nil;
    NSDictionary *responseDict = [NSJSONSerialization JSONObjectWithData:responseData options:0 error:&error];

    // ... 设备注册完成操作

    // 保存服务器返回来的证书
    if (isDeviceRegisted) {
        NSString *certString = responseDict[@"certificate"];
        NSData *certData = [Base64 decodeString:certString];

        SecIdentityRef identity = NULL;
        SecCertificateRef certificate = NULL;
        [Utils identity:&identity certificate:&certificate fromPKCS12Data:certData withPhrase:@"test"];

        if (identity) {
            // 把 identity, certificate 保存到 keychain 中
            NSArray *cerArray = [NSArray arrayWithObject:(__bridge id)certificate];
            NSURLCredential *credential = [NSURLCredential credentialWithIdentity:identity certificates:cerArray persistence:NSURLCredentialPersistencePermanent];

            NSURLProtectionSpace *certSpace = [[NSURLProtectionSpace alloc] initWithHost:@"xxx.com" port:443 protocol:NSURLProtectionSpaceHTTPS realm:@"mobileApp" authenticationMethod:NSURLAuthenticationMethodClientCertificate];

            [[NSURLCredentialStorage sharedCredentialStorage] setDefaultCredential:credential forProtectionSpace:certSpace];
        }
    }
}
从 NSData 中获取 identity,certificate
+ (void)identity:(SecIdentityRef *)identity certificate:(SecCertificateRef *)certificate fromPKCS12Data:(NSData *)certData withPhrase:(NSString *)phrase {

    // bridge the import data to foundation objects
    CFStringRef importPassphrase = (__bridge CFStringRef)phrase;
    CFDataRef importData = (__bridge CFDataRef)certData;

    // create dictionary of options for the PKCS12 import
    const void *keys[] = {kSecImportExportPassphrase};
    const void *values[] = {importPassphrase};
    CFDictionaryRef importOptions = CFDictionaryCreate(NULL, keys, values, 1, NULL, NULL);

    // create array to store import results
    CFArrayRef importResults = CFArrayCreate(NULL, 0, 0, NULL);

    OSStatus pkcs12ImportStatus = SecPKCS12Import(importData, importOptions, &importResults);

    if (pkcs12ImportStatus == errSecSuccess) {
        CFDictionaryRef identityAndTrust = CFArrayGetValueAtIndex(importResults, 0);

        // retrieve the identity from the certificate imported
        const void *tempIdentity = CFDictionaryGetValue(identityAndTrust, kSecImportItemIdentity);
        *identity = (SecIdentityRef)tempIdentity;

        // extract certificate from the identity
        SecCertificateRef tmpCertificate = NULL;
        SecIdentityCopyCertificate(*identity, &tmpCertificate);
        *certificate = (SecCertificateRef)tmpCertificate;
    }


    // clean up
    if (importOptions) {
        CFRelease(importOptions);
    }
    if (importResults) {
        CFRelease(importResults);
    }
}
2.2.2 由于 willSendRequestForAuthenticationChallenge 会在服务器与客户端认证过程中多次被调用,因此需要判断需要处理那个 challenge。以下代码用于确定是否应该发出客户端证书或者是使用辨准的用户凭证进行认证。
- (void)connection:(NSURLConnection *)connection willSendRequestForAuthenticationChallenge:(NSURLAuthenticationChallenge *)challenge {

    // 使用客户端证书认证
    NSURLProtectionSpace *clientCertificateProtectionSpace = [[NSURLProtectionSpace alloc] initWithHost:@"xxx.com" port:443 protocol:NSURLProtectionSpaceHTTPS realm:@"mobileApp" authenticationMethod:NSURLAuthenticationMethodClientCertificate];

    if (challenge.protectionSpace.authenticationMethod == NSURLAuthenticationMethodClientCertificate && isDeviceRegisted) {
        if (challenge.previousFailureCount == 0) {
            // 读取本地存储下来的客户端证书
            NSURLCredential *cred = [[NSURLCredentialStorage sharedCredentialStorage] defaultCredentialForProtectionSpace:clientCertificateProtectionSpace];

            if (cred) {
                [challenge.sender useCredential:cred forAuthenticationChallenge:challenge];
            }
        }
        else {
            [challenge.sender cancelAuthenticationChallenge:challenge];

            // 并提示用户认证失败
        }
    }
    else {
        // 使用其他的授权方式,例如 HTTP Basic, HTTP Digest, NTLM, 见 2.1 标准认证代码
    }

    // 如果不是应用能处理的类型,则不响应认证,继续连接
    [challenge.sender continueWithoutCredentialForAuthenticationChallenge:challenge];

}
在服务层,可以通过 openssl_x509_parse() 函数检索到证书的属性。在获取证书属性后,可以使用服务器层的很多认证选项。其中一个选项好似验证请求发起人,然后已知的私钥列表中查找该用户。另一个选项是在应用中使用 PIN 机制,从而在向认证发出客户端证书之前进行验证。
如果是自签的 SSL 证书,NSURLConnection 会拦截掉不带信任证书的服务器响应。因此需要将服务器证书(.cer 文件扩展),以邮件的形式发送给设备上配置好的 email 账户,就可以单机并安装证书。
posted on 2016-06-23 11:11 EileenLeung 阅读(902) 评论(0) 编辑 收藏 举报


