SSM简单整合(Spring5 + MyBatis3)
SSM整合
- Spring5 + MyBatis3 简单整合
- IDE:
eclipse - 项目:
dynamic web project
导包
- Spring
【IOC核心】
commons-logging-1.2.jar
spring-aop-5.2.9.RELEASE.jar
spring-beans-5.2.9.RELEASE.jar
spring-context-5.2.9.RELEASE.jar
spring-core-5.2.9.RELEASE.jar
spring-expression-5.2.9.RELEASE.jar

【AOP核心】
spring-aspects-5.2.9.RELEASE.jar
com.springsource.org.aspectj.weaver-1.6.8.RELEASE.jar
com.springsource.net.sf.cglib-2.2.0.jar
com.springsource.org.aopalliance-1.0.0.jar

【jdbc核心】
spring-jdbc-5.2.9.RELEASE.jar
spring-orm-5.2.9.RELEASE.jar
spring-tx-5.2.9.RELEASE.jar

【测试】
spring-test-5.2.9.RELEASE.jar
- SpringMVC
【核心】
spring-web-5.2.9.RELEASE.jar
spring-webmvc-5.2.9.RELEASE.jar

【数据校验】
hibernate-validator-5.1.0.Final.jar
hibernate-validator-annotation-processor-5.1.0.Final.jar
hibernate-validator-cdi-5.1.0.Final.jar
classmate-1.0.0.jar
jboss-logging-3.1.3.GA.jar
validation-api-1.1.0.Final.jar

【ajax】
jackson-annotations-2.11.3.jar
jackson-core-2.11.3.jar
jackson-databind-2.11.3.jar

【文件上传】
commons-fileupload-1.4.jar
commons-io-2.4.jar

【jstl - jsp标准标签库】
jstl.jar
standard.jar

【验证码】
kaptcha-2.3.2.jar
- MyBatis
【核心】
mybatis-3.5.6.jar

【ehcache 第三方缓存】
ehcache-core-2.6.11.jar
mybatis-ehcache-1.1.0.jar
slf4j-api-1.7.30.jar
slf4j-log4j12-1.7.25.jar

【与spring的整合包】
mybatis-spring-1.3.2.jar
- 其他
【log4j】
log4j-1.2.17.jar

【mysql驱动】
mysql-connector-java-8.0.19.jar

【数据源】
druid-1.2.0.jar
配置
1. web.xml
<?xml version="1.0" encoding="UTF-8"?>
<web-app xmlns:xsi="http://www.w3.org/2001/XMLSchema-instance" xmlns="http://java.sun.com/xml/ns/javaee" xsi:schemaLocation="http://java.sun.com/xml/ns/javaee http://java.sun.com/xml/ns/javaee/web-app_3_0.xsd" id="WebApp_ID" version="3.0">
  <display-name>1.SSM_merge</display-name>
  <welcome-file-list>
    <welcome-file>index.jsp</welcome-file>
  </welcome-file-list>

  <!-- 配置前端控制器 -->
  <!-- The front controller of this Spring Web application, responsible for handling all application requests -->
	<servlet>
		<servlet-name>springDispatcherServlet</servlet-name>
		<servlet-class>org.springframework.web.servlet.DispatcherServlet</servlet-class>
		<init-param>
			<param-name>contextConfigLocation</param-name>
			<param-value>classpath:spring/ApplicationContext-mvc.xml</param-value>
		</init-param>
		<load-on-startup>1</load-on-startup>
	</servlet>

	<!-- Map all requests to the DispatcherServlet for handling -->
	<servlet-mapping>
		<servlet-name>springDispatcherServlet</servlet-name>
		<url-pattern>/</url-pattern>
	</servlet-mapping>


  <!-- 配置Spring容器 -->
	<context-param>
		<param-name>contextConfigLocation</param-name>
		<param-value>classpath:spring/ApplicationContext.xml</param-value>
	</context-param>

	<!-- Bootstraps the root web application context before servlet initialization -->
	<listener>
		<listener-class>org.springframework.web.context.ContextLoaderListener</listener-class>
	</listener>


  <!-- 其余两个配置 -->

  <!-- 配置字符编码 -->
  <filter>
  	<filter-name>CharacterEncodingFilter</filter-name>
  	<filter-class>org.springframework.web.filter.CharacterEncodingFilter</filter-class>
  	<init-param>
  		<param-name>encoding</param-name>
  		<param-value>UTF-8</param-value>
  	</init-param>
  	<init-param>
  		<param-name>forceRequestEncoding</param-name>
  		<param-value>true</param-value>
  	</init-param>
  	<init-param>
  		<param-name>forceResponseEncoding</param-name>
  		<param-value>true</param-value>
  	</init-param>
  </filter>
  <filter-mapping>
  	<filter-name>CharacterEncodingFilter</filter-name>
  	<url-pattern>/*</url-pattern>
  </filter-mapping>

  <!-- 支持Rest风格 -->
  <filter>
  	<filter-name>HiddenHttpMethodFilter</filter-name>
  	<filter-class>org.springframework.web.filter.HiddenHttpMethodFilter</filter-class>
  </filter>
  <filter-mapping>
  	<filter-name>HiddenHttpMethodFilter</filter-name>
  	<url-pattern>/*</url-pattern>
  </filter-mapping>

</web-app>
2. Spring容器
- 配置文件位置
conf/spring/ApplicationContext.xml
<?xml version="1.0" encoding="UTF-8"?>
<beans xmlns="http://www.springframework.org/schema/beans"
	xmlns:xsi="http://www.w3.org/2001/XMLSchema-instance"
	xmlns:tx="http://www.springframework.org/schema/tx"
	xmlns:context="http://www.springframework.org/schema/context"
	xmlns:aop="http://www.springframework.org/schema/aop"
	xsi:schemaLocation="http://www.springframework.org/schema/beans http://www.springframework.org/schema/beans/spring-beans.xsd
		http://www.springframework.org/schema/context http://www.springframework.org/schema/context/spring-context-4.3.xsd
		http://www.springframework.org/schema/aop http://www.springframework.org/schema/aop/spring-aop-4.3.xsd
		http://www.springframework.org/schema/tx http://www.springframework.org/schema/tx/spring-tx-4.3.xsd">

	<!-- spring容器除过 控制器不要,剩下的业务逻辑组件都要,包括dao、service等 -->
	<!-- 排除扫描不写 use-default-filters="false" -->
	<context:component-scan base-package="com.engure">
		<context:exclude-filter type="annotation" expression="org.springframework.stereotype.Controller"/>
	</context:component-scan>

	<context:property-placeholder location="classpath:jdbc.properties"></context:property-placeholder>

	<!-- 1、配置数据源 -->
	<bean id="dataSource" class="com.alibaba.druid.pool.DruidDataSource">
		<property name="username" value="${prop.username}"></property>
		<property name="driverClassName" value="${prop.driver}"></property>
		<property name="password" value="${prop.password}"></property>
		<property name="url" value="${prop.url}"></property>
	</bean>

	<!-- 2、配置JdbcTemplate操作数据库 -->
	<!-- 3、配置使用 mybatis操作数据库	整合包mybatis-spring-1.3.2.jar -->

	<bean id="sqlSessionFactoryBean" class="org.mybatis.spring.SqlSessionFactoryBean">
		<!-- mybatis全局配置文件位置 -->
		<property name="configLocation" value="classpath:mybatis/mybatis-config.xml"></property>
		<!-- mybatis使用 数据源 -->
		<property name="dataSource" ref="dataSource"></property>
		<!-- 指定xml映射文件位置 -->
		<property name="mapperLocations" value="classpath:mybatis/mapper/*.xml"></property>

		<!-- 其他属性的配置    ==>>>  <property name="..."></property> -->
	</bean>

	<!-- 指定 dao接口所在的包 -->
	<bean class="org.mybatis.spring.mapper.MapperScannerConfigurer">
		<property name="sqlSessionFactoryBeanName" value="sqlSessionFactoryBean"></property>
		<property name="basePackage" value="com.engure.dao"></property>
	</bean>

	<!-- 4、配置事务控制 -->

	<!-- 配置事务管理器 -->
	<bean id="tm" class="org.springframework.jdbc.datasource.DataSourceTransactionManager">
		<property name="dataSource" ref="dataSource"></property>
	</bean>

	<aop:config>
		<!-- 切入点表达式,事务要切入哪些方法 -->
		<aop:pointcut expression="execution(* com.engure.service.impl.*.*(..))" id="myPointCut"/>
		<!-- 事务建议/增强/通知,advice-ref 指向事务建议 -->
		<aop:advisor advice-ref="myAdvice" pointcut-ref="myPointCut"/>
	</aop:config>

	<!-- 配置事务建议(也叫增强、通知) -->
	<tx:advice id="myAdvice" transaction-manager="tm">
		<tx:attributes>
			<!-- 指明事务方法及配置 -->
			<tx:method name="*"/>
			<tx:method name="get*" read-only="true"/>
			<!-- 其他属性 <tx:method name="" isolation="DEFAULT"rollback-for="" propagation="REQUIRED" timeout="-1"/> -->
		</tx:attributes>
	</tx:advice>

</beans>
- 使用外部属性文件
conf/jdbc.properties
prop.driver=com.mysql.cj.jdbc.Driver
prop.url=jdbc:mysql://localhost:3306/user_db?serverTimezone=UTC
prop.username=root
prop.password=123
3. SpringMVC容器
- 配置文件位置
conf/spring/ApplicationContext-mvc.xml
<?xml version="1.0" encoding="UTF-8"?>
<beans xmlns="http://www.springframework.org/schema/beans"
	xmlns:xsi="http://www.w3.org/2001/XMLSchema-instance"
	xmlns:context="http://www.springframework.org/schema/context"
	xmlns:mvc="http://www.springframework.org/schema/mvc"
	xsi:schemaLocation="http://www.springframework.org/schema/mvc http://www.springframework.org/schema/mvc/spring-mvc-4.3.xsd
		http://www.springframework.org/schema/beans http://www.springframework.org/schema/beans/spring-beans.xsd
		http://www.springframework.org/schema/context http://www.springframework.org/schema/context/spring-context-4.3.xsd">

	<!-- springmvc只扫描 控制器,【一定要禁用默认规则!】 -->
	<!-- 如果不使用 ControllerAdvice做异常处理就不扫描 -->
	<context:component-scan base-package="com.engure" use-default-filters="false">
		<context:include-filter type="annotation" expression="org.springframework.stereotype.Controller"/>
	</context:component-scan>

	<!-- 配置视图解析器,返回方便 -->
	<bean class="org.springframework.web.servlet.view.InternalResourceViewResolver">
		<property name="prefix" value="/WEB-INF/pages/"></property>
		<property name="suffix" value=".jsp"></property>
	</bean>

	<!-- 配置文件上传解析器 -->
	<bean id="multipartResolver" class="org.springframework.web.multipart.commons.CommonsMultipartResolver">
		<property name="maxUploadSize" value="#{1024*1024*20}"></property>
		<property name="defaultEncoding" value="utf-8"></property>
	</bean>

	<!-- 扫描静态资源 -->
	<mvc:default-servlet-handler/>
	<!-- 扫描动态资源 -->
	<mvc:annotation-driven></mvc:annotation-driven>

</beans>
4. MyBatis全局配置
- 文件位置
conf/mybatis/mybatis-config.xml
<?xml version="1.0" encoding="UTF-8" ?>
<!DOCTYPE configuration
	PUBLIC "-//mybatis.org//DTD Config 3.0//EN"
	"http://mybatis.org/dtd/mybatis-3-config.dtd">
<configuration>

	<settings>
		<setting name="cacheEnabled" value="true"/>
		<setting name="lazyLoadingEnabled" value="true"/>
		<setting name="aggressiveLazyLoading" value="false"/>
		<setting name="mapUnderscoreToCamelCase" value="true"/>
	</settings>

</configuration>
5. 其他配置
- 配置日志
conf/log4j.properties
# global log configuration
log4j.rootLogger=DEBUG, stdout
# MyBatis log configuration
log4j.logger.org.mybatis.example.BlogMapper=TRACE
# console output
log4j.appender.stdout=org.apache.log4j.ConsoleAppender
log4j.appender.stdout.layout=org.apache.log4j.PatternLayout
log4j.appender.stdout.layout.ConversionPattern=%5p [%t] - %m%n
- ehcache第三方缓存
conf/ehcache.xml
<?xml version="1.0" encoding="UTF-8"?>
<ehcache xmlns:xsi="http://www.w3.org/2001/XMLSchema-instance"
	xsi:noNamespaceSchemaLocation="../config/ehcache.xsd">
    <diskStore path="F:\ehcache"/>
    <defaultCache
            maxElementsOnDisk="10000"
            maxElementsInMemory="10000"
            eternal="false"
            overflowToDisk="true"
            timeToIdleSeconds="120"
            timeToLiveSeconds="120"
            diskExpiryThreadIntervalSeconds="120"
            memoryStoreEvictionPolicy="LRU"/>
</ehcache>
Client简单实现(实体类、dao、service、测试)
- 数据表
user_db.user
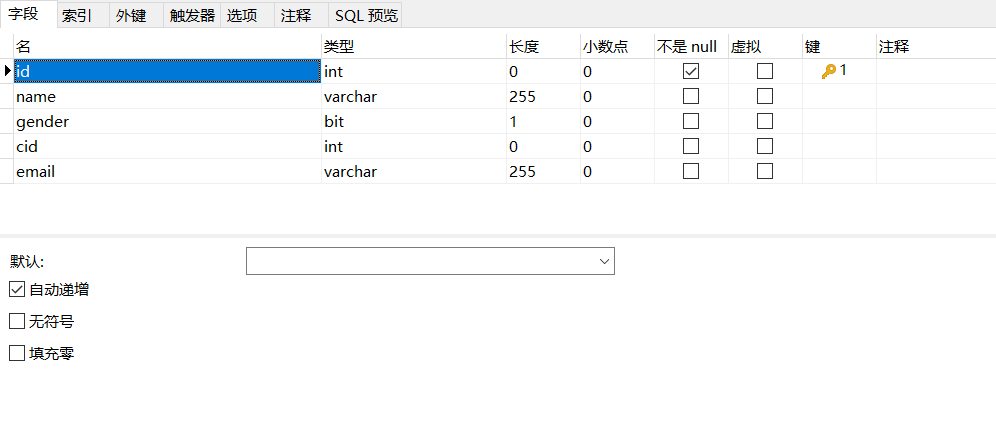
实体类 User
package com.engure.bean;

import java.io.Serializable;

public class User implements Serializable/* 使用ehcache */{
	private Integer userId;
	private String userName;
	private Integer userGender;
	private Integer userCid;
	private String userEmail;

	public User() {
		super();
	}

	@Override
	public String toString() {
		return "User [userId=" + userId + ", userName=" + userName + ", userGender=" + userGender + ", userCid="
				+ userCid + ", userEmail=" + userEmail + "]";
	}

	public User(Integer userId, String userName, Integer userGender, Integer userCid, String userEmail) {
		super();
		this.userId = userId;
		this.userName = userName;
		this.userGender = userGender;
		this.userCid = userCid;
		this.userEmail = userEmail;
	}

	public Integer getUserId() {
		return userId;
	}

	public void setUserId(Integer userId) {
		this.userId = userId;
	}

	public String getUserName() {
		return userName;
	}

	public void setUserName(String userName) {
		this.userName = userName;
	}

	public Integer getUserGender() {
		return userGender;
	}

	public void setUserGender(Integer userGender) {
		this.userGender = userGender;
	}

	public Integer getUserCid() {
		return userCid;
	}

	public void setUserCid(Integer userCid) {
		this.userCid = userCid;
	}

	public String getUserEmail() {
		return userEmail;
	}

	public void setUserEmail(String userEmail) {
		this.userEmail = userEmail;
	}

}
UserDao.java
package com.engure.dao;

import com.engure.bean.User;

public interface UserDao {

	public User getUserById(Integer id);

}
UserDao.xml
<?xml version="1.0" encoding="UTF-8"?>
<!DOCTYPE mapper
        PUBLIC "-//mybatis.org//DTD Mapper 3.0//EN"
        "http://mybatis.org/dtd/mybatis-3-mapper.dtd">
<mapper namespace="com.engure.dao.UserDao">

	<!-- 为mapper配置cache -->
	<cache type="org.mybatis.caches.ehcache.EhcacheCache"></cache>

	<resultMap type="com.engure.bean.User" id="myUserMap">
		<id property="userId" column="id"/>
		<result property="userName" column="name"/>
		<result property="userGender" column="gender"/>
		<result property="userCid" column="cid"/>
		<result property="userEmail" column="email"/>
	</resultMap>

	<select id="getUserById" resultMap="myUserMap">
		select * from user where id=#{id}
	</select>

</mapper>
UserService
package com.engure.service;

import org.springframework.beans.factory.annotation.Autowired;
import org.springframework.stereotype.Service;

import com.engure.bean.User;
import com.engure.dao.UserDao;

//此处有所简化

@Service
public class UserService{

	@Autowired
	private UserDao userDao;

	public User getUserById(Integer id) {
		return userDao.getUserById(id);
	}

}
UserController
package com.engure.controller;

import org.springframework.beans.factory.annotation.Autowired;
import org.springframework.stereotype.Controller;
import org.springframework.ui.Model;
import org.springframework.web.bind.annotation.RequestMapping;

import com.engure.bean.User;
import com.engure.service.UserService;

@Controller
public class UserController {

	@Autowired
	private UserService userService;

	@RequestMapping("/h1")
	public String h1(Integer id,
			Model m) {
		System.out.println("h1............");
		User u = userService.getUserById(id);
		m.addAttribute("user", u);
		return "success";
	}

	@RequestMapping("/h2")
	public String h2() {
		System.out.println("h2............");
		return "success";
	}

}
测试
WebContent/index.jsp
<%@ page language="java" contentType="text/html; charset=UTF-8"
    pageEncoding="UTF-8"%>
<!DOCTYPE html>
<html>
<head>
<meta charset="UTF-8">
<title>Insert title here</title>
</head>
<body>

	<a href="h1?id=2">查询User</a>

</body>
</html>
- 跳转页面
/WEB-INF/pages/success.jsp
<%@ page language="java" contentType="text/html; charset=UTF-8"
    pageEncoding="UTF-8"%>
<!DOCTYPE html>
<html>
<head>
<meta charset="UTF-8">
<title>Insert title here</title>
</head>
<body>

<h1>SUCCESS</h1>

${user }

</body>
</html>
项目结构相关说明
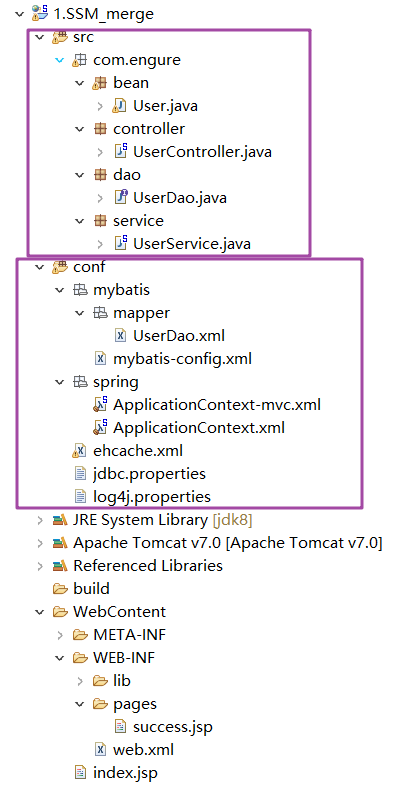
conf是资源目录(source folder),src是类路径,项目运行时会将两者合并、创建出运行目录build/classes/

遇到的错误
- 使用
druid连接池,配置数据源时配置错误:driverClassName 记成 driver
	<!-- 1、配置数据源 -->
	<bean id="dataSource" class="com.alibaba.druid.pool.DruidDataSource">
		<property name="username" value="${prop.username}"></property>
		<property name="driver" value="${prop.driver}"></property>
		<property name="password" value="${prop.password}"></property>
		<property name="url" value="${prop.url}"></property>
	</bean>
+++++++++++++++++++++++分割线+++++++++++++++++++++++++++++++++++++++++
踩坑记录 4.16
1. 装配过的 XXXService(接口)找不到 bean
>>>>>>>错误代码<<<<<

@Service
public interface BookEnty1Service {
    public List<BookEnty1> getBooks();
}

++++++++++++++

public class BookEnty1ServiceImpl implements BookEnty1Service {

    @Autowired
    BookEnty1Mapper mapper;

    @Override
    public List<BookEnty1> getBooks() {
        return mapper.getBooks();
    }
}

++++++++++++++

@Controller
public class BookEnty1Controller {

    @Autowired
    BookEnty1Service service;//不能通过类型找到子类

    @ResponseBody
    @RequestMapping(path = "/test2")
    public List<BookEnty1> h2() {
        return service.getBooks();
    }
}

>>>>>>>>>> 漫长的debug........
不太高效的debug方式:复制报错信息,直接百度,然后一个一个看、调、、

突然蹦出来的思路:会不会是service写错了,要不找个博客看看。找到之后竟发现它的 @Service 竟然指定了id。
https://blog.csdn.net/qq_25233621/article/details/102792862
于是我决定找详细的log日志。找到之后发现真是这里的问题。

正确做法:针对tomcat,应该看它生成的详细log。【第一时间也往这块想了,不过感觉不好找副本tomcat目录,就放弃了】

---->
\AppData\Local\JetBrains\IntelliJIdea2020.1\tomcat\Tomcat_7_0_104_Idea20210310_mvnWebdemos\logs\localhost.2021-04-16.log

四月 16, 2021 10:52:13 下午 org.apache.catalina.core.StandardContext loadOnStartup
严重: web应用程序[/04_blogdemo_01_war_exploded]中的Servlet[springDispatcherServlet]引发了load()异常
org.springframework.beans.factory.NoSuchBeanDefinitionException: No qualifying bean of type 'com.engure.service.BookEnty1Service' available: expected at least 1 bean which qualifies as autowire candidate.

=====> BookEnty1Service 没有装配

思考:为何装配了 AServiceImpl,通过 autowire 不可以自动装配 AService ?
reference:https://blog.csdn.net/qq_25233621/article/details/102792862
2. 第二次连接 Durid 又把 driverClassName 写成了 driver
    <bean id="dataSource" class="com.alibaba.druid.pool.DruidDataSource">
        <property name="username" value="${prop.username}" />
        <property name="url" value="${prop.url}" />
        <property name="driverClassName" value="${prop.driver}" />                   <---- 是driverClassName
        <property name="password" value="${prop.password}" />
    </bean>
沉舟侧畔千帆过,病树前头万木春。

 浙公网安备 33010602011771号