

构造模型的pytorch代码
- 使用有序字典构造模块
layers = OrderedDict() # 定义一个有序字典
layers.update({"expand_conv": 层结构}) # 添加层结构
self.block = nn.Sequential(layers) # 将有序字典转化为前向传播模块
如果layers使用的是list, 则在self.block = nn.Sequential(*layers), 需要多个*
self.downsample_layers = nn.ModuleList() # stem and 3 intermediate downsampling conv layers
self.downsample_layers.append = nn.Sequential(
nn.Conv2d(in_chans, dims[0], kernel_size=4, stride=4),
LayerNorm(dims[0], eps=1e-6, data_format="channels_first"))
- 合并成一整层
class ConvBNActivation(nn.Sequential):
def __init__(self,
in_planes: int,
out_planes: int,
kernel_size: int = 3,
stride: int = 1,
groups: int = 1, # 控制使用普通的卷积还是dw卷积
norm_layer: Optional[Callable[..., nn.Module]] = None, # BN结构
activation_layer: Optional[Callable[..., nn.Module]] = None):
padding = (kernel_size - 1) // 2
if norm_layer is None:
norm_layer = nn.BatchNorm2d
if activation_layer is None:
activation_layer = nn.SiLU # alias Swish (torch>=1.7)
super(ConvBNActivation, self).__init__(nn.Conv2d(in_channels=in_planes,
out_channels=out_planes,
kernel_size=kernel_size,
stride=stride,
padding=padding,
groups=groups,
bias=False),
norm_layer(out_planes),
activation_layer())
partial
from functools import partial
固定参数
func(a, b, c) # 函数
partia(func, a=1, b=2) # 固定参数
下次调用func之后直接输入c参数的值,后会自动调用,a, b的固定参数。
EfficientNet的MBConv模块
# MB模块
class InvertedResidual(nn.Module):
def __init__(self,
cnf: InvertedResidualConfig, # 参数配置, 前面还有一个参数配置类
norm_layer: Callable[..., nn.Module]): # BN结构
super(InvertedResidual, self).__init__()
if cnf.stride not in [1, 2]:
raise ValueError("illegal stride value.")
self.use_res_connect = (cnf.stride == 1 and cnf.input_c == cnf.out_c) # 是否使用shortcut连接
layers = OrderedDict() # 定义一个有序字典
activation_layer = nn.SiLU # alias Swish
# expand
if cnf.expanded_c != cnf.input_c: # 说明没有通过1x1的卷积核升降维度
layers.update({"expand_conv": ConvBNActivation(cnf.input_c,
cnf.expanded_c,
kernel_size=1,
norm_layer=norm_layer,
activation_layer=activation_layer)})
# depthwise
layers.update({"dwconv": ConvBNActivation(cnf.expanded_c,
cnf.expanded_c,
kernel_size=cnf.kernel,
stride=cnf.stride,
groups=cnf.expanded_c,
norm_layer=norm_layer,
activation_layer=activation_layer)})
if cnf.use_se:
layers.update({"se": SqueezeExcitation(cnf.input_c,
cnf.expanded_c)})
# project
layers.update({"project_conv": ConvBNActivation(cnf.expanded_c,
cnf.out_c,
kernel_size=1,
norm_layer=norm_layer,
activation_layer=nn.Identity)}) # nn.Identity是不做任何处理的意思
self.block = nn.Sequential(layers)
self.out_channels = cnf.out_c
self.is_strided = cnf.stride > 1
# 只有在使用shortcut连接时才使用dropout层
if self.use_res_connect and cnf.drop_rate > 0:
self.dropout = DropPath(cnf.drop_rate)
else:
self.dropout = nn.Identity()
def forward(self, x: Tensor) -> Tensor:
result = self.block(x)
result = self.dropout(result)
if self.use_res_connect:
result += x
return result
EfficientNet
参考资料:9.1 EfficientNet网络详解_哔哩哔哩_bilibili
网络参数
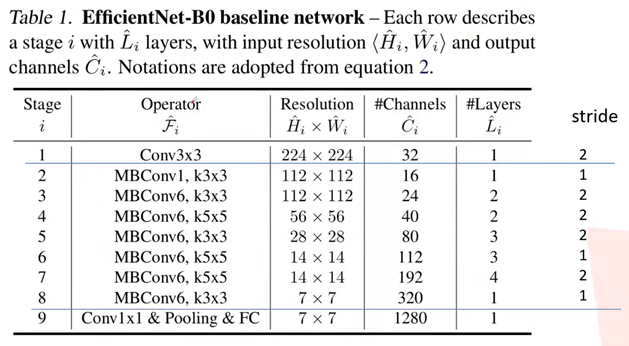
只有第一个步距给出来了, 象Stage=5, layers=3的层, 除了第一层stride=2其他的默认都是1。
MBConv
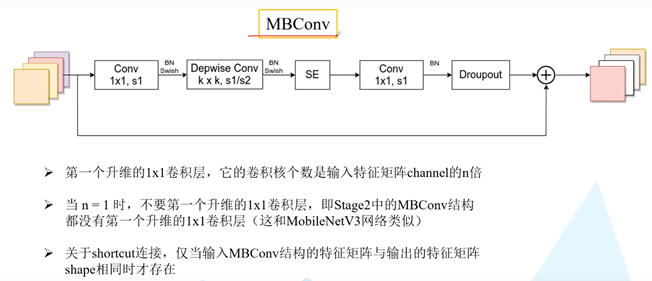
SE是注意力机制。
第二个Conv1x1, s1卷积核的个数和网络参数表格中一致。
源码中只有使用shortcut的MBConv模块才有dropout。
SE(注意力机制)
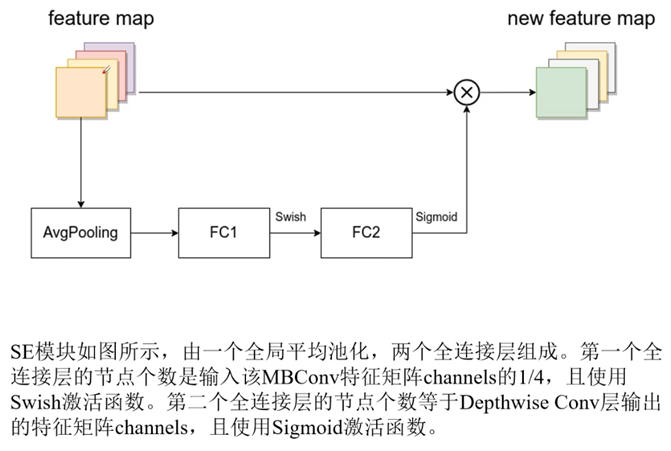
FC2和feature map的shape必须保证一致, 这样才可以乘法操作。
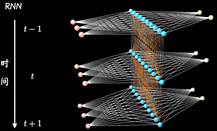
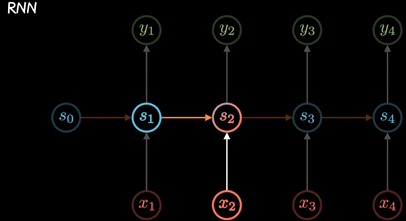
RNN
Why:
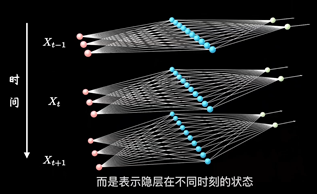
CNN都是水平方向延伸,没有考虑单个隐藏层在时间上时序的变化。RNN关注每一个神经元在时间维度上的不断成长
普通的结构
加入时序关联的结构:表示隐藏层在不同时刻的状态
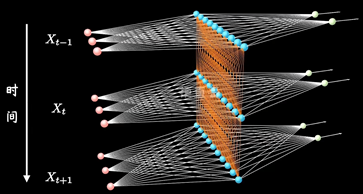
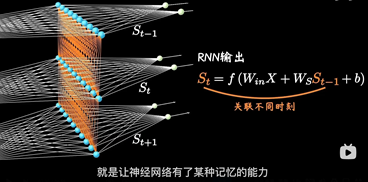
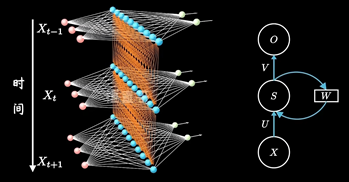
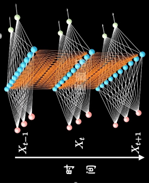
其中每个时间段的UWV权重矩阵都是共享一个
参考资料:
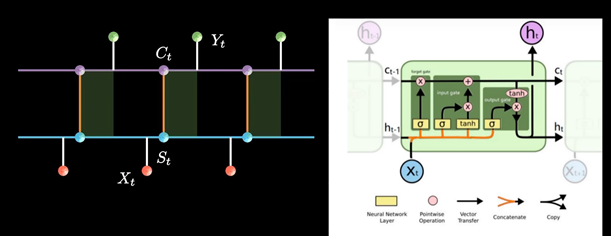
LSTM
参考: 【LSTM长短期记忆网络】3D模型一目了然,带你领略算法背后的逻辑_哔哩哔哩_bilibili
Why:
就像人的记忆不能无线延伸, 机器也是,通常超过十步就不行了,为了解决这个问题
研究者在普通RNN的基础上提出了LSTM(长短期记忆网络Long Short-term Memory)
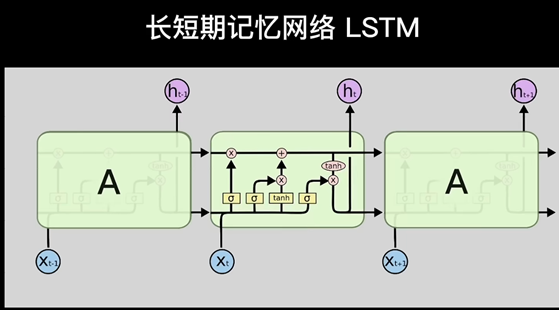
RNN以三个时间点为例,简化模型(xt是不同时间的输入, St是不同时间的隐藏层, y输出)

LSTM增加了一条新的时间链, 记录Long Term Memory, 用C表示, 同时增加了两条链接的关联关系
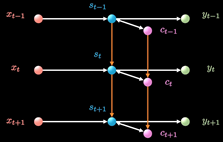
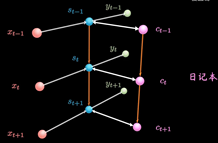
新增加的链条相当于日记本.
当计算隐藏层St的信息时, 除了输入Xt, 前一刻信息St-1 外还要包含当前的时刻记录的日记信息.
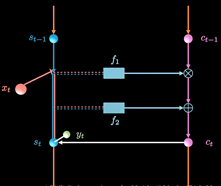
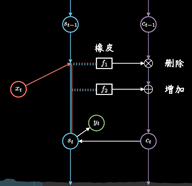
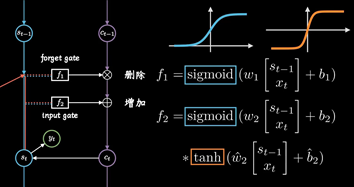

同时保持短期记忆链条St和长期记忆链条Ct, 并且相互更新, 这便是LSTM成功改的奥秘
Attention
参考: 【Attention 注意力机制】近年最流行的AI算法,transformer它爹_哔哩哔哩_bilibili
RNN模型建立了网络隐藏层之间的时序关联 , 每一时刻的隐藏层St, 不仅取决于输入Xt, 还取决于上一时刻转台St-1
两个RNN组合形成Encoder-Decoder模型
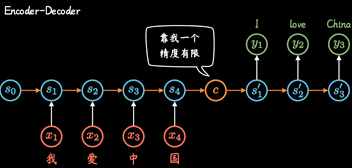
但是这种不管输入多长, 都统一压缩成形同长度编码C的做法,(眉毛胡子一把抓),会导致翻译精度下降.
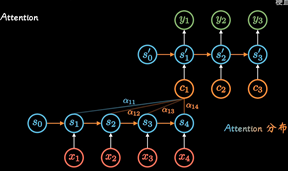
Attention机制:通过每个时间输入不同的C解决这个问题, 其中ati表明了在t时刻所有输入的权重, 以Ct
的视角看过去,a权重就是不同输入的注意力, 因此也被称为Attention分布.
后来随着GPU等大规模并行运算的发展 , 人们发现RNN的顺序结构很不方便, 那以并行运算,效率太低
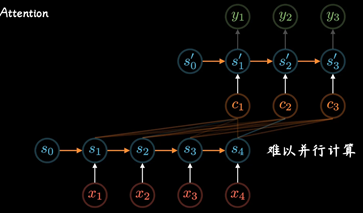
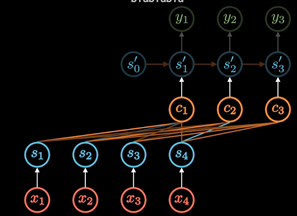
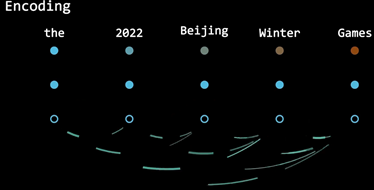
便去掉了RNN顺序, 变为self-attention, 在Encoding阶段计算每个单词和其他所有单词的关联
Transformer
参考资料:
Transformer从零详细解读(可能是你见过最通俗易懂的讲解)_哔哩哔哩_bilibili
Transformer的PyTorch实现_哔哩哔哩_bilibili
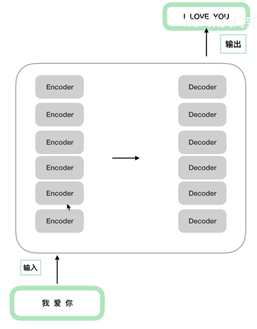
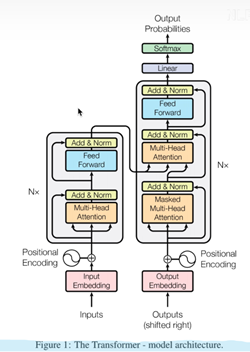
6(经验而得)个encoder和decoder的结构一样参数不一样。
Encoder
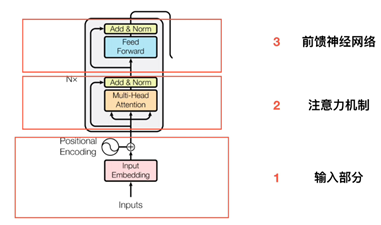
输入部分(Embedding, 位置嵌入)
Embedding

位置编码(不进行训练)

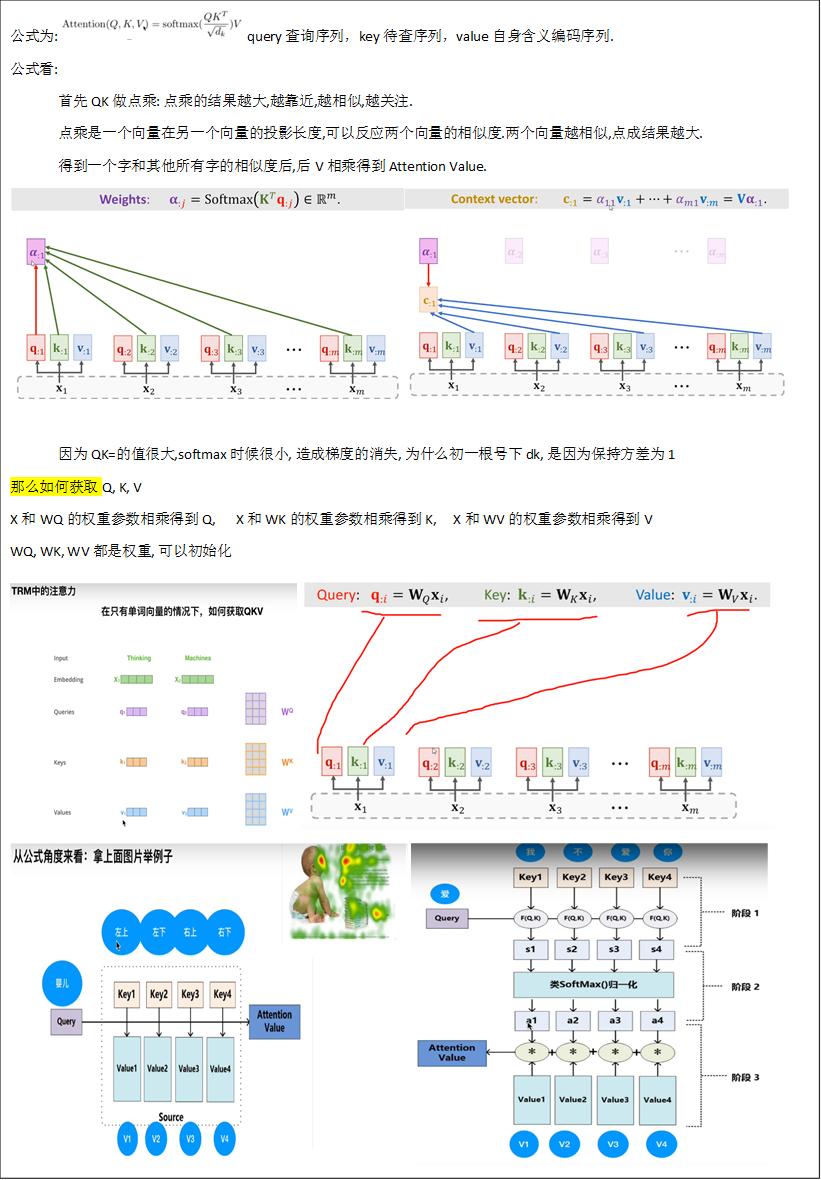
self-Attention
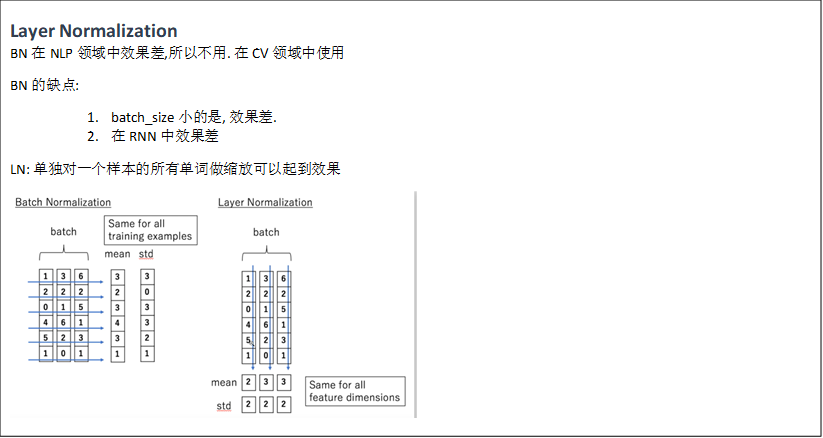
Layer Normalization
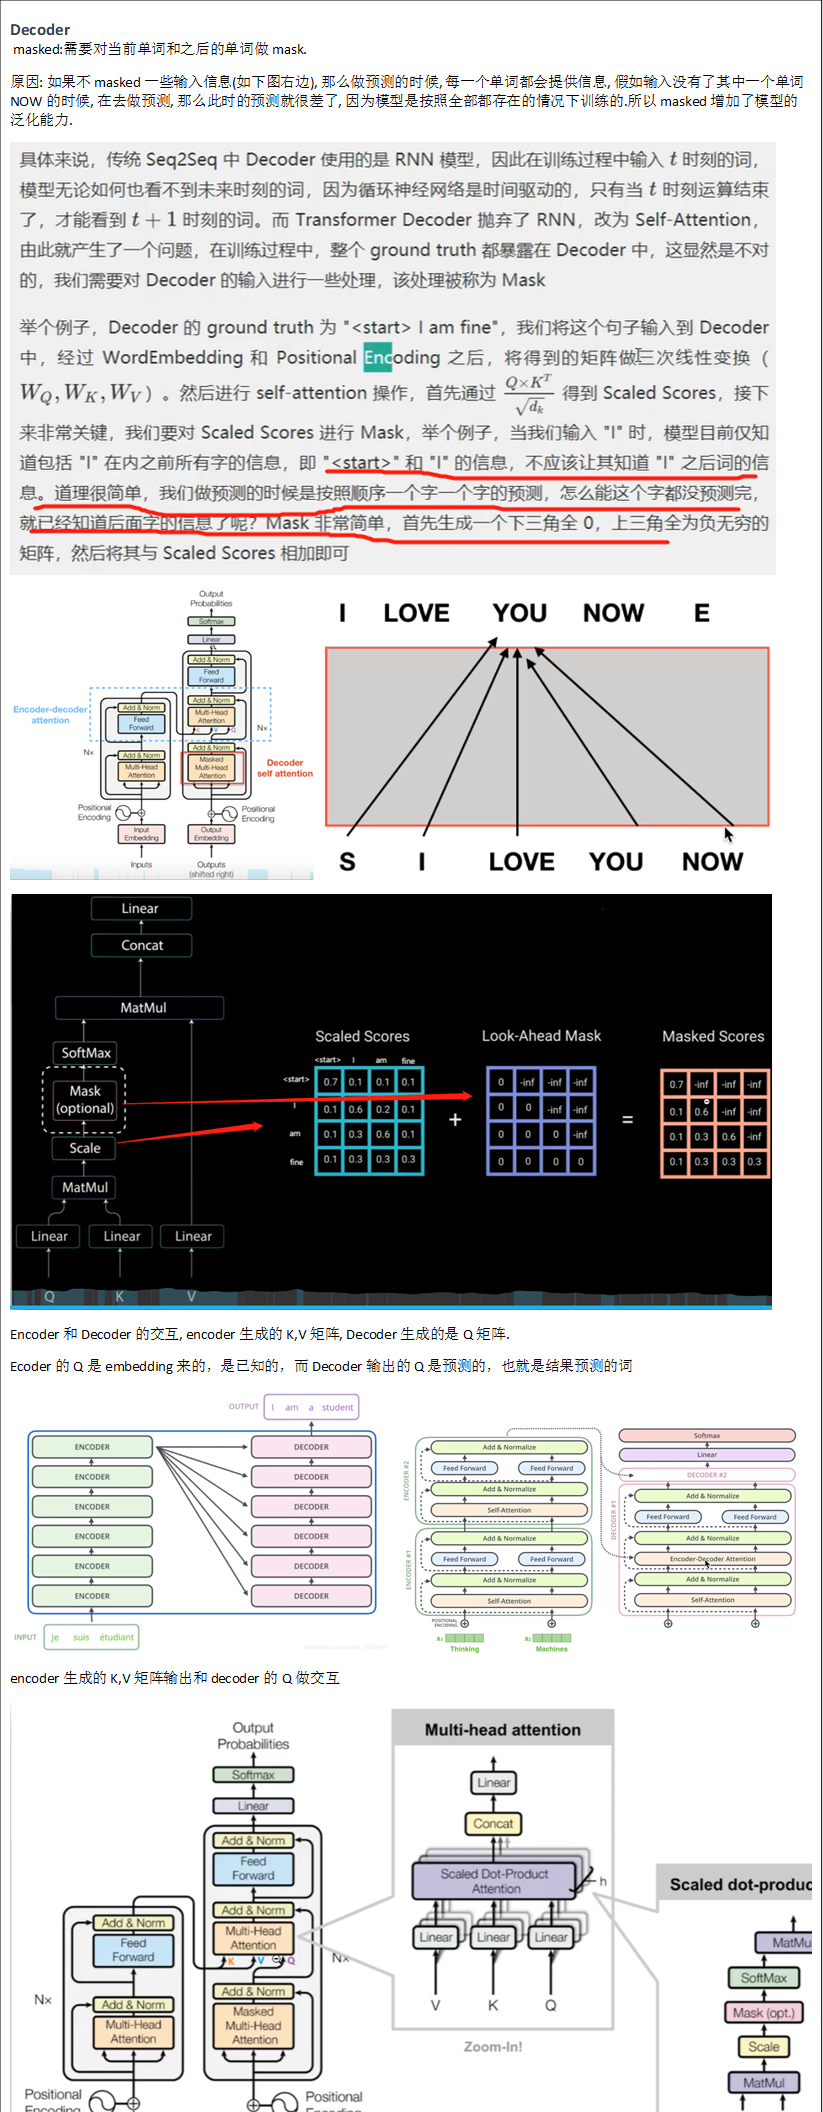
Decoder![]()
![]()

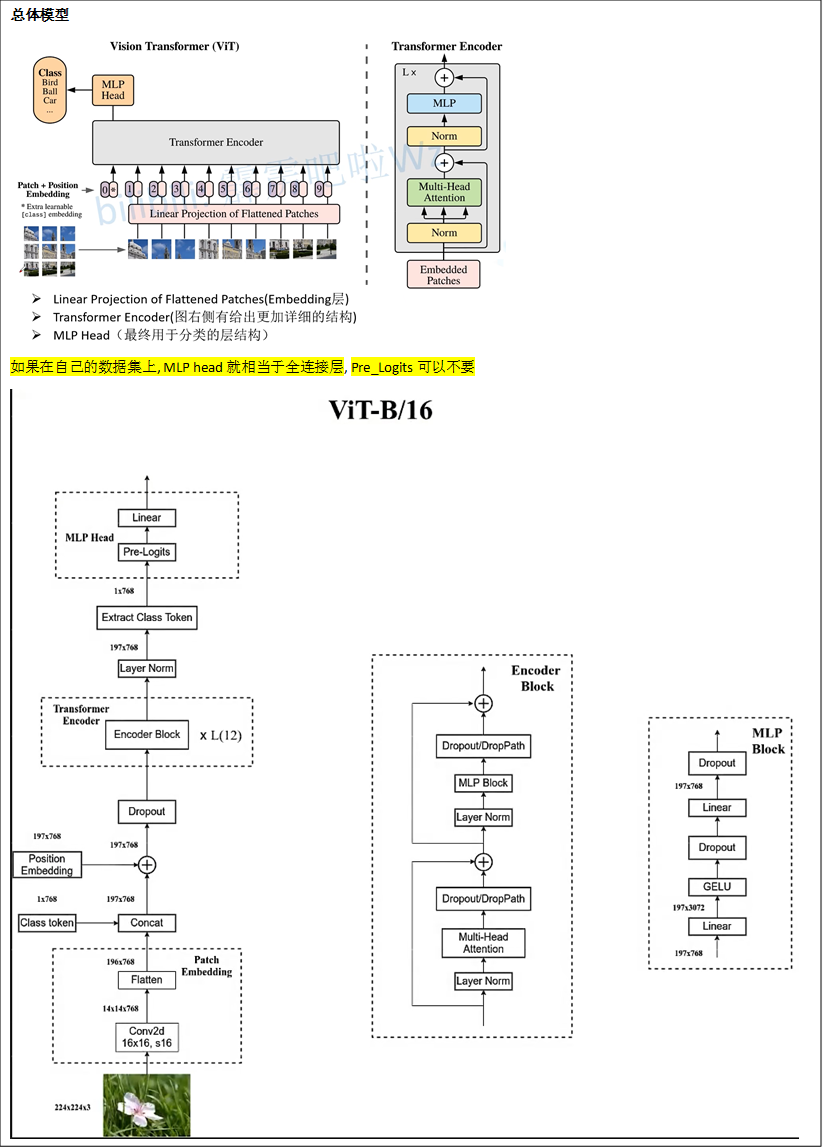
Vision-transformer
参考: 11.1 Vision Transformer(vit)网络详解_哔哩哔哩_bilibili
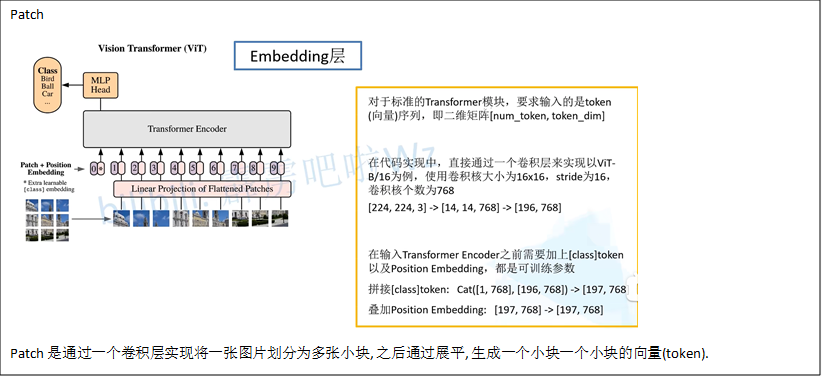
Patch
encoder

Attention代码

class Attention(nn.Module):
def __init__(self,
dim, # 输入token的dim
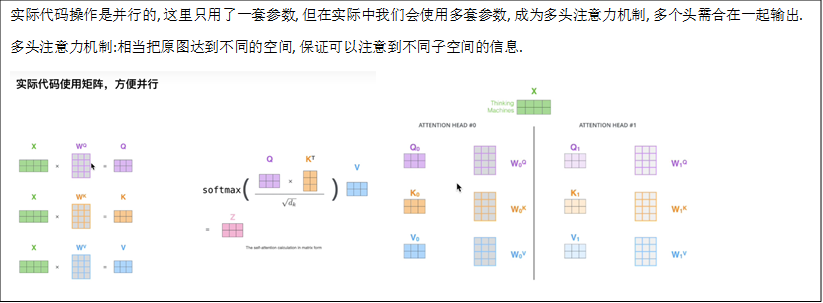
num_heads=8, # 8组共享Q, K, V的权重参数
qkv_bias=False,
qk_scale=None,
attn_drop_ratio=0., #
proj_drop_ratio=0.):
super(Attention, self).__init__()
self.num_heads = num_heads
head_dim = dim // num_heads # 根据head的数目, 将dim 进行均分, Q K V 深度上进行划分多个head, 类似于组卷积
self.scale = qk_scale or head_dim ** -0.5 # 根号下dk分之一, 为了避免梯度过小
self.qkv = nn.Linear(dim, dim * 3, bias=qkv_bias) # Q K V的计算是通过全连接层实现的?
self.attn_drop = nn.Dropout(attn_drop_ratio)
self.proj = nn.Linear(dim, dim)
self.proj_drop = nn.Dropout(proj_drop_ratio)
# 一个小块中包14 x 14 = 197 个深度为768的单像素向量,
def forward(self, x):
# [batch_size, num_patches + 1, total_embed_dim] torch.Size([2, 197, 768]) num_patches + 1是小块的w * h + class, # total_embed_dim是一小块的深度
B, N, C = x.shape
# qkv(): -> [batch_size, num_patches + 1, 3 * total_embed_dim]
# reshape: -> [batch_size, num_patches + 1, 3, num_heads, embed_dim_per_head]
# permute: -> [3, batch_size, num_heads, num_patches + 1, embed_dim_per_head]
qkv = self.qkv(x).reshape(B, N, 3, self.num_heads, C // self.num_heads).permute(2, 0, 3, 1, 4)
# [batch_size, num_heads, num_patches + 1, embed_dim_per_head]
q, k, v = qkv[0], qkv[1], qkv[2] # make torchscript happy (cannot use tensor as tuple)
# transpose: -> [batch_size, num_heads, embed_dim_per_head, num_patches + 1]
# @: multiply -> [batch_size, num_heads, num_patches + 1, num_patches + 1]
attn = (q @ k.transpose(-2, -1)) * self.scale
attn = attn.softmax(dim=-1) # 对每一行惊醒处理
attn = self.attn_drop(attn)
# @: multiply -> [batch_size, num_heads, num_patches + 1, embed_dim_per_head]
# transpose: -> [batch_size, num_patches + 1, num_heads, embed_dim_per_head]
# reshape: -> [batch_size, num_patches + 1, total_embed_dim]
x = (attn @ v).transpose(1, 2).reshape(B, N, C)
x = self.proj(x)
x = self.proj_drop(x)
return x
Swin-transform
参考:12.1 Swin-Transformer网络结构详解_哔哩哔哩_bilibili
Vision transformer 和Swin-transformer的区别
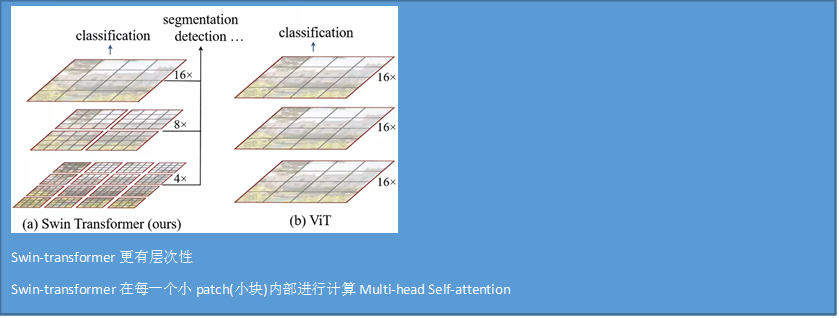
整体模型结构

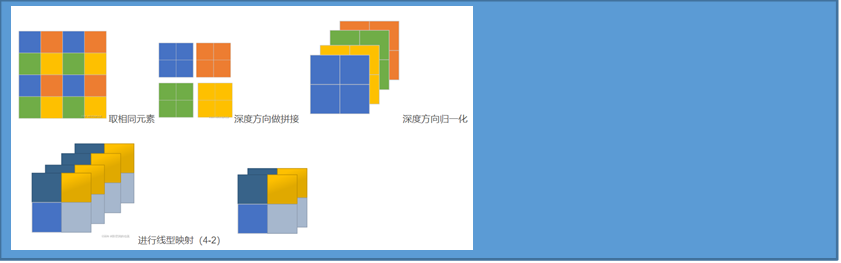
Patch
Shift Windows

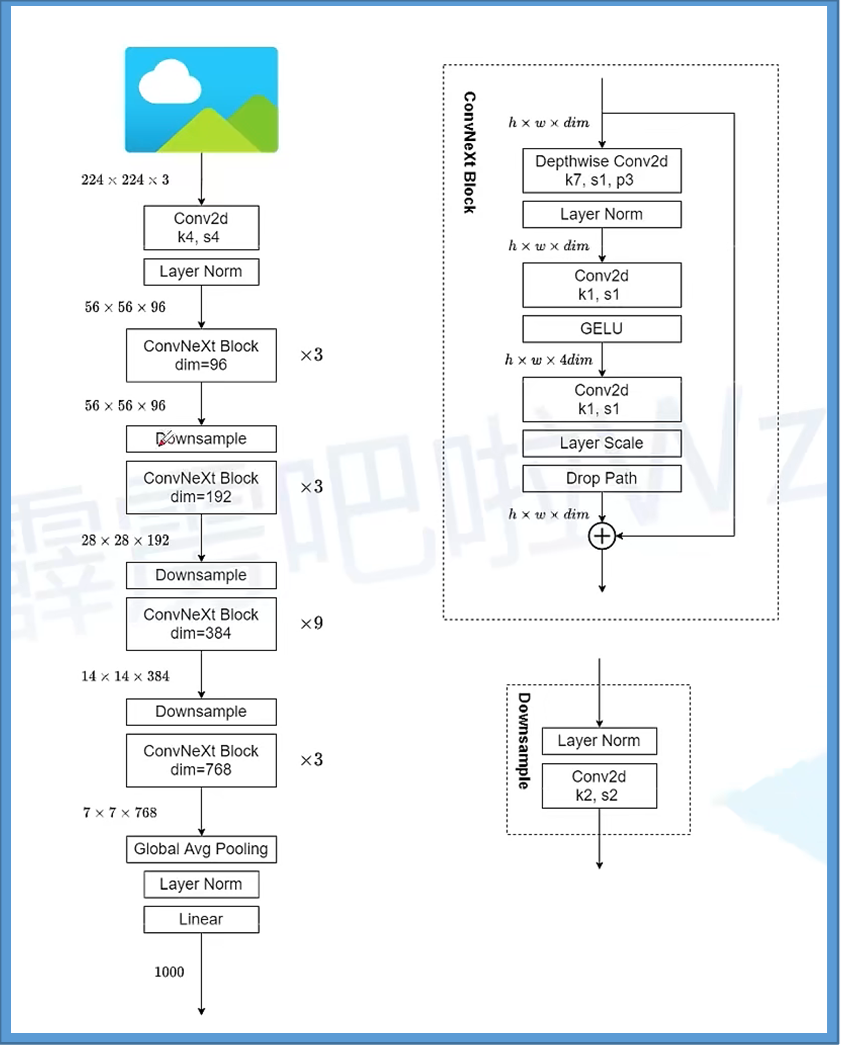
ConvNet
CapsulNet
参考:
胶囊网络及其路由机制 Part 1: 动态路由_哔哩哔哩_bilibili
胶囊网络-Capsule Network_哔哩哔哩_bilibili
What is a Capsule
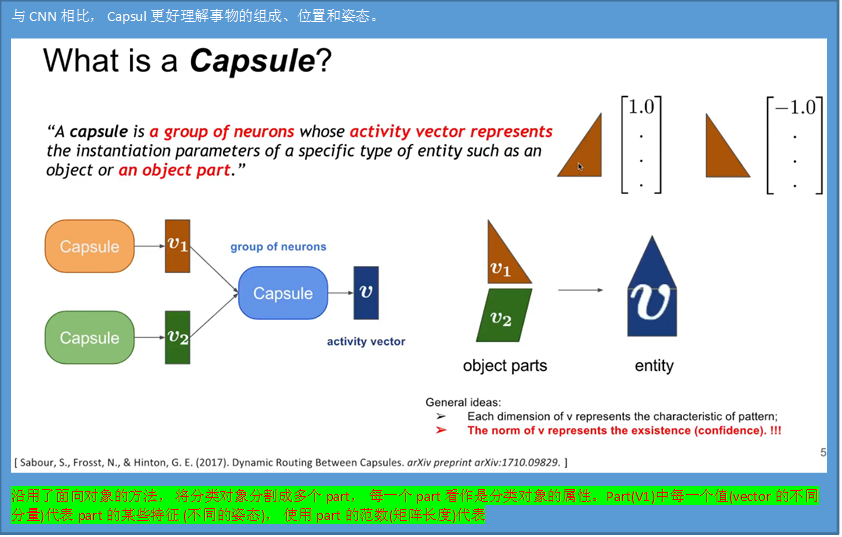
CNN和Capsul的的区别
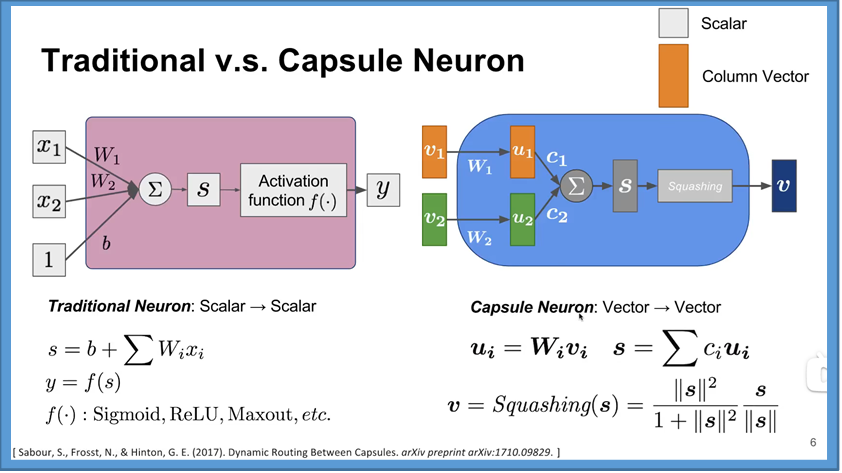
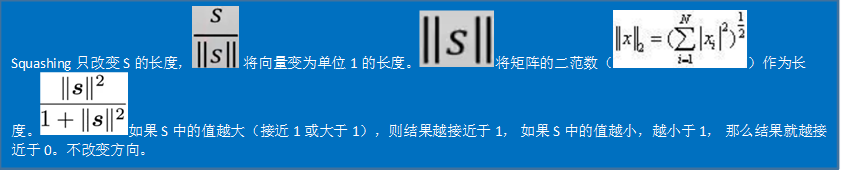
Squashing挤压
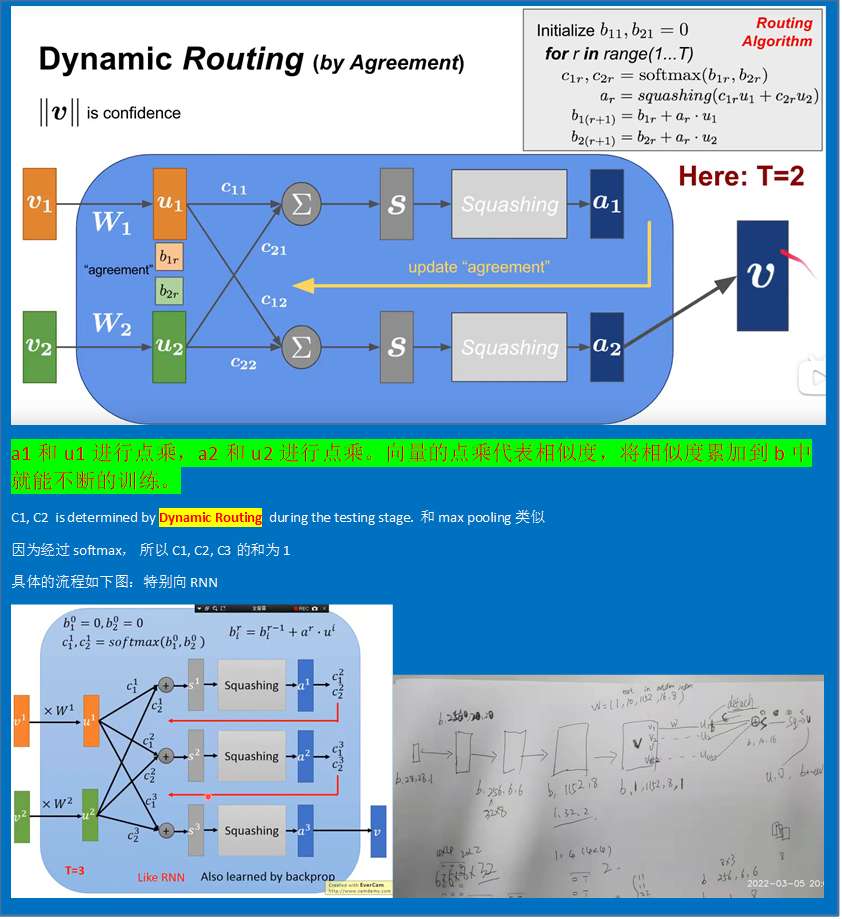
Dynamic Routing(by Agreement)
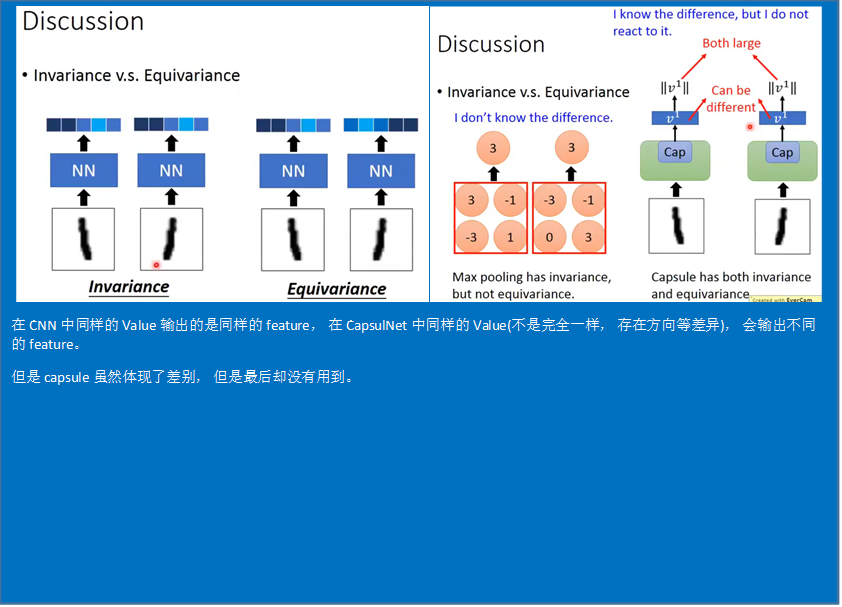
Discussion
待补充

 浙公网安备 33010602011771号