Zabbix安装与配置
1. Zabbix简介
Zabbix是一个企业级的开源分布式监控解决方案,由C语言编写而成的底层架构(server端和agent端),由一个国外的团队持续维护更新,软件可以自由下载使用,运作团队靠提供收费的技术支持赢利。
Zabbix运行条件:
Server:Zabbix Server需运行在LAMP(Linux+Nginx+Mysql+PHP)环境下,对硬件要求低
Agent:目前已有的agent基本支持市面常见的OS,包含Linux、HPUX、Solaris、Sun、windows等
SNMP:支持各类常见的网络设备
zabbix是一个监控软件:它是一个C/S架构,还是一个B/S架构,zabbix软件的前端是由PHP语言写的
zabbix数据采集:
主动模式 被监控端主动将采集的数据发送给监控端
被动模式 zabbix默认的模式 监控端定时向被监控端拿数据
zabbix监控对象:
系统的性能
内存使用率 cpu负载 网络以及磁盘I/O
Tcp的各种连接状态
应用程序
首先监控应用程序是否正常运行(端口|进程)
监控应用程序的性能
zabbix的优点:有报警、有图形化、可以监控服务器和网络设备,还可以实现自动发现
2. zabbix-server安装配置
搭建zabbix6.0之前首先需要搭建LNMP或LAMP,并且最低需要MySQL8.0版本,PHP最低需要7.0版本暂不支持8.0版本的PHP。
2.1 安装php
[root@insight-zabbix ~]# yum -y install gcc-c++ mysql-devel net-snmp-devel libevent-devel
[root@insight-zabbix ~]# yum -y install https://rpms.remirepo.net/enterprise/remi-release-7.rpm
[root@insight-zabbix ~]# yum -y install yum-utils
[root@insight-zabbix ~]# yum-config-manager --disable 'remi-php*'
[root@insight-zabbix ~]# yum-config-manager --enable   remi-php74
[root@insight-zabbix ~]# yum -y install php php-bcmath php-gd php-xml php-mbstring php-mysqlnd php-ldap php-fpm
[root@insight-zabbix ~]# yum -y install curl-devl libxml2 libxml2-devel
[root@insight-zabbix ~]# systemctl enable nginx --now
[root@insight-zabbix ~]# ss -tln | grep 9000

2.2 安装mysql
## 下载源
wget https://dev.mysql.com/get/mysql80-community-release-el7-4.noarch.rpm
# 安装
yum remove mysql mysql-server mysql-libs mysql-server
yum install mysql80-community-release-el7-4.noarch.rpm
# 生成yum源缓存每次当我们编写了,都需要生成yum缓存,以免安装错误。
yum makecache
# 检查安装的yum源是否存在
yum repolist enabled | grep mysql
# 选择默认安装的版本  默认的是8.0 版本
# 安装 YUM 管理工具包,此包提供了 yum-config-manager 命令工具
yum -y install yum-utils
yum-config-manager --enable mysql80-community
yum-config-manager --disable mysql57-community
yum repolist enabled | grep mysql
# 安装MySQL服务
yum install -y  mysql-community-server
# 启动MySQL服务
systemctl start mysqld
systemctl enable mysqld
# 查看是否启动
systemctl status mysqld
# 查看默认密码
grep 'temporary password' /var/log/mysqld.log
# 修改密码
mysqladmin -uroot -p'vwuSYrmiy1<o' password 'dongjian#158POIA'
2.3 安装zabbix server服务端
# 创建zabbix用户zabbix组
[root@insight-zabbix ~]# groupadd zabbix
[root@insight-zabbix ~]# useradd -r -g zabbix zabbix
# 下载zabbix所需依赖包
[root@insight-zabbix ~]# yum -y install libaio* curl-devel net-snmp-devel mysql-devel net-snmp-devel libevent-devel curl-devel libxml2 libxml2-devel
2.4 升级gcc
8.0版本以上不然make isntall 会报错
[root@insight-zabbix ~]# yum -y install centos-release-scl
[root@insight-zabbix ~]# yum -y install devtoolset-9-gcc devtoolset-9-gcc-c++ devtoolset-9-binutils
[root@insight-zabbix ~]# scl enable devtoolset-9 bash
# 永久设置
[root@insight-zabbix ~]# echo "source /opt/rh/devtoolset-9/enable" >>/etc/profile
查看gcc安装之后版本
gcc -v
2.5 安装zabbix
# 下载安装包
wget https://cdn.zabbix.com/zabbix/sources/stable/6.0/zabbix-6.0.13.tar.gz
2.5.1 解压配置zabbix包
[root@insight-zabbix ~]# tar zxvf zabbix-6.0.13.tar.gz -C /usr/src/
[root@insight-zabbix ~]# cd /usr/src/zabbix-6.0.13/
[root@insight-zabbix zabbix-6.0.13]# ./configure --prefix=/usr/local/zabbix --enable-server --enable-agent --with-mysql --enable-ipv6 --with-net-snmp --with-libcurl --with-libxml2
[root@insight-zabbix zabbix-6.0.13]# make && make install
2.5.2 配置mysql
数据库并授权,在8.0版本授权之前需要先创建用户
[root@insight-zabbix ~]# mysql -uroot -pdongjian#158POIA
mysql> create database zabbix character set utf8 collate utf8_bin;
mysql> create user zabbix@'%' identified by 'dongjian#158POIA';
mysql> grant all on zabbix.* to zabbix@'%' with grant option;
mysql> flush privileges;
导入数据库架构及数据
[root@insight-zabbix ~]# mysql -uroot -pdongjian#158POIA zabbix < /usr/src/zabbix-6.0.13/database/mysql/schema.sql
[root@insight-zabbix ~]# mysql -uroot -pdongjian#158POIA zabbix < /usr/src/zabbix-6.0.13/database/mysql/images.sql
[root@insight-zabbix ~]# mysql -uroot -pdongjian#158POIA zabbix < /usr/src/zabbix-6.0.13/database/mysql/data.sql
创建zabbix日志存储位置和pid存储位置并设置属主属组
[root@insight-zabbix ~]# mkdir /usr/local/zabbix/{logs,pid}
[root@insight-zabbix ~]# chown zabbix:zabbix /usr/local/zabbix/ -R
2.5.3 修改配置zabbix server
vim /usr/local/zabbix/etc/zabbix_server.conf
LogFile=/usr/local/zabbix/logs/zabbix_server.log ##日志存放路径
PidFile=/usr/local/zabbix/pid/zabbix_server.pid ##运行的PID文件
DBHost=192.168.3.158 ##数据库主机ip
DBSocket=/var/lib/mysql/mysql.sock ##mysql.sock
DBName=zabbix ##数据库名字
DBUser=zabbix ##mysql授权的用户
DBPassword=dongjian#158POIA ##mysql授权的密码
Include=/usr/local/zabbix/etc/zabbix_server.conf.d/*.conf ##开启附加配置文件目录
LogSlowQueries=3000 ##用于服务端数据库慢查询功能,单位是毫秒
StatsAllowedIP=127.0.0.1,192.168.0.0/16,10.0.0/16 ##来源IP访问控制限制
2.5.4 修改配置zabbix agent
vim /usr/local/zabbix/etc/zabbix_agentd.conf
LogFile=/usr/local/zabbix/logs/zabbix_agentd.log
PidFile=/usr/local/zabbix/pid/zabbix_agent.pid
Server=192.168.3.158
ServerActive=192.168.3.158 ####输入agent主机采集到数据发送到的server端
Hostname=Zabbix-agent
Include=/usr/local/zabbix/etc/zabbix_agentd.conf.d/*.conf
2.5.5 配置zabbix_server启动脚本
vim /usr/lib/systemd/system/zabbix.service
[Unit]
Description=Zabbix Server with MySQL DB
After=syslog.target network.target mysqld.service
[Service]
Type=simple
ExecStart=/usr/local/zabbix/sbin/zabbix_server -f ##zabbix安装目录
User=zabbix
[Install]
WantedBy=multi-user.target
2.5.6 启动监控端 和 启动agent端
# 启动监控端
[root@localhost ~]# systemctl enable zabbix --now
# 启动agent端
[root@localhost ~]# /usr/local/zabbix/sbin/zabbix_agentd
[root@localhost ~]# ss -tln | grep 1005
LISTEN     0      128          *:10050                    *:*
LISTEN     0      128          *:10051                    *:*
LISTEN     0      128       [::]:10050                 [::]:*
LISTEN     0      128       [::]:10051                 [::]:*
2.5.7 需要修改php参数(网页预配置必要条件)
vim /etc/php.ini
# 修改
 date.timezone = Asia/Shanghai
 post_max_size=32M
 max_execution_time=600
 max_input_time=600
# 重启
service php-fpm restart
2.5.8 安装http服务
移动前端文件至web服务的录并授权
[root@insight-zabbix ~]# yum install httpd -y
[root@insight-zabbix ~]# systemctl enable httpd
[root@insight-zabbix ~]# systemctl enable httpd
[root@insight-zabbix ~]# cp -r /usr/src/zabbix-6.0.13/ui/* /var/www/html/
[root@insight-zabbix ~]# chown apache:apache /var/www/html -R
[root@insight-zabbix ~]# chown -R nginx:nginx /etc/opt/remi/php74/php.ini
2.6 验证测试
浏览器输入主机ip并加入zabbix前端文件路径
192.168.3.158
选择语言Chinese(zh_CN)
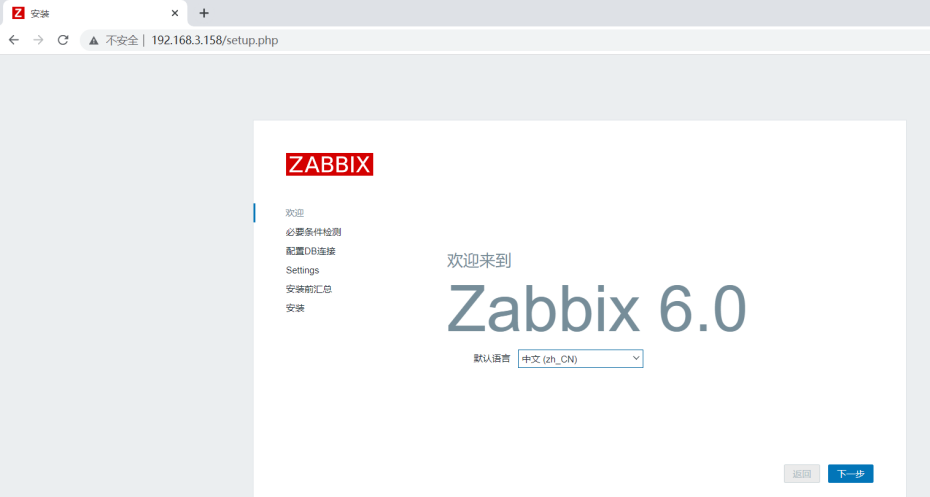
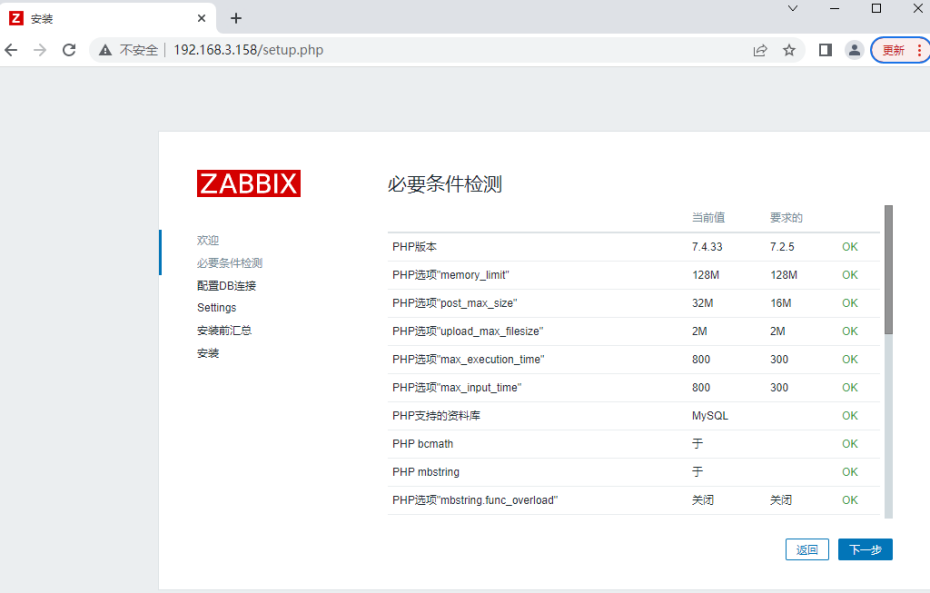
查看条件是否全部OK全部OK的下一步
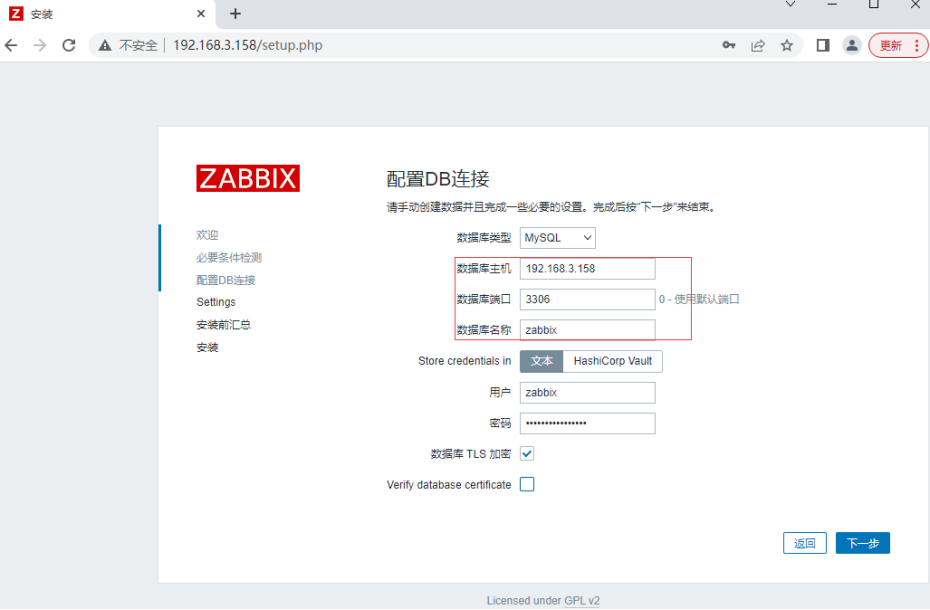
配置数据库
Zabbix主机名称随便起
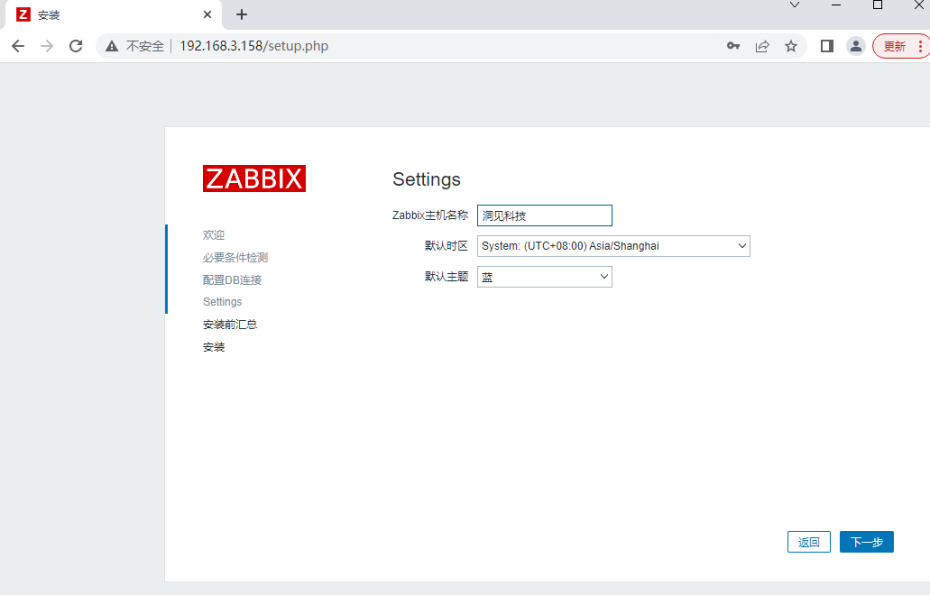
确认信息后下一步
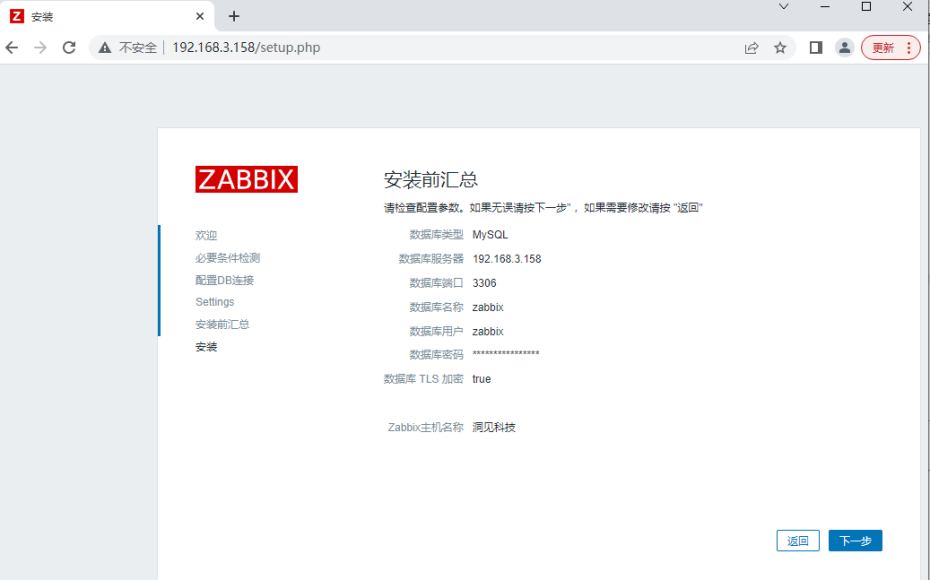
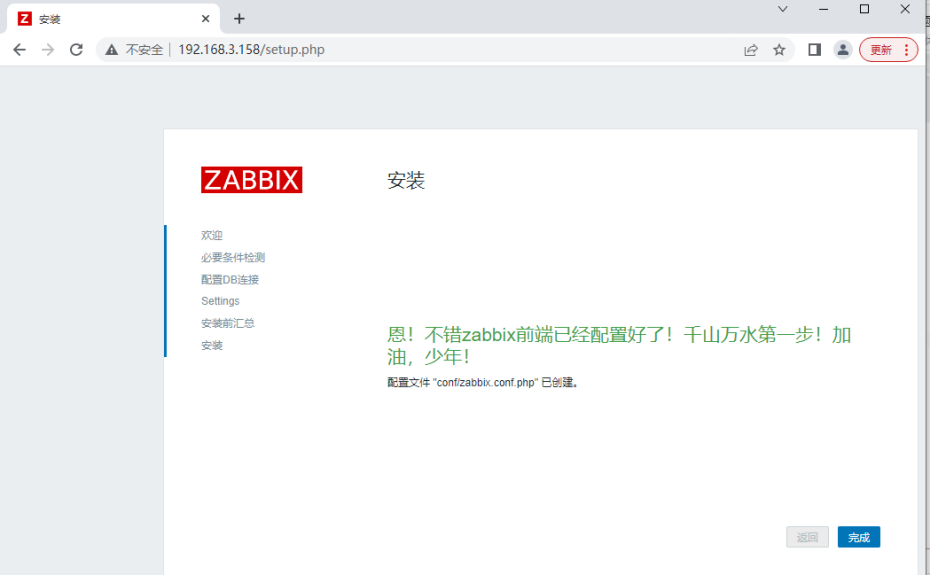
查看安装信息
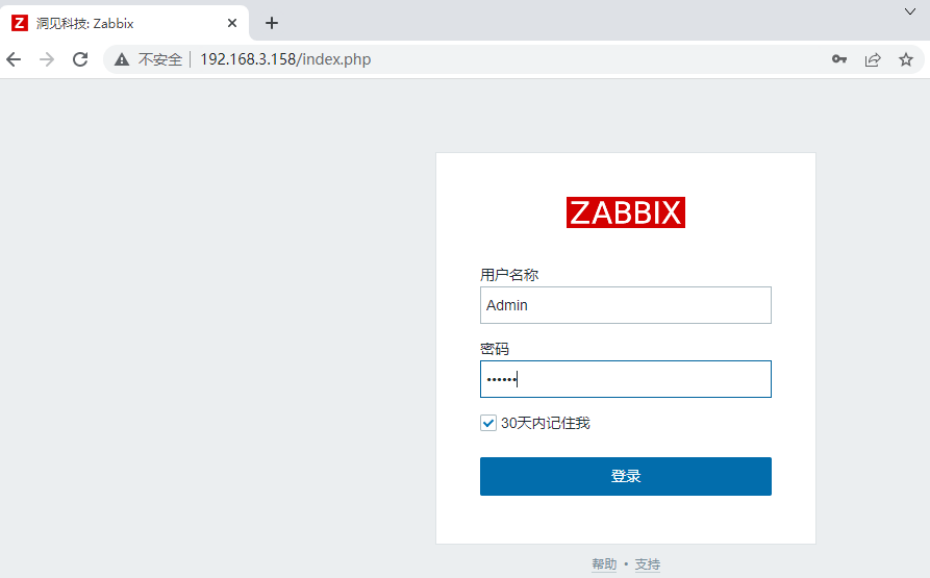
默认账号Admin密码zabbix
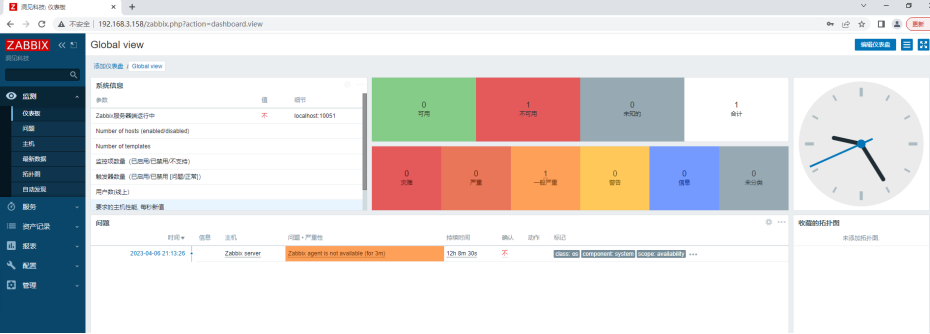
安装成功,并且添加监控数据
解决zabbix显示图像下边文字乱码情况:
[root@insight-zabbix ~]# cd /usr/share/nginx/html/zabbix/assets/fonts
删除默认的语言
[root@insight-zabbix fonts]# rm -rf *
# 上传新的语言
# 下载自己想要的语言传到服务器上并改成系统默认语言的名字
[root@insight-zabbix fonts]# mv simkai.ttf DejaVuSans.ttf
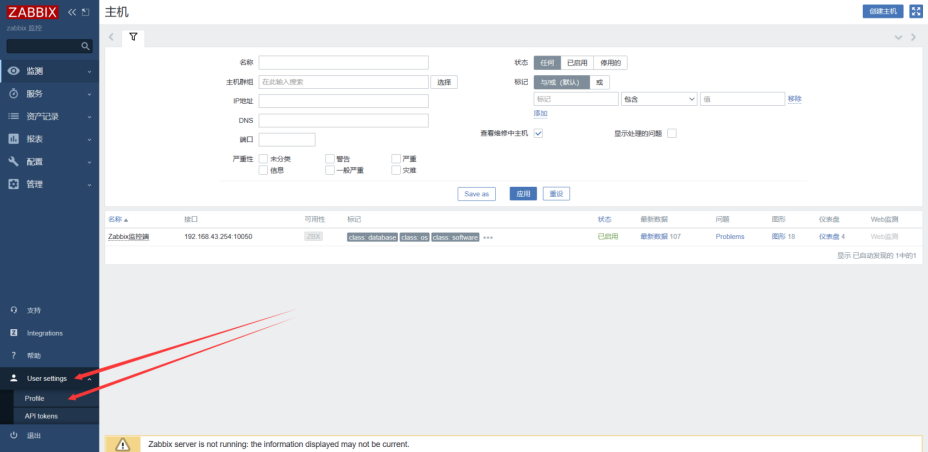
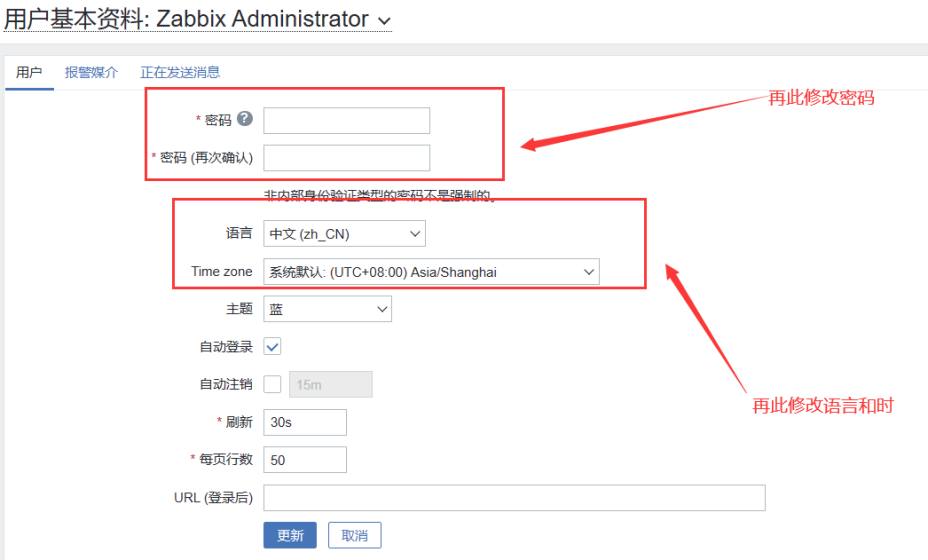
修改语言和默认密码
点击User settings-->Profile
3. zabbix-agent安装配置
[root@insight-zabbix ~]# yum -y install mysql-devel net-snmp-devel libevent-devel curl-devel libxml2 libxml2-devel
#升级gcc为8.0版本以上不然make isntall 会报错
[root@insight-zabbix ~]# yum -y install centos-release-scl
[root@insight-zabbix ~]# yum -y install devtoolset-9-gcc devtoolset-9-gcc-c++ devtoolset-9-binutils
[root@insight-zabbix ~]# scl enable devtoolset-9 bash
#永久设置
[root@insight-zabbix ~]# echo "source /opt/rh/devtoolset-9/enable" >>/etc/profile
3.1 创建zabbix用户和组
[root@insight-zabbix ~]# groupadd zabbix
[root@insight-zabbix ~]# useradd -r -g zabbix zabbix

#下载并上传zabbix包
[root@localhost ~]# wget https://cdn.zabbix.com/zabbix/sources/stable/6.0/zabbix-6.0.13.tar.gz
#解压配置zabbix包
[root@localhost ~]# tar zxvf zabbix-6.0.13.tar.gz -C /usr/src/
[root@localhost ~]# cd /usr/src/zabbix-6.0.13/
[root@localhost zabbix-6.0.13]# ./configure --prefix=/usr/local/zabbix --enable-agent  --enable-ipv6 --with-net-snmp --with-libcurl --with-libxml2
[root@localhost zabbix-6.0.13]# make install
#修改权限
[root@localhost ~]# chown -R zabbix:zabbix /usr/local/zabbix/
3.2 修改配置文件
[root@localhost ~]# vim /usr/local/zabbix/etc/zabbix_agentd.conf
LogFile=/usr/local/zabbix/logs/zabbix_agentd.log
PidFile=/usr/local/zabbix/pid/zabbix_agent.pid
Server=192.168.3.1
ServerActive=192.168.3.158                                ####输入agent主机采集到数据发送到的server端
Hostname=Zabbix server
Include=/usr/local/zabbix/etc/zabbix_server.conf.d/*.conf
3.3 编写系统启动脚本
cat <<EOF > /etc/systemd/system/zabbix-agent.service
[Unit]
Description=Zabbix Agent
After=syslog.target network.target network-online.target
Wants=network.target network-online.target
[Service]
Type=simple
User=root
ExecStart=/usr/local/zabbix/sbin/zabbix_agentd -c /usr/local/zabbix/etc/zabbix_agentd.conf
RemainAfterExit=yes
[Install]
WantedBy=multi-user.target
EOF
4. Grafana可视化展示
Grafana是一个跨平台的开源的度量分析和可视化工具,可以通过将采集的数据查询然后可视化的展示,并及时通知。它主要有以下六大特点:
1、展示方式:快速灵活的客户端图表,面板插件有许多不同方式的可视化指标和日志,官方库中具有丰富的仪表盘插件,比如热图、折线图、图表等多种展示方式;
2、数据源:Graphite,InfluxDB,OpenTSDB,Prometheus,Elasticsearch,CloudWatch和KairosDB等;
3、通知提醒:以可视方式定义最重要指标的警报规则,Grafana将不断计算并发送通知,在数据达到阈值时通过Slack、PagerDuty等获得通知;
4、混合展示:在同一图表中混合使用不同的数据源,可以基于每个查询指定数据源,甚至自定义数据源;
5、注释:使用来自不同数据源的丰富事件注释图表,将鼠标悬停在事件上会显示完整的事件元数据和标记;
6、过滤器:Ad-hoc过滤器允许动态创建新的键/值过滤器,这些过滤器会自动应用于使用该数据源的所有查询。
4.1 部署介质
官网地址:https://grafana.com/grafana/download
选择对应系统的版本
在监控服务器上执行下载安装包命令:
[root@centos7 ~]# wget https://dl.grafana.com/oss/release/grafana-6.3.3-1.x86_64.rpm
4.2 安装
[root@centos7 ~]# yum localinstall grafana-5.4.3-1.x86_64.rpm
4.3 启动
安装完成后启动服务:
[root@centos7 ~]# service grafana-server start

 # 要安装一下grafana-zabbix插件,否则无法添加zabbix模板,获取插件列表,命令:

[root@centos7 ~]# grafana-cli plugins list-remote

[root@centos7 ~]# grafana-cli plugins list-remote|grep zabbix
id: alexanderzobnin-zabbix-app version: 3.10.4

# 安装alexanderzobnin-zabbix-app version: 3.10.4这个插件包:

[root@centos7 ~]# grafana-cli plugins install alexanderzobnin-zabbix-app
installing alexanderzobnin-zabbix-app @ 3.10.4
from url: https://grafana.com/api/plugins/alexanderzobnin-zabbix-app/versions/3.10.4/download
into: /var/lib/grafana/plugins

✔ Installed alexanderzobnin-zabbix-app successfully

Restart grafana after installing plugins . <service grafana-server restart>
26154/article/details/86654516

# 安装插件包后需要重启一次:

[root@centos7 ~]# service grafana-server restart
# centos 7
systemctl enable grafana-server.service
systemctl start grafana-server.service
启动服务,打开浏览器,输入IP+端口,3000为Grafana的默认侦听端口。
系统默认用户名和密码为admin/admin,第一次登陆系统会要求修改密码,修改密码后登陆。
4.4 Grafana使用
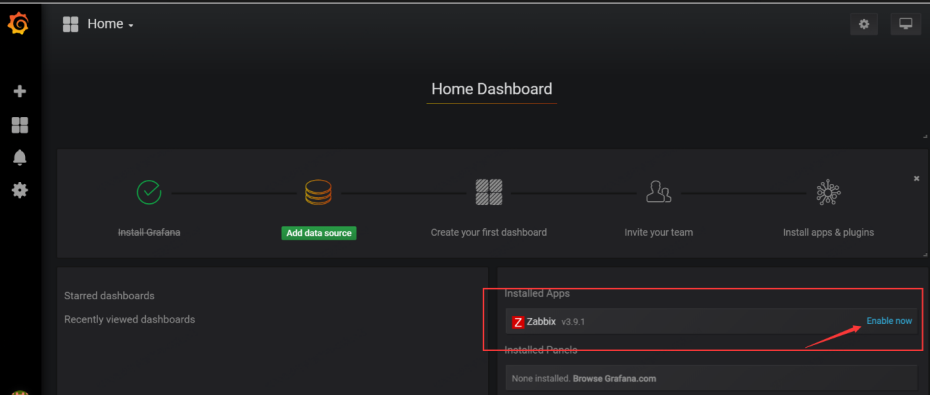
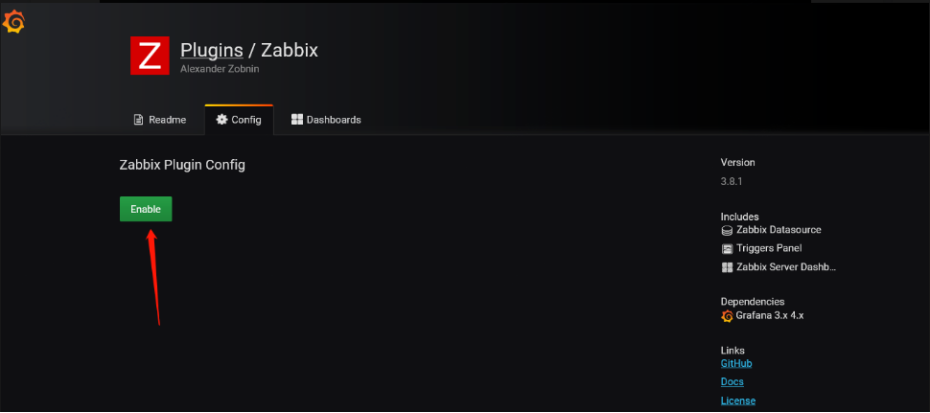
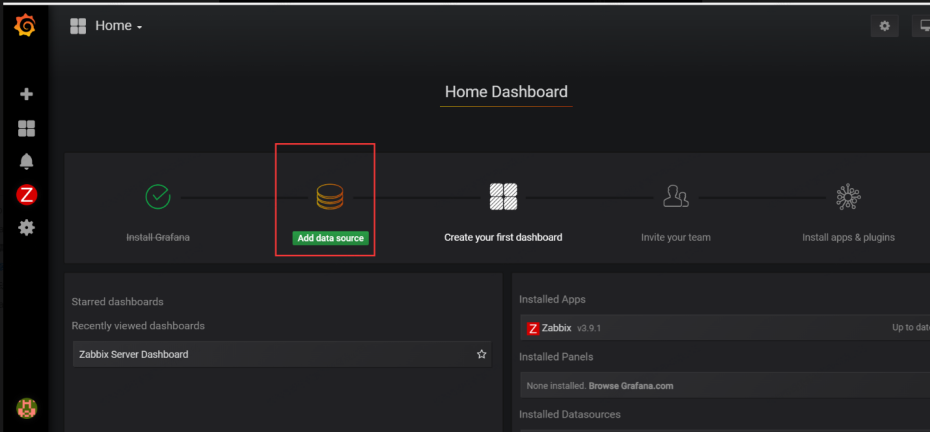
1. 登录完成之后的界面,并点击红色箭头这里启用zabbix插件:
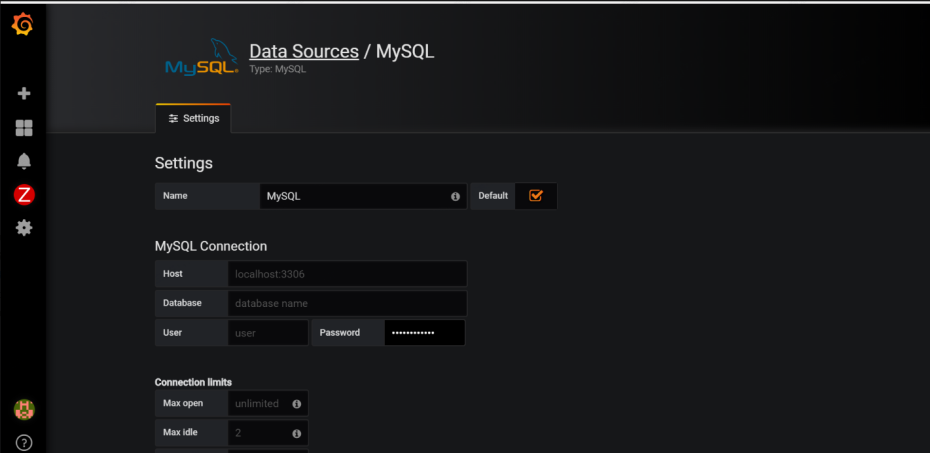
2. 我们现在来创建zabbix-mysql数据库的连接,这步可选可不选,选择的好处是更快更省资源,不选的话,监控本身zbbixx-server 需要连接Direct DB Connection,用zabbix-api来通信。
3. 选择菜单"Configuration"-->"Data Source"-->"Add data source",配置示例如下
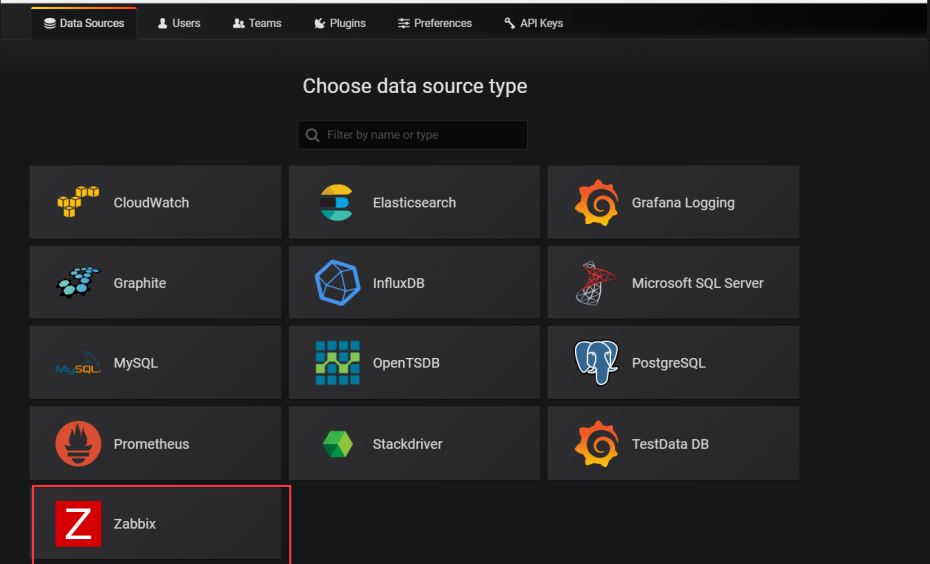
选择数据来源为zabbix。
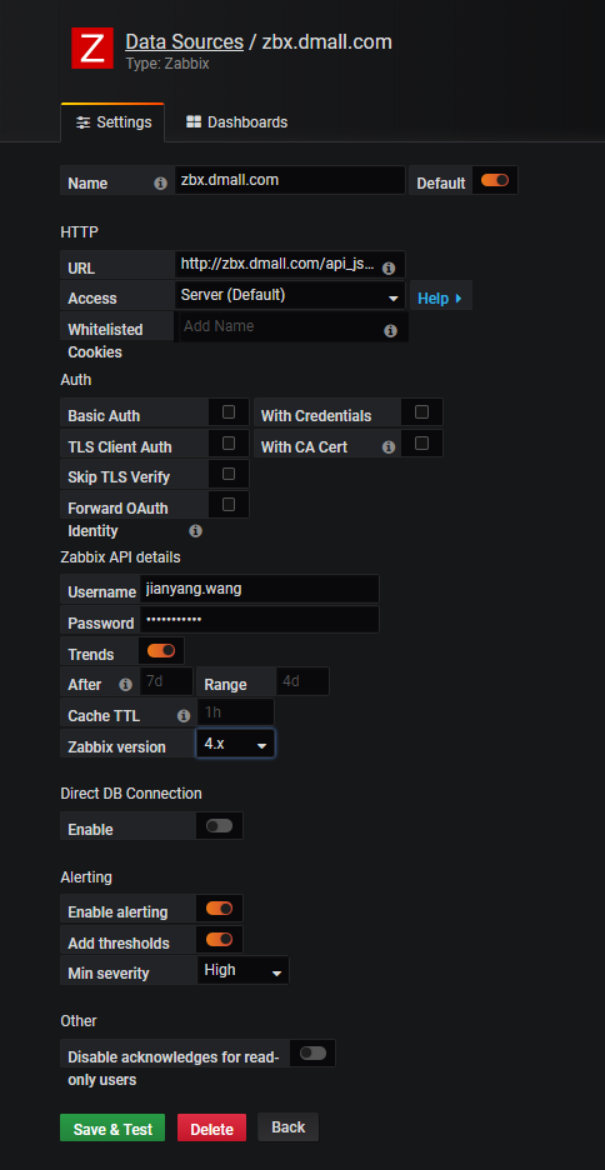
url要填写zabbix目录下的api_jsonrpc.php,格式为http://192.168.1.1/api_jsonrpc.php,
下面的选项按实际情况填写,我的zabbix没有proxy,所以选默认的Server(default):
在Dashboards选项中可以选择默认的仪表盘:
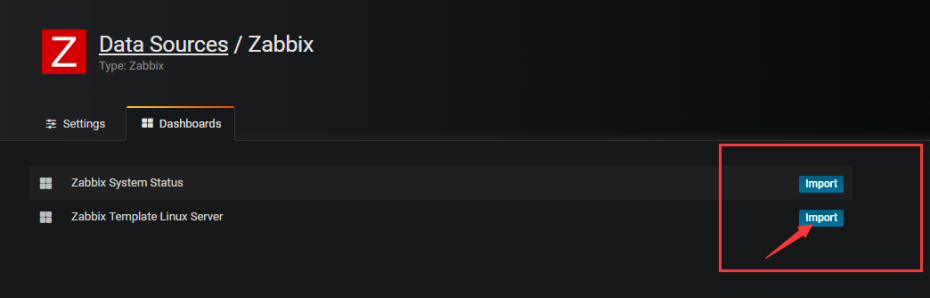
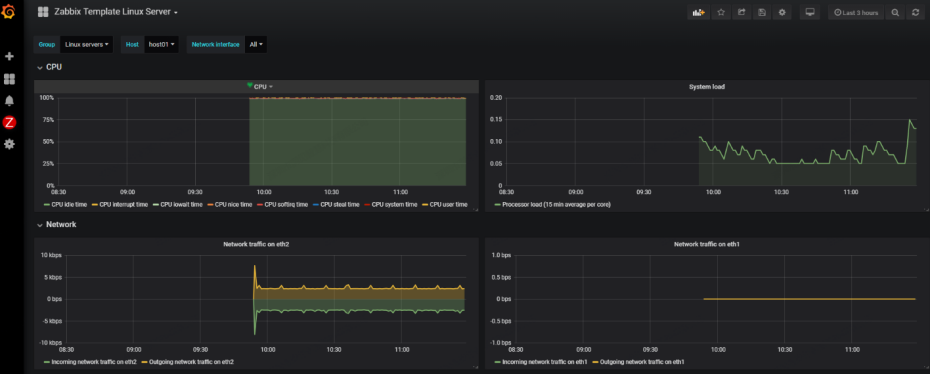
在左侧工具栏中的Dashboards选项中选择刚才的“Zabbix Template Linux Server”,就可以查看到获取到的zabbix数据:
本文来自博客园,作者:王竹笙,转载请注明原文链接:https://www.cnblogs.com/edeny/p/17292427.html

 浙公网安备 33010602011771号