Springboot集成Jersey
Springboot集成Jersey
Springboot支持Jersey1.x和Jersey2.x,我们这里只介绍Springboot对Jersey2.x的支持。springboot对jersey的集成非常简单。
项目结构:

1、引入Springboot对Jersey的starter包:
<dependency>
    <groupId>org.springframework.boot</groupId>
    <artifactId>spring-boot-starter-jersey</artifactId>
</dependency>
2、配置Jersey配置对象
Springboot需要对Jersey的配置对象,有三种配置方式:
- 创建一个自定义的ResourceConfig
- 返回一个ResourceConfig类型的@Bean
- 配置一组ResourceConfigCustomizer对象
我们分别测试一下这三种配置方式。
User.java
package com.echo.restful.bean;

import org.springframework.stereotype.Component;

import javax.xml.bind.annotation.XmlElement;
import javax.xml.bind.annotation.XmlRootElement;
import java.io.Serializable;

@Component
@XmlRootElement(name = "user")
public class User implements Serializable {
    private static final long serialVersionUID = 1L;

    private String id;
    private String name;
    private String profession;

    public String getId() {
        return id;
    }

    @XmlElement
    public void setId(String id) {
        this.id = id;
    }

    public String getName() {
        return name;
    }

    @XmlElement
    public void setName(String name) {
        this.name = name;
    }

    public String getProfession() {
        return profession;
    }

    @XmlElement
    public void setProfession(String profession) {
        this.profession = profession;
    }

    @Override
    public String toString() {
        return "User{" +
                "id='" + id + '\'' +
                ", name='" + name + '\'' +
                ", profession='" + profession + '\'' +
                '}';
    }
}
UserService.java
package com.echo.restful.service;

import com.echo.restful.bean.User;
import com.echo.restful.dao.UserDao;
import org.springframework.stereotype.Service;

import javax.ws.rs.GET;
import javax.ws.rs.Path;
import javax.ws.rs.Produces;
import javax.ws.rs.core.MediaType;
import java.util.List;

@Path("/UserService")
@Service
public class UserService {

    @Path("/users")
    @GET
    @Produces(MediaType.APPLICATION_XML)
    public List<User> getUsers() {
        System.out.println("success");
        UserDao dao = new UserDao();
        return dao.getAllUsers();
    }
}
UserDao.java(为了方便我们使用硬编码)
package com.echo.restful.dao;

import com.echo.restful.bean.User;
import org.springframework.stereotype.Repository;

import java.io.*;
import java.util.ArrayList;
import java.util.List;

@Repository
public class UserDao{

    public List<User> getAllUsers() {
        List<User> userList;
        File file = new File("Users.dat");
        if (!file.exists()) {
            User user = new User();
            user.setId("1");
            user.setName("Tom");
            user.setProfession("Student");
            userList = new ArrayList<>();
            userList.add(user);
            writeUserList(userList, file);
        } else {
            userList = readUserList(file);
        }
        return userList;
    }


    /**
     * 序列化
     *
     * @param userList
     * @param file
     */
    private void writeUserList(List<User> userList, File file) {
        ObjectOutputStream oos = null;
        FileOutputStream fos = null;
        try {
            fos = new FileOutputStream(file);
            oos = new ObjectOutputStream(fos);
            oos.writeObject(userList);
        } catch (IOException e) {
            e.printStackTrace();
        } finally {
            if (oos != null) {
                try {
                    oos.close();
                } catch (IOException e) {
                    e.printStackTrace();
                }
            }
            if (fos != null) {
                try {
                    fos.close();
                } catch (IOException e) {
                    e.printStackTrace();
                }
            }

        }
    }

    /**
     * 反序列化
     *
     * @param file
     * @return
     */
    @SuppressWarnings("unchecked")
    private List<User> readUserList(File file) {
        List<User> userList = null;
        FileInputStream fis = null;
        ObjectInputStream ois = null;
        try {
            fis = new FileInputStream(file);
            ois = new ObjectInputStream(fis);
            userList = (List<User>) ois.readObject();
        } catch (IOException | ClassNotFoundException e) {
            e.printStackTrace();
        } finally {
            if (ois != null) {
                try {
                    ois.close();
                } catch (IOException e) {
                    e.printStackTrace();
                }
            }
            if (fis != null) {
                try {
                    fis.close();
                } catch (IOException e) {
                    e.printStackTrace();
                }
            }
        }
        return userList;
    }
}
RestfulDemoApplication.java
@SpringBootApplication
public class RestfulDemoApplication extends SpringBootServletInitializer {

    public static void main(String[] args) {
        new Application()
                .configure(new SpringApplicationBuilder(Application.class))
                .run(args);
    }
}
我这里使用的是Springboot提供的SpringBootServletInitializer类启动的应用,当然在main方法中也可以使用最简单的SpringApplication.run(Application.class, args)来启动也行。
2.1 第1种方式:创建一个自定义的ResourceConfig
JerseyConfig.java
package com.echo.restful;

import com.echo.restful.service.UserService;
import org.glassfish.jersey.server.ResourceConfig;
import org.springframework.stereotype.Component;

@Component
public class JerseyConfig extends ResourceConfig {

    public JerseyConfig() {
        register(UserService.class);
    }
}
只需要保证JerseyConfig在Application类能够扫描的包下即可。
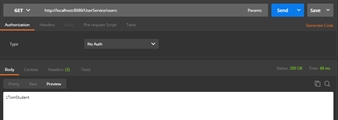
使用postman发送测试请求:http://localhost:8080/UserService/users
测试结果:
注意:
- Springboot默认把Jersey的根路径映射在/*上的;这个可以通过几种方式来配置,对于自定义的ResourceConfig方式来说,只需要在类上面添加一个@ApplicationPath注解即可:
@Component
@ApplicationPath("webapi")
public class JerseyConfig extends ResourceConfig {
此时测试地址变为:http://localhost:8080/webapi/UserService/users
- Springboot建议在使用ResourceConfig添加资源类的时候,不要使用ResourceConfig类的packages方法去自动扫描,建议还是手动添加。官方的解释为:
Jersey’s support for scanning executable archives is rather limited. For example, it cannot scan for endpoints in a package found in a fully executable jar fileor in
WEB-INF/classeswhen running an executable war file. To avoid this limitation, thepackagesmethod should not be used, and endpoints should be registered individually by using theregistermethod, as shown in the preceding example.
即使用Jersey的packages是比较局限的,比如在应用运行在war包中的时候,就不能扫描到其中的包。所以建议单独的为每一个资源类独立使用register方法注册。
2.2 第2种方式:ResourceConfig类型的@Bean
使用@Bean创建一个ResourceConfig类实例即可。注释掉JerseyConfig类,我们只需要修改一下RestfulDemoApplication类,添加方法:
@Bean
public ResourceConfig resourceConfig() {
    ResourceConfig config = new ResourceConfig();
    config.register(UserService.class);
    return config;
}
但是在这种情况下,想要配置Jersey的基础路径,就需要在application.properties文件中配置一个
spring.jersey.application-path=webapi
2.3 第3种方式: 使用ResourceConfigCustomizer
Springboot提供了一个ResourceConfigCustomizer接口,让我们更灵活的对ResourceConfig对象进行配置。要使用该接口,我们先注释掉上面两节的相关代码,然后创建一个类:
@Component
public class MyResourceConfigCustomizer implements ResourceConfigCustomizer {
    @Override
    public void customize(ResourceConfig config) {
        config.register(UserService.class);
    }
}
该接口很简单,传入一个ResourceConfig实例,我们就可以针对这个实例进行相关配置。但是要让这个传入的config生效,我们还需要在RestfulDemoApplication类中提供一个基础的ResourceConfig类即可:
@SpringBootApplication
public class RestfulDemoApplication extends SpringBootServletInitializer {

    @Bean
    public ResourceConfig resourceConfig() {
        return new ResourceConfig();
    }

    public static void main(String[] args) {
        new Application()
                .configure(new SpringApplicationBuilder(Application.class))
                .run(args);
    }
}
这种方式对比第二种方式的好处在于,我们可以把资源类的注册,过滤器,拦截器,Entity Provider,Feature等不同类型的组件注册从主类中分开,在代码管理上会更加清晰。
3、细节点
- Jersey和Springboot的集成有两种方式,一种是使用Filter的方式注册,一种是使用Servlet的方式注册,默认使用的是Servlet的方式,也可以通过spring.jersey.type=filter或者spring.jersey.type=servlet来控制。具体的代码可以参考JerseyAutoConfiguration类中源码:
@Bean
@ConditionalOnMissingBean(name = "jerseyFilterRegistration")
@ConditionalOnProperty(prefix = "spring.jersey", name = "type", havingValue = "filter")
public FilterRegistrationBean jerseyFilterRegistration() {


@Bean
@ConditionalOnMissingBean(name = "jerseyServletRegistration")
@ConditionalOnProperty(prefix = "spring.jersey", name = "type", havingValue = "servlet", matchIfMissing = true)
public ServletRegistrationBean jerseyServletRegistration() {
从这两段代码我们也能看出来,当使用的是Filter的时候,Springboot实际上注册了一个名字为jerseyFilterRegistration的FilterRegistrationBean;而使用的是Servlet的时候,Springboot实际上注册了一个名字为jerseyServletRegistration的ServletRegistrationBean。那么这些都是如果我们要更进一步定制Jersey启动方式可以扩展的点。
- 如果使用Servlet的方式启动,默认是使用的延迟启动。我们可以通过jerseyServletRegistration方法的代码就可以看出来:
    registration.setName(getServletRegistrationName());
    registration.setLoadOnStartup(this.jersey.getServlet().getLoadOnStartup());
    return registration;
第二句代码setLoadOnStartup方法,调用的是this.jersey.getServlet().getLoadOnStartup(),而这个地方的jersey就是JerseyProperties对象:
@ConfigurationProperties(prefix = "spring.jersey")
public class JerseyProperties {
其中servlet的类代码为:
public static class Servlet {

    /**
     * Load on startup priority of the Jersey servlet.
     */
    private int loadOnStartup = -1;

    public int getLoadOnStartup() {
        return this.loadOnStartup;
    }

    public void setLoadOnStartup(int loadOnStartup) {
        this.loadOnStartup = loadOnStartup;
    }

}
可以看到,默认值为-1;那么我们只需要在application.properties中配置spring.jersey.servlet.loadOnStartup=1即可迫切让Jersey的Servlet实例化。
更多的配置,请参考org.springframework.boot.autoconfigure.jersey包中的两个类:
- JerseyProperties
- JerseyAutoConfiguration
代码非常简单,但是能看出很多配置,比如不管针对Filter的方式还是Servlet的方式都可以使用spring.jersey.init.*来为Jersey添加初始化配置参数:
@ConfigurationProperties(prefix = "spring.jersey")
public class JerseyProperties {

    /**
     * Init parameters to pass to Jersey via the servlet or filter.
     */
    private Map<String, String> init = new HashMap<String, String>();
附注:
Spingboot2.1.4官方文档:29.3 JAX-RS and Jersey
┆ 凉 ┆ 暖 ┆ 降 ┆ 等 ┆ 幸 ┆ 我 ┆ 我 ┆ 里 ┆ 将 ┆ ┆ 可 ┆ 有 ┆ 谦 ┆ 戮 ┆ 那 ┆ ┆ 大 ┆ ┆ 始 ┆ 然 ┆
┆ 薄 ┆ 一 ┆ 临 ┆ 你 ┆ 的 ┆ 还 ┆ 没 ┆ ┆ 来 ┆ ┆ 是 ┆ 来 ┆ 逊 ┆ 没 ┆ 些 ┆ ┆ 雁 ┆ ┆ 终 ┆ 而 ┆
┆ ┆ 暖 ┆ ┆ 如 ┆ 地 ┆ 站 ┆ 有 ┆ ┆ 也 ┆ ┆ 我 ┆ ┆ 的 ┆ 有 ┆ 精 ┆ ┆ 也 ┆ ┆ 没 ┆ 你 ┆
┆ ┆ 这 ┆ ┆ 试 ┆ 方 ┆ 在 ┆ 逃 ┆ ┆ 会 ┆ ┆ 在 ┆ ┆ 清 ┆ 来 ┆ 准 ┆ ┆ 没 ┆ ┆ 有 ┆ 没 ┆
┆ ┆ 生 ┆ ┆ 探 ┆ ┆ 最 ┆ 避 ┆ ┆ 在 ┆ ┆ 这 ┆ ┆ 晨 ┆ ┆ 的 ┆ ┆ 有 ┆ ┆ 来 ┆ 有 ┆
┆ ┆ 之 ┆ ┆ 般 ┆ ┆ 不 ┆ ┆ ┆ 这 ┆ ┆ 里 ┆ ┆ 没 ┆ ┆ 杀 ┆ ┆ 来 ┆ ┆ ┆ 来 ┆

 浙公网安备 33010602011771号