SSM学习day05_MVC_Spring集成web环境、SpringMVC简介
一、Spring集成web环境
1.2 Spring提供获取应用上下文的工具
上一波的监听器其实Spring都封装完了,我写只是理解。
Spring提供了一个ContextLoaderListener,该监听器内部加载Spring配置文件,创建应用上下文对象,并存储到ServletContext域中,提供了一个客户端工具WebApplicationContextUtils供使用者获得应用上下文对象。
所以只用:
- 在web.xml中配置ContextLoaderListener监听器(导入spring-web坐标)
- 使用WebApplicationContextUtils获得应用上下文对象ApplicaitionContext
Tomcat10错误过多,Jakarta包和javax包冲突,尝试多种解决方法无果,换回Tomcat9才解决。
知识要点
Spring集成Web步骤
- 配置ContextLoaderListener监听器
- 使用WebApplicationContextUtils获得应用上下文
UserServlet
public class UserServlet extends HttpServlet {
    @Override
    protected void doGet(HttpServletRequest req, HttpServletResponse resp) throws ServletException, IOException {
        ServletContext servletContext = this.getServletContext();
        WebApplicationContext app = WebApplicationContextUtils.getWebApplicationContext(servletContext);
        UserService userService = app.getBean(UserService.class);
        userService.save();
    }
}
pom.xml
    <dependency>
      <groupId>org.springframework</groupId>
      <artifactId>spring-web</artifactId>
      <version>5.3.9</version>
    </dependency>
web.xml
 <listener>
    <listener-class>org.springframework.web.context.ContextLoaderListener</listener-class>
  </listener>
二、SpringMVC简介
2.1 SpringMVC时基于Java实现的MVC设计模型的请求驱动类型的轻量级Web框架,属于SpringFrameWork的后续产品,已经融合在Spring Web Flow中。
2.3 SpringMVC快速入门
需求:客户端发起请求,服务器端接受请求,执行逻辑并进行视图跳转
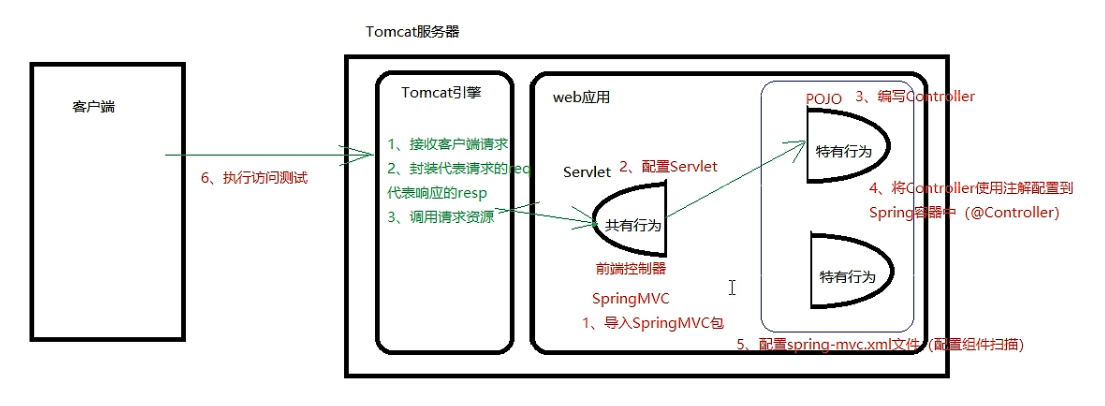
开发步骤:
-
导入SpringMVC相关坐标
-
配置SpringMVC核心控制器DispathcerServlet(前端控制器)
-
创建Controller类和视图
-
使用注解配置Controller类中业务方法的映射地址
-
配置SpringMVC核心文件spring-mvc.xml
-
客户端发起请求测试
-
pom.xml
    <dependency>
      <groupId>org.springframework</groupId>
      <artifactId>spring-webmvc</artifactId>
      <version>5.3.9</version>
    </dependency>
- web.xml
<!--  配置SpringMVC的前端控制器-->
  <servlet>
    <servlet-name>DispatcherServlet</servlet-name>
    <servlet-class>org.springframework.web.servlet.DispatcherServlet</servlet-class>
<!--    代表服务器启动时就加载这个Servlet,如果不配置,默认第一次访问才配置-->
    <load-on-startup>1</load-on-startup>
  </servlet>
  <servlet-mapping>
    <servlet-name>DispatcherServlet</servlet-name>
    <url-pattern>/</url-pattern>
  </servlet-mapping>
- UserController.java
@Controller
public class UserController {

    @RequestMapping("/quick")
    public String save(){
        System.out.println("Controller save running....");
        return "success.jsp";
    };
}
- spring-mvc.xml
context命名空间,组件扫描
<beans xmlns="http://www.springframework.org/schema/beans"
       xmlns:context="http://www.springframework.org/schema/context"
       xmlns:xsi="http://www.w3.org/2001/XMLSchema-instance"
       xsi:schemaLocation="
       http://www.springframework.org/schema/context http://www.springframework.org/schema/context/spring-context.xsd
       http://www.springframework.org/schema/beans http://www.springframework.org/schema/beans/spring-beans.xsd">

<!--    Controller的组件扫描-->
    <context:component-scan base-package="com.hf.controller"/>
</beans>

 浙公网安备 33010602011771号