Laravel Vuejs 实战:开发知乎 (10)使用 Select2 优化话题选择
1.添加选择Topic
使用Select2,如何安装Select2 ,具体使用实例 Select2 and Laravel: Ajax Autocomplete 及 Loading data remotely in Select2 – Laravel
使用命令行:
1 composer require select2/select2完成后打开resources\app.scss,添加Select2引用:
  1 // Fonts
  2 @import url('https://fonts.googleapis.com/css?family=Nunito');
  3
  4 // Variables
  5 @import 'variables';
  6
  7 // Bootstrap
  8 @import '~bootstrap/scss/bootstrap';
  9
 10 // Select2
 11 @import 'vendor/select2/select2/src/scss/core.scss';
 12
1 require('../../vendor/select2/select2/dist/js/select2.js');如下:
  1 /**
  2  * First we will load all of this project's JavaScript dependencies which
  3  * includes Vue and other libraries. It is a great starting point when
  4  * building robust, powerful web applications using Vue and Laravel.
  5  */
  6
  7 require('./bootstrap');
  8 require('../../vendor/select2/select2/dist/js/select2.js');
  9
 10 window.Vue = require('vue');
 11
 12 /**
 13  * The following block of code may be used to automatically register your
 14  * Vue components. It will recursively scan this directory for the Vue
 15  * components and automatically register them with their "basename".
 16  *
 17  * Eg. ./components/ExampleComponent.vue -> <example-component></example-component>
 18  */
 19
 20 // const files = require.context('./', true, /\.vue$/i)
 21 // files.keys().map(key => Vue.component(key.split('/').pop().split('.')[0], files(key).default))
 22
 23 Vue.component('example-component', require('./components/ExampleComponent.vue').default);
 24
 25 /**
 26  * Next, we will create a fresh Vue application instance and attach it to
 27  * the page. Then, you may begin adding components to this application
 28  * or customize the JavaScript scaffolding to fit your unique needs.
 29  */
 30
 31 const app = new Vue({
 32     el: '#app',
 33 });
然后执行命令:
1 npm install & npm run dev注意:原教程中采用@include('vendor.ueditor.assets') 方式引用了ueditor的js代码, 在Laravel vue中 打开chrome console会看到有异常提示,便将其中代码分拆:
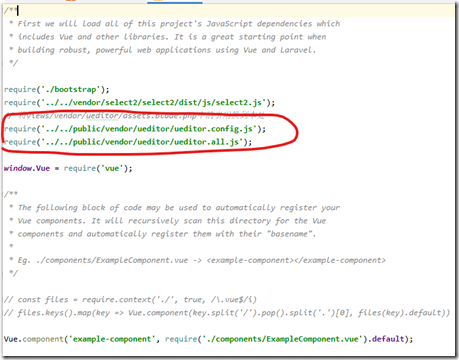
一部分移入app.js中:一定要注意这个顺序,否则可能出现百度富文本编辑器UE.getEditor is not a function 异常:
  1 // 将views/vendor/ueditor/assets.blade.php中的引用换到本处
  2 require('../../public/vendor/ueditor/ueditor.config.js');
  3 require('../../public/vendor/ueditor/ueditor.all.js');
然后,
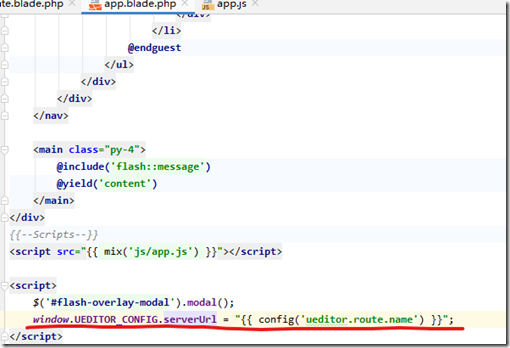
1 window.UEDITOR_CONFIG.serverUrl = "{{ config('ueditor.route.name') }}";移入app.blade.php中
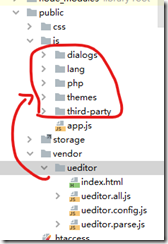
最后,将ueditor需要的dialogs,lang,php,themes,third-party文件夹移入public/js文件夹内:
还要记得删除 create.blade.php中的引用语句:@include('vendor.ueditor.assets')
在webpack.mix.js使用mix.version();添加版本控制,防止多次更新浏览器缓存导致效果没显示的问题。

  1 const mix = require('laravel-mix');
  2
  3 /*
  4  |--------------------------------------------------------------------------
  5  | Mix Asset Management
  6  |--------------------------------------------------------------------------
  7  |
  8  | Mix provides a clean, fluent API for defining some Webpack build steps
  9  | for your Laravel application. By default, we are compiling the Sass
 10  | file for the application as well as bundling up all the JS files.
 11  |
 12  */
 13
 14 mix.js('resources/js/app.js', 'public/js')
 15     .sass('resources/sass/app.scss', 'public/css');
 16 mix.version();
打包完成后,参考多选使用方法示例,再创建问题的view blade文件中添加一个位置用来选问题的Topic:
如:

  1 <div class="form-group">
  2     <label for="topic_list">选择主题</label>
  3     <select id="topic_list" class="js-example-basic-multiple" name="topics[]"
  4             multiple="multiple">
  5         <option value="AL">Alabama</option>
  6         <option value="WY">Wyoming</option>
  7     </select>
  8 </div>
为了更规范,我们将create.blade.php中的js代码放进一个section,并在app.blade.php中使用yield放置:

  1 <!doctype html>
  2 <html lang="{{ str_replace('_', '-', app()->getLocale()) }}">
  3 <head>
  4     <meta charset="utf-8">
  5     <meta name="viewport" content="width=device-width, initial-scale=1">
  6
  7     {{--    CSRF Token--}}
  8     <meta name="csrf-token" content="{{ csrf_token() }}">
  9
 10     <title>{{ config('app.name', 'Laravel') }}</title>
 11
 12
 13     {{--    Fonts--}}
 14     <link rel="dns-prefetch" href="//fonts.gstatic.com">
 15     <link href="https://fonts.googleapis.com/css?family=Nunito" rel="stylesheet">
 16
 17     {{--    Styles--}}
 18     <link href="{{ mix('css/app.css') }}" rel="stylesheet">
 19
 20 </head>
 21 <body>
 22 <div id="app">
 23     <nav class="navbar navbar-expand-md navbar-light bg-white shadow-sm">
 24         <div class="container">
 25             <a class="navbar-brand" href="{{ url('/') }}">
 26                 {{ config('app.name', 'Laravel') }}
 27             </a>
 28             <button class="navbar-toggler" type="button" data-toggle="collapse" data-target="#navbarSupportedContent"
 29                     aria-controls="navbarSupportedContent" aria-expanded="false"
 30                     aria-label="{{ __('Toggle navigation') }}">
 31                 <span class="navbar-toggler-icon"></span>
 32             </button>
 33
 34             <div class="collapse navbar-collapse" id="navbarSupportedContent">
 35                 {{--                Left Side Of Navbar--}}
 36                 <ul class="navbar-nav mr-auto">
 37
 38                 </ul>
 39
 40                 {{--                Right Side Of Navbar--}}
 41                 <ul class="navbar-nav ml-auto">
 42                     {{--                    Authentication Links--}}
 43                     @guest
 44                         <li class="nav-item">
 45                             <a class="nav-link" href="{{ route('login') }}">{{ __('Login') }}</a>
 46                         </li>
 47                         @if (Route::has('register'))
 48                             <li class="nav-item">
 49                                 <a class="nav-link" href="{{ route('register') }}">{{ __('Register') }}</a>
 50                             </li>
 51                         @endif
 52                     @else
 53                         <li class="nav-item dropdown">
 54                             <a id="navbarDropdown" class="nav-link dropdown-toggle" href="#" role="button"
 55                                data-toggle="dropdown" aria-haspopup="true" aria-expanded="false" v-pre>
 56                                 {{ Auth::user()->name }} <span class="caret"></span>
 57                             </a>
 58
 59                             <div class="dropdown-menu dropdown-menu-right" aria-labelledby="navbarDropdown">
 60                                 <a class="dropdown-item" href="{{ route('logout') }}"
 61                                    onclick="event.preventDefault();
 62                                                      document.getElementById('logout-form').submit();">
 63                                     {{ __('Logout') }}
 64                                 </a>
 65
 66                                 <form id="logout-form" action="{{ route('logout') }}" method="POST"
 67                                       style="display: none;">
 68                                     @csrf
 69                                 </form>
 70                             </div>
 71                         </li>
 72                     @endguest
 73                 </ul>
 74             </div>
 75         </div>
 76     </nav>
 77
 78     <main class="py-4">
 79         @include('flash::message')
 80         @yield('content')
 81     </main>
 82 </div>
 83 {{--Scripts--}}
 84 <script src="{{ mix('js/app.js') }}"></script>
 85
 86 <script>
 87     $('#flash-overlay-modal').modal();
 88     window.UEDITOR_CONFIG.serverUrl = "{{ config('ueditor.route.name') }}";
 89 </script>
 90 @yield('footer-js')
 91 </body>
 92 </html>

  1 @extends('layouts.app')
  2 @section('content')
  3     <div class="container">
  4         <div class="row">
  5             <div class="col-md-8 col-md-offset-2">
  6                 <div class="card">
  7                     <div class="card-header">
  8                         发布问题
  9                     </div>
 10                     <div class="card-body">
 11                         <form action="{{ route('questions.store') }}" method="post">
 12                             {{--注意要有csrftoken--}}
 13                             @csrf
 14                             <div class="form-group">
 15                                 <label for="title">标题</label>
 16                                 <input type="text" name="title" class="form-control" placeholder="标题" id="title"
 17                                        value="{{ old('title') }}">
 18                                 <p class="text text-danger"> @error('title') {{ $message }} @enderror </p>
 19                             </div>
 20                             <!-- Select2 Topic Select -->
 21                             <div class="form-group">
 22                                 <label for="topic_list">选择主题</label>
 23                                 <select id="topic_list" class="js-example-basic-multiple form-control" name="topics[]"
 24                                         multiple="multiple">
 25                                     <option value="AL">Alabama</option>
 26                                     <option value="WY">Wyoming</option>
 27                                 </select>
 28                             </div>
 29                             <!-- 编辑器容器 -->
 30                             <script id="container" name="content" type="text/plain"
 31                                     style="width: 100%">{!! old('content') !!}</script>
 32                             <p class="text text-danger"> @error('content') {{ $message }} @enderror </p>
 33                             <!--发布按钮-->
 34                             <button type="submit" class="btn btn-primary mt-2 float-md-right">发布问题</button>
 35                         </form>
 36                     </div>
 37                 </div>
 38             </div>
 39         </div>
 40     </div>
 41 @endsection
 42 @section('footer-js')
 43     <script type="text/javascript">
 44         // 实例化编辑器
 45         var ue = UE.getEditor('container', {
 46             toolbars: [
 47                 ['bold', 'italic', 'underline', 'strikethrough', 'blockquote', 'insertunorderedlist', 'insertorderedlist', 'justifyleft', 'justifycenter', 'justifyright', 'link', 'insertimage', 'fullscreen']
 48             ],
 49             elementPathEnabled: false,
 50             enableContextMenu: false,
 51             autoClearEmptyNode: true,
 52             wordCount: false,
 53             imagePopup: false,
 54             autotypeset: {indent: true, imageBlockLine: 'center'}
 55         });
 56         ue.ready(function () {
 57             ue.execCommand('serverparam', '_token', '{{ csrf_token() }}'); // 设置 CSRF token.
 58         });
 59         $(document).ready(function () {
 60             // Select2多选js
 61             $('.js-example-basic-multiple').select2();
 62         });
 63     </script>
 64 @endsection
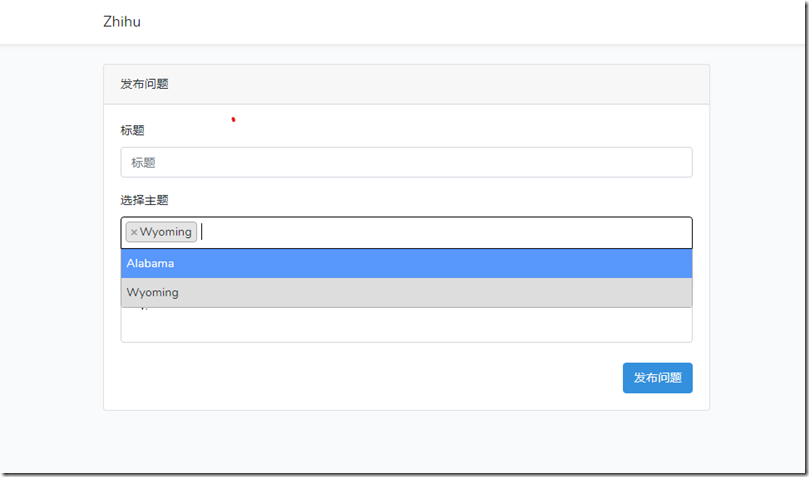
初始效果如下:
接下来使用ajax实现数据请求填充,具体参考 additional-examples,作者原代码链接:Laravel 实战开发知乎使用 Select2 的相关代码。
编辑后create.blade.php代码如下:

  1 @extends('layouts.app')
  2 @section('content')
  3     <div class="container">
  4         <div class="row">
  5             <div class="col-md-8 col-md-offset-2">
  6                 <div class="card">
  7                     <div class="card-header">
  8                         发布问题
  9                     </div>
 10                     <div class="card-body">
 11                         <form action="{{ route('questions.store') }}" method="post">
 12                             {{--注意要有csrftoken--}}
 13                             @csrf
 14                             <div class="form-group">
 15                                 <label for="title">标题</label>
 16                                 <input type="text" name="title" class="form-control" placeholder="标题" id="title"
 17                                        value="{{ old('title') }}">
 18                                 <p class="text text-danger"> @error('title') {{ $message }} @enderror </p>
 19                             </div>
 20                             <!-- Select2 Topic Select -->
 21                             <div class="form-group">
 22                                 <label for="topic_list">选择主题</label>
 23                                 <select id="topic_list" class="js-example-basic-multiple form-control" name="topics[]"
 24                                         multiple="multiple">
 25                                     <option value="AL">Alabama</option>
 26                                     <option value="WY">Wyoming</option>
 27                                 </select>
 28                             </div>
 29                             <!-- 编辑器容器 -->
 30                             <script id="container" name="content" type="text/plain"
 31                                     style="width: 100%">{!! old('content') !!}</script>
 32                             <p class="text text-danger"> @error('content') {{ $message }} @enderror </p>
 33                             <!--发布按钮-->
 34                             <button type="submit" class="btn btn-primary mt-2 float-md-right">发布问题</button>
 35                         </form>
 36                     </div>
 37                 </div>
 38             </div>
 39         </div>
 40     </div>
 41 @endsection
 42 @section('footer-js')
 43     <script type="text/javascript">
 44         // 实例化编辑器
 45         var ue = UE.getEditor('container', {
 46             toolbars: [
 47                 ['bold', 'italic', 'underline', 'strikethrough', 'blockquote', 'insertunorderedlist', 'insertorderedlist', 'justifyleft', 'justifycenter', 'justifyright', 'link', 'insertimage', 'fullscreen']
 48             ],
 49             elementPathEnabled: false,
 50             enableContextMenu: false,
 51             autoClearEmptyNode: true,
 52             wordCount: false,
 53             imagePopup: false,
 54             autotypeset: {indent: true, imageBlockLine: 'center'}
 55         });
 56         ue.ready(function () {
 57             ue.execCommand('serverparam', '_token', '{{ csrf_token() }}'); // 设置 CSRF token.
 58         });
 59         $(document).ready(function () {
 60             // Select2多选js
 61             $('.js-example-basic-multiple').select2({
 62                 // 设置属性及初始化值
 63                 tags: true,
 64                 placeholder: '选择相关话题',
 65                 miniumInputLength: 2,
 66
 67                 ajax: {
 68                     url: '/api/topics',
 69                     dataType: 'json',
 70                     // Additional AJAX parameters go here; see the end of this chapter for the full code of this example
 71                     delay: 250,
 72                     data: function (params) {
 73                         return {
 74                             q: params.term, // search term
 75                             // page: params.page 暂时不需要分页
 76                         };
 77                     },
 78                     processResults: function (data, params) {
 79                         // 解析结果为Select2期望的格式
 80                         // parse the results into the format expected by Select2
 81                         // since we are using custom formatting functions we do not need to
 82                         // alter the remote JSON data, except to indicate that infinite
 83                         // scrolling can be used
 84                         return {
 85                             results: data
 86                         };
 87                     },
 88                     cache: true,
 89                 },
 90                 //模板样式
 91                 templateResult: formatTopic,
 92                 //模板样式 【选择项】
 93                 templateSelection: formatTopicSelection,
 94                 escapeMarkup: function (markup) {
 95                     return markup;
 96                 }
 97             });
 98         });
 99
100         //格式化话题
101         function formatTopic(topic) {
102             return "<div class='select2-result-repository clearfix'>" +
103             "<div class='select2-result-repository__meta'>" +
104             "<div class='select2-result-repository__title'>" +
105             topic.name ? topic.name : "Laravel" +
106                 "</div></div></div>";
107         }
108
109         //格式化话题选项
110         function formatTopicSelection(topic) {
111             return topic.name || topic.text;
112         }
113     </script>
114 @endsection
现在请求的js写好了,我们需要提供ajax api请求的路由及请求时候要的数据,使用faker生成:
(1)在api.php文件中添加路由:
  1 Route::middleware('api')->get('/topics', function (Request $request) {
  2     $query = $request->query('q');
  3     return \App\Topic::query()->where('name', 'like', '%' . $query . '%')->get();
  4 });
路由测试可以通过打开如:http://zhihu.test/api/topics?q=Americ 链接查看结果的方式,这里没有数据,我们先添加示例数据:
(2)执行命令添加一个Factory:
关于工厂可以参考:
Laravel Model Factory(模型工厂)的用法以及数据本地化
进一步可以了解一下seeder:
1 php artisan make:factory TopicFactory打开生成的TopicFactory.php工厂文件,修改如下:
  1 <?php
  2
  3 /** @var \Illuminate\Database\Eloquent\Factory $factory */
  4
  5 use App\Topic;
  6 use Faker\Generator as Faker;
  7
  8 $factory->define(Topic::class, function (Faker $faker) {
  9     return [
 10         //
 11         'name' => $faker->name,
 12         'content' => $faker->paragraph,
 13         'questions_count' => $faker->numberBetween(1, 10),
 14     ];
 15 });
执行命令打开tinker:
关于tinker可以查看:
PHP laravel系列之PHP Artisan Tinker
使用 Php Artisan Tinker 来调试你的 Laravel
以上两篇文章讲解已经很丰富,官方文档也提供了讲解
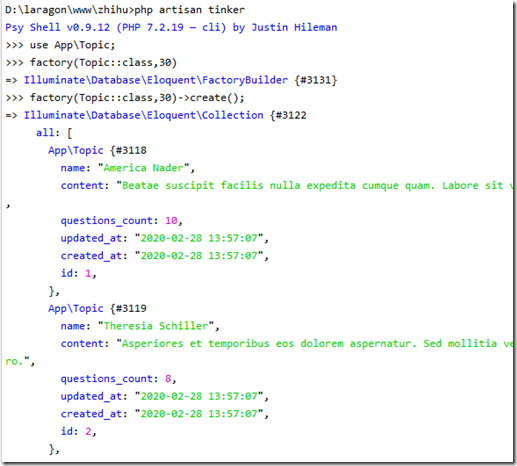
1 php artisan tinker使用factory方法生成30个topic:
1 factory(App\Topic::class,30)->create();或
  1 use App\Topic;
  2 factory(Topic::class,30)->create();
数据生成完毕,
删除create.blade.php中的option
  1 <select id="topic_list" class="js-example-basic-multiple form-control" name="topics[]"
  2                                         multiple="multiple">
  3                                     <option value="AL">Alabama</option>
  4                                     <option value="WY">Wyoming</option>
  5                                 </select>

  1 @extends('layouts.app')
  2 @section('content')
  3     <div class="container">
  4         <div class="row">
  5             <div class="col-md-8 col-md-offset-2">
  6                 <div class="card">
  7                     <div class="card-header">
  8                         发布问题
  9                     </div>
 10                     <div class="card-body">
 11                         <form action="{{ route('questions.store') }}" method="post">
 12                             {{--注意要有csrftoken--}}
 13                             @csrf
 14                             <div class="form-group">
 15                                 <label for="title">标题</label>
 16                                 <input type="text" name="title" class="form-control" placeholder="标题" id="title"
 17                                        value="{{ old('title') }}">
 18                                 <p class="text text-danger"> @error('title') {{ $message }} @enderror </p>
 19                             </div>
 20                             <!-- Select2 Topic Select -->
 21                             <div class="form-group">
 22                                 <label for="topic_list">选择主题</label>
 23                                 <select id="topic_list" class="js-example-basic-multiple form-control"
 24                                         name="topics[]" multiple></select>
 25                             </div>
 26                             <!-- 编辑器容器 -->
 27                             <script id="container" name="content" type="text/plain"
 28                                     style="width: 100%">{!! old('content') !!}</script>
 29                             <p class="text text-danger"> @error('content') {{ $message }} @enderror </p>
 30                             <!--发布按钮-->
 31                             <button type="submit" class="btn btn-primary mt-2 float-md-right">发布问题</button>
 32                         </form>
 33                     </div>
 34                 </div>
 35             </div>
 36         </div>
 37     </div>
 38 @endsection
 39 @section('footer-js')
 40     <script type="text/javascript">
 41         // 实例化编辑器
 42         var ue = UE.getEditor('container', {
 43             toolbars: [
 44                 ['bold', 'italic', 'underline', 'strikethrough', 'blockquote', 'insertunorderedlist', 'insertorderedlist', 'justifyleft', 'justifycenter', 'justifyright', 'link', 'insertimage', 'fullscreen']
 45             ],
 46             elementPathEnabled: false,
 47             enableContextMenu: false,
 48             autoClearEmptyNode: true,
 49             wordCount: false,
 50             imagePopup: false,
 51             autotypeset: {indent: true, imageBlockLine: 'center'}
 52         });
 53         ue.ready(function () {
 54             ue.execCommand('serverparam', '_token', '{{ csrf_token() }}'); // 设置 CSRF token.
 55         });
 56         $(document).ready(function () {
 57             // Select2多选js
 58             $('.js-example-basic-multiple').select2({
 59                 // 设置属性及初始化值
 60                 tags: true,
 61                 placeholder: '选择相关话题',
 62                 miniumInputLength: 2,
 63
 64                 ajax: {
 65                     url: '/api/topics',
 66                     dataType: 'json',
 67                     // Additional AJAX parameters go here; see the end of this chapter for the full code of this example
 68                     delay: 250,
 69                     data: function (params) {
 70                         return {
 71                             // term : The current search term in the search box.
 72                             //     q : Contains the same contents as term.
 73                             // _type: A "request type". Will usually be query, but changes to query_append for paginated requests.
 74                             // page : The current page number to request. Only sent for paginated (infinite scrolling) searches.
 75                             q: params.term, // search term
 76                             // page: params.page 暂时不需要分页
 77                         };
 78                     },
 79                     processResults: function (data, params) {
 80                         // 解析结果为Select2期望的格式
 81                         // parse the results into the format expected by Select2
 82                         // since we are using custom formatting functions we do not need to
 83                         // alter the remote JSON data, except to indicate that infinite
 84                         // scrolling can be used
 85                         return {
 86                             results: data
 87                         };
 88                     },
 89                     cache: true,
 90                 },
 91                 //模板样式
 92                 templateResult: formatTopic,
 93                 //模板样式 【选择项】
 94                 templateSelection: formatTopicSelection,
 95                 escapeMarkup: function (markup) {
 96                     return markup;
 97                 }
 98             });
 99         });
100
101         //格式化话题
102         function formatTopic(topic) {
103             return "<div class='select2-result-repository clearfix'>" +
104             "<div class='select2-result-repository__meta'>" +
105             "<div class='select2-result-repository__title'>" +
106             topic.name ? topic.name : "Laravel" +
107                 "</div></div></div>";
108         }
109
110         //格式化话题选项
111         function formatTopicSelection(topic) {
112             return topic.name || topic.text;
113         }
114     </script>
115 @endsection
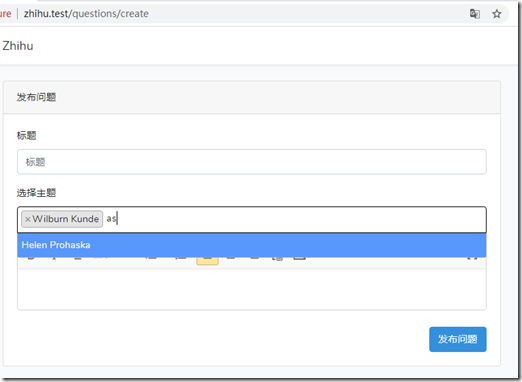
刷新页面测试效果:
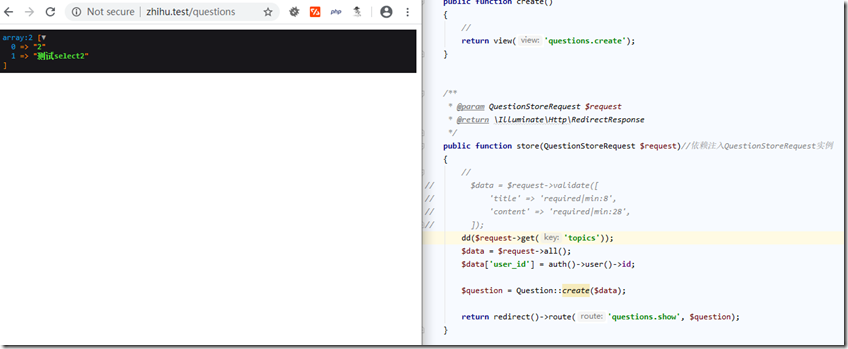
我们通过dd()方法查看一下请求:
可以看到,如果请求的topic在数据库中找到了,传入的是topic在表中的id,
如果是用户自己新增的在数据库中找不到,则传入用户设置的值。

