spring boot 入门学习笔记
1 简介
1.1 概述
使用 Spring Boot 可以很容易地创建出能直接运行的独立的、生产级别的基于 Spring 的应用。我们对 Spring 平台和第三方类库有自己的考虑,因此您可以从最基本的开始。大多数 Spring Boot 应用只需要很少的 Spring 配置。您可以使用 Spring Boot 来创建一个可以使用 java -jar 命令来运行或者基于传统的 war 包部署的应用程序。我们还提供了一个用于运行 spring scripts 的命令行工具。
- 为所有 Spring Boot 开发提供一个更快、更全面的入门体验。
- 坚持自我虽好,但当需求出现偏离,您需要能迅速摆脱出来。
- 提供大量非功能性特性相关项目(例如:内嵌服务器、安全、指标、健康检查、外部配置)。
- 绝对没有代码生成,也不要求 XML 配置。
1.2 初步了解
pom.xml
pom.xml的父工程的父工程pring-boot-dependencies 是核心依赖。我们在引入一些依赖的时候不需要指定版本,正是因为有这些版本仓库。
启动器
 <dependency>
 	<groupId>org.springframework.boot</groupId>
 	<artifactId>spring-boot-starter</artifactId>
 </dependency>
启动器:springboot的启动场景。spring会将所有的应用场景变成一个个的启动器,需要什么功能,就只需要找到对应的启动器。Developing with Spring Boot
<dependency>
    <groupId>org.springframework.boot</groupId>
    <artifactId>spring-boot-starter</artifactId>
</dependency>
主程序
//@SpringBootApplication 标注这个类是一个springboot的应用 启动类下的所有资源被导入
@SpringBootApplication
public class SpringBoot01Application {

    public static void main(String[] args) {
        //将springboot 应用启动
        SpringApplication.run(SpringBoot01Application.class, args);
    }

}

@SpringBootConfiguration springboot的配置
    @Configuration spring配置类
    	@Component 说明这也是spring的一个组件

@EnableAutoConfiguration 自动配置
    @AutoConfigurationPackage 自动配置包
    	@Import({Registrar.class}) 自动配置 包注册
    @Import({AutoConfigurationImportSelector.class})  自动配置导入选择

获取所有的配置
List<String> configurations = this.getCandidateConfigurations(annotationMetadata, attributes);
META-INF/spring.factories 自动配置的核心文件。
自动装配
@Configuration(  //表示这是一个配置类
    proxyBeanMethods = false
)
//自动配置属性 ServerProperties
@EnableConfigurationProperties({ServerProperties.class})
//spring 底层注解 根据不同的条件,来判断当前配置或者类是否生效。
@ConditionalOnWebApplication(
    type = Type.SERVLET
)

@ConditionalOnClass({CharacterEncodingFilter.class})
@ConditionalOnProperty(
    prefix = "server.servlet.encoding",
    value = {"enabled"},
    matchIfMissing = true
)
public class HttpEncodingAutoConfiguration {


}
@Conditional的扩展注解
一旦配置生效,这个配置类就会给容器中添加各种组件,这些组件的属性是从对应的properties类中获取的,这些类里面的每一个属性又是和配置文件绑定的。
-
sping boot 启动会加载大量的自动配置类(spring.factories )
-
看需要的功能有没有在springboot默认写好的自动配置中
-
在看这个自动配置类中到底配置了那些组件
-
给容器中的自动配置类添加组件的时候,会从properties类中获取某些属性,我们只需在配置文件中指定这些属性的值即可。
xxxxAutoConfiguraryion 自动配置类 给容器添加组件
xxxxProperties 封装配置文件中相关的属性
启动
SpringApplication类
- 推断应用的类型是普通的项目还是web项目
- 查找并加载所有可用初始化器。设置到initializers属性中
- 找出所有应用程序监听器,设置到listeners属性中
- 推断并设置main方法的定义类,找到并运行的主类
2 yaml 语法
springboot使用一个全局配置文件,配置文件名是固定的:application.xxx
application.properties key=value
application.yaml key: 空格 value
#普通键值对
name: ddd

#对象
student:
  name: aaa
  age: 12

#行内写法
student1: {name: ccc,age: 13}

#数组
pets:
  - cat
  - dog
pets1: [cat,dog]
松散绑定:
JSR-303
@Validated  //数据校验
public class Student {

    @NonNull
    private String name;
    private int age;
多环境配置
---
spring:
  profiles:
    active: dev

---
spring:
  profiles: dev


---
spring:
  profiles: test
3 springboot web开发
3.1 静态资源
//添加资源管理器
public void addResourceHandlers(ResourceHandlerRegistry registry) {

    //如果静态资源属性已经被自定义, 故如果此处定义了,则下面的默认的staticLocations和 staticPathPattern就不会生效。
    if (!this.resourceProperties.isAddMappings()) {
        logger.debug("Default resource handling disabled");
    } else {
        //注册,添加静态资源到 webjars/**
        this.addResourceHandler(registry, "/webjars/**", "classpath:/META-INF/resources/webjars/");
        //添加注册 静态资源即如下的的staticLocations和 staticPathPattern
        this.addResourceHandler(registry, this.mvcProperties.getStaticPathPattern(), (registration) -> {
            registration.addResourceLocations(this.resourceProperties.getStaticLocations());
            if (this.servletContext != null) {
                ServletContextResource resource = new ServletContextResource(this.servletContext, "/");
                registration.addResourceLocations(new Resource[]{resource});
            }

        });
    }
}
静态资源配置
spring:
  mvc:
    static-path-pattern: /**
private static final String[] CLASSPATH_RESOURCE_LOCATIONS = new String[]{"classpath:/META-INF/resources/", "classpath:/resources/", "classpath:/static/", "classpath:/public/"};
private String[] staticLocations;
//故 根据数组访问顺序 资源获取resources>static>public
3.2 首页定制
WelcomePageHandlerMapping welcomePageHandlerMapping = new WelcomePageHandlerMapping(new TemplateAvailabilityProviders(applicationContext), applicationContext, this.getWelcomePage(), this.mvcProperties.getStaticPathPattern());


 private Resource getWelcomePage() {
	Resource indexHtml = this.getIndexHtml(location);


private Resource getIndexHtml(Resource location) {
	Resource resource = location.createRelative("index.html");
// 会从静态资源处 找到第一个 index.html
4 扩展springmvc
If you want to keep those Spring Boot MVC customizations and make more MVC customizations (interceptors, formatters, view controllers, and other features), you can add your own @Configuration class of type WebMvcConfigurer but without @EnableWebMvc.
If you want to provide custom instances of RequestMappingHandlerMapping, RequestMappingHandlerAdapter, or ExceptionHandlerExceptionResolver, and still keep the Spring Boot MVC customizations, you can declare a bean of type WebMvcRegistrations and use it to provide custom instances of those components.
If you want to take complete control of Spring MVC, you can add your own @Configuration annotated with @EnableWebMvc, or alternatively add your own @Configuration-annotated DelegatingWebMvcConfiguration as described in the Javadoc of @EnableWebMvc.
@Configuration
public class ExtendMVCConfig implements WebMvcConfigurer {
    // 实现了视图解析器接口的类,就可以看作为视图解析器
    @Bean
    public ViewResolver myViewResolver(){
        return new MyViewResolver();
    }


    //自定义一个视图解析器
    public static class MyViewResolver implements ViewResolver{
        @Override
        public View resolveViewName(String viewName, Locale locale) throws Exception {
            return null;
        }
    }

}
5 web开发
5.1 国际化
- 设置文件编码全部为UTF-8
- 编写资源配置文件
- 自定义地域解析
public class MyLocalResolver implements LocaleResolver {

    //获取请求解析
    @Override
    public Locale resolveLocale(HttpServletRequest request) {

        //获取请求解析中的语言参数
        String la=request.getParameter("l");
        //拿到默认的,如果没有就使用默认的。
        Locale locale=Locale.getDefault();

        //如果请求的携带了国际化的参数
        if(!StringUtils.isEmpty(la)){
            String[] split=la.split("_");
            return  new Locale(split[0], split[1]);
        }
        return locale;
    }

    @Override
    public void setLocale(HttpServletRequest request, HttpServletResponse response, Locale locale) {

    }
}
//自定义国际化组件就生效了
@Bean
public LocaleResolver localResolver(){
    return new MyLocalResolver();
}
5.2 登录拦截
public class LoginHandlerInterceptor implements HandlerInterceptor {

    @Override
    public boolean preHandle(HttpServletRequest request, HttpServletResponse response, Object handler) throws Exception {


        String requestURI = request.getRequestURI();

        String name= (String) request.getSession().getAttribute("name");
        if(name==null){
            request.setAttribute("msg","没有权限");
            request.getRequestDispatcher("/").forward(request,response);
            return false;
        }

        return true;
    }
}
@Override
public void addInterceptors(InterceptorRegistry registry) {
    registry.addInterceptor(new LoginHandlerInterceptor()).addPathPatterns("/**")
            .excludePathPatterns("index.html","/","/user/login");
}
6 Data
6.1 连接mysql
依赖引入
<dependency>
    <groupId>org.springframework.boot</groupId>
    <artifactId>spring-boot-starter-data-jdbc</artifactId>
</dependency>

<dependency>
    <groupId>mysql</groupId>
    <artifactId>mysql-connector-java</artifactId>
</dependency>
数据库配置
datasource:
  username: root
  password: 123456
  driver-class-name: com.mysql.jdbc.Driver
  url: jdbc:mysql://localhost:3306/myemployees?useUnicode=utf-8&characterEncoding=utf-8
连接测试
@Autowired
DataSource dataSource;
@Test
void contextLoads() {
    try {
        System.out.println(dataSource.getConnection());
    } catch (SQLException e) {
        e.printStackTrace();
    }

}
打印出::HikariProxyConnection@631851861 wrapping com.mysql.cj.jdbc.ConnectionImpl@6adc5b9c
6.2 Druid
依赖
<!-- https://mvnrepository.com/artifact/com.alibaba/druid -->
<dependency>
    <groupId>com.alibaba</groupId>
    <artifactId>druid</artifactId>
    <version>1.2.8</version>
</dependency>
配置
datasource:
  username: root
  password: 123456
  driver-class-name: com.mysql.jdbc.Driver
  url: jdbc:mysql://localhost:3306/myemployees?useUnicode=utf-8&characterEncoding=utf-8
  type: com.alibaba.druid.pool.DruidDataSource

  #配置监控统计拦截器的fiters ,stat监控统计,wall:防御sql注入,log4j:日志记录
  filters: stat,wall,log4j
package com.fadaiyu.config;

import com.alibaba.druid.support.http.StatViewServlet;
import org.springframework.boot.context.properties.ConfigurationProperties;
import org.springframework.boot.web.servlet.ServletRegistrationBean;
import org.springframework.context.annotation.Bean;
import org.springframework.context.annotation.Configuration;
import org.springframework.data.repository.NoRepositoryBean;

import java.util.HashMap;

@Configuration
public class DruidDatasSource {

    @ConfigurationProperties(prefix = "spring.datasource")
    @Bean
    public DruidDatasSource datasSource(){
        return new DruidDatasSource();
    }

    //后台监控
    @Bean
    public ServletRegistrationBean registrationBean(){
        ServletRegistrationBean<StatViewServlet> bean=new ServletRegistrationBean<>(new StatViewServlet(),"/druid/*");

        //后台需要有人登录,账号密码配置
        HashMap<String,String> initParameters=new HashMap<>();

        //增加配置
        initParameters.put("loginUsername","admin");
        initParameters.put("loginPassword","123456");

        //允许谁可以访问
        initParameters.put("allow","");

        //禁止谁能访问
        initParameters.put("xxx","xxx");

        //设置初始化参数
        bean.setInitParameters(initParameters);

        return bean;
    }

}
6.3 整合mybatis
依赖
<!-- https://mvnrepository.com/artifact/org.mybatis.spring.boot/mybatis-spring-boot-starter -->
<dependency>
    <groupId>org.mybatis.spring.boot</groupId>
    <artifactId>mybatis-spring-boot-starter</artifactId>
    <version>2.2.1</version>
</dependency>
配置
mybatis:
  type-aliases-package: com.fadaiyu.pojo
  mapper-locations: classpath:mapper/*.xml
使用
@Mapper
public interface JobsMapper {

    @Select("SELECT* FROM jobs")
    List<Jobs> queryJobList();

    Jobs queryJobsById(String jo_id);

}
<?xml version="1.0" encoding="UTF-8" ?>
<!DOCTYPE mapper PUBLIC "-//mybatis.org//DTD Mapper 3.0//EN"
        "http://mybatis.org/dtd/mybatis-3-mapper.dtd" >
<mapper namespace="com.fadaiyu.mapper.JobsMapper" >

    <select id="queryJobsById" resultType="Jobs">
        SELECT* FROM jobs WHERE job_id = #{job_id}
    </select>

</mapper>
7 安全
7.1 springsecurity
Spring Security是一个专注于为Java应用程序提供身份验证和授权的框架。与所有Spring项目一样,Spring Security的真正强大之处在于它可以很容易地扩展以满足定制需求.
WebSecurityConfigurerAdapter 自定义security 策略
AuthenticationManagerBuilder 自定义认证策略
@EnableWebSecurity 开启WebSecurity模式
依赖
<dependency>
    <groupId>org.springframework.boot</groupId>
    <artifactId>spring-boot-starter-security</artifactId>
</dependency>


<!-- https://mvnrepository.com/artifact/org.thymeleaf.extras/thymeleaf-extras-springsecurity5 -->
<dependency>
    <groupId>org.thymeleaf.extras</groupId>
    <artifactId>thymeleaf-extras-springsecurity5</artifactId>
    <version>3.0.4.RELEASE</version>
</dependency>
配置
@EnableWebSecurity  //aop 拦截器
public class SecurityConfig extends WebSecurityConfigurerAdapter {
    @Override
    protected void configure(HttpSecurity http) throws Exception {
        //首页所有人都可以访问 功能页只有对应有权限的人才能访问
        http.authorizeRequests()
                .antMatchers("/").permitAll()
                .antMatchers("//level1/*").hasRole("vip1");
        //没有登录权限,跳到登录页
        http.formLogin();

        //注销成功后返回首页
        http.logout().logoutSuccessUrl("/");
    }

    //认证
    @Override
    protected void configure(AuthenticationManagerBuilder auth) throws Exception {
        auth.inMemoryAuthentication()
                .passwordEncoder(new BCryptPasswordEncoder())
                .withUser("ding1").password(new BCryptPasswordEncoder().encode("123456")).roles("vip1");
    }
}
thymeleaf springsecurity5
<!DOCTYPE html>
<html lang="en"
      xmlns:th="http://www.thymeleaf.org"
      xmlns:sec="http://www.thymeleaf.org/thymeleaf-extras-springsecurity5">
<head>
    <meta charset="UTF-8">
    <title>Title</title>
</head>
<body>

<h1>index</h1>
<!--
	sec:authorize :判断信息是否存在
	sec:authentication:取出相应的值
-->
<div sec:authorize="isAuthenticated()">
    <h1>已经登录</h1>

</div>
<a th:href="@{/level1/view1}">level1--view1</a>
<a th:href="@{/logout}">logout</a>
</body>
</html>
登录定制
//定制login页面,登录页面路径,登录请求路径,参数名
 // http.formLogin().loginPage("/toLogin").usernameParameter("userName").passwordParameter("passWodr");

  http.rememberMe().rememberMeParameter("rememberMe");
7.2 shiro
7.2.1 简介[1]
Apache Shiro 是 Java 的一个安全框架。目前,使用 Apache Shiro 的人越来越多,因为它相当简单,对比 Spring Security,可能没有 Spring Security 做的功能强大,但是在实际工作时可能并不需要那么复杂的东西,所以使用小而简单的 Shiro 就足够了。对于它俩到底哪个好,这个不必纠结,能更简单的解决项目问题就好了。
本教程只介绍基本的 Shiro 使用,不会过多分析源码等,重在使用。
Shiro 可以非常容易的开发出足够好的应用,其不仅可以用在 JavaSE 环境,也可以用在 JavaEE 环境。Shiro 可以帮助我们完成:认证、授权、加密、会话管理、与 Web 集成、缓存等。这不就是我们想要的嘛,而且 Shiro 的 API 也是非常简单;其基本功能点如下图所示:
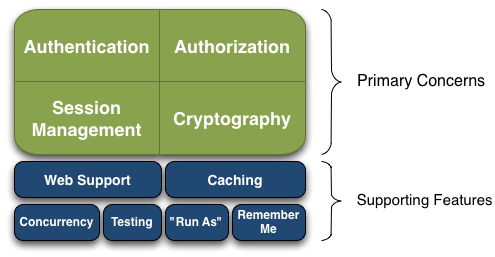
- Authentication:身份认证 / 登录,验证用户是不是拥有相应的身份;
- Authorization:授权,即权限验证,验证某个已认证的用户是否拥有某个权限;即判断用户是否能做事情,常见的如:验证某个用户是否拥有某个角色。或者细粒度的验证某个用户对某个资源是否具有某个权限;
- Session Management:会话管理,即用户登录后就是一次会话,在没有退出之前,它的所有信息都在会话中;会话可以是普通 JavaSE 环境的,也可以是如 Web 环境的;
- Cryptography:加密,保护数据的安全性,如密码加密存储到数据库,而不是明文存储;
- Web Support:Web 支持,可以非常容易的集成到 Web 环境;
- Caching:缓存,比如用户登录后,其用户信息、拥有的角色 / 权限不必每次去查,这样可以提高效率;
- Concurrency:shiro 支持多线程应用的并发验证,即如在一个线程中开启另一个线程,能把权限自动传播过去;
- Testing:提供测试支持;
- Run As:允许一个用户假装为另一个用户(如果他们允许)的身份进行访问;
- Remember Me:记住我,这个是非常常见的功能,即一次登录后,下次再来的话不用登录了。
记住一点,Shiro 不会去维护用户、维护权限;这些需要我们自己去设计 / 提供;然后通过相应的接口注入给 Shiro 即可。
接下来我们分别从外部和内部来看看 Shiro 的架构,对于一个好的框架,从外部来看应该具有非常简单易于使用的 API,且 API 契约明确;从内部来看的话,其应该有一个可扩展的架构,即非常容易插入用户自定义实现,因为任何框架都不能满足所有需求。
首先,我们从外部来看 Shiro 吧,即从应用程序角度的来观察如何使用 Shiro 完成工作。如下图:
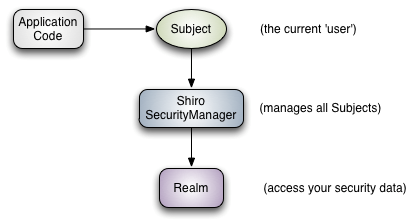
可以看到:应用代码直接交互的对象是 Subject,也就是说 Shiro 的对外 API 核心就是 Subject;其每个 API 的含义:
Subject:主体,代表了当前 “用户”,这个用户不一定是一个具体的人,与当前应用交互的任何东西都是 Subject,如网络爬虫,机器人等;即一个抽象概念;所有 Subject 都绑定到 SecurityManager,与 Subject 的所有交互都会委托给 SecurityManager;可以把 Subject 认为是一个门面;SecurityManager 才是实际的执行者;
SecurityManager:安全管理器;即所有与安全有关的操作都会与 SecurityManager 交互;且它管理着所有 Subject;可以看出它是 Shiro 的核心,它负责与后边介绍的其他组件进行交互,如果学习过 SpringMVC,你可以把它看成 DispatcherServlet 前端控制器;
Realm:域,Shiro 从 Realm 获取安全数据(如用户、角色、权限),就是说 SecurityManager 要验证用户身份,那么它需要从 Realm 获取相应的用户进行比较以确定用户身份是否合法;也需要从 Realm 得到用户相应的角色 / 权限进行验证用户是否能进行操作;可以把 Realm 看成 DataSource,即安全数据源。
也就是说对于我们而言,最简单的一个 Shiro 应用:
- 应用代码通过 Subject 来进行认证和授权,而 Subject 又委托给 SecurityManager;
- 我们需要给 Shiro 的 SecurityManager 注入 Realm,从而让 SecurityManager 能得到合法的用户及其权限进行判断。
从以上也可以看出,Shiro 不提供维护用户 / 权限,而是通过 Realm 让开发人员自己注入。
接下来我们来从 Shiro 内部来看下 Shiro 的架构,如下图所示:
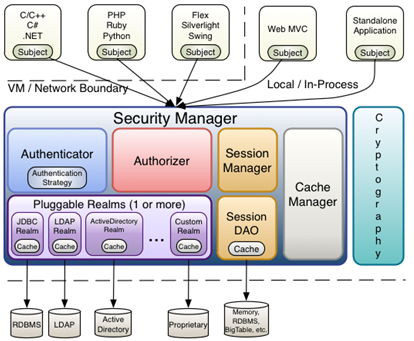
- Subject:主体,可以看到主体可以是任何可以与应用交互的 “用户”;
- SecurityManager:相当于 SpringMVC 中的 DispatcherServlet 或者 Struts2 中的 FilterDispatcher;是 Shiro 的心脏;所有具体的交互都通过 SecurityManager 进行控制;它管理着所有 Subject、且负责进行认证和授权、及会话、缓存的管理。
- Authenticator:认证器,负责主体认证的,这是一个扩展点,如果用户觉得 Shiro 默认的不好,可以自定义实现;其需要认证策略(Authentication Strategy),即什么情况下算用户认证通过了;
- Authorizer:授权器,或者访问控制器,用来决定主体是否有权限进行相应的操作;即控制着用户能访问应用中的哪些功能;
- Realm:可以有 1 个或多个 Realm,可以认为是安全实体数据源,即用于获取安全实体的;可以是 JDBC 实现,也可以是 LDAP 实现,或者内存实现等等;由用户提供;注意:Shiro 不知道你的用户 / 权限存储在哪及以何种格式存储;所以我们一般在应用中都需要实现自己的 Realm;
- SessionManager:如果写过 Servlet 就应该知道 Session 的概念,Session 呢需要有人去管理它的生命周期,这个组件就是 SessionManager;而 Shiro 并不仅仅可以用在 Web 环境,也可以用在如普通的 JavaSE 环境、EJB 等环境;所以呢,Shiro 就抽象了一个自己的 Session 来管理主体与应用之间交互的数据;这样的话,比如我们在 Web 环境用,刚开始是一台 Web 服务器;接着又上了台 EJB 服务器;这时想把两台服务器的会话数据放到一个地方,这个时候就可以实现自己的分布式会话(如把数据放到 Memcached 服务器);
- SessionDAO:DAO 大家都用过,数据访问对象,用于会话的 CRUD,比如我们想把 Session 保存到数据库,那么可以实现自己的 SessionDAO,通过如 JDBC 写到数据库;比如想把 Session 放到 Memcached 中,可以实现自己的 Memcached SessionDAO;另外 SessionDAO 中可以使用 Cache 进行缓存,以提高性能;
- CacheManager:缓存控制器,来管理如用户、角色、权限等的缓存的;因为这些数据基本上很少去改变,放到缓存中后可以提高访问的性能
- Cryptography:密码模块,Shiro 提供了一些常见的加密组件用于如密码加密 / 解密的。
7.2.2 快速入门
引入依赖
<!-- https://mvnrepository.com/artifact/org.apache.shiro/shiro-core -->
<dependency>
    <groupId>org.apache.shiro</groupId>
    <artifactId>shiro-core</artifactId>
    <version>1.8.0</version>
</dependency>

<dependency>
    <groupId>org.slf4j</groupId>
    <artifactId>jcl-over-slf4j</artifactId>
    <version>1.5.6</version>
</dependency>

<dependency>
    <groupId>org.slf4j</groupId>
    <artifactId>slf4j-log4j12</artifactId>
    <version>2.0.0-alpha6</version>
</dependency>

<dependency>
    <groupId>log4j</groupId>
    <artifactId>log4j</artifactId>
    <version>1.2.17</version>
</dependency>
配置 和快速启动类
https://github.com/apache/shiro/tree/shiro-root-1.8.0/samples/quickstart/src (1.8)
7.2.3 与spring boot集成
依赖
<!-- https://mvnrepository.com/artifact/org.apache.shiro/shiro-spring -->
<dependency>
    <groupId>org.apache.shiro</groupId>
    <artifactId>shiro-spring</artifactId>
    <version>1.8.0</version>
</dependency>
配置
package com.fadaiyu.config.shiro;

import com.fadaiyu.mapper.UserMapper;
import com.fadaiyu.pojo.User;
import org.apache.shiro.SecurityUtils;
import org.apache.shiro.authc.*;
import org.apache.shiro.authz.AuthorizationInfo;
import org.apache.shiro.authz.SimpleAuthorizationInfo;
import org.apache.shiro.realm.AuthorizingRealm;
import org.apache.shiro.subject.PrincipalCollection;
import org.apache.shiro.subject.Subject;
import org.springframework.beans.factory.annotation.Autowired;

public class UserRealm extends AuthorizingRealm {

    @Autowired
    UserMapper userMapper;

    //授权
    @Override
    protected AuthorizationInfo doGetAuthorizationInfo(PrincipalCollection principalCollection) {
        System.out.println("执行了授权");

        SimpleAuthorizationInfo info=new SimpleAuthorizationInfo();
        info.addStringPermission("user:add");
        return info;

    }

    //认证
    @Override
    protected AuthenticationInfo doGetAuthenticationInfo(AuthenticationToken authenticationToken) throws AuthenticationException {
        System.out.println("执行了认证");
        //用户名 密码  从数据库中取出

        UsernamePasswordToken token= (UsernamePasswordToken) authenticationToken;

        User user = userMapper.queryByName(token.getUsername());
        //用户名认证
        if(user==null){
            return null;  //抛出异常 UnknownAccountException
        }

        //密码认证 由shrio 做
        return new SimpleAuthenticationInfo("",user.getPassword(),"");

    }
}
package com.fadaiyu.config.shiro;

import at.pollux.thymeleaf.shiro.dialect.ShiroDialect;
import org.apache.shiro.spring.web.ShiroFilterFactoryBean;
import org.apache.shiro.web.mgt.DefaultWebSecurityManager;
import org.springframework.beans.factory.annotation.Qualifier;
import org.springframework.context.annotation.Bean;
import org.springframework.context.annotation.Configuration;

import java.util.LinkedHashMap;
import java.util.Map;


@Configuration
public class ShiroConfig {


    @Bean
    public ShiroFilterFactoryBean shiroFilterFactoryBean(@Qualifier("defaultWebSecurityManager") DefaultWebSecurityManager defaultWebSecurityManager){
        ShiroFilterFactoryBean factoryBean = new ShiroFilterFactoryBean();
        //设置安全管理器
        factoryBean.setSecurityManager(defaultWebSecurityManager);

        //添加shiro 的内置过滤器
        /**
         * anon : 无需认真即可访问
         * authc: 必须认证才能访问
         * user: 必须拥有 记住我 功能才能访问
         * perms: 拥有对某个资源的权限才能访问
         * role: 拥有某个角色的权限才能访问
         */
        Map<String,String> map=new LinkedHashMap<>();

        //授权,未授权用户户 会跳转到未授权页面
        map.put("/level1/*","perms[user:add]");


        factoryBean.setFilterChainDefinitionMap(map);

        factoryBean.setLoginUrl("/toLogin");

        //设置未授权页面
        factoryBean.setUnauthorizedUrl("/unauthorized");

        return factoryBean;
    }


    @Bean
    public DefaultWebSecurityManager defaultWebSecurityManager(@Qualifier("userRealm") UserRealm userRealm){
        DefaultWebSecurityManager manager = new DefaultWebSecurityManager();
        //管理realm
        manager.setRealm(userRealm);

        return manager;

    }


    //创建realm对象
    @Bean
    public UserRealm userRealm(){
        return new UserRealm();
    }


    //整合shirodialect 用来整合shiro thymeleaf
    @Bean
    public ShiroDialect shiroDialect(){
        return new ShiroDialect();
    }
}
8 swagger
8.1 简介
Swagger 是一个规范且完整的框架,用于生成、描述、调用和可视化 RESTful 风格的 Web 服务。
Swagger 的目标是对 REST API 定义一个标准且和语言无关的接口,可以让人和计算机拥有无须访问源码、文档或网络流量监测就可以发现和理解服务的能力。当通过 Swagger 进行正确定义,用户可以理解远程服务并使用最少实现逻辑与远程服务进行交互。与为底层编程所实现的接口类似,Swagger 消除了调用服务时可能会有的猜测。
8.2 使用
依赖引入
<!-- https://mvnrepository.com/artifact/io.springfox/springfox-swagger2 -->
<dependency>
    <groupId>io.springfox</groupId>
    <artifactId>springfox-swagger2</artifactId>
    <version>3.0.0</version>
</dependency>


<!-- https://mvnrepository.com/artifact/io.springfox/springfox-swagger-ui -->
<dependency>
    <groupId>io.springfox</groupId>
    <artifactId>springfox-swagger-ui</artifactId>
    <version>3.0.0</version>
</dependency>
如果发生 documentxxxxxxx xxx错误,,添加如下配置:
spring:
    mvc:
      pathmatch:
        matching-strategy: ANT_PATH_MATCHER
配置
@Configuration
@EnableSwagger2 //开启swagger
public class SwaggerConfig {

    //配置swagger的bean实列
    @Bean
    public Docket docket(){
        return new Docket(DocumentationType.SWAGGER_2)
                .apiInfo(this.apiInfo());
    }

    public ApiInfo apiInfo() {
        //作者信息
        Contact DEFAULT_CONTACT = new Contact("发呆鱼", "", "");

        return  new ApiInfo("api 文档",
                "啦啦啦",
                "1.0",
                "urn:tos",
                DEFAULT_CONTACT,
                "Apache 2.0",
                "http://www.apache.org/licenses/LICENSE-2.0",
                new ArrayList());
    }
}
8.3 进一步配置
配置扫描接口
@Configuration
@EnableSwagger2 //开启swagger
public class SwaggerConfig {

    //可是设置多个分组
    @Bean
    public Docket docket1(){
        return new Docket(DocumentationType.SWAGGER_2).groupName("1");
    }

    //配置swagger的bean实列
    @Bean
    public Docket docket(Environment environment){

        //设置要显示的swagger 环境
        Profiles profiles=Profiles.of("dev");
        //通过environment.acceptsProfiles 判读是否处于自己设定的环境中
        boolean flag = environment.acceptsProfiles(profiles);


        return new Docket(DocumentationType.SWAGGER_2)
                .apiInfo(this.apiInfo())
                .select()

                //RequestHandlerSelectors配置要扫描接口的方式
                //basePackage 指定要扫描的包
                //any 扫描全部
                // none 不扫描
                //withClassAnnotation 扫描类上的注解
                //withMethodAnnotation 扫描方法上的注解
                .apis(RequestHandlerSelectors.basePackage("com.fadaiyu.controller"))
                //.paths(PathSelectors.any()) 过滤什么路径
                .build()
                .groupName("A") //设置分组名
                .enable(flag);  //是否启动swagger
    }

    public ApiInfo apiInfo() {
        //作者信息
        Contact DEFAULT_CONTACT = new Contact("发呆鱼", "", "");

        return  new ApiInfo("api 文档",
                "啦啦啦",
                "1.0",
                "urn:tos",
                DEFAULT_CONTACT,
                "Apache 2.0",
                "http://www.apache.org/licenses/LICENSE-2.0",
                new ArrayList());
    }
}
实体类配置
//只要返回的接口中,返回值中存在实体类,他就会被扫描到swagger中
@GetMapping("/a2")
public User userTest(){
    return new User();
}
@Data
@AllArgsConstructor
@NoArgsConstructor
@ApiModel("用户实体类")
public class User {

    @ApiModelProperty("用户编号")
    private int id;
    private String name;
    private String password;
}
接口注释
package com.fadaiyu.controller;

import com.fadaiyu.pojo.User;
import io.swagger.annotations.Api;
import io.swagger.annotations.ApiOperation;
import io.swagger.annotations.ApiParam;
import org.springframework.stereotype.Controller;
import org.springframework.web.bind.annotation.GetMapping;
import org.springframework.web.bind.annotation.PostMapping;
import org.springframework.web.bind.annotation.RequestMapping;
import org.springframework.web.bind.annotation.RestController;

import java.lang.annotation.Target;


@Api(tags = "hello 控制类")
@RestController
@RequestMapping("/hello")
public class HelloCon {

    @ApiOperation("接口a1")
    @PostMapping("/a1")
    public String test1(){
        return "aaa";
    }

    //只要返回的接口中,返回值中存在实体类,他就会被扫描到swagger中
    @GetMapping("/a2")
    public User userTest(){
        return new User();
    }

    @GetMapping("/a3")
    public String test2(@ApiParam("用户名") String username){
        return username;
    }
}
9 任务
9.1 异步任务
@SpringBootApplication
@EnableAsync //开启异步注解功能
public class SpringBoot01Application {

    public static void main(String[] args) {
        //将springboot 应用启动
        SpringApplication.run(SpringBoot01Application.class, args);
    }

}
//告诉spring 这是一个异步方法
@Async
public void hello(){

    try {
        Thread.sleep(3000);
    } catch (InterruptedException e) {
        e.printStackTrace();
    }
}
9.2 发送邮件
依赖
<dependency>
    <groupId>org.springframework.boot</groupId>
    <artifactId>spring-boot-starter-mail</artifactId>
</dependency>
配置
spring:
    mail:
      username: 邮箱名
      password: 密钥
      host: smtp.163.com
简单使用
@Test
public void mailTest(){
    //一个简单的邮件
    SimpleMailMessage simpleMessage=new SimpleMailMessage();

    simpleMessage.setSubject("发呆鱼");
    simpleMessage.setText("aaaaaaaa");
    simpleMessage.setTo("2305932120@qq.com");
    simpleMessage.setFrom("dingthefist@163.com");


    javaMailSender.send(simpleMessage);
}

@Test
public void mailTest2(){
    //一个复杂邮件
    MimeMessage mimeMessage=javaMailSender.createMimeMessage();

    //组装
    try {
        MimeMessageHelper mimeMessageHelper=new MimeMessageHelper(mimeMessage,true);

        //正文
        mimeMessageHelper.setSubject("复杂邮件");
        mimeMessageHelper.setText("<p stytle='color:red'> 啦啦啦啦啦啦啦</p>",true);

        //附件
        mimeMessageHelper.addAttachment("favicon.ico",new File("D:\\WorkeSpace_Study\\Java\\Spring_St\\Spring-Boot-01\\src\\main\\resources\\favicon.ico"));


        mimeMessageHelper.setTo("2305932120@qq.com");
        mimeMessageHelper.setFrom("dingthefist@163.com");


    } catch (MessagingException e) {
        e.printStackTrace();
    }


    javaMailSender.send(mimeMessage);
}
9.3 定时任务
TaskScheduler 任务调度者
TaskExecutor 任务执行者

@EnableScheduling 开启定时功能注解
@Scheduler 什么时候执行


    /**
     *  *:代表任何时间
     *  #, :代表连续时间
     * #-:代表持续范围
     * * /n :代表每隔多久执行一次
     * 第1* 一分钟的第多少秒
     * 第2*:一个小时当中的第几分钟
     * 第3*:一天中的第几个小时
     * 第4*:一个月当中的第几天
     * 第5*:一年之中第几个月
     * 第6*:一周当中的星期几 (0-7 0和7都是星期日)
     */
    //在一个特定时间执行
    @Scheduled(cron = "0 42 10 * * ?")
    public void schedulerTest1(){
        System.out.println("----------------------------------------------");
    }
10 整合redis
导入依赖
<dependency>
    <groupId>org.springframework.boot</groupId>
    <artifactId>spring-boot-starter-data-redis</artifactId>
</dependency>
在springboot 2.后,原来使用的jedis 被替换为lettuce
jedis :采用直连,多个线程操作的化,是不安全的。如果想要避免,使用jedis pool 连接池。bio
lettuce:采用netiy 实例可以再多个线程中共享,不存在线程不安全情况。 nio
@ConditionalOnClass({RedisOperations.class})
@EnableConfigurationProperties({RedisProperties.class})
@Import({LettuceConnectionConfiguration.class, JedisConnectionConfiguration.class})
public class RedisAutoConfiguration {
    public RedisAutoConfiguration() {
    }


	//提供了 redistemplate ,如果不需要,可以进行自定义
    @Bean
    @ConditionalOnMissingBean(
        name = {"redisTemplate"}
    )
    @ConditionalOnSingleCandidate(RedisConnectionFactory.class)
    public RedisTemplate<Object, Object> redisTemplate(RedisConnectionFactory redisConnectionFactory) {
    	//默认的RedisTemplate 没有过多的设置, redis 对象都是需要序列化。
    	//两个泛型都是 object object 的类型,使用后需要转为string object
        RedisTemplate<Object, Object> template = new RedisTemplate();
        template.setConnectionFactory(redisConnectionFactory);
        return template;
    }

    @Bean
    @ConditionalOnMissingBean //
    @ConditionalOnSingleCandidate(RedisConnectionFactory.class)
    public StringRedisTemplate stringRedisTemplate(RedisConnectionFactory redisConnectionFactory) {
        return new StringRedisTemplate(redisConnectionFactory);
    }
}
配置
spring:
   redis:
    port: 6379
    host: 127.0.0.1
测试
//操作不同的数据类型
//redisTemplate.opsForValue();// 操作字符串 类似 string
//redisTemplate.opsForList(); //操作list
//redisTemplate.opsForHash(); //操作哈希


// redisTemplate.opsForValue().set("name","fadaiyu");
//  System.out.println(redisTemplate.opsForValue().get("name"));
自定义redisTemplate
package com.fadaiyu.config;

import com.fasterxml.jackson.annotation.JsonAutoDetect;
import com.fasterxml.jackson.annotation.PropertyAccessor;
import com.fasterxml.jackson.databind.ObjectMapper;
import org.springframework.context.annotation.Bean;
import org.springframework.context.annotation.Configuration;
import org.springframework.data.redis.connection.RedisConnectionFactory;
import org.springframework.data.redis.core.RedisTemplate;
import org.springframework.data.redis.serializer.Jackson2JsonRedisSerializer;
import org.springframework.data.redis.serializer.StringRedisSerializer;

@Configuration
public class RedisConfig {

    //编写自己的redisTemplate
    @Bean
    public RedisTemplate<String,Object> redisTemplate(RedisConnectionFactory redisConnectionFactory){

        RedisTemplate<String, Object> template=new RedisTemplate<>();
        template.setConnectionFactory(redisConnectionFactory);

        //json 序列化方式
        Jackson2JsonRedisSerializer objectJackson2JsonRedisSerializer = new Jackson2JsonRedisSerializer(Object.class);
        ObjectMapper om=new ObjectMapper();
        om.setVisibility(PropertyAccessor.ALL, JsonAutoDetect.Visibility.ANY);
        om.enableDefaultTyping(ObjectMapper.DefaultTyping.NON_FINAL);
        objectJackson2JsonRedisSerializer.setObjectMapper(om);

        //string 序列化
        StringRedisSerializer stringRedisSerializer=new StringRedisSerializer();

        //key采用string序列化方式
        template.setKeySerializer(stringRedisSerializer);
        //hash 的key 采用string 序列化方式
        template.setHashKeySerializer(stringRedisSerializer);
        //value 也采用string序列化方式
        template.setValueSerializer(stringRedisSerializer);
        //hash 的value 序列化采用jackson
        template.setHashValueSerializer(objectJackson2JsonRedisSerializer);

        template.afterPropertiesSet();
        return template;
    }

}
跟随《遇见狂神说》学习 未完待续
Shiro 简介_w3cschool :https://www.w3cschool.cn/shiro/co4m1if2.html ↩︎

 浙公网安备 33010602011771号