labview 消息处理器 Queued Message Handler
https://www.bloomy.com/support/blog/getting-started-actor-framework-part-i
The Queued Message Handler
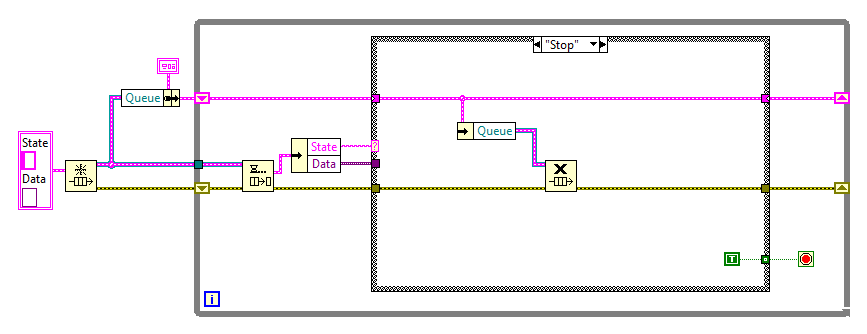
As a LabVIEW developer you probably utilize the Queued Message Handler pattern very frequently. It looks something like this:
If this pattern is foreign to you, I would recommend familiarizing yourself with it before moving forward (Warning: shameless plug ahead - The LabVIEW Style Book is a great resource for this).
In the queued message handler we have a few important properties:
- A loop with multiple states (Each case in the case structure is a state)
- A queue of messages that can invoke a state and pass data to that state (the cluster wired to the obtain queue VI is the message. The string invokes a state because it is wired to the case structure, and the variant can pass data along with the message)
- A store of data that persists all states (the shift register on the loop which would consist of a cluster of pertinent data)
This pattern provides many advantages. Data is encapsulated by the loop; no other loops can directly alter its data. Other loops can interact with the loop via its queue, but this loop gets to define the interface through which that interaction occurs. For example, this loop could provide a state for modifying a value on its shift register and other loops could invoke that state and pass the new data with the message. The benefit of this is that this loop has the final say of how that data gets inserted, so it could, for example, reject certain values that are invalid or out of range. In other words, since the queued message handler owns its data, it can protect it by only exposing what it wants to expose and by defining the rules of how that data is exposed.
There are, however, some disadvantages to this approach. For one, every time we want to create a queued message handler in our application we need to copy and paste the pattern. This leaves open the possibility of erroneously breaking the way the QMH works. It also means that if we want to add a feature to all QMH’s, we must copy and paste that new feature as well. We also have no way of reusing the QMH’s we have already developed without once again resorting to copying and pasting. For example, if we developed a Timer QMH and we want to have multiple parallel timers running throughout our application, we would have to duplicate the timer code for each one.
The other primary disadvantage relates to the concept of type safety. In this pattern, states are invoked via string. It is easy to imagine a scenario where a mistyped state string could cause unexpected behavior. In addition to this, the data is passed in as a variant, so it is the QMHs responsibility to convert that variant into the data type it expects. If the wrong data type is passed in, again unexpected behavior could result. The real issue here is that these problems are not identifiable until runtime. In other words, wiring in the wrong data doesn’t produce a broken run arrow. The application will compile, it just won’t do what you expect. These types of bugs can be easy to introduce and difficult to track down.
The Actor Framework
The Actor Framework serves to solve the issues with the QMH pattern implementation outlined above. The important point to remember is that the Actor Framework is not a completely new pattern. It is still a QMH like we’re accustomed to using, it is only the implementation of the pattern that is different. As we create our first actor we will see how each component of the actor is analogous to the components of the QMH we identified earlier.
The completed source code for this tutorial can be found here:
Getting Started with Actor Framework – LabVIEW 2014
Getting Started with Actor Framework – LabVIEW 2013
To create a new actor, first create a new class by right clicking My Computer in your LabVIEW project and selecting New > Class
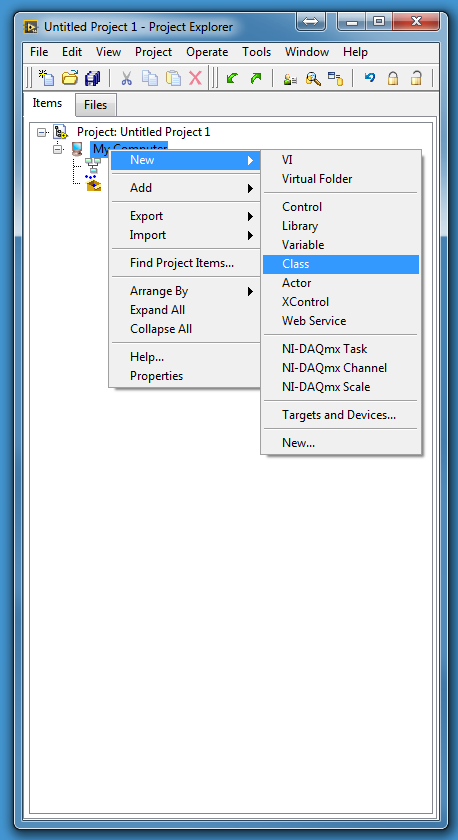
Give the class the name “My Actor” when prompted. You should now have the My Actor.lvclass class in your project.
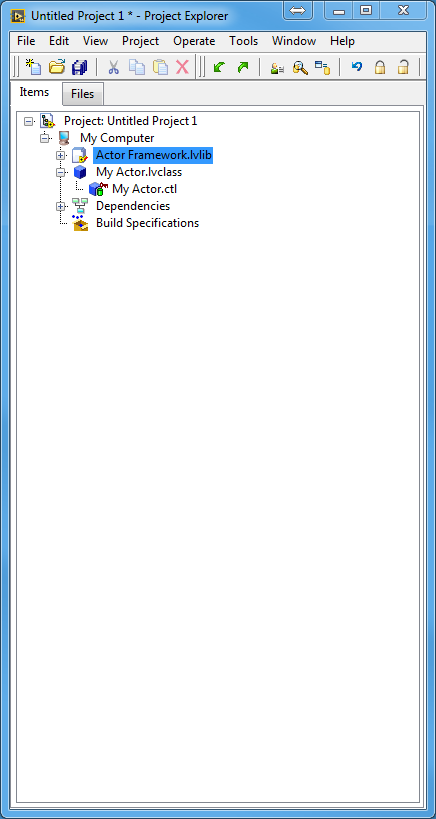
Next we must add the Actor Framework library to our project. To do so, right click on My Computer in the project and select Add > File. Next, browse to your vi.lib folder. Typically this will be located at C:\Program Files (x86)\National Instruments\LabVIEW 2014\vi.lib. Note: this tutorial assumes you are using LabVIEW 2014. If not, that's ok, but be sure you have the latest version of the actor framework, or some of the steps later on will not be accurate. In the vi.lib folder, you should have an “Actor Framework” folder. Inside the Actor Framework folder you will find the “Actor Framework.lvlib” library file which we want to add. Select this file and click Add File. The Actor Framework library should now be added to your project.
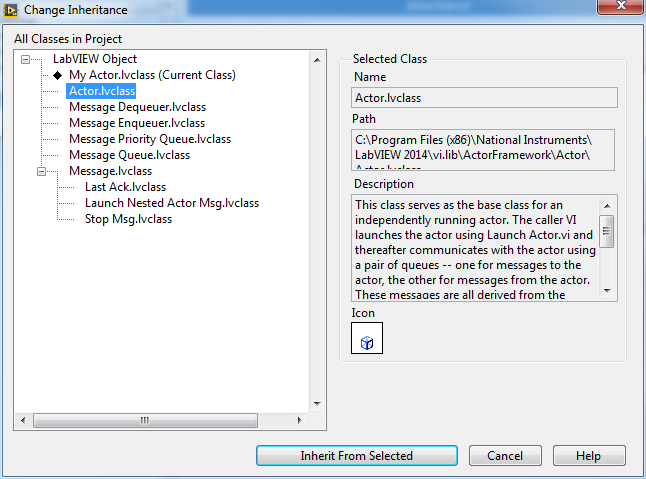
Next we must make our “My Actor” class inherit from the Actor Framework. This transforms our currently blank class into an actor. In other words, we can inherit the QMH functionality we want from the Actor class, rather than having to write it ourselves. To do this, first right click My Actor.lvclass and select Properties. Select the “Inheritance” Category on the left and click Change Inheritance. Select Actor.lvclass and click Inherit From Selected. Click OK to close the class properties dialog.
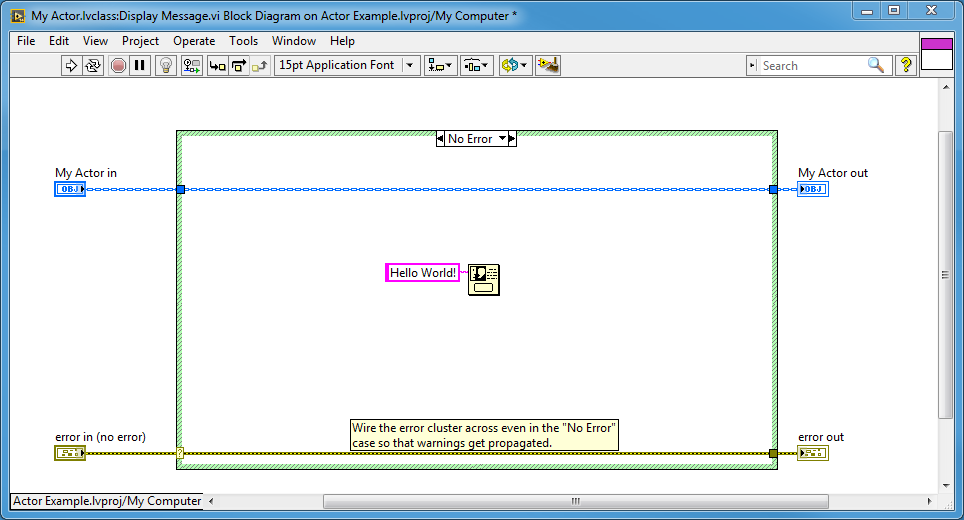
Congratulations, you've made your first actor. Don't stop to celebrate now though, because we still have to make our actor do something. For this example we'll have our actor pop up a message to the user. To do this with a classic QMH we would create a new case in the case structure and name it something like "Display Message". The AF equivalent of this is to make a new method (read: VI) and name it "Display Message", so that's what we'll do next.
In your project, right click on My Actor.lvclass and select New > VI from Static Dispatch Template. This will auto-generate a new method. Edit the method's block diagram to look like below, and save it as Display Message.vi.
Great, now our actor can greet the outside world. But how do we call this functionality? In the QMH world we would enqueue a cluster with a string and a variant where the string is "Display Message". In the AF, rather than sending a cluster, we send a Message Class. Creating all of these message classes can become tedious, but luckily there is a tool that ships with the actor framework that makes it very easy.
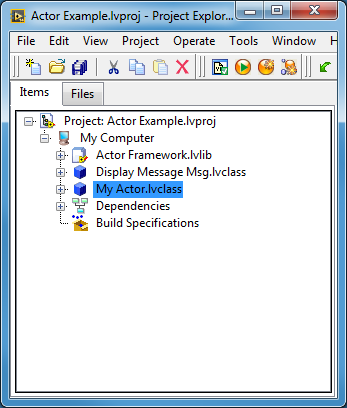
In your project window, go to Tools > Actor Framework Message Maker. In the window that opens, select Display Message and click Build Selected. This will create a new Message Class that can be sent to our actor to invoke the Display Message method. Your project tree should now look like this:
Ok, we're almost done. The last step is to launch the actor and to send it the message. To do this create a new VI by right clicking My Computer and selecting New > VI. Save the VI as Launcher.vi. Modify the block diagram to look like this:
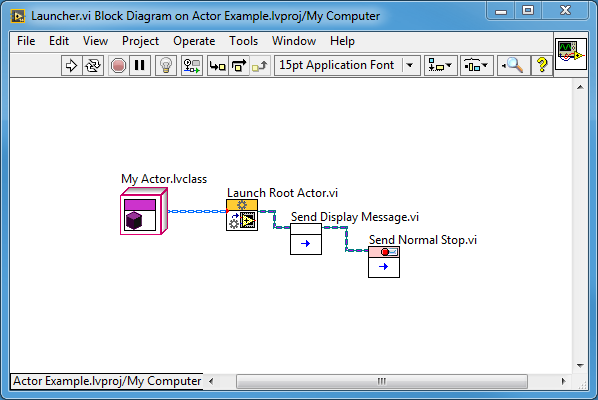
You can get the My Actor.lvclass class constant by dragging My Actor.lvclass from your project into the block diagram. The Send Display Message VI can also be found in your project in the Display Message Msg.lvclass we created earlier. The Launch Root Actor VI and the Send Normal Stop VI can be found in the Actor Framework pallete which is in the Data Communication pallete.
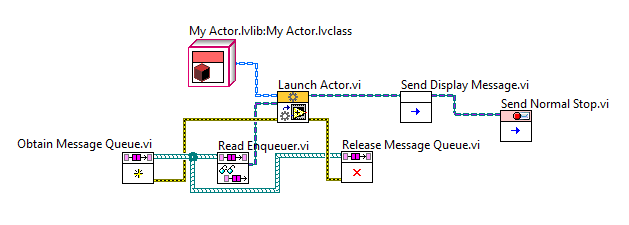
If you are using an earlier version of LabVIEW or the Actor Framework, you may not have a "Launch Root Actor.vi". If so, you will need to construct your launcher using "Launch Actor.vi" as shown below:
That's it, you're done! If you run Launcher.vi you should see your actor's pop-up message. At this point you may wish to organize your project a bit and place your actor in a library and create a virtual folder for its messages as shown here:
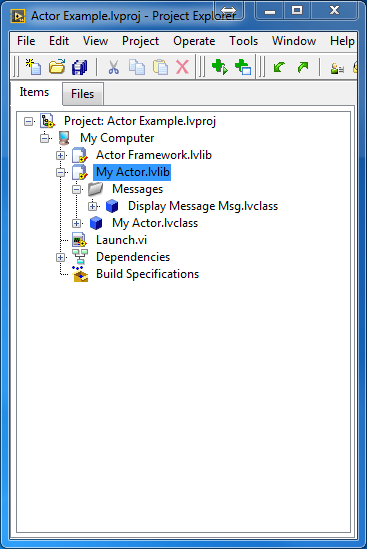
This will help you keep track of all of your classes as your project grows.
In future blog entries we will build some more complex actor-based applications to show the additional features of the AF.

 浙公网安备 33010602011771号