VS2019 开发Django(九)------内置模板和过滤器
紧接上篇,继续介绍Django中的模板,考虑可能篇幅过长,所以分为两部分来讲,今天的主要内容:
- 母版,继承关系。头部导航和页脚,是需要与其他页面共用的,那么,需要把这一部分提取出来,放在一个单独的layout.cshtml页面中,其他需要显示的页面,继承这个页面即可。
注意着色部分,{% load staticfiles %} 加载静态文件,静态文件按照项目默认配置,在App文件夹里边的static文件夹下边
注意着色部分,{% block content %}{% endblock %},block定义可以被子模板覆盖的块,通俗一点就是用来给子模板占位用的
从引用的静态文件我们可以看出来,使用了BootStrap前端框架,这个是VS在新建Django项目的时候默认添加的,那么就直接用这个前端框架来布局了layout.cshtml母版页
另外要提一下的是还引入了一个bootstrap-table.min.js,官方介绍:与一些最广泛使用的CSS框架集成的扩展表。(支持Bootstrap,语义UI,Bulma,Material Design,Foundation)
<!DOCTYPE html> <html lang="en" xmlns="http://www.w3.org/1999/xhtml"> <head> <meta charset="utf-8" /> <title></title> {% load staticfiles %} <link rel="stylesheet" type="text/css" href="{% static 'app/content/bootstrap.min.css' %}" /> <link rel="stylesheet" type="text/css" href="{% static 'app/content/bootstrap-table.min.css' %}" /> <script src="{% static 'hello/scripts/jquery-1.10.2.min.js' %}"></script> <script src="{% static 'hello/scripts/bootstrap.min.js' %}"></script> <script src="{% static 'hello/scripts/bootstrap-table.min.js' %}"></script> <script src="{% static 'hello/scripts/bootstrap-table-zh-CN.min.js' %}"></script> </head> <body> <div id="myModal" class="modal fade" tabindex="-1" role="dialog"> <div class="modal-dialog" role="document"> <div class="modal-content"> <div class="modal-header"> <button type="button" class="close" data-dismiss="modal" aria-label="Close"><span aria-hidden="true">×</span></button> <h4 class="modal-title"></h4> </div> <div class="modal-body"> <p></p> </div> <div class="modal-footer"> <button type="button" class="btn btn-default" data-dismiss="modal">关闭</button> </div> </div> </div> </div> <div class="navbar navbar-inverse navbar-fixed-top"> <div class="container"> <div class="navbar-header"> <button type="button" class="navbar-toggle" data-toggle="collapse" data-target=".navbar-collapse"> <span class="icon-bar"></span> <span class="icon-bar"></span> <span class="icon-bar"></span> </button> <a href="/" class="navbar-brand">DjangoLazyOrders</a> </div> <div class="navbar-collapse collapse"></div> </div> </div> <div class="container body-content"> {% block content %}{% endblock %} <hr /> <footer> <p>© {{ year }} - My DjangoLazyOrders Application</p> </footer> </div> {% block scripts %}{% endblock %} </body> </html>
母版页有了,那么,在子模板中怎么继承这个母版页呢?新建一个模板LazyOrders.cshtml,复制下面的代码贴进去,然后当前子模板的内容写在 block之间即可。注意extends标记声明了需要继承哪个母版页
{% extends "hello/layout.cshtml" %} {% block content %} ...... {% endblock %} - 其他常用标记。框架提供很多的标记,都是为了在渲染html文本的时候,更方便的表达而设计的标记,这里不一一做介绍,可以直接参考官方文档
for:循环数组中的每个项,使该项在上下文变量中可用。
if:{% if %}标签计算一个变量,如果该变量为“true”(即存在,不为空,也不是一个假布尔值),则输出块的内容。categorys为视图中调用render()函数传递的参数,上一篇中提到过。
到这一步,如果直接运行,并访问的话http://localhost:8090/hello/lazy_orders_index/,已经可以看到一个类别(categorys)的table展示出来了
<div class="panel panel-info">
                <div class="panel-heading">
                    <h3 class="panel-title">类别</h3>
                </div>
                <div class="panel-body">
                    <div class="list-op" id="list_op">
                        <button type="button" class="btn btn-default btn-sm" id="dgbtn_category_add">
                            <span class="glyphicon glyphicon-plus" aria-hidden="true"></span>新增
                        </button>
                        <button type="button" class="btn btn-default btn-sm" id="dgbtn_category_edit">
                            <span class="glyphicon glyphicon-pencil" aria-hidden="true"></span>修改
                        </button>
                        <button type="button" class="btn btn-default btn-sm" data-message="[删除]未选中任何行" id="dgbtn_category_delete">
                            <span class="glyphicon glyphicon-remove" aria-hidden="true"></span>删除
                        </button>
                    </div>
                    <table class="table table-hover table-bordered" id="dgtable_category">
                        <thead>
                            <tr>
                                <th></th>
                                <th>ID</th>
                                <th>类别名</th>
                            </tr>
                        </thead>
                        <tbody>
                            {% if categorys %} {% for category in categorys %}
                            <tr>
                                <td><input data-id="{{ category.category_id}}" type="checkbox" /></td>
                                <td>{{category.category_id}}</td>
                                <td>{{category.category_name}}</td>
                            </tr>
                            {% endfor %} {% else %}
                            <tr>
                                <td></td>
                            </tr>
                            {% endif %}
                        </tbody>
                    </table>

                </div>

            </div>
运行之后展示的效果如下:
图中展示的效果,每次单击某一行,这一行所在checkbox就被选中了,需要单独写JS脚本来操作dom,核心代码如下:每一行都有注释,就不做解释了。
$dgtable_category.on('click', 'tr', singleSelect);

function singleSelect(e) {
        let inputChild = $(this).find('input');//获取该行input元素
        let checkBoxs = $(this).parents('.table').find('input');//获取table中所有的input元素
        if (inputChild[0].checked) {//如果该行本来为选中状态 则置为非选中状态
            checkBoxs.prop('checked', false);
        } else {//如果该行为非选中状态
            checkBoxs.prop('checked', false);//先将table中所有的checkbox置为非选中状态
            inputChild.prop('checked', true);//然后将该行置为选中状态
        }

        var target = e.target;//如果点击的是checkbox而不是tr 那么需要单独处理
        if (target.type == "checkbox") {
            inputChild.prop('checked', !inputChild[0].checked);
        }
    }
对JS操作DOM不熟练的话,写这些代码还是需要花一定的时间的,虽然最终也能整出来,但是效率太低,如果有现成的框架有这些效果,那么,用起来就轻松很多,所以引入了Bootstrap Table这个组件,那么使用第三方组件的好处是什么呢?
1.花更短的时间,却能达到相同的效果,站在伟人的肩膀上更容易成功,不重复造轮子
2.服务器渲染html文本花费更少的时间,返回的html代码也更少,减少带宽
2)使用第三方组件Bootstrap Table渲染绑定数据
- 这部分,放到下一篇来介绍,因为想要介绍的内容还挺多,其次,夜又深了.....困了,想早点洗洗睡
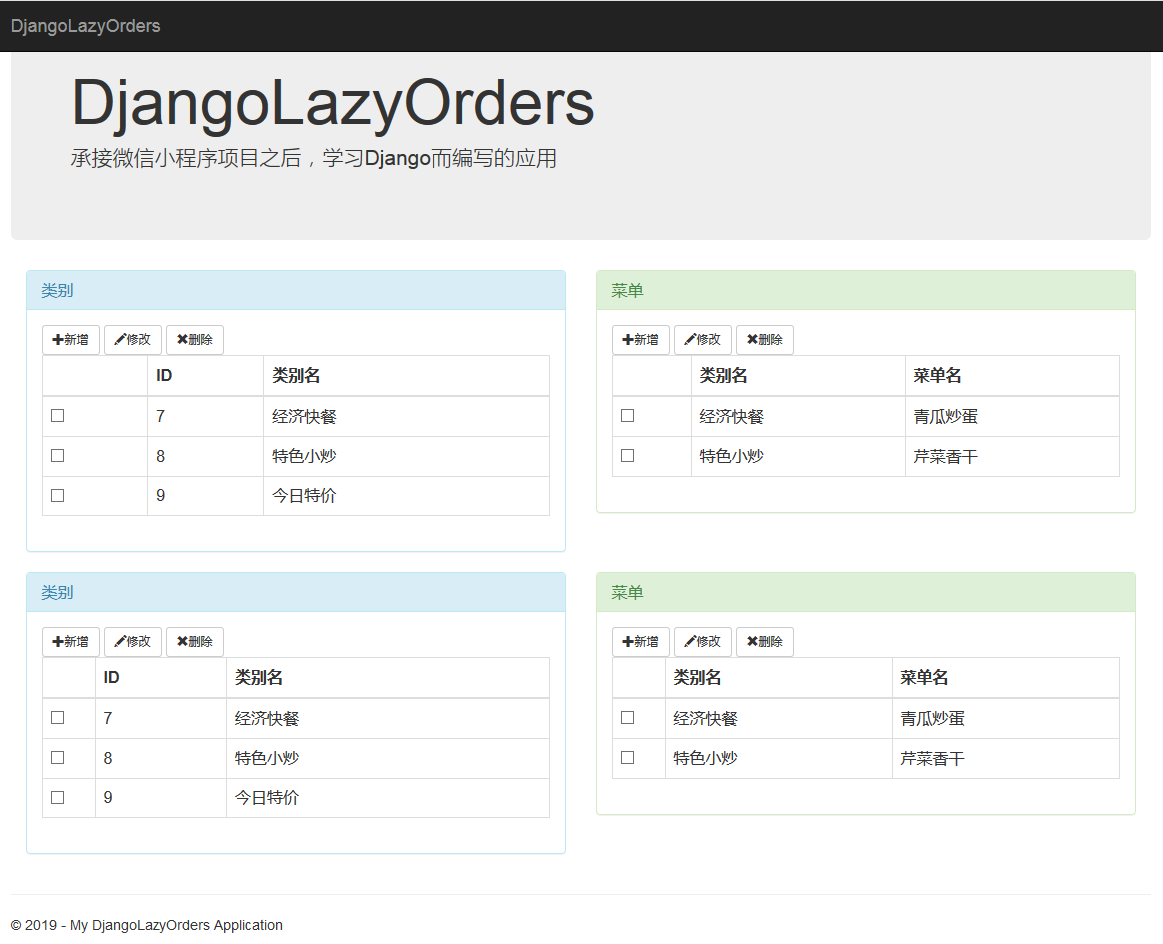
目前,呈现的效果如下图:前两个table中的效果是使用Django 标记渲染html呈现的效果,后两个table是使用BootStrap Table渲染数据的效果,涉及到Django的数据与JavaScript数据交互。


 浙公网安备 33010602011771号