Alibaba Seata 分布式事务管理
Alibaba Seata 分布式事务管理
1、简介
Seata 是一款开源的分布式事务解决方案,致力于提供高性能和简单易用的分布式事务服务。
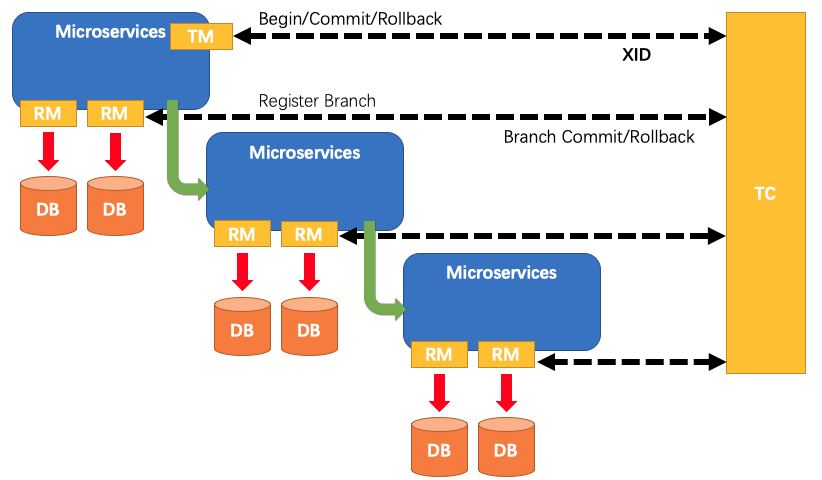
Seata有3个基本组成部分:
事务协调器(TC): 维护全局事务和分支事务的状态,驱动全局提交或回滚。
事务管理器TM: 定义全局事务的范围:开始全局事务,提交或回滚全局事务。
资源管理器(RM): 管理分支事务处理的资源,与TC交谈以注册分支事务和报告分支事务的状态,并驱动分支事务提交或回滚。
Seata管理的分布式事务的典型生命周期:
1、TM要求TC开始一项新的全局事务。TC生成代表全局事务的XID。
2、XID通过微服务的调用链传播。
3、RM将本地事务注册为XID到TC的相应全局事务的分支。
4、TM要求TC提交或回退相应的XID全局事务。
5、TC驱动XID的相应全局事务下的所有分支事务以完成分支提交或回滚。

2、Seata下载地址:
https://github.com/seata/seata/tags
解压后:

1、如果是1.0之前的版本 打开 conf 文件夹,找到 db_store.sql mysql脚本文件在mysql中建表,1.1.0解压后没有,参考下面的建表语句:
-- the table to store GlobalSession data
drop table if exists `global_table`;
create table `global_table` (
  `xid` varchar(128)  not null,
  `transaction_id` bigint,
  `status` tinyint not null,
  `application_id` varchar(32),
  `transaction_service_group` varchar(32),
  `transaction_name` varchar(128),
  `timeout` int,
  `begin_time` bigint,
  `application_data` varchar(2000),
  `gmt_create` datetime,
  `gmt_modified` datetime,
  primary key (`xid`),
  key `idx_gmt_modified_status` (`gmt_modified`, `status`),
  key `idx_transaction_id` (`transaction_id`)
);

-- the table to store BranchSession data
drop table if exists `branch_table`;
create table `branch_table` (
  `branch_id` bigint not null,
  `xid` varchar(128) not null,
  `transaction_id` bigint ,
  `resource_group_id` varchar(32),
  `resource_id` varchar(256) ,
  `lock_key` varchar(128) ,
  `branch_type` varchar(8) ,
  `status` tinyint,
  `client_id` varchar(64),
  `application_data` varchar(2000),
  `gmt_create` datetime,
  `gmt_modified` datetime,
  primary key (`branch_id`),
  key `idx_xid` (`xid`)
);

-- the table to store lock data
drop table if exists `lock_table`;
create table `lock_table` (
  `row_key` varchar(128) not null,
  `xid` varchar(96),
  `transaction_id` long ,
  `branch_id` long,
  `resource_id` varchar(256) ,
  `table_name` varchar(32) ,
  `pk` varchar(36) ,
  `gmt_create` datetime ,
  `gmt_modified` datetime,
  primary key(`row_key`)
);
各个表对应功能:
- 全局事务---global_table
- 分支事务---branch_table
- 全局锁-----lock_table
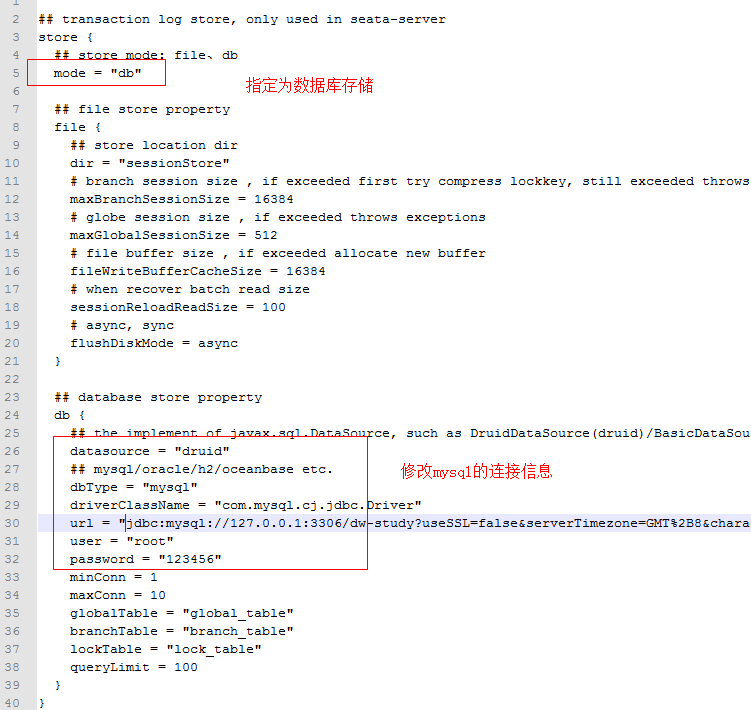
2、修改 file.conf 配置文件

因为我使用的是mysql8.0, 但是 /seata/lib 目录下的mysql驱动是

所以如果你也是mysql8.0,需要删除这个jar,重新添加:

3.修改conf文件夹下的 registry.conf, 根据自己的实际情况修改,nacos默认端口号是8848

使用案例:
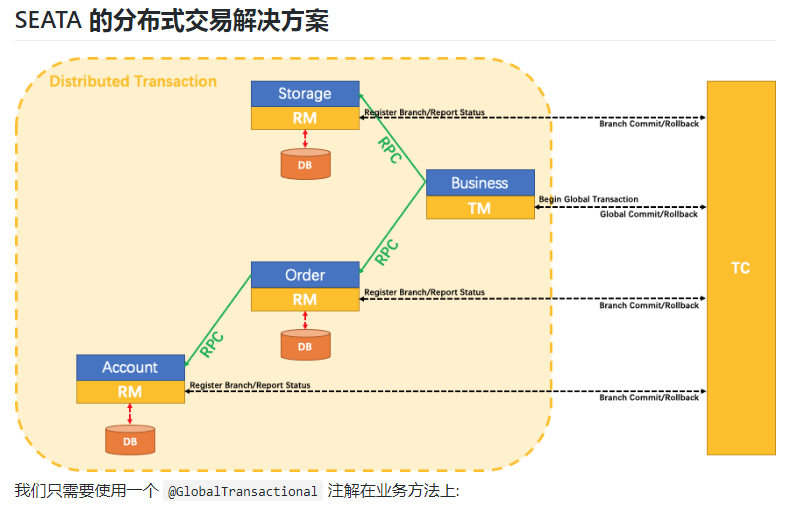
以用户购买商品的业务逻辑为例。整个业务逻辑由3个微服务提供支持:
- 仓储服务:对给定的商品扣除仓储数量。
- 订单服务:根据采购需求创建订单。
- 帐户服务:从用户帐户中扣除余额。
如果该操作跨越3个不同的数据库来操作,那么就存在分布式事务的问题。


测试开始:
1: 创建3个数据库: seata_order(订单)、 seata_storage(库存)、seata_account(用户的账户信息)
分别创建对应的表:order、storage、account表
2: 每个库都创建 db_undo_log.sql 里面的表,同样的Seata1.0之前的版本conf下面有,1.0之后的参考下面:
-- the table to store seata xid data
-- 0.7.0+ add context
-- you must to init this sql for you business databese. the seata server not need it.
-- 此脚本必须初始化在你当前的业务数据库中,用于AT 模式XID记录。与server端无关(注:业务数据库)
-- 注意此处0.3.0+ 增加唯一索引 ux_undo_log
drop table `undo_log`;
CREATE TABLE `undo_log` (
  `id` bigint(20) NOT NULL AUTO_INCREMENT,
  `branch_id` bigint(20) NOT NULL,
  `xid` varchar(100) NOT NULL,
  `context` varchar(128) NOT NULL,
  `rollback_info` longblob NOT NULL,
  `log_status` int(11) NOT NULL,
  `log_created` datetime NOT NULL,
  `log_modified` datetime NOT NULL,
  `ext` varchar(100) DEFAULT NULL,
  PRIMARY KEY (`id`),
  UNIQUE KEY `ux_undo_log` (`xid`,`branch_id`)
) ENGINE=InnoDB AUTO_INCREMENT=1 DEFAULT CHARSET=utf8;
建java服务项目:
1、maven依赖:
<dependencies>
        <!--cloud alibaba nacos- discovery-->
        <dependency>
            <groupId> com.alibaba.cloud </groupId>
            <artifactId>spring-cloud-starter-alibaba-nacos-discovery</artifactId>
        </dependency>
        <!-- https://mvnrepository.com/artifact/com.alibaba.cloud/spring-cloud-starter-alibaba-seata -->
        <dependency>
            <groupId>com.alibaba.cloud</groupId>
            <artifactId>spring-cloud-starter-alibaba-seata</artifactId>
            <exclusions>
                <exclusion>
                    <artifactId>seata-all</artifactId>
                    <groupId>io.seata</groupId>
                </exclusion>
            </exclusions>
        </dependency>

        <!--seata-all 与下载的server保持一致 -->
        <dependency>
            <groupId>io.seata</groupId>
            <artifactId>seata-all</artifactId>
            <version>1.1.0</version>
        </dependency>

        <!-- openFeign -->
        <dependency>
            <groupId>org.springframework.cloud</groupId>
            <artifactId>spring-cloud-starter-openfeign</artifactId>
        </dependency>

        <dependency>
            <groupId>org.springframework.boot</groupId>
            <artifactId>spring-boot-starter-web</artifactId>
        </dependency>

        <dependency>
            <groupId>org.springframework.boot</groupId>
            <artifactId>spring-boot-starter-actuator</artifactId>
        </dependency>

        <dependency>
            <groupId>org.springframework.boot</groupId>
            <artifactId>spring-boot-devtools</artifactId>
            <scope>runtime</scope>
            <optional>true</optional>
        </dependency>

        <dependency>
            <groupId>org.projectlombok</groupId>
            <artifactId>lombok</artifactId>
            <optional>true</optional>
        </dependency>
<!-- Druid 数据库连接池 -->
<dependency>
    <groupId>com.alibaba</groupId>
    <artifactId>druid-spring-boot-starter</artifactId>
    <version>1.1.5</version>
</dependency>
<dependency>
    <groupId>org.mybatis.spring.boot</groupId>
    <artifactId>mybatis-spring-boot-starter</artifactId>
    <version>2.1.2</version>
</dependency>
</dependencies>
2、yml:
server:
  port: 2001

spring:
  application:
    name: seata-order-service
  cloud:
    alibaba:
      seata:
       # 自定义的事务组名称,需要与seata-server 的conf文件里面配置的一致
        tx-service-group: default
    nacos:
      discovery:
        server-addr: localhost:8848
  datasource:
    druid:
      driver-class-name: com.mysql.jdbc.Driver
      url: jdbc:mysql://192.168.2.241:3306/common_dev_scheme?useSSL=false&characterEncoding=utf8&autoReconnect=true
      username: root
      password: 123456
      filters: stat
      # 设置最大数据库连接数,设为0为无限制
      maxActive: 20
      # 配置初始化大小、最小、最大
      initialSize: 1
      #  最大等待时间
      maxWait: 60000
      # 始终保留在池中的最小连接数,如果连接验证失败将缩小至此值
      minIdle: 1
      timeBetweenEvictionRunsMillis: 6000
#      连接在池中保持空闲而不被回收的最小时间(毫秒)
      minEvictableIdleTimeMillis: 30000
      validationQuery: select 'x'
#      对池中空闲的连接是否进行验证,验证失败则回收此连接(默认为false)
      testWhileIdle:  true
#       当从连接池中取出一个连接时是否进行验证,若验证失败则从池中删除该连接并尝试取出另一个连接
      testOnBorrow: true
#      当一个连接使用完归还到连接池时是否进行验证
      testOnReturn: false
#      启用游标缓存,这个对数据库的性能提升很大
      poolPreparedStatements: true
#        要启用PSCache,必须配置大于0,当大于0时,poolPreparedStatements自动触发修改为true。在Druid中,不会存在Oracle下PSCache占用内存过多的问题,可以把这个数值配置大一些,比如说100
      maxOpenPreparedStatements: 20
      filter:
        stat:
          log-slow-sql: true
          slow-sql-millis: 2000
mybatis:
  mapper-locations: classpath:mapper/*.xml
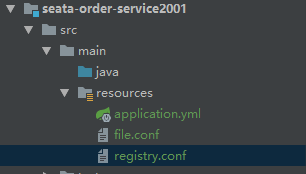
3、拷贝seata-server包下面的 file.conf 和 registry.conf 到resource目录下

我们需要排除掉SpringBoot默认自动注入的 DataSourceAutoConfigurationBean , 因为SEATA是基于数据源拦截来实现的分布式事务,因此,我们需要自定义数据源配置信息:
@SpringBootApplication(exclude = DataSourceAutoConfiguration.class)
package com.geekplus.broadway.ws.tally.application;
import com.alibaba.druid.pool.DruidDataSource;
import io.seata.rm.datasource.DataSourceProxy;
import org.apache.ibatis.session.SqlSessionFactory;
import org.mybatis.spring.SqlSessionFactoryBean;
import org.mybatis.spring.transaction.SpringManagedTransactionFactory;
import org.springframework.boot.context.properties.ConfigurationProperties;
import org.springframework.context.annotation.Bean;
import org.springframework.context.annotation.Configuration;
import org.springframework.context.annotation.Primary;
import org.springframework.core.io.support.PathMatchingResourcePatternResolver;
import javax.sql.DataSource;
@Configuration
public class DataSourceConfiguration {
    @Bean
    @ConfigurationProperties(prefix = "spring.datasource")
    public DataSource druidDataSource(){
        DruidDataSource druidDataSource = new DruidDataSource();
        return druidDataSource;
    }
    @Primary
    @Bean("dataSource")
    public DataSourceProxy dataSource(DataSource druidDataSource){
        return new DataSourceProxy(druidDataSource);
    }
    @Bean
    public SqlSessionFactory sqlSessionFactory(DataSourceProxy dataSourceProxy)throws Exception{
        SqlSessionFactoryBean sqlSessionFactoryBean = new SqlSessionFactoryBean();
        sqlSessionFactoryBean.setDataSource(dataSourceProxy);
        sqlSessionFactoryBean.setMapperLocations(new PathMatchingResourcePatternResolver()
                .getResources("classpath*:/com.dw.study/*.xml"));
        sqlSessionFactoryBean.setTransactionFactory(new SpringManagedTransactionFactory());
        return sqlSessionFactoryBean.getObject();
    }
}
该配置类,一般放在与启动类相同的目录即可!
使用全局事务:


