
【iOS ARKit】同时开启前后摄像头BlendShapes
在上一节中已经了解了 iOS ARkit 进行BlendShapes的基本操作,这一小节继续实践同时开启前后摄像头进行人脸捕捉和世界追踪。
iOS设备配备了前后两个摄像头,在运行AR 应用时,需要选择使用哪个摄像头作为图像输人。最常见的AR 体验使用设备后置摄像头进行世界跟踪、虚实融合,通常使用 ARWorldTrackingConfiguration 配置跟踪使用者的真实环境。除了进行虚实融合,我们通常还利用后置摄像头采集的图像信息评估真实世界中的光照情况、对真实环境中的2D图像或者3D物体进行检测等。
对具备前置深度相机(TrueDepth Camera)或者A12及以上处理器的设备,使用 ARFaceTrackingConfiguration配置可以实时进行人脸检测跟踪,实现人脸姿态和表情的捕捉。拥有前置深度相机或 A12及以上处理器硬件的iPhone/iPad,在运行iOS 13及以上系统时,还可以同时开启设备前后摄像头,即同时进行人脸检测和世界跟踪。这是一项非常有意义且实用的功能,意味着使用者可以使用表情控制场景中的虚拟物体,实现除手势与语音之外的另一种交互方式。
在 RealityKit 中,同时开启前后摄像头需要使用 ARFaceTrackingConfiguration 配置或者ARWorldTrackingConfiguration 配置之一。使用 ARFaceTracking Configuration 配置时将其 supportsWorldTracking属性设置为 true,使用 ARWorldTrackingConfiguration 配置时将其 userFaceTrackingEnabled 属性设置为true 都可以在支持人脸检测的设备上同时开启前后摄像头。
同时开启前后摄像头后,RealityKit 会使用后置摄像头跟踪现实世界,同时也会通过前置摄像头实时检测人脸信息,包括人脸表情信息。
需要注意的是,并不是所有设备都支持同时开启前后摄像头,只有符合前文所描述的设备才支持该功能,因此,在使用之前也应当对该功能的支持情况进行检查。在不支持同时开启前后摄像头的设备上应当执行另外的策略,如提示用户进行只使用单个摄像头的操作。
在下面的演示中,我们会利用后置摄像头的平面检测功能,在检测到的水平平面上放置机器头像模型,然后利用从前置摄像头中捕获的人脸表情信息驱动头像模型。核心代码如代码如下所示。
1 2 3 4 5 6 7 8 9 10 11 12 13 14 15 16 17 18 19 20 21 22 23 24 25 26 27 28 29 30 31 32 33 34 35 36 37 38 39 40 41 42 43 44 45 46 47 48 49 50 51 52 53 54 55 56 57 58 59 60 61 62 63 64 | //// BlendShapeRobot.swift// ARKitDeamo//// Created by zhaoquan du on 2024/1/25.//import SwiftUIimport ARKitimport RealityKitstruct BlendShapeRobot: View { var body: some View { BlendShapeRobotContainer().edgesIgnoringSafeArea(.all) }}struct BlendShapeRobotContainer :UIViewRepresentable{ func makeUIView(context: Context) -> ARView { let arView = ARView(frame: .zero) return arView } func updateUIView(_ uiView: UIViewType, context: Context) { guard ARFaceTrackingConfiguration.isSupported else { return } let config = ARWorldTrackingConfiguration() config.userFaceTrackingEnabled = true config.isLightEstimationEnabled = true config.worldAlignment = .gravity config.planeDetection = .horizontal uiView.session.delegate = context.coordinator uiView.automaticallyConfigureSession = false uiView.session.run(config, options: []) let planeAnchor = AnchorEntity(plane:.horizontal) planeAnchor.addChild(context.coordinator.robotHead) uiView.scene.addAnchor(planeAnchor) } func makeCoordinator() -> Coordinator { Coordinator() } class Coordinator: NSObject, ARSessionDelegate{ var robotHead = RobotHead() func session(_ session: ARSession, didUpdate anchors: [ARAnchor]) { for anchor in anchors { guard let anchor = anchor as? ARFaceAnchor else { continue } robotHead.update(with: anchor) } } } } |
在代码中,我们首先对设备支持情况进行检查,在确保设备支持同时开启前后摄像头功能时使用 ARWorldTrackingConfiguration 配置并运行 AR进程,然后在检测到平面时将机器头像模型放置于平面上,最后利用 session(didUpdate frame:) 代理方法使用实时捕获到的人脸表情数据更新机器头像模型,从而达到了使用人脸表情驱动场景中模型的目的。需要注意的是代码中 userFaceTrackingEnabled 必须设置为true,并且开启平面检测功能,另外,为更好地组织代码,我们将与模型及表情驱动相关的代码放到了RobotHead类中。RobotHead类用于管理机器头像模型加载及使用表情数据驱动模型的工作,关键代码如下所示。
1 2 3 4 5 6 7 8 9 10 11 12 13 14 15 16 17 18 19 20 21 22 23 24 25 26 27 28 29 30 31 32 33 34 35 36 37 38 39 40 41 42 43 44 45 46 47 48 49 50 51 52 53 54 55 56 57 58 59 60 61 62 63 64 65 66 67 68 69 70 71 72 73 74 75 76 77 78 79 80 81 82 83 84 85 86 87 88 89 90 91 92 93 94 95 96 97 98 99 100 101 102 103 104 105 106 107 108 109 110 111 112 113 114 115 116 117 118 119 120 121 122 123 124 125 126 127 128 129 130 131 132 133 134 135 136 137 138 139 140 141 142 143 144 145 146 147 148 149 150 151 152 | //// RobotHead.swift// ARKitDeamo//// Created by zhaoquan du on 2024/1/25.//import RealityKitimport ARKitclass RobotHead: Entity, HasModel { // Default color values private let eyeColor: SimpleMaterial.Color = .blue private let eyebrowColor: SimpleMaterial.Color = .brown private let headColor: SimpleMaterial.Color = .green private let lipColor: SimpleMaterial.Color = .lightGray private let mouthColor: SimpleMaterial.Color = .gray private let tongueColor: SimpleMaterial.Color = .red private let clearColor: SimpleMaterial.Color = .clear private var originalJawY: Float = 0 private var originalUpperLipY: Float = 0 private var originalEyebrowY: Float = 0 private lazy var eyeLeftEntity = findEntity(named: "eyeLeft")! private lazy var eyeRightEntity = findEntity(named: "eyeRight")! private lazy var eyebrowLeftEntity = findEntity(named: "eyebrowLeft")! private lazy var eyebrowRightEntity = findEntity(named: "eyebrowRight")! private lazy var jawEntity = findEntity(named: "jaw")! private lazy var upperLipEntity = findEntity(named: "upperLip")! private lazy var headEntity = findEntity(named: "head")! private lazy var tongueEntity = findEntity(named: "tongue")! private lazy var mouthEntity = findEntity(named: "mouth")! private lazy var jawHeight: Float = { let bounds = jawEntity.visualBounds(relativeTo: jawEntity) return (bounds.max.y - bounds.min.y) }() private lazy var height: Float = { let bounds = headEntity.visualBounds(relativeTo: nil) return (bounds.max.y - bounds.min.y) }() required init() { super.init() if let robotHead = try? Entity.load(named: "robotHead") { robotHead.position.y += 0.05 addChild(robotHead) } else { fatalError("无法加载模型.") } originalJawY = jawEntity.position.y originalUpperLipY = upperLipEntity.position.y originalEyebrowY = eyebrowLeftEntity.position.y setColor() } func setColor(){ headEntity.color = headColor eyeLeftEntity.color = eyeColor eyeRightEntity.color = eyeColor eyebrowLeftEntity.color = eyebrowColor eyebrowRightEntity.color = eyebrowColor upperLipEntity.color = lipColor jawEntity.color = lipColor mouthEntity.color = mouthColor tongueEntity.color = tongueColor } // MARK: - Animations /// - Tag: InterpretBlendShapes func update(with faceAnchor: ARFaceAnchor) { // Update eyes and jaw transforms based on blend shapes. let blendShapes = faceAnchor.blendShapes guard let eyeBlinkLeft = blendShapes[.eyeBlinkLeft] as? Float, let eyeBlinkRight = blendShapes[.eyeBlinkRight] as? Float, let eyeBrowLeft = blendShapes[.browOuterUpLeft] as? Float, let eyeBrowRight = blendShapes[.browOuterUpRight] as? Float, let jawOpen = blendShapes[.jawOpen] as? Float, let upperLip = blendShapes[.mouthUpperUpLeft] as? Float, let tongueOut = blendShapes[.tongueOut] as? Float else { return } eyebrowLeftEntity.position.y = originalEyebrowY + 0.03 * eyeBrowLeft eyebrowRightEntity.position.y = originalEyebrowY + 0.03 * eyeBrowRight tongueEntity.position.z = 0.1 * tongueOut jawEntity.position.y = originalJawY - jawHeight * jawOpen upperLipEntity.position.y = originalUpperLipY + 0.05 * upperLip eyeLeftEntity.scale.z = 1 - eyeBlinkLeft eyeRightEntity.scale.z = 1 - eyeBlinkRight let cameraTransform = self.parent?.transformMatrix(relativeTo: nil) let faceTransformFromCamera = simd_mul(simd_inverse(cameraTransform!), faceAnchor.transform) let rotationEulers = faceTransformFromCamera.eulerAngles let mirroredRotation = Transform(pitch: rotationEulers.x, yaw: -rotationEulers.y + .pi, roll: rotationEulers.z) self.orientation = mirroredRotation.rotation }}extension Entity { var color: SimpleMaterial.Color? { get { if let model = components[ModelComponent.self] as? ModelComponent, let color = (model.materials.first as? SimpleMaterial)?.color.tint { return color } return nil } set { if var model = components[ModelComponent.self] as? ModelComponent { if let color = newValue { model.materials = [SimpleMaterial(color: color, isMetallic: false)] } else { model.materials = [] } components[ModelComponent.self] = model } } }}extension simd_float4x4 { // Note to ourselves: This is the implementation from AREulerAnglesFromMatrix. // Ideally, this would be RealityKit API when this sample gets published. var eulerAngles: SIMD3<Float> { var angles: SIMD3<Float> = .zero if columns.2.y >= 1.0 - .ulpOfOne * 10 { angles.x = -.pi / 2 angles.y = 0 angles.z = atan2(-columns.0.z, -columns.1.z) } else if columns.2.y <= -1.0 + .ulpOfOne * 10 { angles.x = -.pi / 2 angles.y = 0 angles.z = atan2(columns.0.z, columns.1.z) } else { angles.x = asin(-columns.2.y) angles.y = atan2(columns.2.x, columns.2.z) angles.z = atan2(columns.0.y, columns.1.y) } return angles }} |
在代码中,我们首先从 ARFaceAnchor 中获取 BendShapes 表情运动因子集合,并从中取出感兴趣的运动因子,然后利用这些表情因子对机器头像模型中的子实体对象相关属性进行调整,最后处理了人脸与模型旋转关系的对应问题。
在支持同时开启前置与后置摄像头的设备上编译运行,当移动设备在检测到的水平平面时放置好机器头像模型,将前置摄像头对准人脸,可以使用人脸表情驱动机器头像模型,当人体头部旋转时,机器头像模理也会相应地进行旋转,实现效果如图 所示。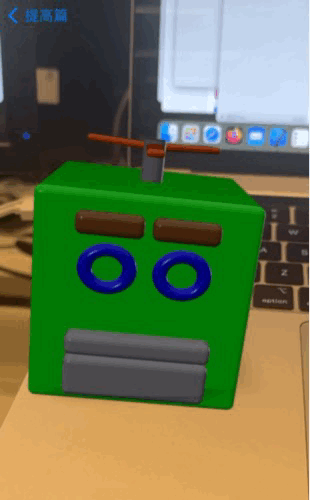
以上演示的是一个简单的实例,完整实现了利用前置摄像头采集的人脸表情信息控制后置摄像头模型的功能。在使用前置摄像头时,后置摄像头可以进行世界追踪。 由于Realiy Kit 目前沒有控制网格变形的函数,要实现利用人脸表情控制驱动模型的功能,需要手动进行人脸表情与模型状态变化的绑定,人工计算模型中各因子对应的位置与方问,这是一个比较容易出错的过程。经过测试发现,ARKit 对人脸表情的捕捉还是比较准确的,在使用配备深度相机的设备时,捕捉精度较高,可以应付一般应用需求。


【推荐】国内首个AI IDE,深度理解中文开发场景,立即下载体验Trae
【推荐】编程新体验,更懂你的AI,立即体验豆包MarsCode编程助手
【推荐】抖音旗下AI助手豆包,你的智能百科全书,全免费不限次数
【推荐】轻量又高性能的 SSH 工具 IShell:AI 加持,快人一步
· 地球OL攻略 —— 某应届生求职总结
· 周边上新:园子的第一款马克杯温暖上架
· Open-Sora 2.0 重磅开源!
· 提示词工程——AI应用必不可少的技术
· .NET周刊【3月第1期 2025-03-02】