最小化centos7 安装 oracle 数据库
最小化centos7 安装 oracle 数据库
一、系统安装
oracle的安装需要一些基础条件 :swap分区8G 磁盘空间大于30G
- 创建虚拟机并加载iso镜像
- 进入安装界面
- 如下截图操作即可

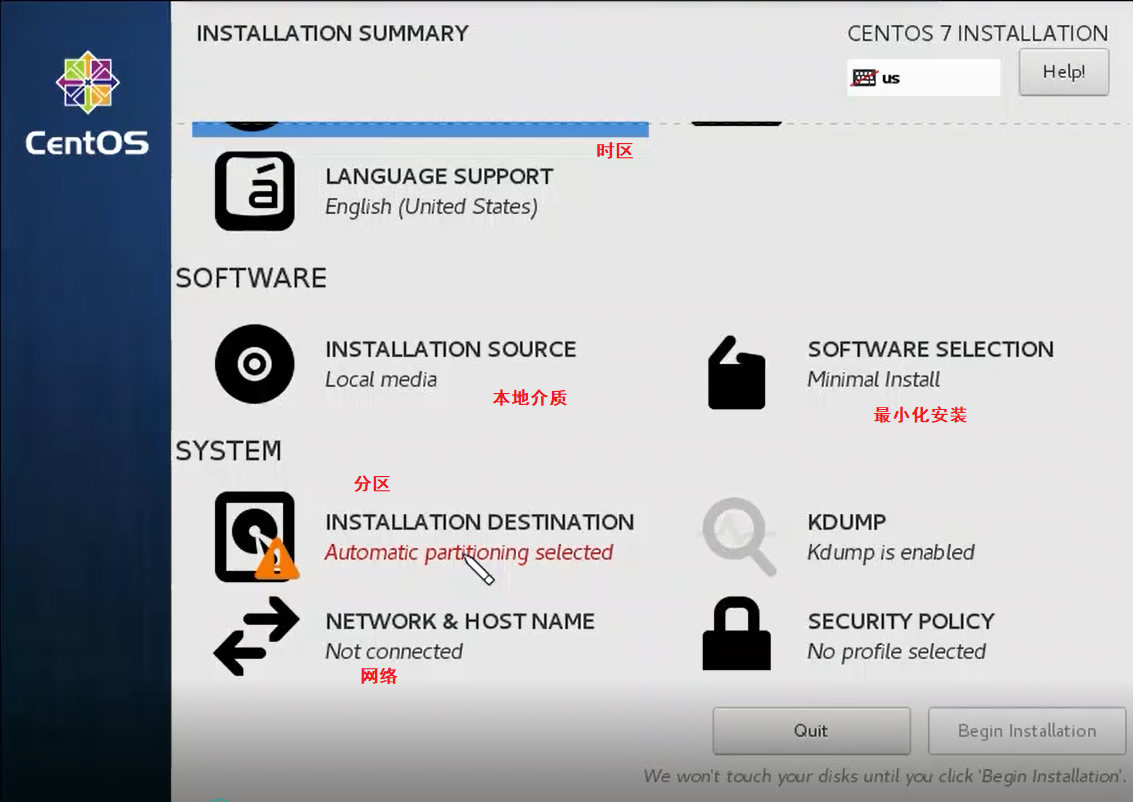
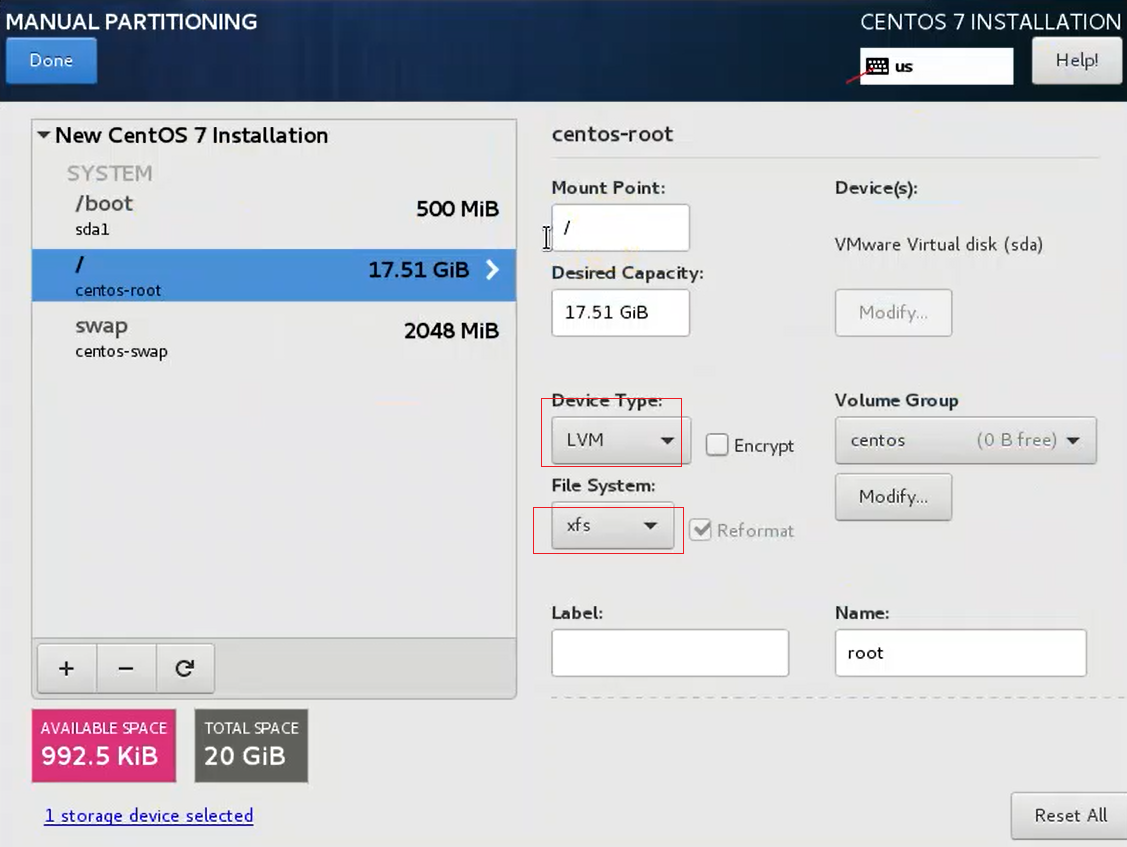
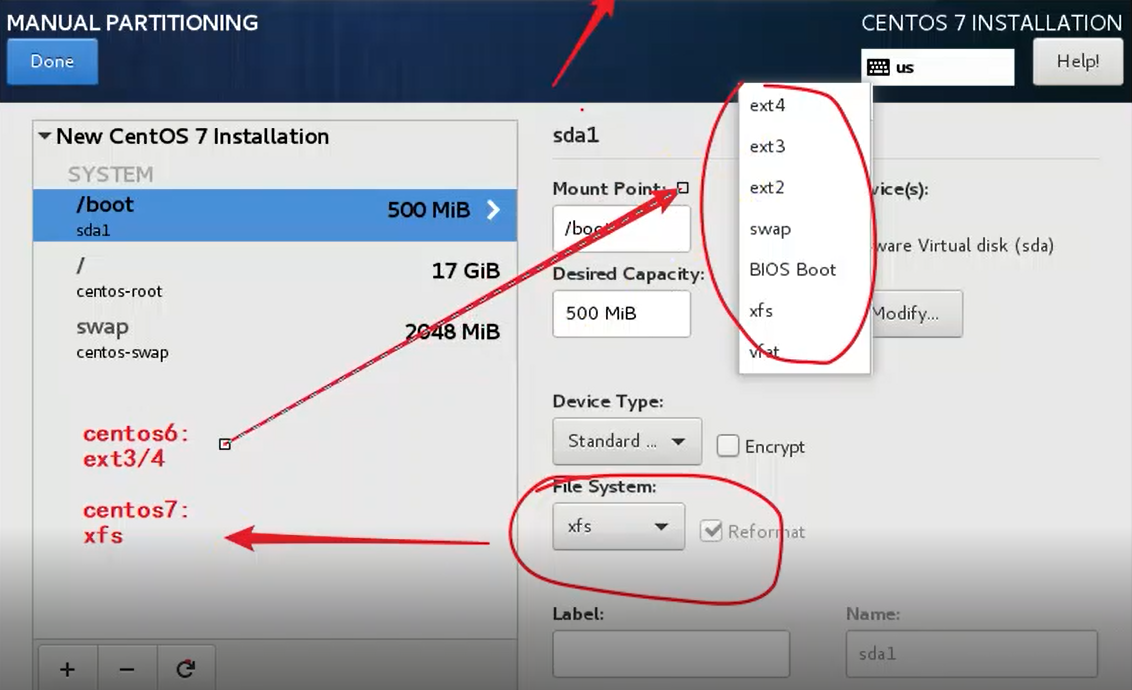
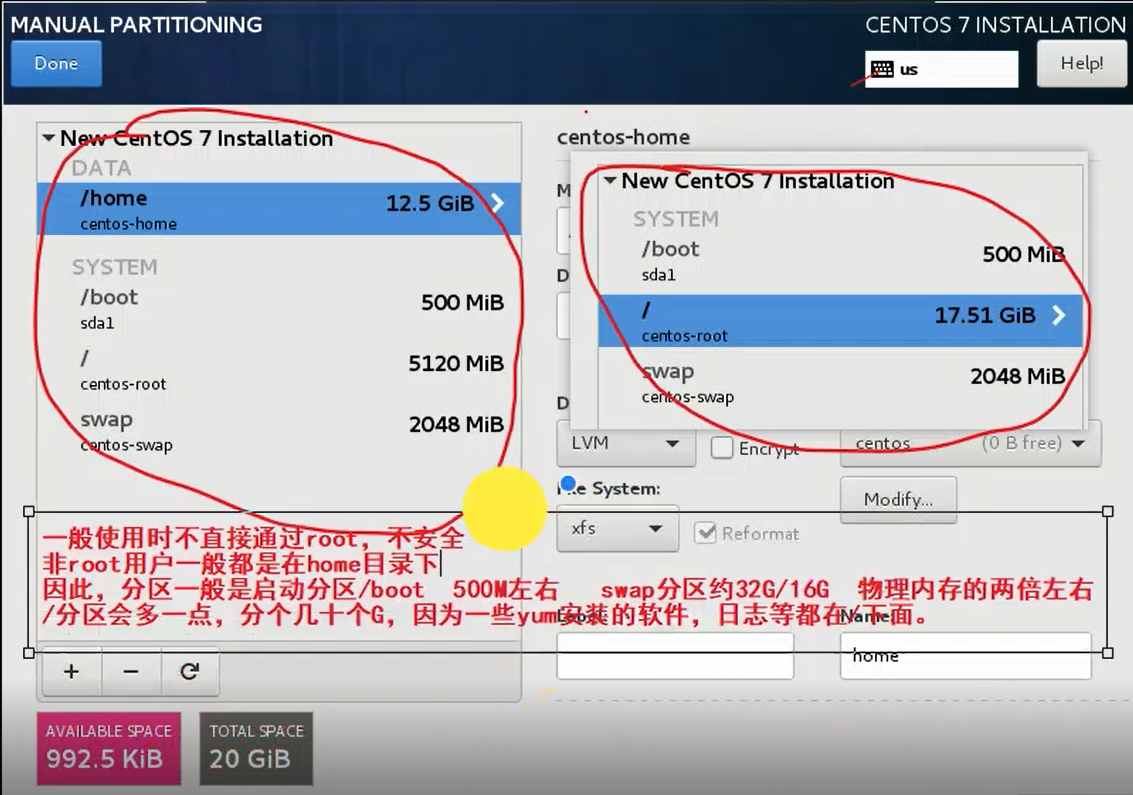
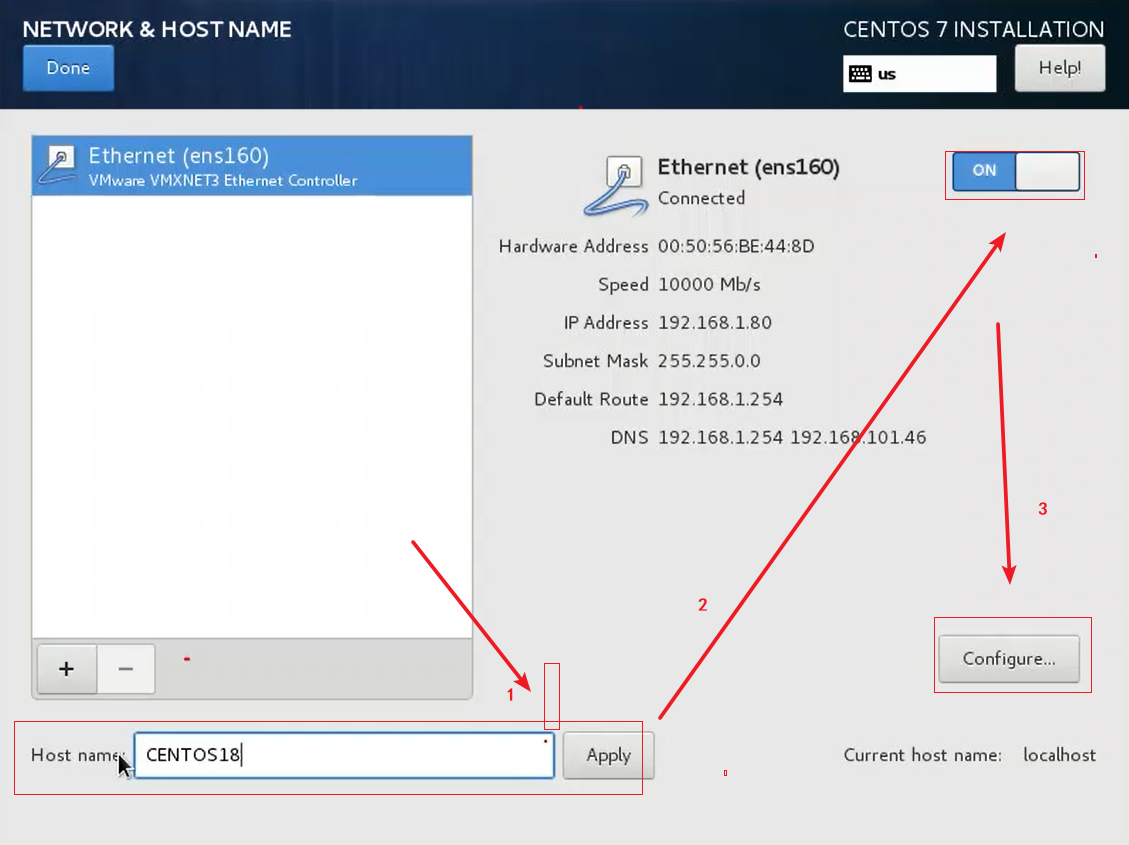
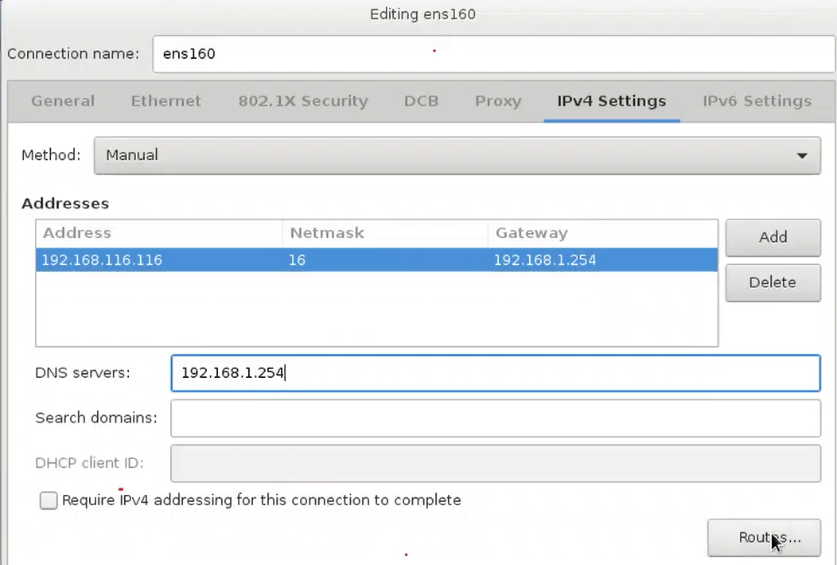
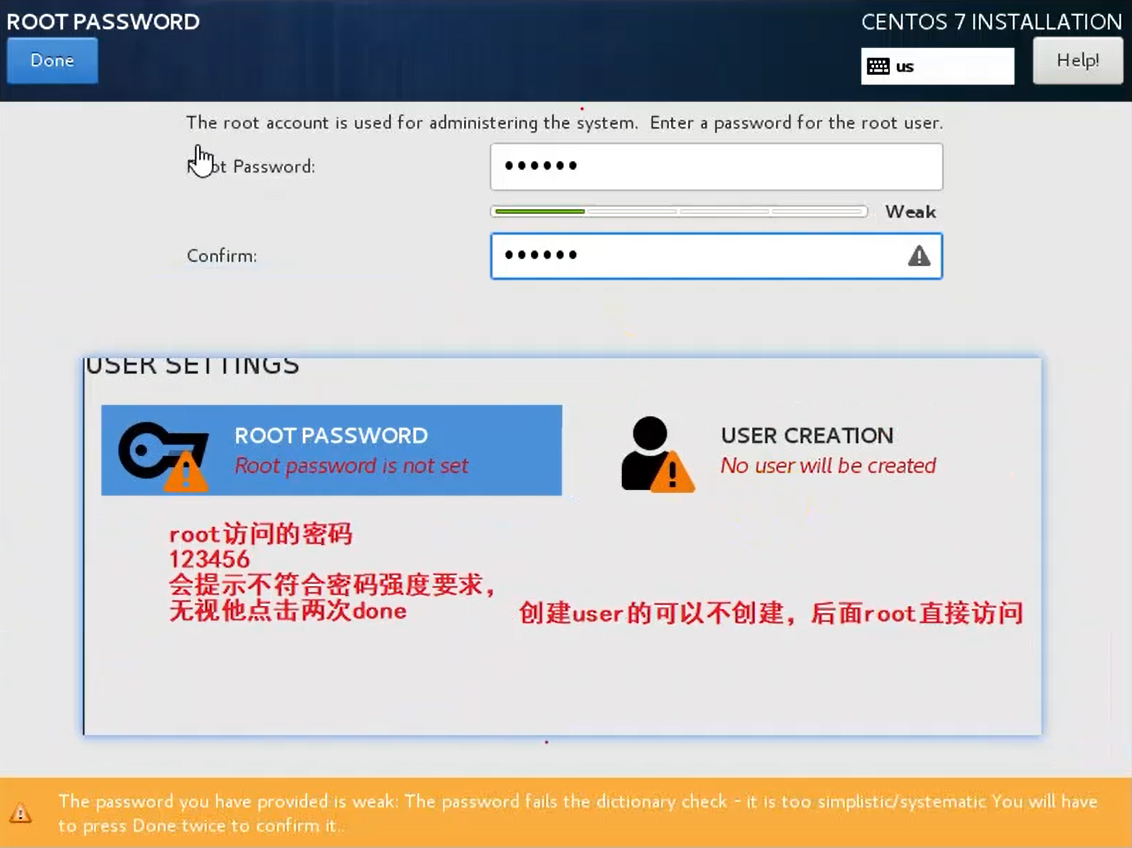
二、服务器初始化
1.防火墙
sed -i "s#SELINUX=enforcing#SELINUX=disabled#g" /etc/selinux/config
setenforce 0
systemctl stop firewalld
systemctl disable firewalld
2.用户属组
groupadd oinstall
groupadd dba
useradd -g oinstall -g dba -m oracle
passwd oracle
id oracle  ##返回值 uid=1000(oracle) gid=1001(dba) groups=1001(dba)
3.创建目录
mkdir -p /app/oracle
mkdir -p /app/oraInventory
mkdir -p /app/database

chown -R oracle:oinstall /app
4.系统支持
##CentOS系统默认不支持oracle数据库安装,需要修改系统标识为redhat-7
echo "redhat-7" /etc/redhat-release
5.系统优化
vi /etc/sysctl.conf

net.ipv4.icmp_echo_ignore_broadcasts = 1
net.ipv4.conf.all.rp_filter = 1
fs.file-max = 6815744
fs.aio-max-nr = 1048576
kernel.shmall = 2097152
kernel.shmmax = 4100737024
kernel.shmmni = 4096
kernel.sem = 250 32000 100 128
net.ipv4.ip_local_port_range = 9000 65500
net.core.rmem_default = 262144
net.core.rmem_max= 4194304
net.core.wmem_default= 262144
net.core.wmem_max= 1048576

sysctl -p

vi /etc/security/limits.conf

oracle soft nproc 2048
oracle hard nproc 16384
oracle soft nofile 1024
oracle hard nofile 65536
6.oracle环境变量
su - oracle
cd
vi .bash_profile
# export PATH
export ORACLE_BASE=/app/oracle
export ORACLE_HOME=$ORACLE_BASE/product/11.2.0/db_1
export ORACLE_SID=orcl
export ORACLE_TERM=xterm
export PATH=$ORACLE_HOME/bin:/user/sbin:$PATH
export LD_LIBRARY_PATH=$ORACLE_HOME/lib:/lib:/usr/lib
export LANG=C
export NLS_LANG="SIMPLIFIED CHINESE_CHINA.AL32UTF8"

source /home/oracle/.bash_profile
7.主机名与jdk
exit 切换 root
hostnamectl set-hostname oracle-m

wget http://192.168.38.38:81/cdh/oracle-j2sdk1.8-1.8.0+update181-1.x86_64.rpm
yum install -y oracle-j2sdk1.8-1.8.0+update181-1.x86_64.rpm
8.依赖
yum -y install binutils compat-libcap1 compat-libstdc++-33 compat-libstdc++-33*i686  \
	compat-libstdc++-33  gcc gcc-c++ glibc glibc*.i686 \
	glibc-devel glibc-devel*.i686 ksh libaio libaio*.i686 \
	libaio-devel libgcc libgcc*.i686 libstdc++ libstdc++*.i686 \
	libstdc++-devel libXi libXi*.i686 libXtst libXtst*.i686 make \
	sysstat unixODBC unixODBC*.i686 unixODBC-devel unixODBC-devel*.i686

yum -y install libXp libXp-devel libXpm-devel telnet
9.图形化界面
yum groupinstall -y "X Window System"
yum groupinstall -y "GNOME Desktop" "Graphical Administration Tools"
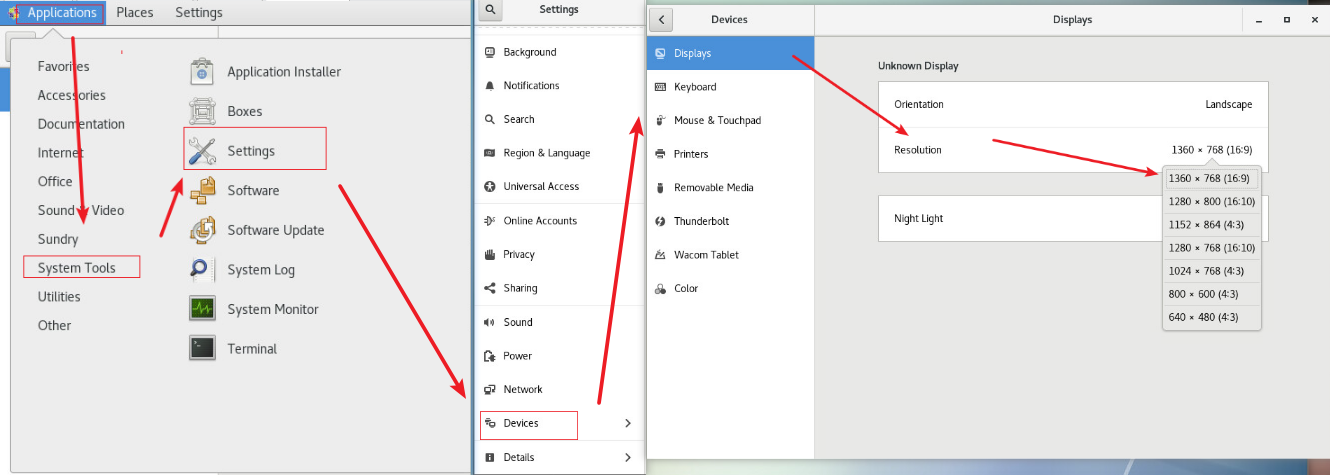
##分辨率问题看下图
三、数据库安装
链接:https://pan.baidu.com/s/1qZ0YWGzH9_utmrxfuouRFA
提取码:91dd
1.下载并上传解压
##文件资源,下载到的,本次安装实际用到的是1 和 2
unzip p13390677_112040_Linux-x86-64_1of7.zip -d /app/database/
unzip p13390677_112040_Linux-x86-64_2of7.zip -d /app/database/
unzip p13390677_112040_Linux-x86-64_3of7.zip -d /app/database/
unzip p13390677_112040_Linux-x86-64_4of7.zip -d /app/database/
unzip p13390677_112040_Linux-x86-64_5of7.zip -d /app/database/
unzip p13390677_112040_Linux-x86-64_6of7.zip -d /app/database/
unzip p13390677_112040_Linux-x86-64_7of7.zip -d /app/database/
注意权限
chown -R oracle:oinstall /app
2.界面安装
## 进入图形化界面 init 5 切换oracle用户
cd /app/database/database/
./runInstaller
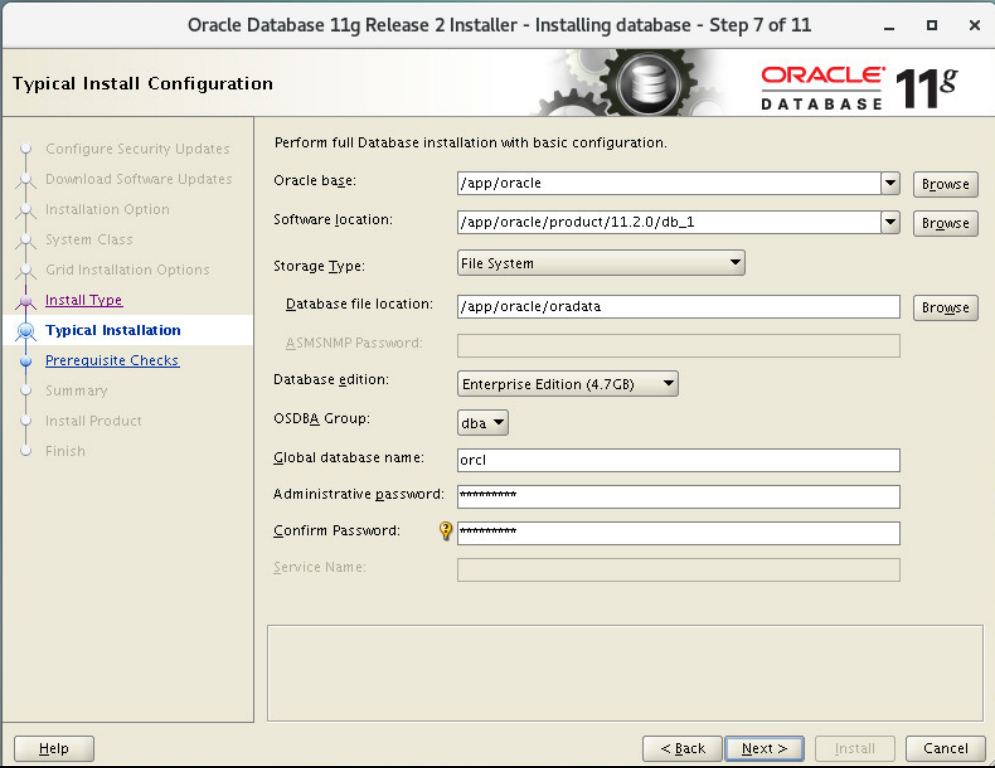
3.看图
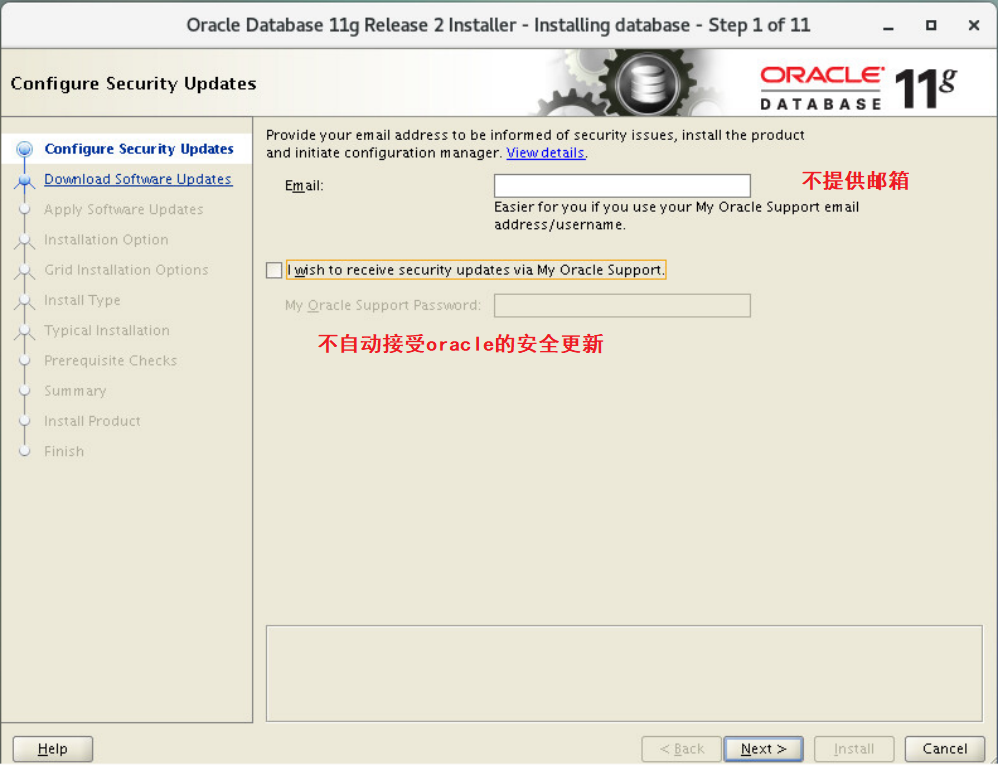
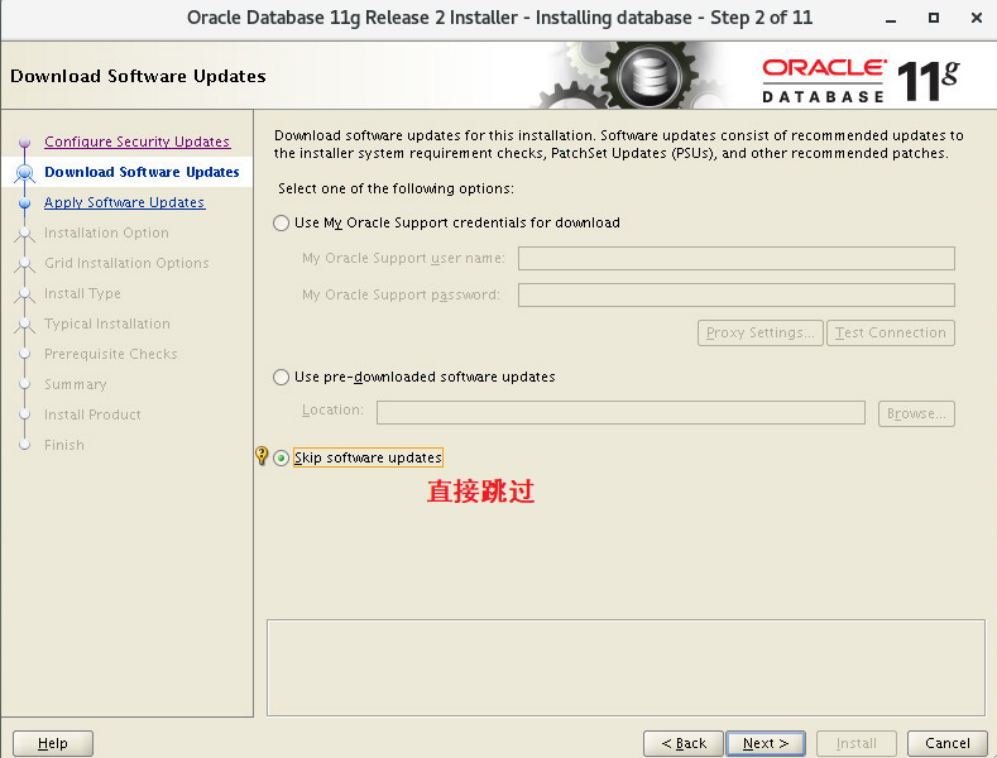
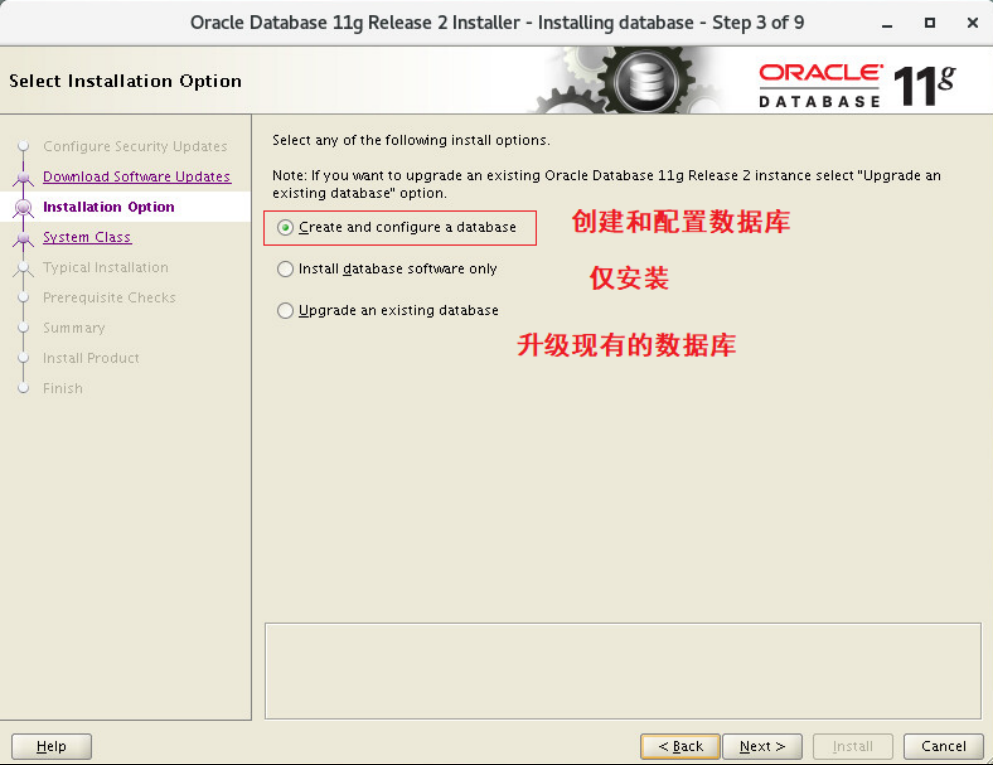
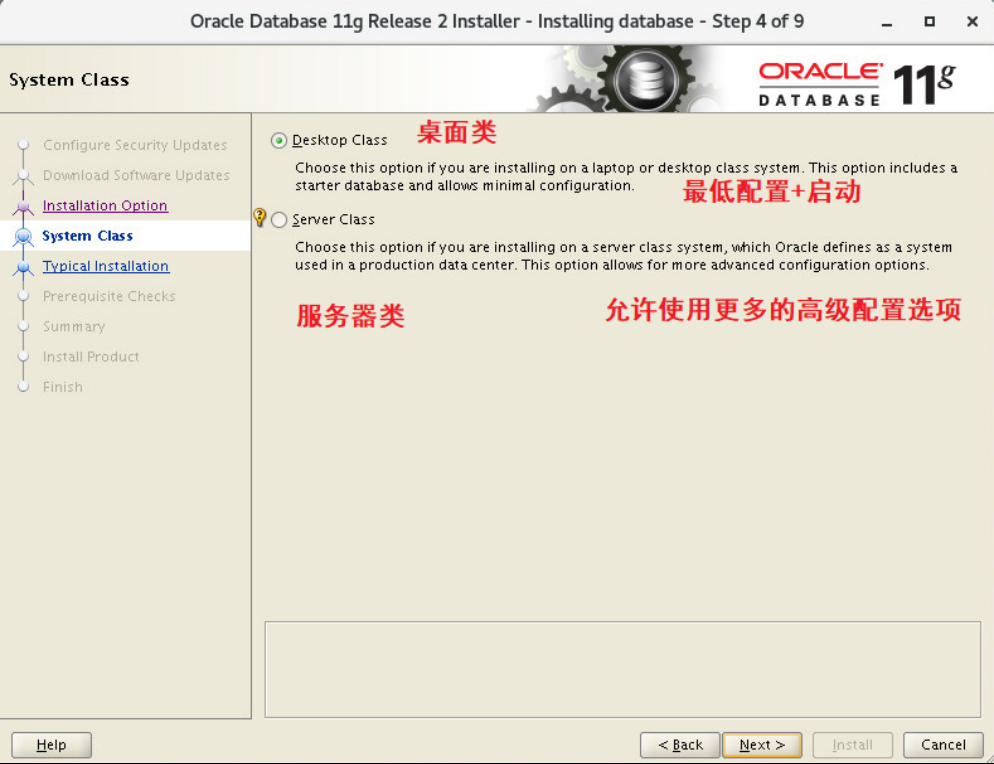
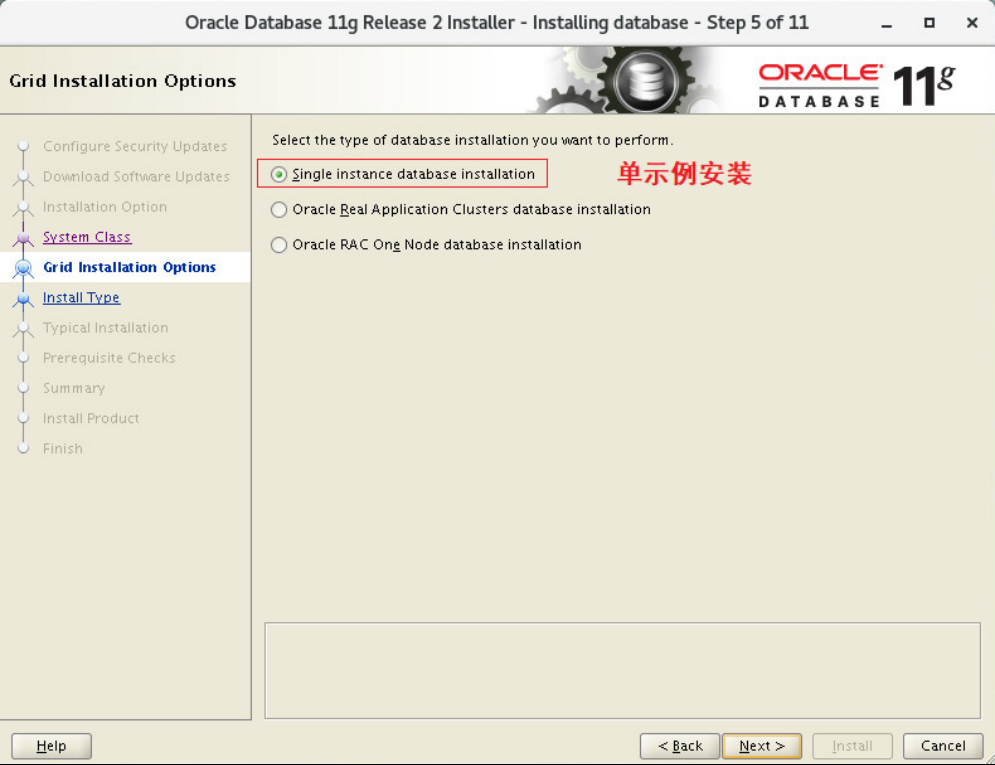
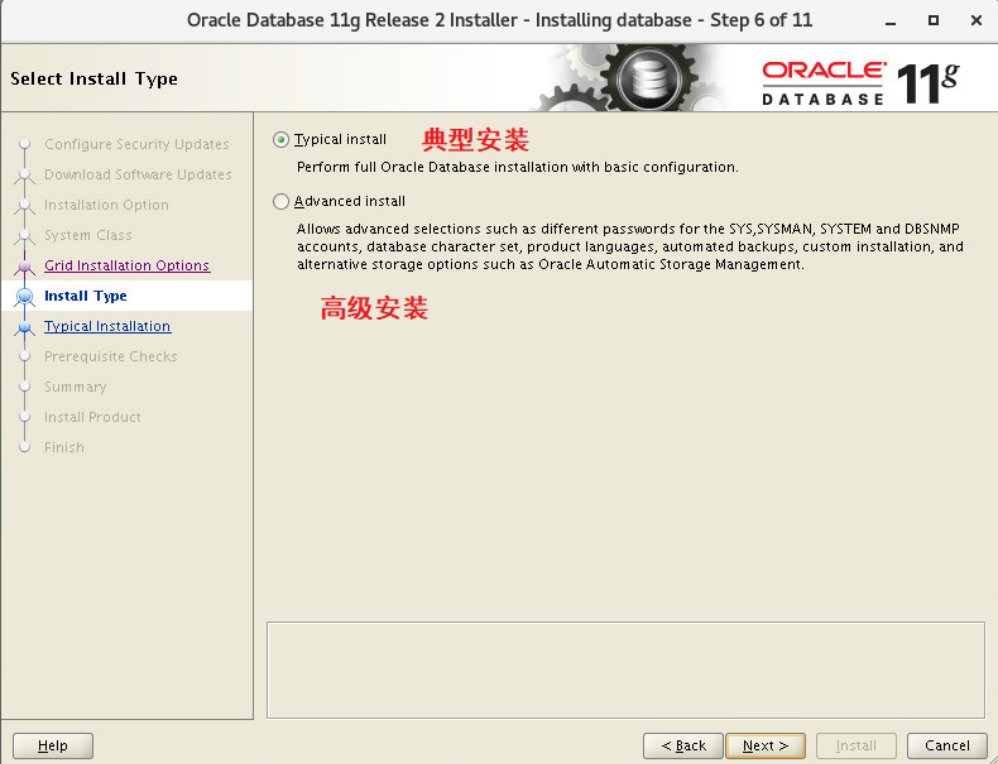
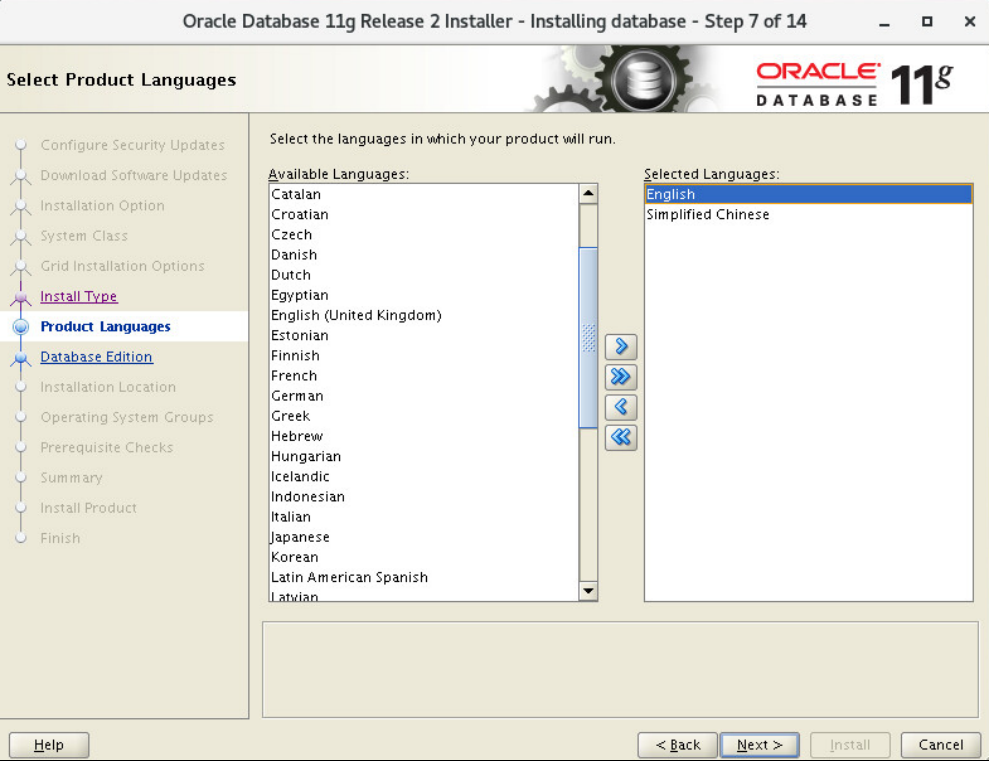
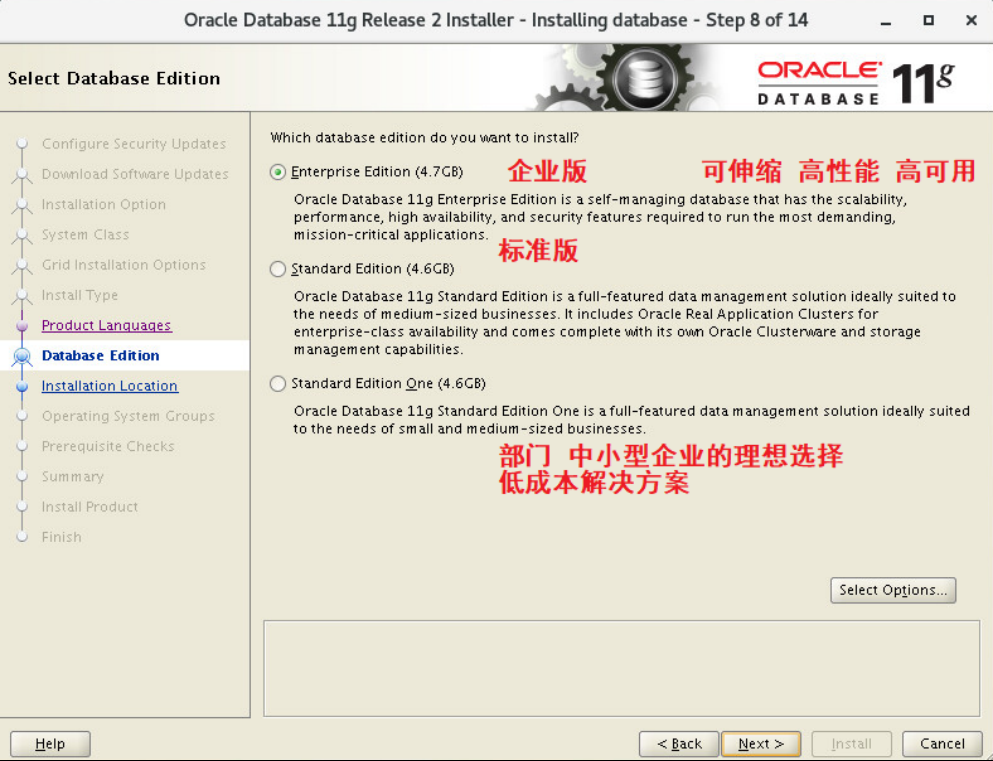
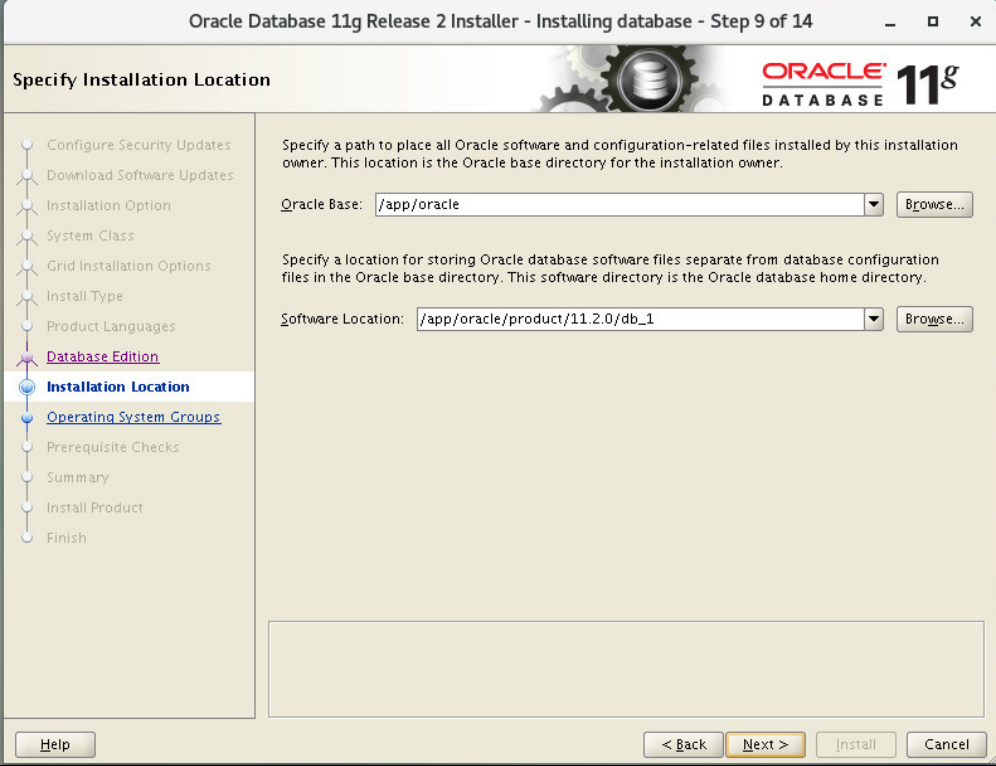
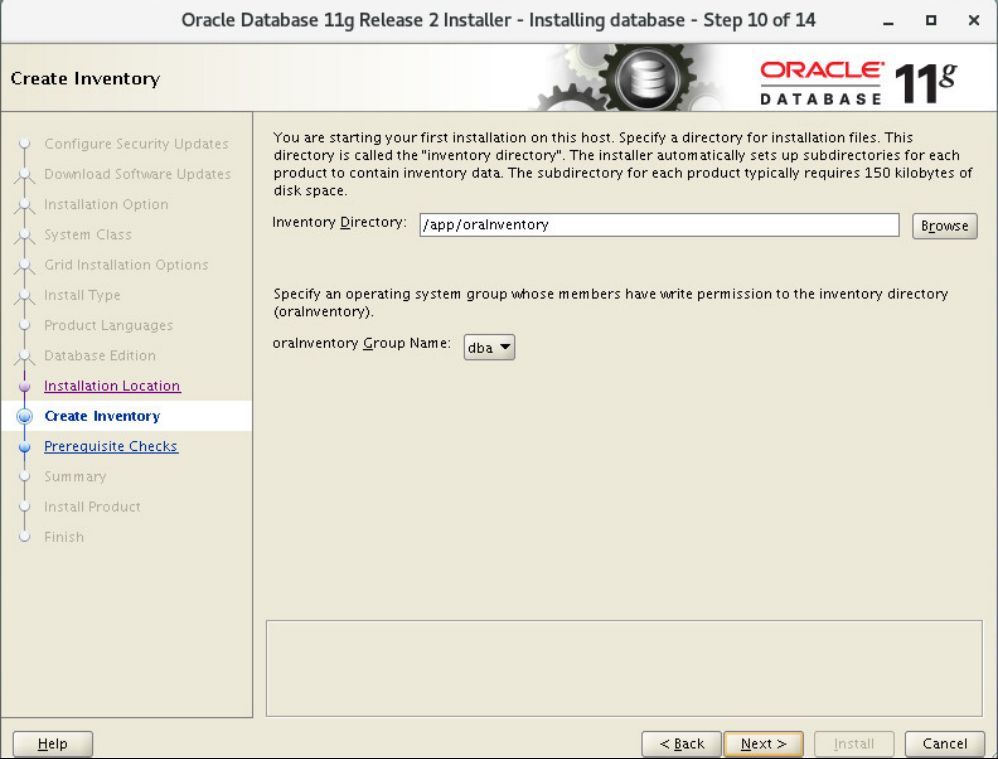
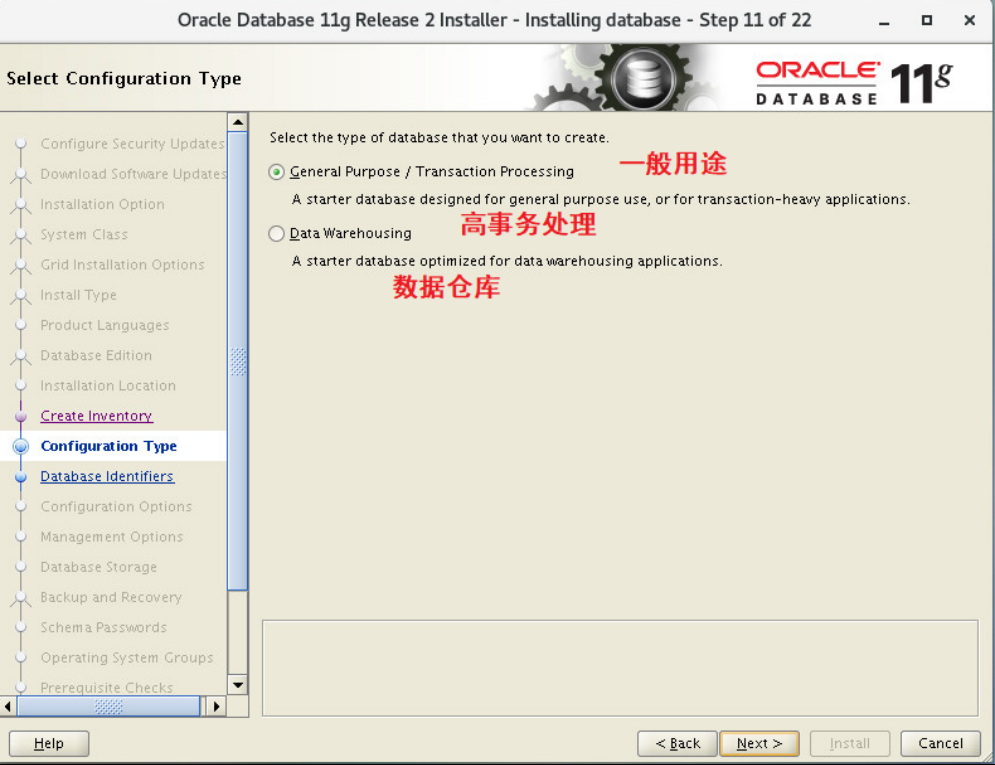
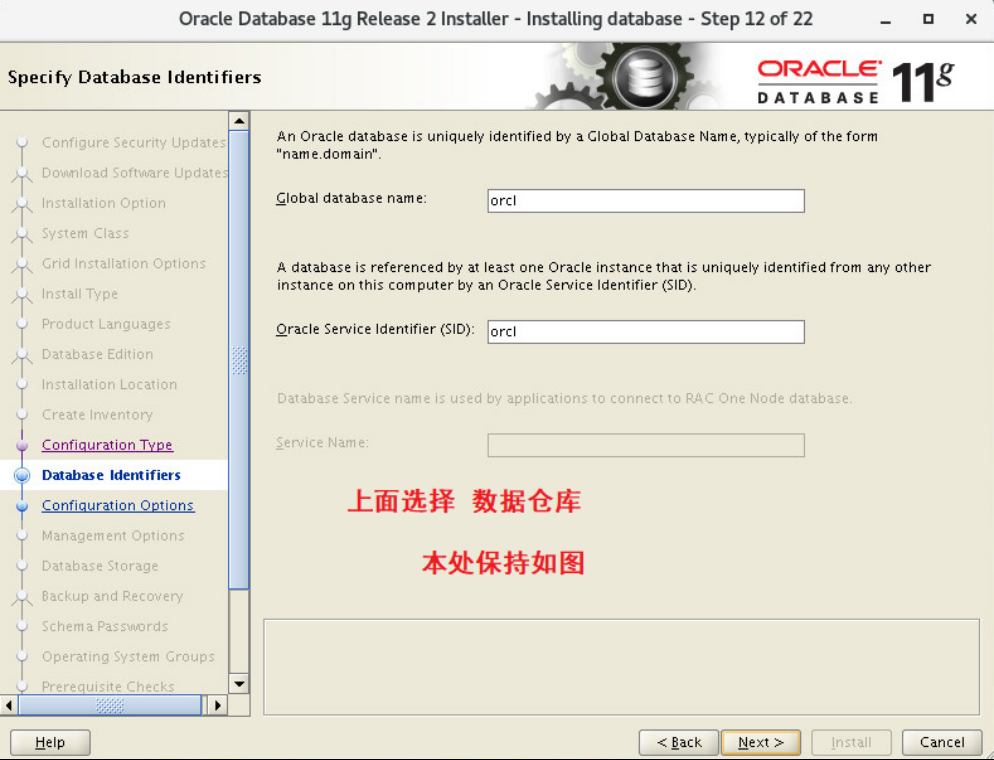
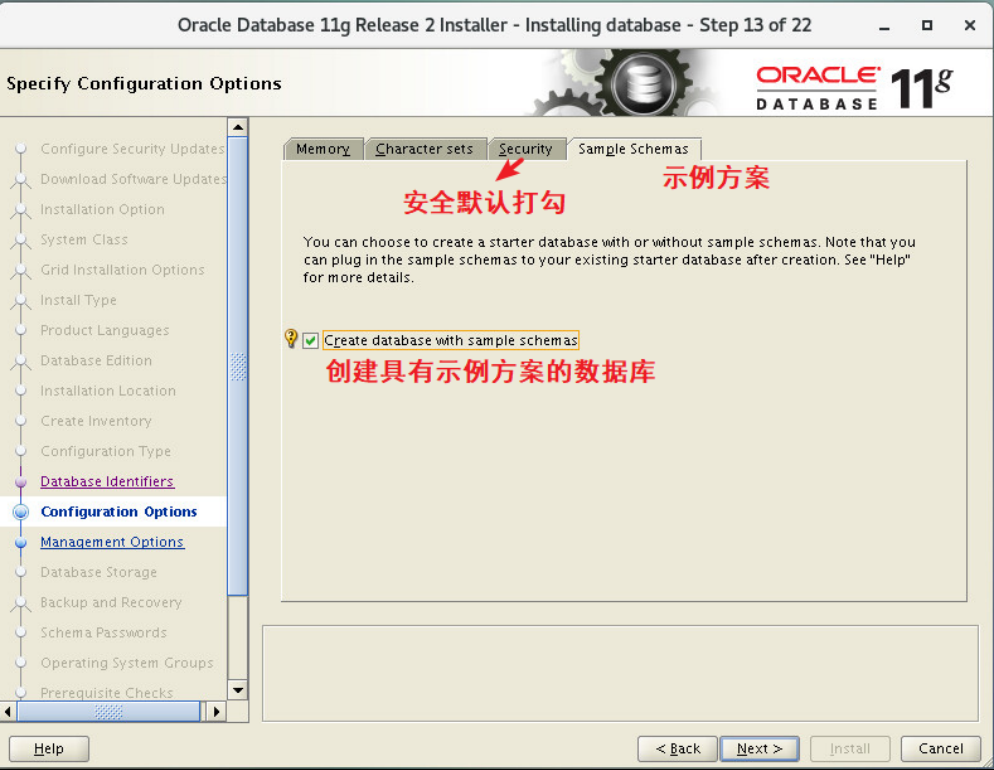
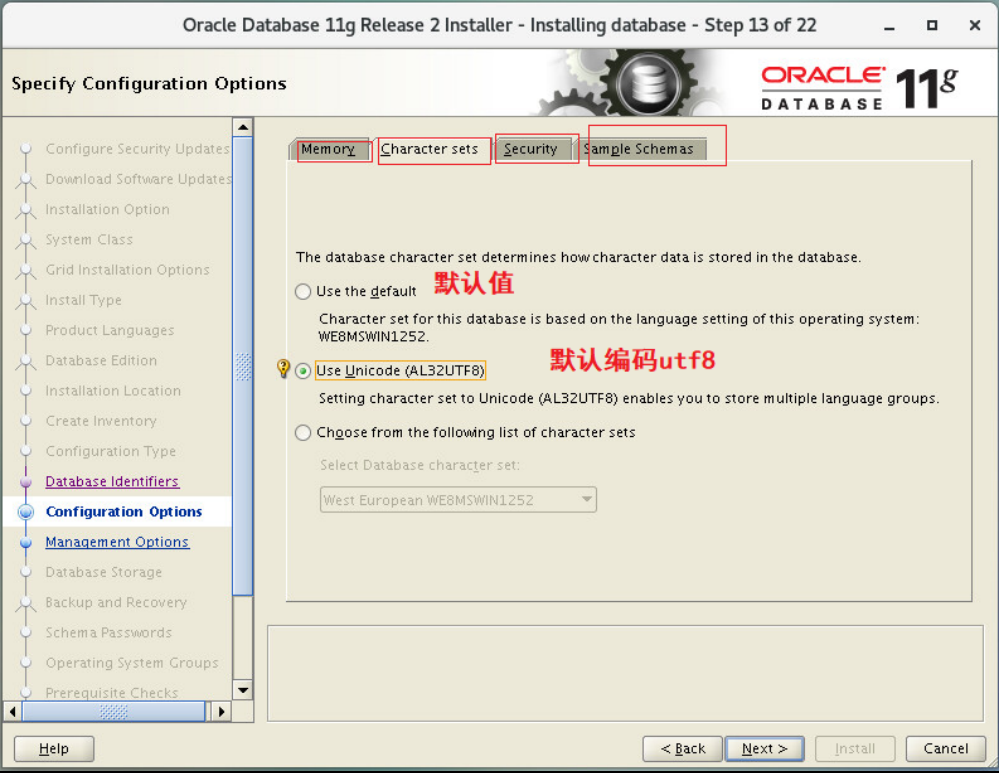
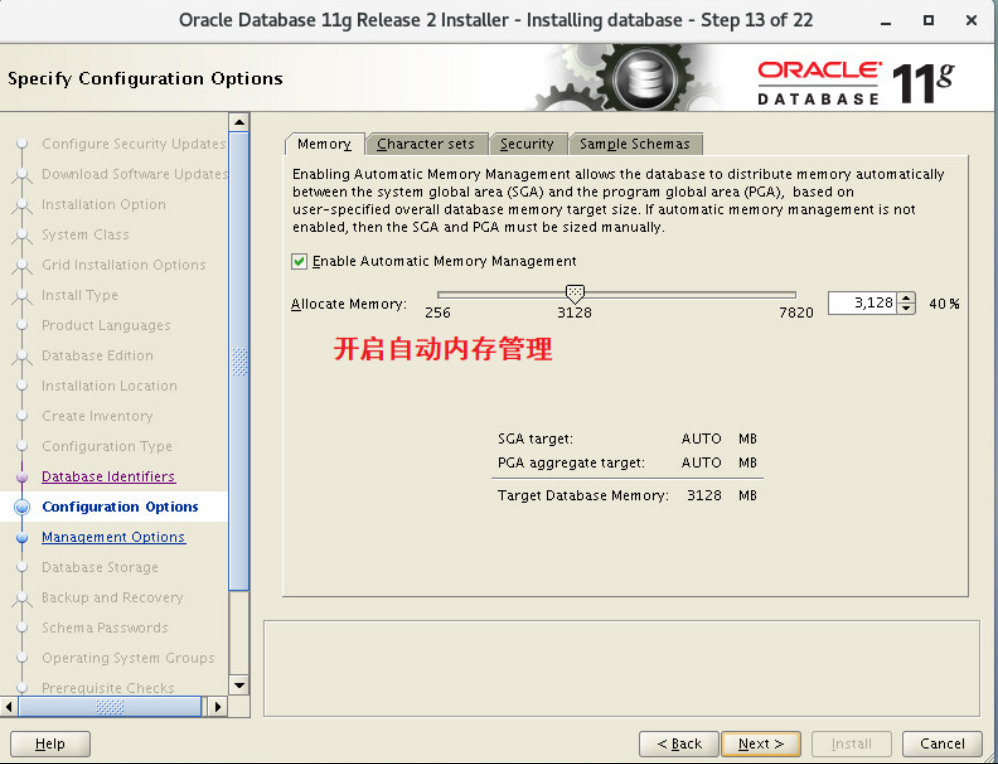
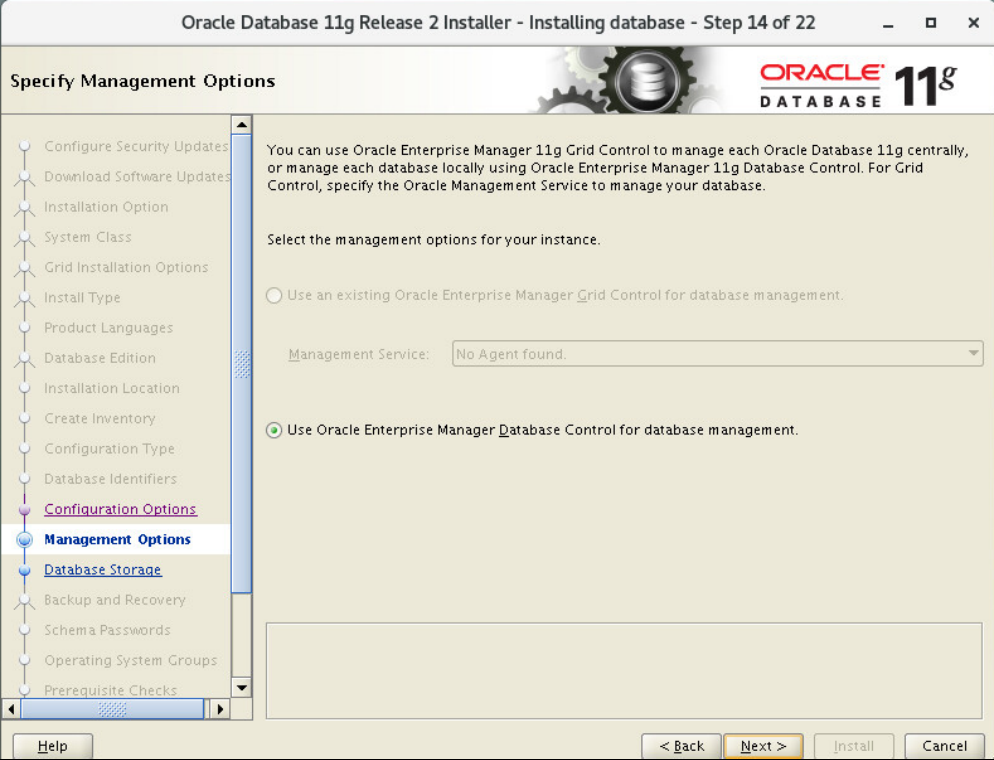
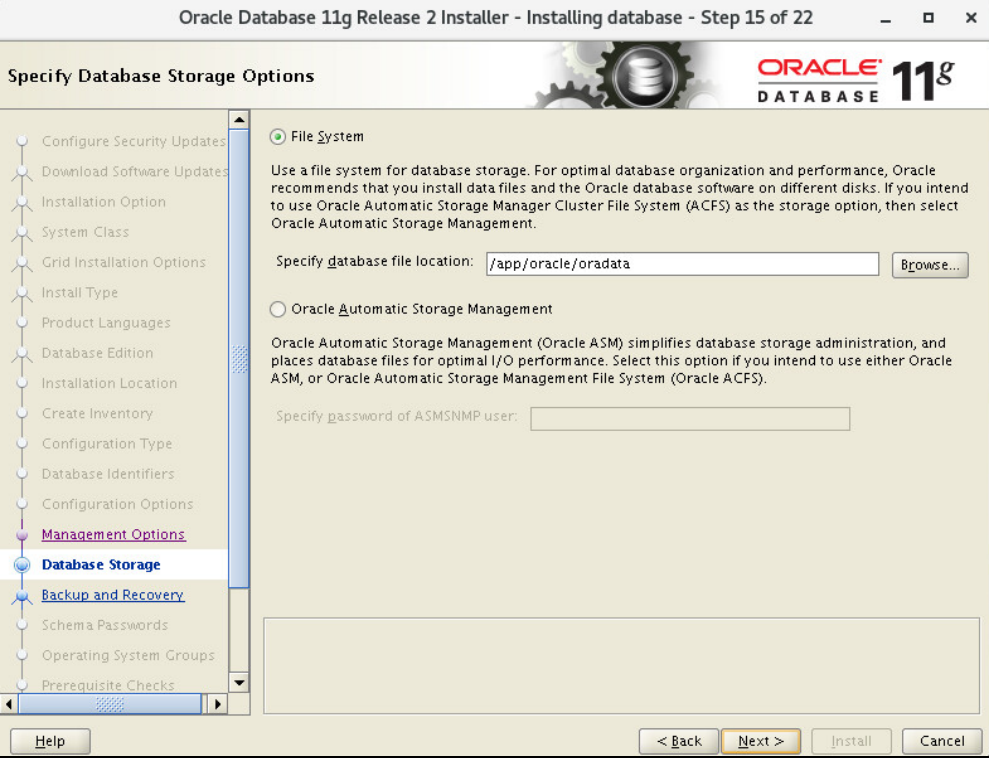
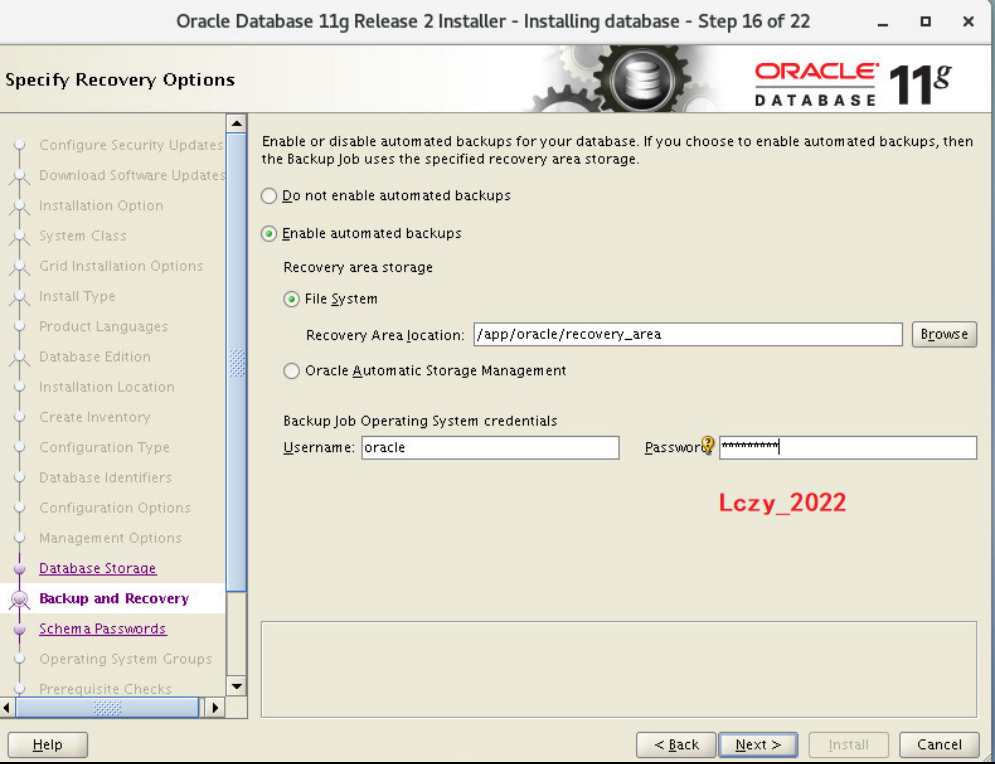
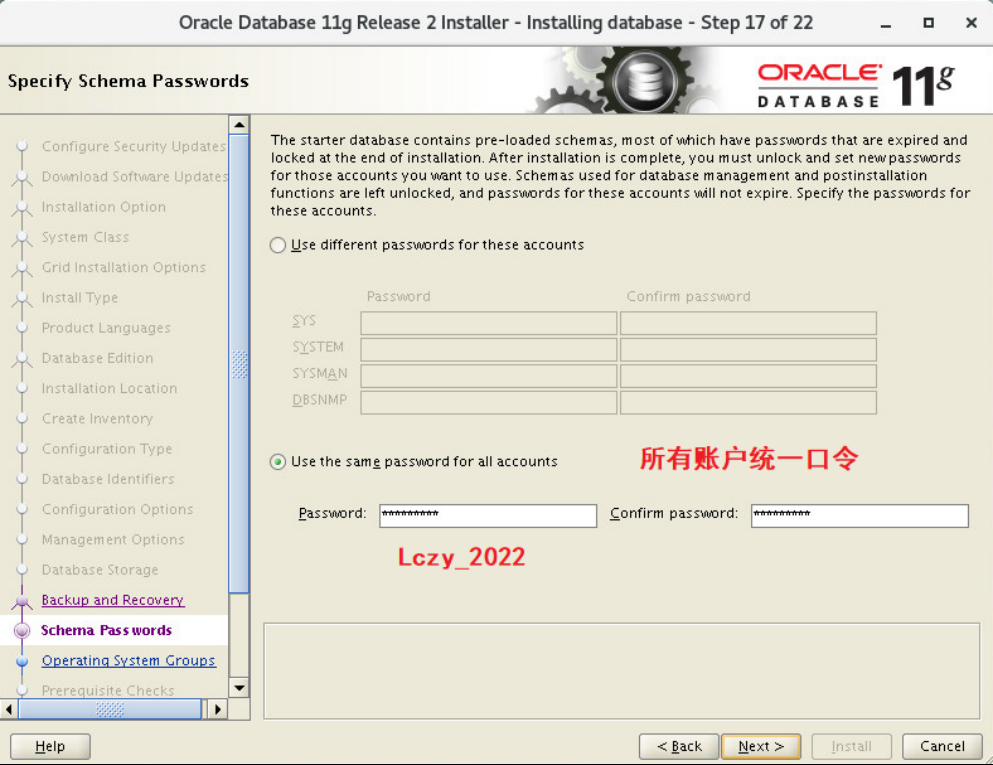
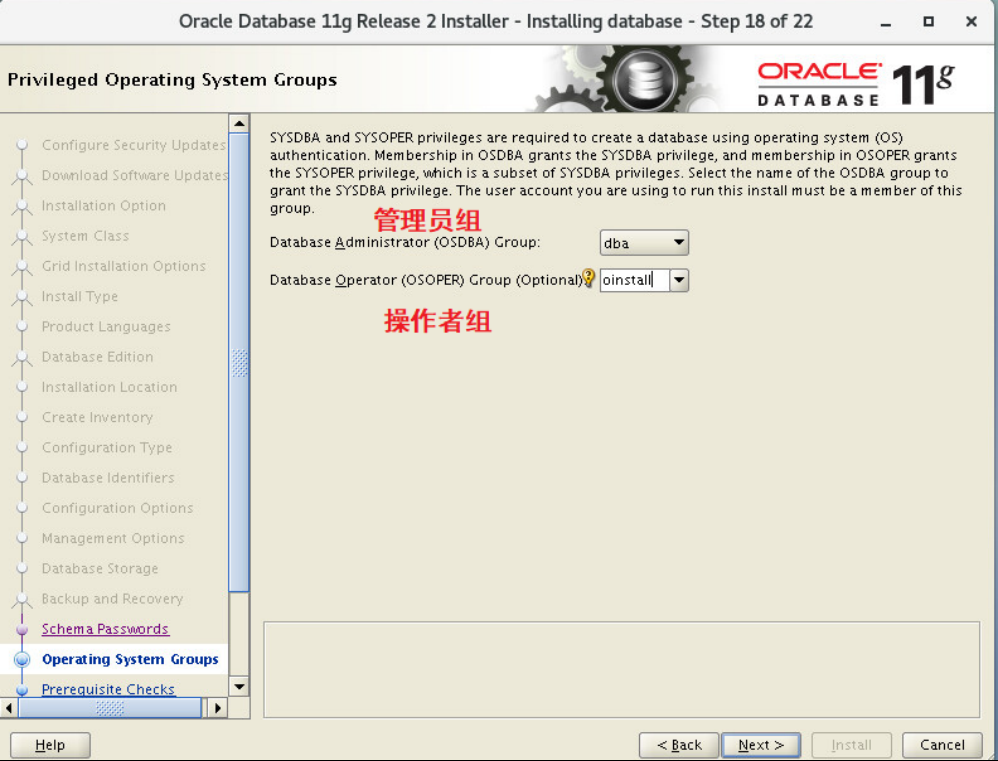
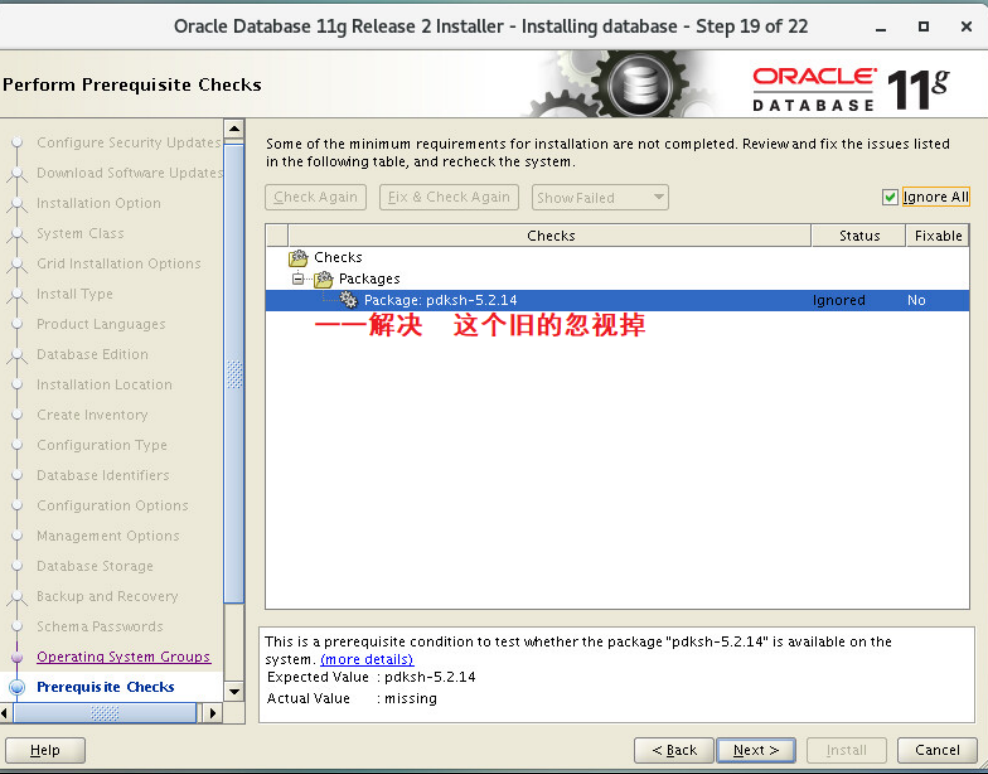
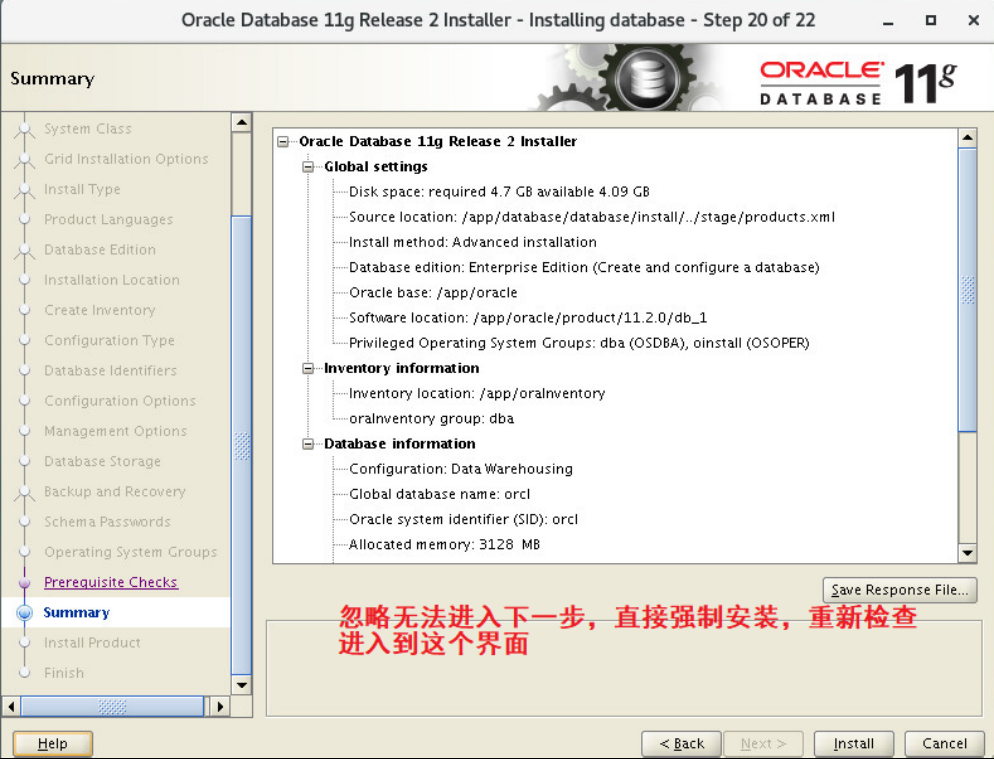
其中选择经典安装
四、问题解决整理
1.swap分区不够
## root用户新建终端
dd if=/dev/zero of=/home/swap bs=1M count=6144   ##(缺多少补多少 1024 = 1G)
mkswap /home/swap
swapon /home/swap
vim /etc/fstab
#-----添加--开机自动挂载---
/home/swap              swap                    swap    defaults        0 0
#----------
mount -a
2.pdksh-5.2.14
## 可以选择强制忽视,然后下一步,屏幕中间有“竖线” ,实际上窗口缩小了,各种点点后可以拉开弹窗,然后进行接受即可。屏幕中间有 条小线,尝试多次,发现光标在该线上,右键点击Closed,也可esc或enter。
pdksh是一个老包,新的oracle都使用ksh包了看ksh有没有安装,如果没有安装就安装ksh,用ksh就可以。
或者强制安装这个
rpm -i --force --nodeps pdksh-5.2.14-37.el5.x86_64.rpm
链接:https://pan.baidu.com/s/17-OS5wC-R5cgZbLGo7_TnA
提取码:gch3
3.OS Kernel Parameters : shmmax 4100614144
[root@oracle-m home]# vim /etc/sysctl.conf
#修改
kernel.shmmax = 4100614144 #最大共享内存的段大小
[root@oracle-m home]# sysctl -p
4.execute root scripts(根脚本执行)-failed
##切换到root用户:
/app/oraInventory/orainstRoot.sh
/app/oracle/product/11.2.0/db_1/root.sh
五、启动与使用
1.启动服务
[Oracle@localhost ~]$ netca //配置监听 进入图形化界面
[Oracle@localhost ~]$ lsnrctl start
[Oracle@localhost ~]$ lsnrctl status //查看监听状态
[Oracle@localhost ~]$ dbca //创建数据库实例orcl
2.进入oracle
##登录
[Oracle@localhost ~]$ sqlplus /nolog
[Oracle@localhost ~]$ conn sys/Lczy_2022@orcl as sysdba
##或者登录
[Oracle@localhost ~]$ su - oracle
[Oracle@localhost ~]$ sqlplus / as sysdba
3.创建
##创建表空间:
create tablespace ogg datafile '/app/oracle/ogg.dbf' size 50m autoextend on next 5m maxsize 600m extent management local;
create user lczy identified by lczy default tablespace  ogg;
grant dba to lczy;
软件链接参数:服务器ip:192.168.66.2    模式: sid   实例:orcl   用户:lczy   密码: lczy
4.删除
删除user
							 # drop user ogg cascade
说明: 删除了user,只是删除了该user下的schema objects,是不会删除相应的tablespace的。
删除tablespace
                                # DROP TABLESPACE ogg INCLUDING CONTENTS AND DATAFILES;
删除表空间分为以下几种情况。
删除空的表空间,但是不包含物理文件 # drop tablespace tablespace_name;
删除非空表空间,但是不包含物理文件 # drop tablespace tablespace_name including contents;
删除空表空间,包含物理文件        # drop tablespace tablespace_name including datafiles;
删除非空表空间,包含物理文件      # drop tablespace tablespace_name including contents and datafiles;
如果其他表空间中的表有外键等约束关联到了本表空间中的表的字段,就要加上CASCADE CONSTRAINTS
							# drop tablespace tablespace_name including contents and datafiles CASCADE CONSTRAINTS;

# drop user ywtest cascade;
# DROP TABLESPACE ywtest INCLUDING CONTENTS AND DATAFILES;
# create tablespace ywtest datafile '/app/oracle/ywtest.dbf' size 50m autoextend on next 5m ;
# create user ywtest identified by ywtest default tablespace ywtest;
# grant dba to ywtest;
# grant read,write on directory backup to ywtest;
六、开机自启
1.方法1--开机执行命令
vim /etc/oratab
	# 找到:    orcl:/usr/oracle/product/11.2.0/db_1:N
	# 修改为:  orcl:/usr/oracle/product/11.2.0/db_1:Y
	# $ORACLE_SID:$ORACLE_HOME:<N|Y>
vim /etc/rc.d/rc.local
	su - oracle -lc "/app/oracle/product/11.2.0/db_1/bin/lsnrctl start"
	su - oracle -lc "/app/oracle/product/11.2.0/db_1/bin/dbstart"
chmod +x /etc/rc.d/rc.local
2.方法2--系统自主启动
vim /etc/init.d/oracle    # 脚本内容在下一个代码框中

chmod a+x /etc/init.d/oracle
chkconfig --add oracle

/etc/init.d/oracle start            #启动oracle脚本
/etc/init.d/oracle stop             #关闭oracle脚本
/etc/init.d/oracle restart          #重启oracle脚本
# 或者
service oracle start
service oracle stop
service oracle restart
## 脚本内容如下:
---------------------------------------------------------------------------------------------------
#!/bin/sh
# chkconfig: 2345 61 61
# description: Oracle 11g R2 AutoRun Servimces
# /etc/init.d/oracle
#
# Run-level Startup script for the Oracle Instance, Listener, and
# Web Interface
export ORACLE_BASE=/app/oracle                                          #oracle安装位置
export ORACLE_HOME=$ORACLE_BASE/product/11.2.0/db_1                     #Oracle安装路径
export ORACLE_SID=orcl
export PATH=$PATH:$ORACLE_HOME/bin
ORA_OWNR="oracle"
# if the executables do not exist -- display error
if [ ! -f $ORACLE_HOME/bin/dbstart -o ! -d $ORACLE_HOME ]
then
echo "Oracle startup: cannot start"
exit 1
fi
# depending on parameter -- startup, shutdown, restart
# of the instance and listener or usage display
case "$1" in
start)
# Oracle listener and instance startup
su $ORA_OWNR -lc $ORACLE_HOME/bin/dbstart
echo "Oracle Start Succesful!OK."
;;
stop)
# Oracle listener and instance shutdown
su $ORA_OWNR -lc $ORACLE_HOME/bin/dbshut
echo "Oracle Stop Succesful!OK."
;;
reload|restart)
$0 stop
$0 start
;;
*)
echo $"Usage: `basename $0` {start|stop|reload|reload}"
exit 1
esac
exit 0
------------------------------------------------------------------------------------------------------
[root@localhost oracle]# chkconfig --level 2345 oracle on
说明:设置oracle脚本在运行级别为2、3、4、5时,都是on(开启)状态,off为关闭

[root@localhost oracle]# chkconfig –list oracle
Oracle   0:off 1:off 2:on 3:on 4:on 5:on 6:off
等级0表示:表示关机
等级1表示:单用户模式
等级2表示:无网络连接的多用户命令行模式
等级3表示:有网络连接的多用户命令行模式
等级4表示:不可用
等级5表示:带图形界面的多用户模式
等级6表示:重新启动
七、使用问题集锦
1.删用户报错
SQL> drop user ogg cascade;		## 删掉用户
drop user ogg cascade
*
ERROR at line 1:
ORA-00604: error occurred at recursive SQL level 1
ORA-14452: attempt to create, alter or drop an index on temporary table already
in use

SQL> exit   ##退出sqlplus
Disconnected from Oracle Database 11g Enterprise Edition Release 11.2.0.4.0 - 64bit Production
With the Partitioning, Automatic Storage Management, OLAP, Data Mining
and Real Application Testing options
[oracle@xmqgbd ogg_trg]$ oerr ora 14452  ## 查看上述报错
14452, 00000, "attempt to create, alter or drop an index on temporary table already in use"
// *Cause:  An attempt was made to create, alter or drop an index on temporary
//          table which is already in use.
// *Action: All the sessions using the session-specific temporary table have
//          to truncate table and all the transactions using transaction
//          specific temporary table have to end their transactions.
[oracle@xmqgbd ogg_trg]$ sqlplus / as sysdba

SQL> select 'alter system kill session '''||sid||','||serial#||'''' from v$session where sid in (select sid from v$lock where id1 in (select object_id from dba_objects where object_name in (select table_name from dba_tables where owner='OGG')));

SQL> alter system kill session '578,23189';

SQL> drop user OGG cascade;


User dropped.


