手把手FFmpeg入门——音频解码+仿流媒体
http://www.ffmpeg.org/doxygen/4.0/decode_video_8c-example.html
http://www.ffmpeg.org/doxygen/4.0/avio_reading_8c-example.html
官方例子链接,我的是由上面改编的
运行环境:
win QT64位
程序目的:
用流的方式解析音频
基础知识:
基本原理:
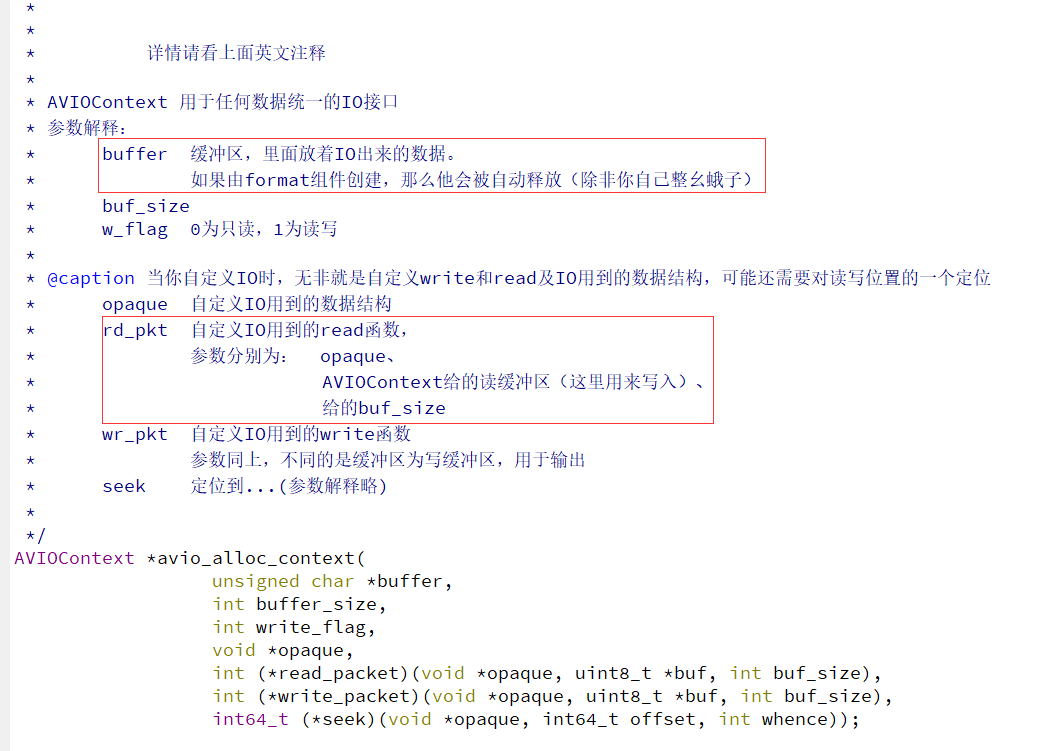
1. 为了把文件当流读取,需要自定义IO函数,无非就是read、write、读写的数据结构、再多就是流定位seek了
这个在ffmpeg里在构造AVIOContext时设置,如下图是说明

2. 几乎所有的解码都分这几个过程:
-->解协议-->解封装-->解码-->
在ffmpeg里由解码器(AVCodec)、解码器环境(AVCodecContext)、音频操作环境(AVFormatContext)、包(AVPacket)、帧(AVFrame)这几个组件配合完成。
基本步驺:
1. 初始化变量,用的各个对象的工厂函数(FFmpeg库的基本规律)
2. 用操作环境链接文件、解码器,并尝试读包
3. 读包直到流结束,每读一个包就用解码器解码,然后就干你想干的任何事情了,嘿嘿嘿。(本例是封装为PCM格式输出到pcm文件,完了可以用audition打开)
4. 拆环境
不到100行的代码:
 1 //    目的在于了解AVFormatContext的packet是怎么发送和接收的,
 2 //    网络上的大同小异
 3 #include <QDebug>
 4 extern "C" {
 5 #include <libavcodec/avcodec.h>
 6 #include <libavformat/avformat.h>
 7 #include <libavformat/avio.h>
 8 #include <libavutil/file.h>
 9 }
10
11 struct buffer_data {
12     uint8_t *ptr;
13     size_t size; ///< size left in the buffer
14 };
15
16 static int read_packet(void *opaque, uint8_t *buf, int buf_size)
17 {
18     struct buffer_data *bd = (struct buffer_data *)opaque;
19     buf_size = FFMIN(buf_size, bd->size);
20
21     if (!buf_size)
22         return AVERROR_EOF;
23     printf("ptr:%p size:%u   buf:%p, buf_size:%u\n", bd->ptr, bd->size, buf, buf_size);
24
25     /* copy internal buffer data to buf */
26     memcpy(buf, bd->ptr, buf_size);
27     bd->ptr  += buf_size;
28     bd->size -= buf_size;
29
30     return buf_size;
31 }
32
33 int main(int argc, char *argv[])
34 {
35     AVFormatContext *fmt_ctx = NULL;
36     AVIOContext *avio_ctx = NULL;
37     uint8_t *buffer = NULL, *avio_ctx_buffer = NULL;
38     size_t buffer_size, avio_ctx_buffer_size = 4096;
39     char *input_filename = NULL;
40     struct buffer_data bd = { 0 };
41
42     input_filename = "D:/test.mp3";
43
44     /* slurp file content into buffer  建立文件到内存的映射 */
45     av_file_map(input_filename, &buffer, &buffer_size, 0, NULL);
46
47     /* fill opaque structure used by the AVIOContext read callback 用AVIOContext的读回调函数填充黑盒 */
48     bd.ptr  = buffer;
49     bd.size = buffer_size;
50
51     fmt_ctx = avformat_alloc_context();
52     avio_ctx_buffer = (uint8_t*)av_malloc(avio_ctx_buffer_size);
53     avio_ctx = avio_alloc_context(avio_ctx_buffer, avio_ctx_buffer_size,
54                                   0, &bd, &read_packet, NULL, NULL);
55     fmt_ctx->pb = avio_ctx;
56
57     avformat_open_input(&fmt_ctx, NULL, NULL, NULL);
58     avformat_find_stream_info(fmt_ctx, NULL);
59     av_dump_format(fmt_ctx, 0, input_filename, 0);
60
61     //  解码
62     AVCodec *codec = avcodec_find_decoder(AV_CODEC_ID_MP3);
63     AVCodecContext *codec_ctx = avcodec_alloc_context3(codec);
64     avcodec_open2(codec_ctx, codec, NULL);
65     FILE *fp = fopen("D:/dst.pcm", "wb+");
66     int aidx;
67     for(int i = 0; i < fmt_ctx->nb_streams; ++i)
68         if(fmt_ctx->streams[i]->codec->codec_type == AVMEDIA_TYPE_AUDIO){
69             aidx = i;
70             break;
71         }
72
73     AVPacket *pkt = av_packet_alloc();
74     AVFrame *frame = av_frame_alloc();
75     int framecount = 0;
76     int sample_size =av_get_bytes_per_sample(codec_ctx->sample_fmt);
77     while(av_read_frame(fmt_ctx, pkt) >= 0){
78         if(pkt->stream_index == aidx){
79             avcodec_decode_audio4(codec_ctx, frame, &framecount, pkt);
80             for(int n = 0; n < frame->nb_samples; ++n)
81                 for(int ch = 0; ch < frame->channels; ++ch){
82                     fwrite(frame->data[ch] + sample_size*n, 1, sample_size, fp);
83                 }
84         }
85     }
86
87     avformat_close_input(&fmt_ctx);
88     /* note: the internal buffer could have changed, and be != avio_ctx_buffer */
89     if (avio_ctx) {
90         av_freep(&avio_ctx->buffer);
91         av_freep(&avio_ctx);
92     }
93     av_file_unmap(buffer, buffer_size);
94
95     return 0;
96 }
学习是一个循序渐进的过程,没有捷径,只有坚持和努力才是最快的方法!


