

ES6学习(二)基础命令
一、Let 和 const
作用域的概念:在es5之前是有两个作用域,一个是全局作用域,另外一个是函数作用域,在es6中就多了这样一个块作用域。在这里let 和 const 就是传说中的块作用域,它们的使用方法和 var 是一样的,只是作用是有区别的。
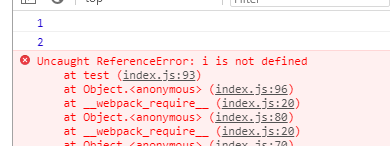
作用的区别有哪些呢,由下面的代码可见 i 是有报错的;
function test() {
  for (let i = 1; i < 3; i++) {
    console.log(i);
  }
  console.log(i);
}

test();
说明:
1)因为let 是块作用域,在for 的花括号内调用 i 是没有问题的, 但是若在 花括号外在调用 i 则找不到该 i ,因为这i 没有在外面声明,如果用var 是没有问题的 ;因此let 是一个块作用域 所以 i 脱离了块作用域,生命周期结束了,便会报错。由此可见es6 在语法强制使用了严格模式,严格模式就是变量没有生命就会报错!
2)另外一个需要注意的是,let 定义的变量不可以重复声明,否则会报错!
3)const 声明一个常量时必须要附一个值,const 常量的值后期是不可以更改的,否则会报错
function last() {
  const IP=111;
  const obj = {
      abc:111
  }
  console.log(obj);
  obj.d = 222
}

last();
4)const 对于数值常量 是不可以修改的,而对于 const 声明对象的时候是可以修改对象的元素,对象是引用类型,引用类型是对象的指针不可以改变,但是对象是可以变的。
二、解构赋值
数值解构赋值、对象解构赋值、字符串解构赋值、布尔值解构赋值、函数参数解构赋值、数值解构赋值。
1、数组解构赋值
{
  let a,b,c;
  [a,b] = [1,2]
  console.log(a,b);
}
输出:a=1 b=2
常见的数组解构赋值
{
  let a,b,c;
  [a,b,...c] = [1,2,3,4,5,6];
  console.log(a,b,c);
}
输出:a=1 b=2 c=[3,4,5,6]
常见的对象解构赋值
{
  let a,b;
  ({a,b} = {a:1, b:2})
  console.log(a, b);
}
输出: a=1 b=2
声明参数但是没有赋值
{
  let a,b,c;
  [a,b,c] = [1,2];
  console.log(a,b,c);
}
输出:a=1 b=2 c 没有赋值为 undefind
使用场景(1)数据交换
{
  let a = 1;
  let b = 2;
  [a,b] = [b,a];
  console.log(a,b);
}
输出:a=2 b=1
函数返回数组赋值
{
  function fun() {
    return [1,2]
  }
  let a, b;
  [a,b] = fun();
  console.log(a,b);
}
输出: a=1 b=2
函数返回多个参数,可以只取部分参数
{
  function fun() {
    return [1,2,3,4,5];
  }
  let a,b,c;
  [a,,,b] = fun();
  console.log(a,b);
}
输出:a=1 b=4
函数返回数组参数,可以跳跃取,也可以使用 ...变量取所有参数
{
  function fun() {
    return [1,2,3,4,5,6,7]
  }
  let a,b,c;
  [a,, ...b] = fun();
  console.log(a, b);
}
输出:a=1 b=[3,4,5,6,7]
对象的赋值,对象赋值,对象的左右都要是对象
{
  let obj = {a:111, b:222};
  let {a, b} = obj
  console.log(a, b);
}
输出:a=111 b=222
对象赋值,默认值
{
  let {a=1,b=2} = {a:100}
  console.log(a,b);
}
输出:a=100 b=2
对象赋值要注意接收对象参数的格式
{
  let data = {
    title:'this is a title',
    child:[{
      id:123456,
      desc:'this is a desc'
    }]
  }
  let { title:setTitle, child:[{id:setId}] } = data;
  console.log(setTitle, setId);
}
输出:setTitle='this is a title'  setId=123456
三、正则扩展
构造函数的变化,正则方法的扩展,u修饰符,y修饰符,s修饰符
{
  //ES5中正则的写法
  let regex = new RegExp('xyz', 'i');  //2个参数
  let regex2 = new RegExp(/xyz/i);  //1个参数
  console.log(regex.test('xyz123'), regex2.test('xyz123'));

 //输出:true  true

  //ES6中的写法
  let regex3 = new RegExp(/xyz/ig, 'i');//2个参数
  console.log(regex3.flags);

 //输出:i 说明:es6中的第二个参数会覆盖第一个参数的正则修饰符,flags 是输出正则修饰符
}
正则匹配 修饰符 g 和 y 区别
g 第一次匹配成功后 不会紧接着从第二个元素开始匹配,可以从任意位置去匹配
y 第调一有次匹配成功后 只会从紧接着的第二个开始匹配,匹配不成功就返回null
{
  let s = 'bbb_bb_b';
  let a1 = /b+/g;
  let a2 = /b+/y

  console.log('one', a1.exec(s), a2.exec(s));
  console.log('two', a1.exec(s), a2.exec(s));
}
输出:one ["bbb", index: 0, input: "bbb_bb_b"] ["bbb", index: 0, input: "bbb_bb_b"]
two ["bb", index: 4, input: "bbb_bb_b"] null
console.log(a1.sticky, a2.sticky); //sticky 用于查看 变量是否使用了 y 模式,
a1 为 false 即没有使用y
a2 为 true 即使用了y修饰符
四、字符串扩展
字符串新增特性
在学习字符串这一块需要安装扩展库 执行代码如下
npm install babel-polyfill --save-dev
在项目中要引入ES7扩展库: import 'babel-polyfill';
1、针对unicode 编码解析
{
  console.log('a', `\u0061`);
  console.log('s', `\u20bb7`); //字符编码大于FFFF  不能正常显示
  console.log('s', `\u{20bb7}`); //这样写可以正常显示
}
显示结果:a a s ₻7 s 𠮷
{
  let s = '𠮷';
  console.log("length", s.length);
}
结果:length 2 因为s 这个字符编码汉字FFFF, 的字节大于2字节的,所以这里就处理为4个字节了,每两个字节为 1个长度,所以这里 应该是2个长度,4个字节
2、查看一下ES5对UNICODE的编码处理
{
  let s = '𠮷';
  console.log('length', s.length);
  console.log('0', s.charAt(0));
  console.log('1', s.charAt(1));
  console.log('at0', s.charCodeAt(0));
  console.log('at1', s.charCodeAt(1));
}
输出结果为: 0 � 1 � at0 55362 at1 57271
由此可见ES5对字符的编码处理并不是很完善
这里看一下ES6的处理结果
{
  let s1 = '𠮷a';
  console.log('length', s1.length);
  console.log('code0', s1.codePointAt(0)); //取第一个字符编码
  console.log('code0', s1.codePointAt(0).toString(16));
  console.log('code1', s1.codePointAt(1));
  console.log('code2', s1.codePointAt(2));
}
结果:length 3 code0 134071 code0 20bb7 code1 57271 code2 97
由此可见 codePointAt 这个函数是可以取4个字节的编码, 当取 第一个字符编码的时候它会自动识别是个字节还是两个字节的字符。当取第二个字符编码的时候,它能够正常显示第二个字符的编码。
console.log(String.fromCharCode("0x20bb7")); //ES5中的取法
console.log(String.fromCodePoint("0x20bb7")); //ES6中的取法
输出结果:ஷ 𠮷 //可见ES6是多么完善呀
3、打印字符编码
  let str = '\u{20bb7}abc';
  for (let i = 0; i<str.length; i++) {
    console.log('es5', str[i]);
  }
  for (let code of str) {
    console.log('es6', code);
  }
打印结果:
es5 � es5 � es5 a es5 b es5 c
es6 𠮷 es6 a es6 b es6 c
由此可见,ES5中打印字节始终是安装两个字符去取的,而ES6可以通个关 let of 字符串遍历接口去打印,可以匹配得到4个字节的编码
4、查看字符串中的一些处理
{
    //查看字符窜中是否包含某个字符
    let str = 'string';
    console.log('includes', str.includes('r'));

    //查看字符串中是以某某开始的
    console.log('start', str.startsWith('str'));

    //查看字符串是以某某结束的
    console.log('end', str.endsWith('ng'));

    //查看字符串重复复制
    let str1 = 'abc';
    console.log(str1.repeat(2));
}
输出结果:includes true start true end true abcabc
5、ES6中的模板字符串
{
  let name = 'list';
  let info = 'hello word';
  let m = `this is a test ${name}, with ${info}`;
  console.log(m);
}
输出结果:this is a test list, with hello word
6、字符串补白
{
  //字符串补白
  console.log('1'.padStart(2, '0')); //向前补白
  console.log('1'.padEnd(2, '0'));//向后补白
}
输出结果:01 10 补白的作用于 选日期的格式, 第一参数说明:2 ,说明是要求需要两位,不够则在前补一个 0
7、标签模板的使用
{
  let user = {
    name:'list',
    info: 'hello world'
  }

  console.log(abc`this is a ${user.name} you will can look ${user.info}`);;

  function abc( s, v1, v2) {
    console.log(s, v1, v2);
    return s+v1+v2
  }
}
输出结果:this is a , you will can look , list hello world
作用:1、处理多语言,通过处理参数,返回不同的结果。2、防止数据攻击
8、String.row的使用 对斜杠 进行一个转义
{
  console.log(String.raw`ni hao \n ${1+2}`);
  console.log(`ni hao \n${1+2}`);
}
输出结果:
ni hao \n 3
ni hao
3
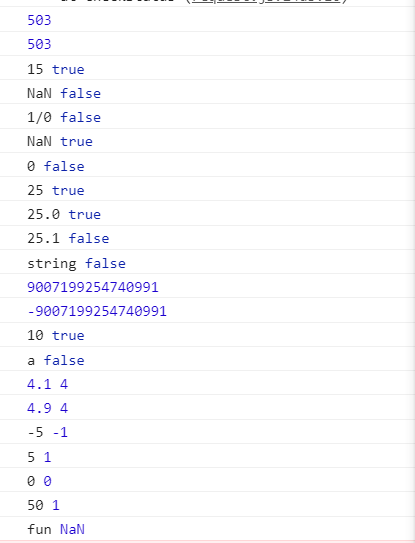
五、数值扩展
{
  //多进制的表示方法
  console.log(0b111110111); //输出结果: 503
  console.log(0o767);//输出结果: 503

  //是否有尽
  console.log('15', Number.isFinite(15)); // 输出结果 15   true
  console.log('NaN', Number.isFinite(NaN));// 输出结果 NaN   false
  console.log('1/0', Number.isFinite('TRUE'/0));// 输出结果 1/0   false

  //判断是否是一个数
  console.log('NaN', Number.isNaN(NaN));//输出结果:NaN true
  console.log('0', Number.isNaN(0)); //输出结果:0 false

  //是否是整数
  console.log('25', Number.isInteger(25));//输出结果:25   TRUE
  console.log('25.0', Number.isInteger(25.0));//输出结果:25.0  TRUE
  console.log('25.1', Number.isInteger(25.1));//输出结果:25.1  FALSE
  console.log('string', Number.isInteger('25.1ABC'));//输出结果:string  FALSE

  //表示数的最大的一个上线
  console.log(Number.MAX_SAFE_INTEGER); //输出结果:9007199254740991
  //表示数的最小的下线
  console.log(Number.MIN_SAFE_INTEGER);//输出结果:-9007199254740991

  //验证数是否送一个安全的数,一定要是一个数
  console.log('10', Number.isSafeInteger(10));//输出结果: 10  TRUE
  console.log('a', Number.isSafeInteger('a'));//输出结果: a   false

  //小数取整
  console.log(4.1, Math.trunc(4.1));//输出结果: 4.1   4
  console.log(4.9, Math.trunc(4.9));//输出结果: 4.9   9

  //判断是整数,负数 还是 O,字符串可以转为
  console.log('-5', Math.sign(-5));//输出结果: -5   -1
  console.log('5', Math.sign(5));//输出结果: 5   1
  console.log('0', Math.sign(0));//输出结果: 0   0
  console.log('50', Math.sign('50'));//输出结果: 50   1
  console.log('fun', Math.sign('fun'));//输出结果: fun   NaN

  //立方根
  console.log('-1', Math.cbrt(-1));//输出结果: -1   -1
  console.log('8', Math.cbrt(8));//输出结果: 8   2
}
输出结果:
六、数组扩展
{
   let arr = Array.of( 1,2,3,4,5 );
   console.log('arr=', arr); //输出结果:arr= (5) [1, 2, 3, 4, 5]

   let mepty = Array.of();
   console.log('mepty', mepty);//输出结果:mepty []

   let array = Array.of(1,2,3,4,5,67,7);
   array.forEach(function (item) {
      console.log(item);//输出结果:打印数组元素
   })

   let p = document.querySelectorAll('p');
   let pArr = Array.from(p);
   pArr.forEach(function (item) {
      console.log(item.textContent);//输出结果:打印数组元素
   })

   //映射处理
   console.log(Array.from([1,2,3], function (item) {
     return item*2
   })); //打印:2,4,6


   //全部转为 7
   console.log('fill-7', [1,'a', undefined].fill(7));//全部替换为:fill-7 (3) [7, 7, 7]
   //从第一位开始替换到第三位
   console.log('fill,pos',['a', 'b', 'c'].fill(7,1,3));//输出结果;fill,pos (3) ["a", 7, 7]

   //打印数组的 KEYs
   for ( let index of [1,'c', 'v'].keys() ) {
      console.log('keys', index);
   }
   //打印数组的 values
   for ( let value of [1,'c', 'v'].values() ) {
      console.log('keys', value);
   }

}
七、set-map 数据结构
set的使用、weakset的用法、map的用法、weakmap的用法
{

    let list = new Set();
    list.add(5);
    list.add(7);
    console.log('size', list.size);//查看长度
    //输出 size  2
}
{
  let arr = [1,2,3,4,5];
  let list = new Set(arr);
  console.log('size', list.size);//查看长度
  //输出 size  5
}
{
  let list = new Set();
  list.add(1);
  list.add(2);
  list.add(1);
  console.log('list', list);//打印数据
  //输出的是 lis t{1,2}  可见set具有去重的效果
}
{
  let arr = [1,2,3,1,2,'1','2'];
  let list = new Set(arr);
  console.log('unique', list);
  //unique {1, 2, 3, "1", "2"}可见set具有去重的效果 并且不会自动转义
}
{
  let arr = ['add', 'delete', 'clear', 'has'];
  let list = new Set(arr);
  console.log('has', list.has('add'));
  //has true
  console.log('delete', list.delete('add'), list);
  //delete  true  {"delete", "clear", "has"}
  list.clear();
  console.log('list', list);
  //list {}
}
{
  let arr = ['add', 'delete', 'clear', 'has'];
  let list = new Set(arr);

  for( let key of list.keys() ) {
    console.log('key', key);
  }

  for( let val of list.values() ) {
    console.log('defaultValue', val);
  }

  for( let list of list ) {
    console.log('list', list);
  }
    //效果雷同
  for( let [key, val] of list.entries() ) {
    console.log('entries', key, val);
  }
  //entries add add
  //entries delete delete
  //entries clear clear
  //entries has has

  list.forEach(function (item) {
    console.log(item);
  });
  //add
  //delete
  //clear
  //has
}
Weaklist的使用
{
  //只能放对象元素 不能垃圾回收 不能遍历
  let weaklist = new WeakSet();

  let arg = {};

  weaklist.add(arg);

  console.log(weaklist);
}
Map的使用
{
  let map = new Map();
  let arr = ['123'];

  map.set(arr,456);
  console.log('map', map, map.get(arr));
  //map Map {_c: Map(1)} 456
}
{
  let map = new Map([['a', 1111], ['b', 2222]]);
  console.log('map', map);
  //Map(2) {"a" => 1111, "b" => 2222}
  console.log('size', map.size);
  //size  2
  console.log('delete', map.delete('a'), map);
  console.log('clear', map.clear(), map);
  //delete true Map {_c: Map(1)}
  //clear undefined Map {_c: Map(0)}
}
weakmap的使用
{
  //key值必须是对象,没有clear 也不能遍历
  let weakmap = new WeakMap();

  let o = {};
  weakmap.set(o, 123)
  console.log(weakmap.get(o));
}
数据结构
Map 和 Array 的对比
{
  //数据结构的横向对比,增删改查
  let map = new Map();
  let array = [];
  //增
  map.set('t', 1);
  array.push({t:1});
  console.log('map-array', map, array);

  //查
  let map_exist = map.has('t');
  let array_exist = array.find(item => item.t);
  console.log('map-array-exist', map_exist, array_exist);
  //map-array-exist true {t: 1}
  //map 返回 true ,而array 返回数组元素

  //改
  map.set('t', 2);
  array.forEach(item=>item.t?item.t=2:'');

  //删
  map.delete('t');
  let index = array.findIndex(item=>item.t)
  array.splice(index, 1);
  console.info('map-array-empty', map, array)
}
Set 和 Array 的对比
{
  //Set 和 Array 的对比
  let set = new Set();
  let array = [];

  //增
  set.add({t:1});
  array.push({t:1});

  console.info('set-array', set, array);

  //查
  let set_exist = set.has({t:1});
  let array_exist = array.find(item => item.t);
  console.info('set-array', set_exist, array_exist);

  //改
  set.forEach(item => item.t?item.t=2:'');
  array.forEach(item=>item.t?item.t=2:'');
  console.log('set-array-update', set, array);

  //删
  set.forEach(item=>item.t?set.delete(item):'');
  let index = array.findIndex(item=>item.t);
  array.splice(index, 1);
  console.info('set-array-empty', set, array);
}
Map 和 Object 的对比
Set 和 Object的对比
{
  let item = {t:1};
  // set map obj 对比
  let map = new Map();
  let set = new Set();
  let obj = {};

  //增
  map.set('t', 1);
  set.add(item);
  obj['t'] = 1;
  console.log('map-set-obj', map, set, obj);

  //查
  console.info({
    map_exist:map.has('t'),
    set_exist:set.has(item),
    obj_exist:'t' in obj
  });
  //{map_exist: true, set_exist: true, obj_exist: true}

  //改
  map.set('t', 2);
  item.t = 2;
  obj['t'] = 2;
  console.log('map-set-obj-modify', map, set, obj);

  //删
  map.delete('t');
  set.delete(item);
  delete obj['t'];
  console.log('map-set-obj-delete', map, set, obj);
}
八、Proxy 和 Reflect
proxy 和 reflect的概念
proxy 和 reflect 的适用场景
{
  let obj = {
    time: '2018-04-01',
    name:'app',
    _r:123
  };

  let monitor = new Proxy(obj, {
    //拦截对象属性的读取
    get(target, key){
      return target[key].replace('2018', '2019');
    },
    //拦截对象设置属性
    set(target, key, value){
      if (key == 'name') {
        return target[key] = value;
      } else {
        return target[key]
      }
    },
    //拦截key in object操作
    has(target, key) {
      if ( key === 'name' ) {
        return monitor[key];
      } else {
        return false;
      }
    },
    //拦截delete
    deleteProperty(target, key) {
      if ( key.indexOf('_') > -1 ) {
        delete target[key];
        return true;
      } else {
        return target[key];
      }
    },
    //拦截Object.keys Object.getOwnPropertySymbols, Object.getOwnPropertyNames
    ownKeys(target) {
      return Object.keys(target).filter(item=>item!='time');
    }
  });

  console.log('get', monitor.time);//get 2019-04-01

  monitor.time = '2018';
  console.log('set', monitor.time);
  monitor.name = '1234566';
  console.log('get', monitor.name); //get 1234566

  console.log('has', 'name' in monitor, 'time' in monitor);//has true false

  delete monitor.time;
  console.log('deletee',  monitor);//{time: "2018-04-01", name: "1234566", _r: 123}

  delete monitor._r;
  console.log('deletee',  monitor);//{time: "2018-04-01", name: "1234566"}

  console.log('ownKeys', Object.keys(monitor));//["name", "_r"]
}
reflect的使用
{
  let obj = {
    time: '2018-04-01',
    name:'app',
    _r:123
  };

  console.log('reflect get', Reflect.get(obj, 'time')); //reflect get 2018-04-01

  Reflect.set(obj, 'name', 'nihaoya');
  console.log('obj', obj);//{time: "2018-04-01", name: "nihaoya", _r: 123}

  console.log('has', Reflect.has(obj, 'name'));//has true
}
九、类
类的基本概念
基本语法 类的继承 静态方法
静态属性 getter setter
{
  //基本定义和生成实例
  class Parent {
      constructor( name = 'nihao') {
        this.name = name;
      }
  }

  let v_parent = new Parent('v');
  console.log('构造函数和实例', v_parent);//构造函数和实例 Parent {name: "v"}
}
继承
{
  //继承
  class Parent{
    constructor(name = 'nihao') {
      this.name = name;
    }
  }

  class Child extends Parent {

  }

  console.log('继承', new Child());//继承 Child {name: "nihao"}
}
继承传递参数
{
  //继承传递参数
  class Parent{
    constructor(name = 'nihao') {
      this.name = name;
    }
  }

  class Child extends Parent {
    constructor(name = 'child') {
      super(name);
    }
  }

  console.log('继承传递参数', new Child());//继承传递参数 _Child {name: "child"}

  console.log('继承传递参数', new Child('lcc'));//继承传递参数 _Child {name: "lcc"}
}
getter setter | 静态方法 | 静态属性
{
  //getter  setter
  class Parent{
    constructor(name = 'nihao') {
      this.name = name;
    }

    get longName() {
      return 'lcc' + this.name;
    }

    set longName(value) {
      this.name = value;
    }
  }

  let v = new Parent();
  console.log('getter', v.longName); //getter lccnihao

  v.longName = 'hello';
  console.log('setter', v.longName); //setter lcchello
}

{
  //静态方法 用类调用,而不是用类的实例调用
  class Parent{
    constructor(name = 'nihao') {
      this.name = name;
    }

    static tell() {
      console.log('tell');
    }
  }

  Parent.tell();
}

{
  //静态属性
  class Parent{
    constructor(name = 'nihao') {
      this.name = name;
    }
  }

  Parent.type = 'test';

  console.log('静态属性', Parent.type); //静态属性 test
}
十、Promise
Promise是解决异步操作顺序应用的,什么是异步,Promise的作用,Promise 的基本用法
如下输出的顺序是 执行 然后是 timeout1 如果代码很多是很难知道哪一个先执行的,因此引入Promise
{
  //基本定义
   let ajax = function (callback) {
     console.log('执行');
     setTimeout( function () {
       callback&&callback.call();
     }, 1000);
   }
   ajax(function () {
     console.log('timeout1');
   })
}
{
  let ajax = function () {
    console.log('执行2');
    return new Promise(function (resolve, reject) {
      setTimeout(function () {
        resolve();
      }, 1000)
    })
  }

  ajax().then(function () {
    console.log('promist', 'timeout2'); //promist timeout2
  })
}

{
  let ajax = function () {
    console.log('执行3');
    return new Promise(function (resolve, reject) {
      setTimeout(function () {
        resolve();
      }, 1000)
    })
  }

  ajax().then(function () {
    return new Promise(function ( resolve, reject ) {
        setTimeout(function () {
          resolve()
        }, 2000)
    }).then(function () {
      console.log('timeout3');
    })
  })
}
Cache的使用
{
  let ajax = function (num) {
    console.log('执行4');
    return new Promise(function (resolve, reject) {
      if ( num > 5 ) {
        resolve();
      } else {
        throw new Error('出错了');
      }
    })
  }

  ajax(6).then(function () {
    console.log('log', 6);
  }).catch(function (err) {
    console.log('catch', err);
  })

  ajax(3).then(function () {
    console.log('log', 3);
  }).catch(function (err) {
    console.log('catch', err);
  })

}
十一、Lterator 和 for ... of 循环
什么是lterator 接口
lterator 的基本用法
for ... of
{
  let arr = ['hello', 'world'];
  let map = arr[Symbol.iterator]();
  console.log(map.next());
  console.log(map.next());
  console.log(map.next());
  //{value: "hello", done: false}
  //{value: "world", done: false}
  //{value: undefined, done: true}
}

{
  let obj = {
    start:[1,3,2],
    end:[7,9,8],
    [Symbol.iterator](){
      let self = this;
      let index = 0;
      let arr = self.start.concat(self.end);
      let len = arr.length;
      return {
        next(){
          if ( index < len ) {
            return {
              value: arr[index++],
              done: false,
            }
          } else {
            return {
              value: arr[index++],
              done: true
            }
          }
        }
      }
    }
  }

  for ( let key of obj ) {
    console.log(key);
  }
}
{
  let arr = ['hello', 'world'];
  for (let key of arr) {
    console.log('value', key);
  }
}
十二、模块化
基本概念, ES6的模块语法
Export 的导出 Import 的导入
未完待续......

 浙公网安备 33010602011771号