

如何在java中模拟并发请求
一、背景
有时需要测试一下某个功能的并发性能,又不要想借助于其他工具,因此需要自己在java中模拟并发请求,其原理在于多开几个线程,同时发起请求。但是,这种请求,一般会存在启动的先后顺序了,算不得真正的同时并发!怎么样才能做到真正的同时并发呢?是本文想说的点,java中提供了闭锁 CountDownLatch, 刚好就用来做这种事就最合适了。
二、利用CountDownLatch
1. 开启n个线程,加一个闭锁,开启所有线程;
2. 待所有线程都准备好后,按下开启按钮,就可以真正的发起并发请求了。代码如下
1 2 3 4 5 6 7 8 9 10 11 12 13 14 15 16 17 18 19 20 21 22 23 24 25 26 27 28 29 30 31 32 33 34 35 36 37 38 39 40 41 42 43 44 45 46 47 48 49 50 51 52 53 54 55 56 57 58 59 | @Slf4jpublic class LatchTest { public static void main(String[] args) throws InterruptedException { Runnable task = new Runnable() { private final AtomicInteger threadNumber = new AtomicInteger(1); @Override public void run() { for (int i = 0; i < 2; i++) { // 发起请求,视业务而定// HttpClientOp.doGet("https://www.baidu.com/"); log.info(LocalDateTime.now()+": " + Thread.currentThread().getName() + "-threadNumber = {} is doing", threadNumber.getAndIncrement()); try { Thread.sleep(100); } catch (InterruptedException e) { e.printStackTrace(); } } } }; startTaskAllInOnce(5, task); } private static void startTaskAllInOnce(int nThreads, final Runnable task) throws InterruptedException { final CountDownLatch startGate = new CountDownLatch(1); final CountDownLatch endGate = new CountDownLatch(nThreads); for (int i = 0; i < nThreads; i++) { Thread t = new Thread() { public void run() { try { // 使线程在此等待,当开始门打开时,一起涌入门中 startGate.await(); try { task.run(); } finally { // 将结束门减1,减到0时,就可以开启结束门了 endGate.countDown(); } } catch (InterruptedException e) { log.error(e.getMessage(), e); } } }; t.setName("LatchThread-" + i); log.info(t.getName() + " is waiting to do sth"); t.start(); } log.info("StartTime: {}" + " startGate open", LocalDateTime.now()); // 因开启门只有一个开关,所以立马就开启开始门 startGate.countDown(); // 等等结束门开启 endGate.await(); log.info("endTime: {}" + " All threads is completed.", LocalDateTime.now()); }} |
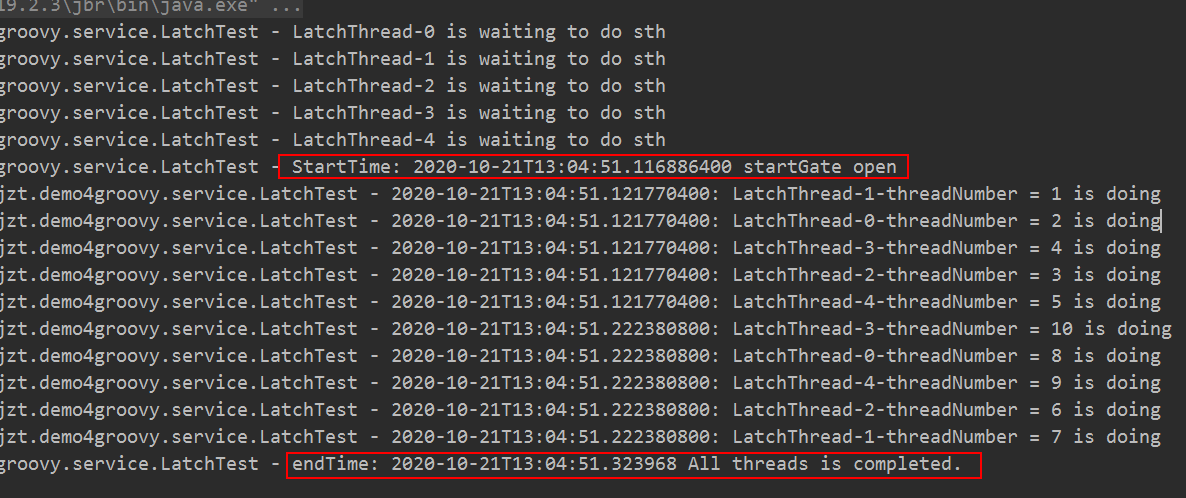
其执行效果如下图所示:
其中httpClientOp工具类代码如下
1 2 3 4 5 6 7 8 9 10 11 12 13 14 15 16 17 18 19 20 21 22 23 24 25 26 27 28 29 30 31 32 33 34 35 36 37 38 39 40 41 42 43 44 45 46 47 48 49 50 51 52 53 54 55 56 57 58 59 60 61 62 63 64 65 66 67 68 69 70 71 72 73 74 75 76 77 78 79 80 81 82 83 84 85 86 87 88 89 90 91 92 93 94 95 96 97 98 99 100 101 102 103 104 105 106 107 108 109 110 111 112 113 114 115 116 117 118 119 120 121 122 123 124 125 126 127 128 129 130 131 132 133 134 135 136 137 138 139 140 | class HttpClientOp { public static String doGet(String httpurl) { HttpURLConnection connection = null; InputStream is = null; BufferedReader br = null; String result = null;// 返回结果字符串 try { // 创建远程url连接对象 URL url = new URL(httpurl); // 通过远程url连接对象打开一个连接,强转成httpURLConnection类 connection = (HttpURLConnection) url.openConnection(); // 设置连接方式:get connection.setRequestMethod("GET"); // 设置连接主机服务器的超时时间:15000毫秒 connection.setConnectTimeout(15000); // 设置读取远程返回的数据时间:60000毫秒 connection.setReadTimeout(60000); // 发送请求 connection.connect(); // 通过connection连接,获取输入流 if (connection.getResponseCode() == 200) { is = connection.getInputStream(); // 封装输入流is,并指定字符集 br = new BufferedReader(new InputStreamReader(is, "UTF-8")); // 存放数据 StringBuffer sbf = new StringBuffer(); String temp = null; while ((temp = br.readLine()) != null) { sbf.append(temp); sbf.append("\r\n"); } result = sbf.toString(); } } catch (MalformedURLException e) { e.printStackTrace(); } catch (IOException e) { e.printStackTrace(); } finally { // 关闭资源 if (null != br) { try { br.close(); } catch (IOException e) { e.printStackTrace(); } } if (null != is) { try { is.close(); } catch (IOException e) { e.printStackTrace(); } } connection.disconnect();// 关闭远程连接 } return result; } public static String doPost(String httpUrl, String param) { HttpURLConnection connection = null; InputStream is = null; OutputStream os = null; BufferedReader br = null; String result = null; try { URL url = new URL(httpUrl); // 通过远程url连接对象打开连接 connection = (HttpURLConnection) url.openConnection(); // 设置连接请求方式 connection.setRequestMethod("POST"); // 设置连接主机服务器超时时间:15000毫秒 connection.setConnectTimeout(15000); // 设置读取主机服务器返回数据超时时间:60000毫秒 connection.setReadTimeout(60000); // 默认值为:false,当向远程服务器传送数据/写数据时,需要设置为true connection.setDoOutput(true); // 默认值为:true,当前向远程服务读取数据时,设置为true,该参数可有可无 connection.setDoInput(true); // 设置传入参数的格式:请求参数应该是 name1=value1&name2=value2 的形式。 connection.setRequestProperty("Content-Type", "application/x-www-form-urlencoded"); // 设置鉴权信息:Authorization: Bearer da3efcbf-0845-4fe3-8aba-ee040be542c0 connection.setRequestProperty("Authorization", "Bearer da3efcbf-0845-4fe3-8aba-ee040be542c0"); // 通过连接对象获取一个输出流 os = connection.getOutputStream(); // 通过输出流对象将参数写出去/传输出去,它是通过字节数组写出的 os.write(param.getBytes()); // 通过连接对象获取一个输入流,向远程读取 if (connection.getResponseCode() == 200) { is = connection.getInputStream(); // 对输入流对象进行包装:charset根据工作项目组的要求来设置 br = new BufferedReader(new InputStreamReader(is, "UTF-8")); StringBuffer sbf = new StringBuffer(); String temp = null; // 循环遍历一行一行读取数据 while ((temp = br.readLine()) != null) { sbf.append(temp); sbf.append("\r\n"); } result = sbf.toString(); } } catch (MalformedURLException e) { e.printStackTrace(); } catch (IOException e) { e.printStackTrace(); } finally { // 关闭资源 if (null != br) { try { br.close(); } catch (IOException e) { e.printStackTrace(); } } if (null != os) { try { os.close(); } catch (IOException e) { e.printStackTrace(); } } if (null != is) { try { is.close(); } catch (IOException e) { e.printStackTrace(); } } // 断开与远程地址url的连接 connection.disconnect(); } return result; }} |
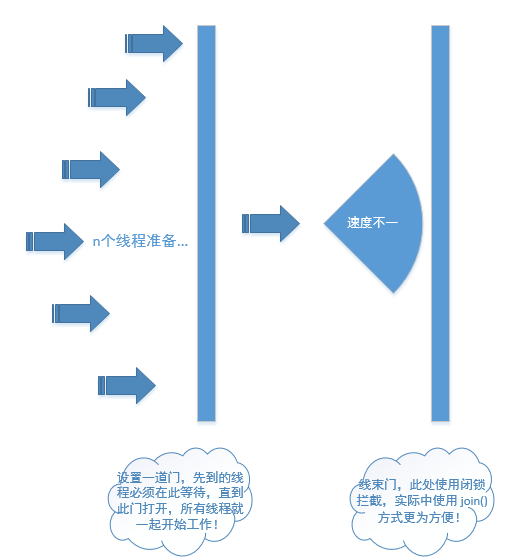
3. 并发请求操作流程示意图如下:
缺点:此处设置了一道门,以保证所有线程可以同时生效。但是,此处的同时启动,也只是语言层面的东西,也并非绝对的同时并发。具体的调用还要依赖于CPU个数,线程数及操作系统的线程调度功能等,不过咱们也无需纠结于这些了,重点在于理解原理!
三、扩展
与 CountDownLatch 有类似功能的,还有个工具栅栏 CyclicBarrier, 也是提供一个等待所有线程到达某一点后,再一起开始某个动作,效果一致,不过栅栏的目的确实比较纯粹,就是等待所有线程到达,而前面说的闭锁 CountDownLatch 虽然实现的也是所有线程到达后再开始,但是他的触发点其实是 最后那一个开关,所以侧重点是不一样的。
简单看一下栅栏是如何实现真正同时并发呢?示例如下:
1 2 3 4 5 6 7 8 9 10 11 12 13 14 15 16 17 18 19 20 21 22 23 24 25 26 27 28 29 30 31 32 33 34 35 36 37 38 39 40 41 42 43 44 45 46 47 48 49 50 51 52 53 54 55 56 57 58 | // 与 闭锁 结构一致public class LatchTest { public static void main(String[] args) throws InterruptedException { Runnable taskTemp = new Runnable() { private int iCounter; @Override public void run() { // 发起请求// HttpClientOp.doGet("https://www.baidu.com/"); iCounter++; System.out.println(System.nanoTime() + " [" + Thread.currentThread().getName() + "] iCounter = " + iCounter); } }; LatchTest latchTest = new LatchTest();// latchTest.startTaskAllInOnce(5, taskTemp); latchTest.startNThreadsByBarrier(5, taskTemp); } public void startNThreadsByBarrier(int threadNums, Runnable finishTask) throws InterruptedException { // 设置栅栏解除时的动作,比如初始化某些值 CyclicBarrier barrier = new CyclicBarrier(threadNums, finishTask); // 启动 n 个线程,与栅栏阀值一致,即当线程准备数达到要求时,栅栏刚好开启,从而达到统一控制效果 for (int i = 0; i < threadNums; i++) { Thread.sleep(100); new Thread(new CounterTask(barrier)).start(); } System.out.println(Thread.currentThread().getName() + " out over..."); }}class CounterTask implements Runnable { // 传入栅栏,一般考虑更优雅方式 private CyclicBarrier barrier; public CounterTask(final CyclicBarrier barrier) { this.barrier = barrier; } public void run() { System.out.println(Thread.currentThread().getName() + " - " + System.currentTimeMillis() + " is ready..."); try { // 设置栅栏,使在此等待,到达位置的线程达到要求即可开启大门 barrier.await(); } catch (InterruptedException e) { e.printStackTrace(); } catch (BrokenBarrierException e) { e.printStackTrace(); } System.out.println(Thread.currentThread().getName() + " - " + System.currentTimeMillis() + " started..."); }} |
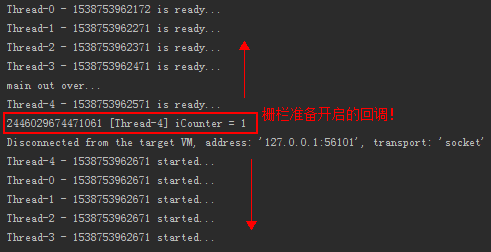
其运行结果如下图:
分类:
多线程与并发


【推荐】国内首个AI IDE,深度理解中文开发场景,立即下载体验Trae
【推荐】编程新体验,更懂你的AI,立即体验豆包MarsCode编程助手
【推荐】抖音旗下AI助手豆包,你的智能百科全书,全免费不限次数
【推荐】轻量又高性能的 SSH 工具 IShell:AI 加持,快人一步
· 开发者必知的日志记录最佳实践
· SQL Server 2025 AI相关能力初探
· Linux系列:如何用 C#调用 C方法造成内存泄露
· AI与.NET技术实操系列(二):开始使用ML.NET
· 记一次.NET内存居高不下排查解决与启示
· Manus重磅发布:全球首款通用AI代理技术深度解析与实战指南
· 被坑几百块钱后,我竟然真的恢复了删除的微信聊天记录!
· 没有Manus邀请码?试试免邀请码的MGX或者开源的OpenManus吧
· 园子的第一款AI主题卫衣上架——"HELLO! HOW CAN I ASSIST YOU TODAY
· 【自荐】一款简洁、开源的在线白板工具 Drawnix