8. Git 远程协作
前言
该文章只是记录了一些自己的见解,可能并不准确,只是为了学习时的一些记录,不喜勿喷,谢谢
本章主要介绍多用户下如何协同开发,因为在我们的企业开发中,一个工程一般是由多个开发者共同开发的,而在之前的文章中,主要是介绍了本次仓库的使用,现在在多用户下,我们要将本地仓库的代码推动到远程的服务器中,可能存在多个用户修改了同一份文件的情况,出现冲突的情况等等,下面我们来看看
1. GitHub
再多用户的情况下,我们要把本地的代码放入到一个远程的服务器中,我们可以自己搭建一个gitlab,也可以使用著名的开源代码托管网站 Github,github是可以选择创建私有仓库和公开仓库,如果想要创建私有仓库(即只有自己能开到或者指定权限的才能看到,以及修改),即需要购买服务,而我们一般使用github,都是使用免得的公开仓库。当然由于github是国外网站,网速可能访问过慢,也可以使用国内的码云gitee平台,其操作是一样的。
至于 Github的使用,这里就不介绍了,可以在网上查找相关博客进行学习,例如:https://blog.csdn.net/qq_41782425/article/details/85183250
现在,我们重新创建一个本地仓库,指定用户为用户A,操作如下:
[root@huangzb mygit]# mkdir git1
[root@huangzb mygit]#
[root@huangzb mygit]# cd git1/
[root@huangzb git1]#
[root@huangzb git1]# git init
Initialized empty Git repository in /root/mygit/git1/.git/
[root@huangzb git1]# git config --local user.name '用户A'
[root@huangzb git1]# git config --local user.email '用户A@A.com'
[root@huangzb git1]# cd -
/root/mygit
[root@huangzb mygit]# cd git2/
[root@huangzb git2]# git init
Initialized empty Git repository in /root/mygit/git2/.git/
[root@huangzb git2]# git config --local user.name '用户B'
[root@huangzb git2]# git config --local user.email '用户B@B.com'
[root@huangzb git2]#
现在,我们即将在git1中添加文件,然后将代码推动到远程中,具体操作继续看。
2. 首次推送代码到远程--未自动创建README.md
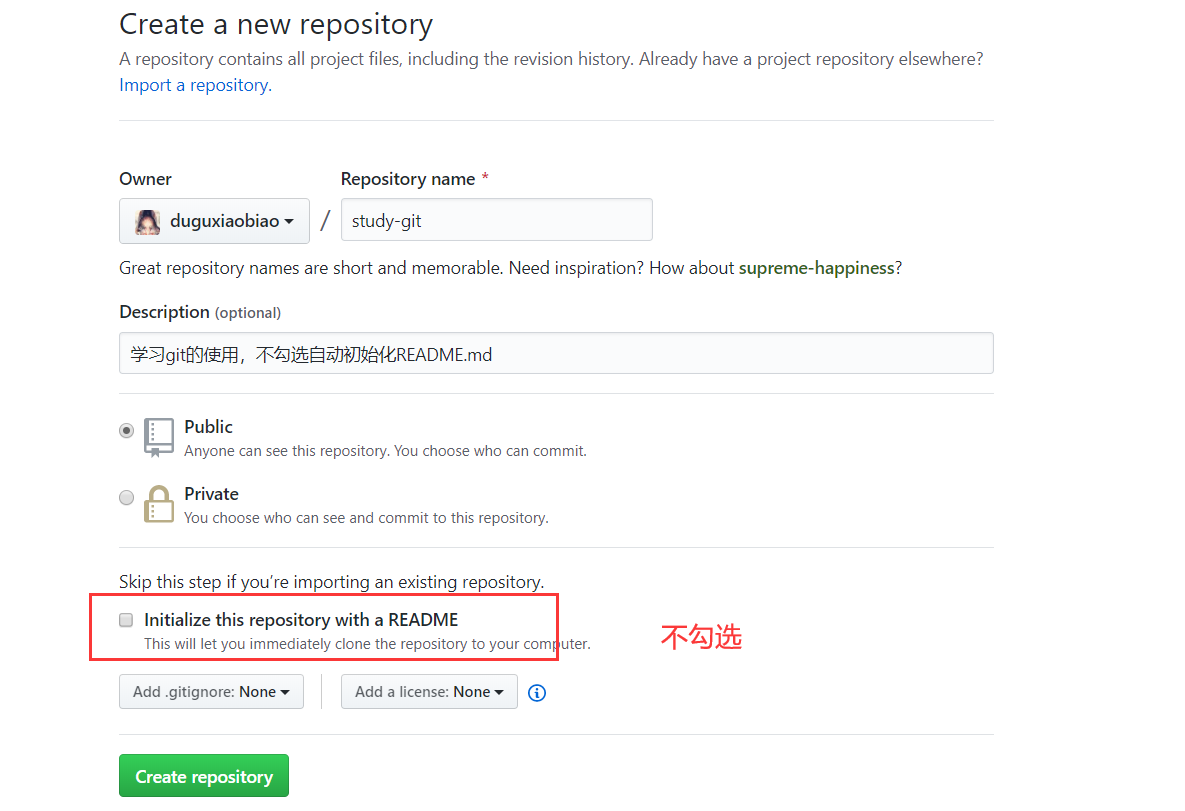
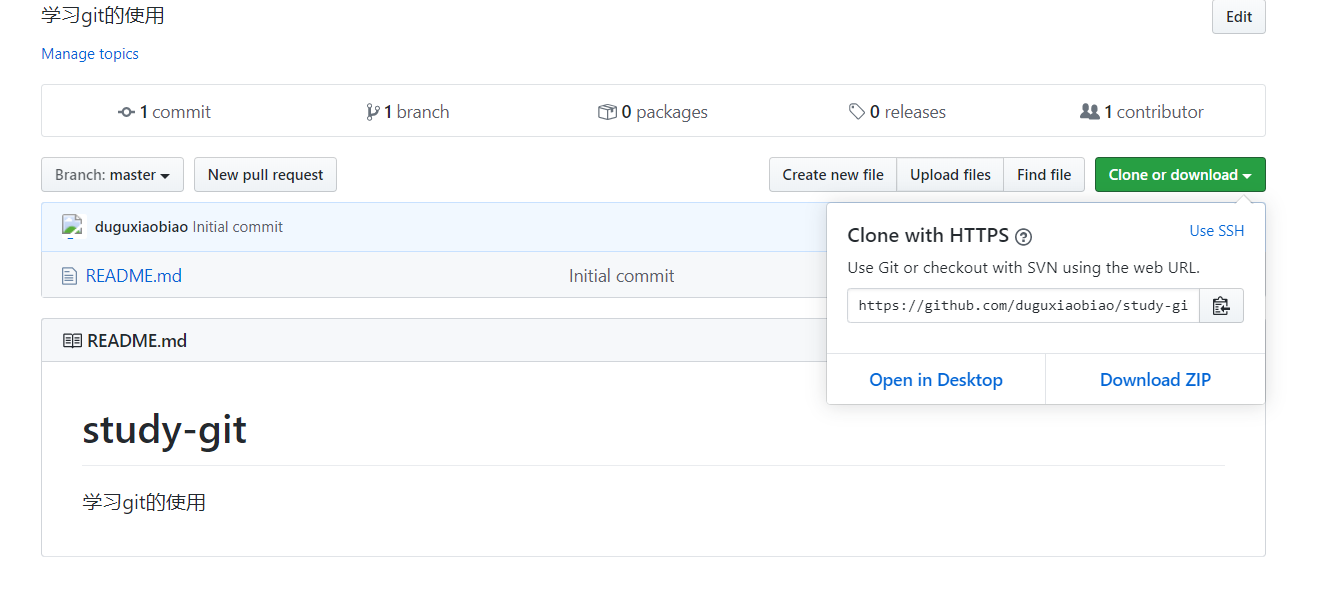
由上图可知,我们在github中创建了一个空的仓库,现在我们在本地库中编写代码,然后推动到远程仓库中,操作如下:
[root@huangzb git1]#
[root@huangzb git1]# echo 'hello 用户A' > welcome.txt
[root@huangzb git1]# git add .
[root@huangzb git1]# echo '学习git' > README.md
[root@huangzb git1]# git add .
[root@huangzb git1]# git commit -m 'init and create welcome.txt'
[master (root-commit) 11386c7] init and create welcome.txt
2 files changed, 2 insertions(+)
create mode 100644 README.md
create mode 100644 welcome.txt
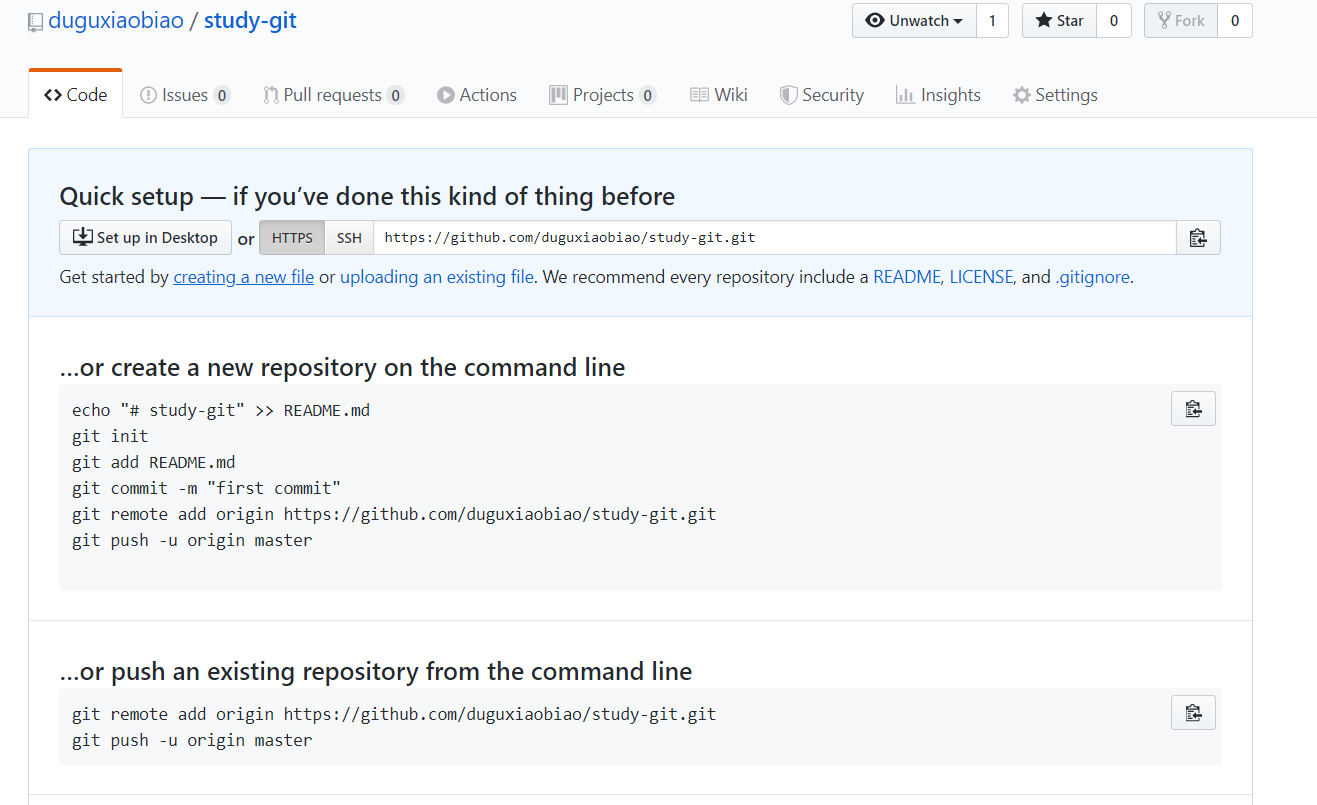
[root@huangzb git1]# git remote add origin https://github.com/duguxiaobiao/study-git.git
[root@huangzb git1]# git push -u origin master
Username for 'https://github.com': duguxiaobiao
Password for 'https://duguxiaobiao@github.com':
Counting objects: 4, done.
Compressing objects: 100% (2/2), done.
Writing objects: 100% (4/4), 293 bytes | 293.00 KiB/s, done.
Total 4 (delta 0), reused 0 (delta 0)
To https://github.com/duguxiaobiao/study-git.git
* [new branch] master -> master
Branch 'master' set up to track remote branch 'master' from 'origin'.
[root@huangzb git1]#
由上图操作后,我们将本地创建的两个文件推动到了github中,可以去github中看看是否提交上去了。
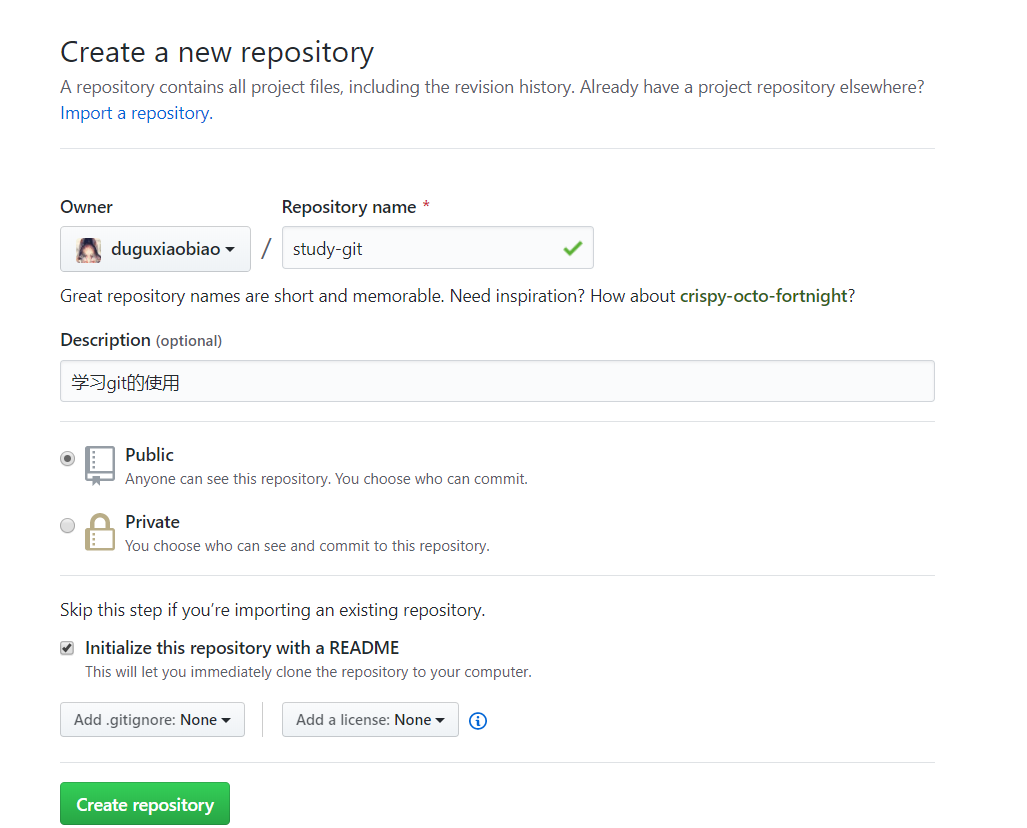
2. 首次推送代码到远程--勾选自动创建README.md
现在,先去github中删除掉之前创建的远程仓库,且重新初始化本地仓库,演示一下当我们在github中创建仓库的时候勾选了自动初始化README.md 与不勾选的差别
我们先去github中创建一个仓库,然后下面勾选自动初始化 README.md
在上述中,已经在github中创建了一个远程仓库,现在,我们要在本地仓库中编写代码,然后推动到远程仓库,下面我们来看看如何操作
[root@huangzb git1]# echo 'hello 用户A' > welcome.txt
[root@huangzb git1]# git add .
[root@huangzb git1]# git commit -m 'create welcome.txt'
[master (root-commit) dc98a4a] create welcome.txt
1 file changed, 1 insertion(+)
create mode 100644 welcome.txt
[root@huangzb git1]# git remote add origin https://github.com/duguxiaobiao/study-git.git
[root@huangzb git1]# git push -u origin master
Username for 'https://github.com': duguxiaobiao
Password for 'https://duguxiaobiao@github.com':
To https://github.com/duguxiaobiao/study-git.git
 ! [rejected]        master -> master (fetch first)
error: failed to push some refs to 'https://github.com/duguxiaobiao/study-git.git'
hint: Updates were rejected because the remote contains work that you do
hint: not have locally. This is usually caused by another repository pushing
hint: to the same ref. You may want to first integrate the remote changes
hint: (e.g., 'git pull ...') before pushing again.
hint: See the 'Note about fast-forwards' in 'git push --help' for details.
由上图可知,我们在git1仓库中创建了一个 welcome.txt文件,然后使用 git remote 命令将本地和远程仓库进行关联,然后使用 git push -u origin master 命令将本地代码推送到远程。结果出现了异常。
那么异常出现的原因是什么呢?
因为我们在github上创建新仓库时勾选了同时创建 README.md 文件,导致远程仓库中有了一次提交。而将本地代码推送到github上时,发现本地比远程落后一个版本,因此git要求我们先执行git pull ,然后在进行提交
我们可以去github仓库中看下,是否如我们所说的那样,在github中已存在一个提交节点

如图,确实在github中存在了一个提交节点,而且该提交节点就是github为我们创建的readme.md 文件。
下面,我们就先来使用 git pull 命令来从远程仓库拉去代码,看看效果
[root@huangzb git1]# git pull origin master
From https://github.com/duguxiaobiao/study-git
 * branch            master     -> FETCH_HEAD
fatal: refusing to merge unrelated histories
[root@huangzb git1]#
可以发现会提示异常,因为目前两个仓库提交历史不一致,无法直接合并,解决方案可以参考博客:
https://www.centos.bz/2018/03/git-出现-fatal-refusing-to-merge-unrelated-histories-错误/
说白了,就是使用参数,进行两个分支的强制合并,操作如下:
[root@huangzb git1]# git pull origin master --allow-unrelated-histories
From https://github.com/duguxiaobiao/study-git
 * branch            master     -> FETCH_HEAD
Merge made by the 'recursive' strategy.
README.md | 2 ++
1 file changed, 2 insertions(+)
create mode 100644 README.md
[root@huangzb git1]# git log
commit d525f8165e90df6b424ddf578438374e8962ac95 (HEAD -> master)
Merge: dc98a4a ea10777
Author: 用户A <用户A@A.com>
Date:   Sat Apr 4 13:21:29 2020 +0800

    Merge branch 'master' of https://github.com/duguxiaobiao/study-git

commit dc98a4acd49edc2c34c39fa9ceb5d57c3f3fe9d4
Author: 用户A <用户A@A.com>
Date:   Thu Apr 2 18:09:27 2020 +0800

    create welcome.txt

commit ea1077739ce11fedcbc07bfa9660b149881247db (origin/master)
Author: xxx <xxx@qq.com>
Date:   Thu Apr 2 17:57:38 2020 +0800

    Initial commit
[root@huangzb git1]#
使用命令 git pull origin master --allow-unrelated-histories 即可以强制性的将两个不同分支的历史强制合并。此时,我们的本地仓库确实有了远程仓库的提交版本以及最新数据,但是远程库中还是原有的数据,我们未将自己本地库的操作推动到远程仓库中,因此,下面我们需要使用命令 git push -u origin master 来进行推送到远程仓库,操作如下:
[root@huangzb git1]# git push -u origin master
Username for 'https://github.com': duguxiaobiao
Password for 'https://duguxiaobiao@github.com':
Counting objects: 5, done.
Compressing objects: 100% (3/3), done.
Writing objects: 100% (5/5), 543 bytes | 543.00 KiB/s, done.
Total 5 (delta 0), reused 0 (delta 0)
To https://github.com/duguxiaobiao/study-git.git
   ea10777..d525f81  master -> master
Branch 'master' set up to track remote branch 'master' from 'origin'.
[root@huangzb git1]#
如上图操作,操作完后,可以去github中看到已经将在本地创建的 welcome.txt 推动到了github中。
3. 总结首次推动代码到远程
这里的首次推送代码到远程,指的是 不是使用git clone命令先从远程仓库中克隆到本地的,而是现在本地编写代码,然后第一次与远程仓库进行关联的, 然后推动到远程仓库中的。
上述的 STEP1 和 STEP2 涉及了以下命令
- git push
- git poll
- git remote add origin https://xxxx
下面来介绍下这些命令的使用
3.1 git remote add origin https://xxx
该段命令意思就是添加远程仓库地址,即当我们想将本地的代码提交到远程的时候,此时本地代码需要绑定一个远程仓库地址,便于我们的提交和下载,但是注意的是,我们不仅仅只能添加一个远程仓库,这里可以绑定多个,即我们的本地代码可以推动到不同的远程仓库,例如我们的代码可以提交到github,也可以提交到gitee中
git remote add 远程仓库别名 远程仓库地址
这里的 origin 代表着后续的一段远程仓库地址,因为地址比较难记,我们可以直接给与一个别名,方便我们的记忆,这里的名字理论上可以随便命令,但是通用的规范是命令为 origin,当然,也可以不叫这个,只是规范而已。
3.2 git push -u origin master
该段命令意思就是 将本地的master分支的代码提及到 远程仓库,仓库地址是 origin,因为是首次将本地和远程仓库进行关联,所以需要添加 -u 参数,用于绑定本地和远程,绑定成功后,后续的推动操作,可以直接使用命令 git push即可
3.3 git pull
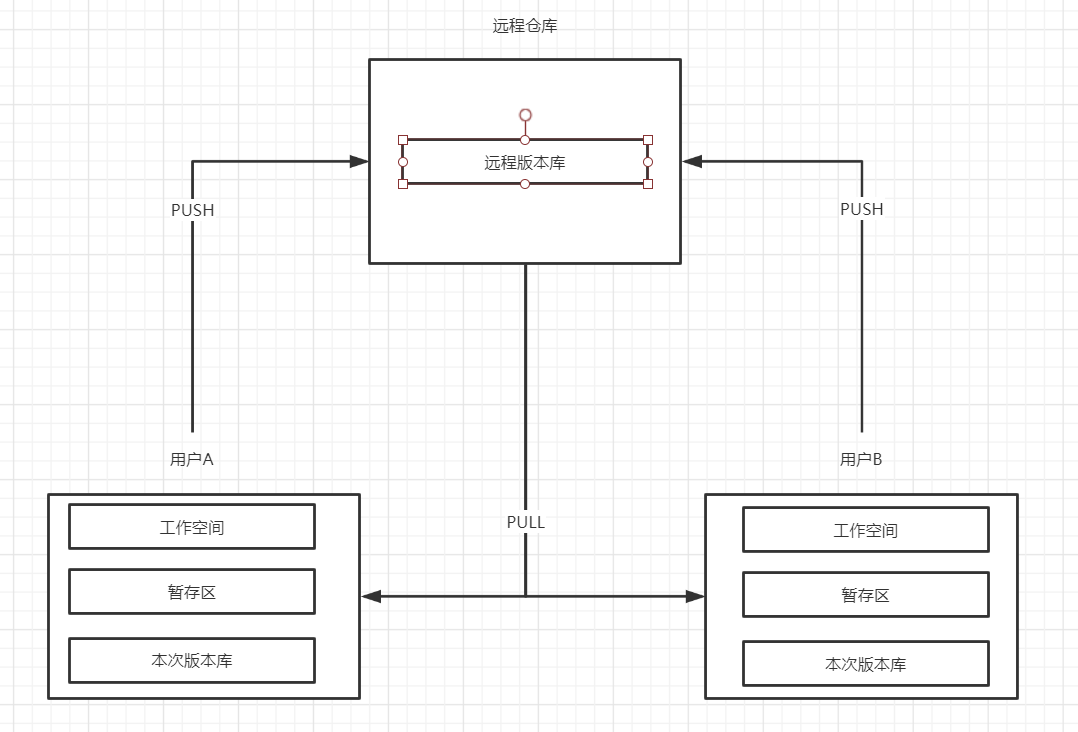
该段命令意思就就是将远程仓库的最新提交拉取到本地仓库中,该段命令是由 命令 git fetch 和 git merge 两个命令的组合操作。首先 git fetch 命令 将远程仓库的版本拉取到 本地的 远程版本库(这里的本地远程版本库,意思就是本地中对应远程的映射,有点绕,原理后续介绍),此时对于我们本地的工作空间没有影响,然后使用 git merge 命令后将远程的最新代码和本地的代码如果不存在冲突,则直接合并,如果存在冲突,则会让我们先解决冲突后,然后再次推送到远程。
但是在STEP1 中 和 STEP2 中使用的 git poll 命令不一样,在STEP1中,因为在github中,没有选择初始化README.md文件,远程仓库是一个空的仓库,因此在本地中使用 git push 没有冲突,可以推送成功,但是在STEP2中,由于选择初始化了README.md 文件,导致github仓库多出了一个提交点,因此推动代码的时候发现本地和远程存在不同的提交点,导致不能直接使用命令git push,需要先从远程拉取代码,需要使用到命令git poll,但是由于此时 本地和远程还没有进行绑定,因此需要使用参数 --allow-unrelated-histories 将互不关联的仓库进行强行合并关联。
4. 新开发下载代码
在STEP1, STEP2 中,模拟的是我们自己作为某一个项目的第一个开发者,首先搭建了一个基础框架后,将本地代码推动到远程仓库,但是,后续的新开发者们,不需要在自己的电脑中类似第一个开发者一样,自己写代码提交,建立本地仓库等等。
此时,git作为分布式协同开发工具,自然涉及到多个用户者,这里模拟一个新的开发者 用户B,首次从远程代码中下载代码,具体操作如下:
[root@huangzb mygit]# mkdir git2
[root@huangzb mygit]# cd git2
[root@huangzb git2]#
[root@huangzb git2]# git clone https://github.com/duguxiaobiao/study-git.git
Cloning into 'study-git'...
remote: Enumerating objects: 4, done.
remote: Counting objects: 100% (4/4), done.
remote: Compressing objects: 100% (2/2), done.
remote: Total 4 (delta 0), reused 4 (delta 0), pack-reused 0
Unpacking objects: 100% (4/4), done.
[root@huangzb git2]# tree
.
└── study-git
    ├── README.md
    └── welcome.txt

1 directory, 2 files
[root@huangzb git2]#
由上图操作可以,我们新创建了一个目录 git2,作为新用户的代码目录,然后使用命令git clone ,将远程仓库克隆了一份到本地,可以看到目录 git2中多出了一个项目,项目名为 github 的指定仓库的项目名,里面的内容跟远程仓库的数据一致,因为远程仓库中存在版本库的概念,因此 git2目录中的 study-git 目录中同样存在了相同的版本信息,也就是不再需要我们使用 git init 来创建本地仓库了。
上述操作中,使用了一个命令 git clone https://github.com/duguxiaobiao/study-git.git
该命令用于将指定地址的远程仓库版本库拉取到本地的当前目录,默认是以远程仓库的仓库名作为目录名,在当前目录中创建该目录,以及里面存放的所有数据。
当然,有默认的目录名, 就会有指定目录名,假设不想使用 study-git 作为目录名,指定目录名为 mystudy-git,则使用命令 git clone https://github.com/duguxiaobiao/study-git.git mystudy-git , 即在原始的命令后面追加想要的目录名即可,操作如下:
[root@huangzb git2]# rm -rf *
[root@huangzb git2]# ll -a
total 8
drwxr-xr-x 2 root root 4096 Apr  5 21:55 .
drwxr-xr-x 4 root root 4096 Apr  5 21:38 ..
[root@huangzb git2]#
[root@huangzb git2]# git clone https://github.com/duguxiaobiao/study-git.git mystudy-git
Cloning into 'mystudy-git'...
remote: Enumerating objects: 4, done.
remote: Counting objects: 100% (4/4), done.
remote: Compressing objects: 100% (2/2), done.
Unpacking objects: 100% (4/4), done.
remote: Total 4 (delta 0), reused 4 (delta 0), pack-reused 0
[root@huangzb git2]# ll
total 4
drwxr-xr-x 3 root root 4096 Apr  5 21:55 mystudy-git
[root@huangzb git2]#
从上图可以看到,我们先将刚下载的代码进行删除,然后重新下载版本库,且命名为 mystudy-git
此时为了区分用户A,我们需要为用户B配置一下用户名和邮箱,操作如下:
[root@huangzb mystudy-git]# git config --local user.name '用户B'
[root@huangzb mystudy-git]# git config --local user.email '用户B@B.com'
[root@huangzb mystudy-git]#
现在,我们使用用户B,创建一个新的文件,在练习一下推送命令,操作如下:
[root@huangzb mystudy-git]# ll
total 8
-rw-r--r-- 1 root root 10 Apr  5 21:55 README.md
-rw-r--r-- 1 root root 14 Apr  5 21:55 welcome.txt
[root@huangzb mystudy-git]#
[root@huangzb mystudy-git]# echo 'hello 用户B' > hello.txt
[root@huangzb mystudy-git]# git add .
[root@huangzb mystudy-git]# git commit -m 'clone data, create hello.txt'
[master 34d5c96] clone data, create hello.txt
1 file changed, 1 insertion(+)
create mode 100644 hello.txt
[root@huangzb mystudy-git]# git push
Username for 'https://github.com': duguxiaobiao
Password for 'https://duguxiaobiao@github.com':
Counting objects: 3, done.
Compressing objects: 100% (2/2), done.
Writing objects: 100% (3/3), 336 bytes | 336.00 KiB/s, done.
Total 3 (delta 0), reused 0 (delta 0)
To https://github.com/duguxiaobiao/study-git.git
   11386c7..34d5c96  master -> master
[root@huangzb mystudy-git]# ll
total 12
-rw-r--r-- 1 root root 14 Apr  5 22:01 hello.txt
-rw-r--r-- 1 root root 10 Apr  5 21:55 README.md
-rw-r--r-- 1 root root 14 Apr  5 21:55 welcome.txt
[root@huangzb mystudy-git]#
从上图中,可以看出,我们在本地创建了一个 hello.txt 文件,然后使用命令 git push ,将本地代码推动到了远程仓库,
有人可能会问,为什么在 STEP1中,使用命令 git push 需要添加参数 -u ,但是这里直接就可以了?
因为使用 git clone 命令,首先会将远程的版本库全部克隆一份到本地,本地不需要自己创建仓库了,其次,会自动的建立远程仓库和本地仓库的关联,想想也是,本地仓库都是由远程仓库来自动创建的。
5. 模拟多用户协同开发的冲突场景
再多用户的情况中,必然存在冲突场景,举个例子来说,对于同一个文件,可能有多个问题在不同的工作目录中进行修改,然后都推送到远程仓库中,那么第一个推送的用户不会产生冲突,因为远程仓库中还没有修改该文件,但是推动成功后,远程仓库的文件修改了,第二个修改了该文件的用户再将本地的修改推动到远程仓库的时候,因为远程的文件已经被修改过了,此时就会产生冲突,此时git不知道如何处理该文件,因此产生冲突的时候,是需要我们自己商量,来看看如何手动合并的。
在演示冲突之前,告诉大家一个普遍的规范,即在推动代码之前,都需要先拉取远程代码,避免提交的时候才发现有冲突,这样就可以先拉取代码,有冲突的时候,商量如何解决冲突,解决完冲突后再推动到远程仓库中。
现在,我们就来模拟一下冲突场景----即用户A和用户B同时修改一个文件,操作如下:
用户A操作:
[root@huangzb git1]# ll
total 8
-rw-r--r-- 1 root root 10 Apr  4 13:42 README.md
-rw-r--r-- 1 root root 14 Apr  4 13:42 welcome.txt
[root@huangzb git1]#
[root@huangzb git1]# cat README.md
学习git
[root@huangzb git1]#
[root@huangzb git1]# echo '存在用户A' >> README.md
[root@huangzb git1]# git commit -am 'update README.md '
[master bede349] update README.md
1 file changed, 1 insertion(+)
[root@huangzb git1]#
[root@huangzb git1]# git pull
remote: Enumerating objects: 4, done.
remote: Counting objects: 100% (4/4), done.
remote: Compressing objects: 100% (2/2), done.
remote: Total 3 (delta 0), reused 3 (delta 0), pack-reused 0
Unpacking objects: 100% (3/3), done.
From https://github.com/duguxiaobiao/study-git
   11386c7..34d5c96  master     -> origin/master
Merge made by the 'recursive' strategy.
hello.txt | 1 +
1 file changed, 1 insertion(+)
create mode 100644 hello.txt
[root@huangzb git1]#
[root@huangzb git1]# git push
Username for 'https://github.com': duguxiaobiao
Password for 'https://duguxiaobiao@github.com':
Counting objects: 5, done.
Compressing objects: 100% (4/4), done.
Writing objects: 100% (5/5), 658 bytes | 658.00 KiB/s, done.
Total 5 (delta 0), reused 0 (delta 0)
To https://github.com/duguxiaobiao/study-git.git
   34d5c96..c4fb3bd  master -> master
[root@huangzb git1]# ll
total 12
-rw-r--r-- 1 root root 14 Apr  5 22:18 hello.txt
-rw-r--r-- 1 root root 24 Apr  5 22:18 README.md
-rw-r--r-- 1 root root 14 Apr  4 13:42 welcome.txt
[root@huangzb git1]#
此时,我们修改了 README.md 文件,现在在用户B中也来修改该文件
用户B操作如下:
[root@huangzb mystudy-git]# ll
total 12
-rw-r--r-- 1 root root 14 Apr  5 22:01 hello.txt
-rw-r--r-- 1 root root 10 Apr  5 21:55 README.md
-rw-r--r-- 1 root root 14 Apr  5 21:55 welcome.txt
[root@huangzb mystudy-git]#
[root@huangzb mystudy-git]# echo '存在用户B' >> README.md
[root@huangzb mystudy-git]# git commit -am '用户B update README.md'
[master c8488a0] 用户B update README.md
1 file changed, 1 insertion(+)
[root@huangzb mystudy-git]# git pull
remote: Enumerating objects: 9, done.
remote: Counting objects: 100% (8/8), done.
remote: Compressing objects: 100% (4/4), done.
remote: Total 5 (delta 0), reused 5 (delta 0), pack-reused 0
Unpacking objects: 100% (5/5), done.
From https://github.com/duguxiaobiao/study-git
   34d5c96..c4fb3bd  master     -> origin/master
Auto-merging README.md
CONFLICT (content): Merge conflict in README.md
Automatic merge failed; fix conflicts and then commit the result.
[root@huangzb mystudy-git]#
在用户B中,我们同样的修改了 README.md文件,在推送使用,使用 git poll 命令,拉取最新代码,果然如我们设想的那样,提示合并出现了冲突,我们来看看此时的 README.md 文件内容
[root@huangzb mystudy-git]# cat README.md
学习git
<<<<<<< HEAD
存在用户B
=======
存在用户A
>>>>>>> c4fb3bd12128f24cd27dbd00f9d3602c240279b7
[root@huangzb mystudy-git]#
此时的冲突,git无法自动合并,作为用户B,此时就需要找到用户A,来商量如何兼容该文件,现在,我们就来修改下该文件,然后重新提交,操作如下:
[root@huangzb mystudy-git]#
[root@huangzb mystudy-git]# vim README.md
[root@huangzb mystudy-git]#
[root@huangzb mystudy-git]# cat README.md
学习git
存在用户B
存在用户A
[root@huangzb mystudy-git]#
[root@huangzb mystudy-git]# git add .
[root@huangzb mystudy-git]# git commit -m '处理了冲突'
[master dd5f41e] 处理了冲突
[root@huangzb mystudy-git]# git push
Username for 'https://github.com': duguxiaobiao
Password for 'https://duguxiaobiao@github.com':
Counting objects: 6, done.
Compressing objects: 100% (4/4), done.
Writing objects: 100% (6/6), 697 bytes | 697.00 KiB/s, done.
Total 6 (delta 0), reused 0 (delta 0)
To https://github.com/duguxiaobiao/study-git.git
   c4fb3bd..dd5f41e  master -> master
[root@huangzb mystudy-git]#
此时,我们修改了该文件后,再调用 git add 命令,此时的 git add 命令意思就是告诉git,我已经解决了冲突,然后提交冲突,且将最新的文件推送到远程中。
现在,作为用户A,本地的代码不再是最新的了,我们可以使用 git pull 命令拉取最新的代码,操作如下图:
[root@huangzb git1]# git pull
remote: Enumerating objects: 10, done.
remote: Counting objects: 100% (10/10), done.
remote: Compressing objects: 100% (4/4), done.
remote: Total 6 (delta 0), reused 6 (delta 0), pack-reused 0
Unpacking objects: 100% (6/6), done.
From https://github.com/duguxiaobiao/study-git
   c4fb3bd..dd5f41e  master     -> origin/master
Updating c4fb3bd..dd5f41e
Fast-forward
README.md | 1 +
1 file changed, 1 insertion(+)
[root@huangzb git1]# cat README.md
学习git
存在用户B
存在用户A
[root@huangzb git1]#
可以看到,用户A中代码也是最新的
6. 关联远程版本库后本地分支的变化
我们使用命令git branch 来看看本地分支的情况
[root@huangzb git3]# git branch
* master
[root@huangzb git3]#
可以看到,本地只有一个分支 master,但是事实上真的如此吗,我们可以添加参数,看下所有的本地分支
[root@huangzb git3]# git branch -a
* master
  remotes/origin/HEAD -> origin/master
  remotes/origin/master
[root@huangzb git3]#
这次,我们看到了三个分支,但是我们应该只有一个master分支,其中的 origin/master 分支我们没有创建过,哪里来的呢?
其实,另外的origin/master分支,是由远程仓库来为我们创建的,这也是作为git分布式的重点之一,在本地创建了一个与远程版本库镜像,即使有人误操作,删除了远程仓库数据,也可以通过该镜像来恢复。
在这里,我们就知道了,当我们本地和远程仓库进行绑定后,之间的关系如下图:
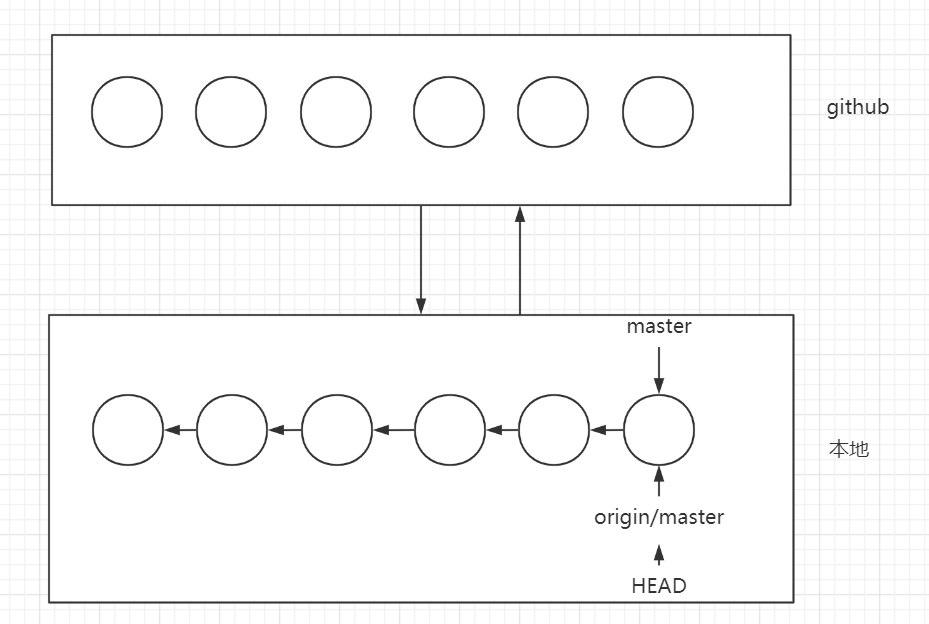
刚才,我们使用了命令git branch -a 可以看到所有的本地分支,但是只有master我们可以进行修改,其余的两个分支,是git服务端用于与本地进行同步时来操作的,而不是我们来处理的,即对于 origin/master 分支,是由 orgin 来操作的。
在这里,我们还可以添加一个参数,git branch -av 来看到每个分支的指针指向的提交节点信息,如下图:
[root@huangzb git3]# git branch -av
* master                dd5f41e 处理了冲突
  remotes/origin/HEAD   -> origin/master
  remotes/origin/master dd5f41e 处理了冲突
[root@huangzb git3]#
可以看到,当前的 master分支和 origin/master 分支 指向的节点是同一个,因为刚从远程仓库 clone下来的,所以是一致的。
