基于百度地图 Android SDKv1.3.5实现简单的定位功能,自定义标题栏
之前在尝试Google Map,但是它的API v2不是很顺利所以还是来做百度地图了,算是简单练习下,这里我们实现的主要功能:定位。
首先下载v1.3.5的lib包并引用:点击下载
然后去申请百度地图Android SDK的KEY
建立MainActivity:
 MainActivity.java

import com.baidu.mapapi.*;

import android.app.AlertDialog;
import android.content.Context;
import android.content.DialogInterface;
import android.content.Intent;
import android.content.SharedPreferences;
import android.location.Location;
import android.os.Bundle;
import android.view.Menu;
import android.view.MenuItem;
import android.view.View;
import android.view.View.OnClickListener;
import android.view.Window;
import android.widget.ImageButton;
import android.widget.Toast;

public class MainActivity extends MapActivity implements LocationListener {

    private BMapManager mapManager;
    private MKLocationManager mLocationManager = null;
    private MyLocationOverlay myLocationOverlay;
    private MapView mapView;
    private MapController mapController;
    private SharedPreferences sp;
    private ImageButton ib_mylocation;
    private ImageButton ib_maylayer;
    private AlertDialog.Builder builder;

    @Override
    protected void onCreate(Bundle savedInstanceState) {
        super.onCreate(savedInstanceState);
        requestWindowFeature(Window.FEATURE_CUSTOM_TITLE);
        setContentView(R.layout.activity_main);
        getWindow().setFeatureInt(Window.FEATURE_CUSTOM_TITLE, R.layout.title_1);

        // 初始化MapActivity
        mapManager = new BMapManager(getApplication());
        mapManager.init("你申请的KEY", null);
        super.initMapActivity(mapManager);

        mLocationManager = mapManager.getLocationManager();
        // 注册位置更新事件
        mLocationManager.requestLocationUpdates(this);
        // 使用GPS定位
        mLocationManager.enableProvider((int) MKLocationManager.MK_GPS_PROVIDER);

        mapView = (MapView) findViewById(R.id.location_mapsView);
        mapView.setBuiltInZoomControls(true);

        //图层按钮
        ib_maylayer = (ImageButton) findViewById(R.id.maylayer);
        ib_maylayer.setOnClickListener(new OnClickListener() {
            public void onClick(View arg0) {
                builder = new AlertDialog.Builder(MainActivity.this);
                builder.setTitle("请选择图层:");
                builder.setItems(R.array.maylayer, new DialogInterface.OnClickListener() {
                            public void onClick(DialogInterface dialog, int which) {
                                if (which == 0) {
                                    mapView.setTraffic(false);
                                    mapView.setSatellite(false);
                                } else if (which == 1) {
                                    mapView.setTraffic(true);
                                    mapView.setSatellite(false);
                                } else if (which == 2) {
                                    mapView.setTraffic(false);
                                    mapView.setSatellite(true);
                                }
                            }
                        });
                builder.show();
            }
        });

        // 取得地图控制器对象,用于控制MapView
        mapController = mapView.getController();
        sp = getSharedPreferences("geopoint", Context.MODE_PRIVATE);
        final GeoPoint point = new GeoPoint(sp.getInt("latitude", (int) (31.1963799263 * 1000000)),
                sp.getInt("longitude", (int) (121.4329036005 * 1000000)));
        mapController.setCenter(point);
        mapController.setZoom(15);

        //定位按钮
        ib_mylocation = (ImageButton) findViewById(R.id.mylocation);
        ib_mylocation.setOnClickListener(new OnClickListener() {
            public void onClick(View v) {
                mapController.setCenter(point);
            }
        });

        // 添加定位图层
        myLocationOverlay = new MyLocationOverlay(this, mapView);
        myLocationOverlay.enableMyLocation();
        myLocationOverlay.enableCompass();
        mapView.getOverlays().add(myLocationOverlay);
    }

    protected boolean isRouteDisplayed() {
        return false;
    }

    @Override
    protected void onDestroy() {
        if (mapManager != null) {
            mapManager.destroy();
            mapManager = null;
        }
        mLocationManager = null;
        super.onDestroy();
    }

    @Override
    protected void onPause() {
        if (mapManager != null) {
            mapManager.stop();
        }
        super.onPause();
    }

    @Override
    protected void onResume() {
        if (mapManager != null) {
            mapManager.start();
        }
        super.onResume();
    }

    /**
     * 根据MyLocationOverlay配置的属性确定是否在地图上显示当前位置
     */
    protected boolean isLocationDisplayed() {
        return myLocationOverlay.isMyLocationEnabled();
    }

    /**
     * 当位置发生变化时触发此方法
     *
     * @param location
     */
    public void onLocationChanged(Location location) {
        SharedPreferences.Editor editor = sp.edit();
        if (location != null) {
            final GeoPoint pt = new GeoPoint(
                    (int) (location.getLatitude() * 1000000),
                    (int) (location.getLongitude() * 1000000));
            mapController.setCenter(pt);
            // 将经纬度信息写入SharedPreferences供下次使用
            editor.putInt("latitude", (int) (location.getLatitude() * 1000000));
            editor.putInt("longitude", (int) (location.getLongitude() * 1000000));
            editor.commit();
        }
    }

}
我在这里用了SharedPreferences,作用是将当前的GPS经纬度记录下来,然后会在下一次启动程序的时候首先去尝试定位到该坐标。
别忘了填上之前申请的KEY。
布局文件activity_main.xml:
activity_main.xml
<?xml version="1.0" encoding="utf-8"?>
<LinearLayout xmlns:Android="http://schemas.android.com/apk/res/android"
    Android:layout_width="fill_parent"
    Android:layout_height="fill_parent"
    Android:orientation="vertical" >

    <com.baidu.mapapi.MapView
        Android:id="@+id/location_mapsView"
        Android:layout_width="fill_parent"
        Android:layout_height="fill_parent"
        Android:clickable="true" />

</LinearLayout>
这里需要几张图片,点击下载
接着是strings.xml
strings.xml
<?xml version="1.0" encoding="utf-8"?>
<resources>

    <string name="app_name">BaiduMap</string>
    <string name="action_settings">Settings</string>
    <string name="hello_world">Hello world!</string>
    <string name="getlocation">GetLocation</string>
    <string name="city">上海</string>
    <string name="desitnation">输入目的地:</string>
    <string name="startnavigation">开始导航</string>

    <string-array name="maylayer">
        <item>默认</item>
        <item>交通信息图</item>
        <item>卫星图</item>
    </string-array>

    <style name="CustomWindowTitleBackground">
        <item name="android:background">#87ceeb</item>
    </style>

    <style name="title_1" parent="android:Theme">
        <item name="android:windowTitleSize">32dp</item>
        <item name="android:windowTitleBackgroundStyle">@style/CustomWindowTitleBackground</item>
    </style>

</resources>
自定义了标题栏的,它布局文件:
title_1.xml
<RelativeLayout xmlns:android="http://schemas.android.com/apk/res/android"
    xmlns:tools="http://schemas.android.com/tools"
    android:layout_width="fill_parent"
    android:layout_height="fill_parent"
    android:background="#87ceeb"
    android:orientation="vertical" >

    <ImageButton
        android:id="@+id/maylayer"
        android:layout_width="wrap_content"
        android:layout_height="wrap_content"
        android:scaleType="fitCenter"
        android:background="#00000000"
        android:src="@drawable/da_ic_menu"
        android:contentDescription="@string/getlocation"/>

    <TextView
        android:id="@+id/text"
        android:layout_width="wrap_content"
        android:layout_height="wrap_content"
        android:layout_centerInParent="true"
        android:text="@string/app_name"
        android:textColor="#000000"
        android:textSize="18sp" />

    <ImageButton
        android:id="@+id/mylocation"
        android:layout_width="wrap_content"
        android:layout_height="wrap_content"
        android:scaleType="fitCenter"
        android:layout_marginRight="8dip"
        android:layout_alignParentRight="true"
        android:background="#00000000"
        android:src="@drawable/btn_mylocation_x"
        android:contentDescription="@string/getlocation"/>

</RelativeLayout>
主要是定义了2个ImageButton。
左边的按钮是选择图层,有普通、交通信息图和卫星图供选择。
右边的按钮用来将你当前的位置设为地图的中心。
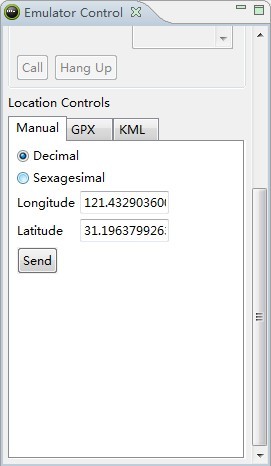
当然了,如果是在安卓模拟器上的话,你之前需要利用Emulator Control来给你的模拟器发送GPS信号。例如
最后是AndroidManifest.xml的一些配置:
AndroidManifest.xml
<?xml version="1.0" encoding="utf-8"?>
<manifest xmlns:android="http://schemas.android.com/apk/res/android"
    android:versionCode="1"
    android:versionName="1.0" >

    <uses-permission android:name="android.permission.ACCESS_NETWORK_STATE" >
    </uses-permission>
    <uses-permission android:name="android.permission.ACCESS_FINE_LOCATION" >
    </uses-permission>
    <uses-permission android:name="android.permission.INTERNET" >
    </uses-permission>
    <uses-permission android:name="android.permission.WRITE_EXTERNAL_STORAGE" >
    </uses-permission>
    <uses-permission android:name="android.permission.ACCESS_WIFI_STATE" >
    </uses-permission>
    <uses-permission android:name="android.permission.CHANGE_WIFI_STATE" >
    </uses-permission>
    <uses-permission android:name="android.permission.READ_PHONE_STATE" >
    </uses-permission>
    <uses-permission android:name="android.permission.CALL_PHONE" >
    </uses-permission>

    <uses-sdk
        android:minSdkVersion="5"
        android:targetSdkVersion="10" />

    <supports-screens
        android:anyDensity="true"
        android:largeScreens="true"
        android:normalScreens="false"
        android:resizeable="true"
        android:smallScreens="true" />

    <application
        android:icon="@drawable/ic_launcher"
        android:label="@string/app_name" >
        <activity
            android:name=".MainActivity"
            android:configChanges="orientation|keyboardHidden"
            android:label="@string/app_name"
            android:screenOrientation="sensor"
            android:theme="@style/title_1" >
            <intent-filter>
                <action android:name="android.intent.action.MAIN" />

                <category android:name="android.intent.category.LAUNCHER" />
            </intent-filter>
        </activity>
    </application>

</manifest>
好了,到这里简单的定位功能便实现了。
关于自定义标题栏简单说明下,代码都在上面了:
先在strings.xml里创建style,然后在AndroidManifest里相关activity里加上android:theme="@style/xxx"
接着创建标题栏的布局,最后在MainActivity的onCreate里写上(注意顺序):
super.onCreate(savedInstanceState);
requestWindowFeature(Window.FEATURE_CUSTOM_TITLE);
setContentView(R.layout.activity_main);
getWindow().setFeatureInt(Window.FEATURE_CUSTOM_TITLE, R.layout.xxx);
就行了。
