LibPNG 库学习小结
前一段时间使用GDAL库进行瓦片切割,由于需要将生成的图片数据直接写入数据库,不需要在本地磁盘上进行IO操作,因此跟踪GDAL的源代码(过程就不说了),发现GDAL库调用了LibPNG库进行相应的PNG格式编码工作,因此我研究了一下LibPNG库,下面是对自己学习的一点总结:
libpng程序结构
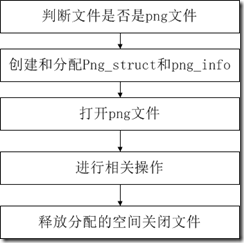
LibPNG库的处理流程如下:
判断文件是否是png文件
通过文件名来判断文件是否是png文件。这里的fp是指向文件指针的指针。主要是作为出口参数。如果文件成功打开后不关闭文件,等待以后对文件操作结束后再关闭文件。
FILE *fp = fopen(file_name, "rb");
if (!fp)
{
    return (ERROR);
}
fread(header, 1, number, fp);
is_png = !png_sig_cmp(header, 0, number);
if (!is_png)
{
    return (NOT_PNG);
}
初始化程序
所谓的初始化程序即为png_struct和png_info分配空间。
png_struct是关于png文件及其相关属性的结构,并不直接访问,只是用与程序内部的信息传递。
png_info则是对于png图片操作的主题。在新版本中主要通过png_set_*和png_get-*系列函数来改变或者得到png_info的信息。
png_struct和png_info是使用libpng的基础,必须在对png文件进行操作前为其分配内存。png_info依赖于png_struct创建。
png_structp png_ptr = png_create_read_struct(PNG_LIBPNG_VER_STRING, (png_voidp)user_error_ptr,
user_error_fn, user_warning_fn);
if (!png_ptr)
    return (ERROR);
png_infop info_ptr = png_create_info_struct(png_ptr);
if (!info_ptr)
{
    png_destroy_read_struct(&png_ptr,(png_infopp)NULL, (png_infopp)NULL);
    return (ERROR);
}
png_create_read_struct()函数和setjmp/longjmp method相关参数见官方文档。
将创建好的png_struct和png_info的指针和已经打开的png文件相关联。
png_init_io(png_ptr, fp);
相关读写操作
当将分配的png_struct和png_info和已经打开的png文件关联后,就可以进行相关操作了。
释放空间
当对png文件相关操作完成后则需要释放分配的空间和关闭打开的文件。
png_free_data(png_ptr, info_ptr, mask, seq);
png_destroy_write_struct(&png_ptr, &info_ptr);
fclose(fp);
以上是在网上搜集整理的一些基本用法,由于我不需要让LibPNG库生成本地图片,因此又继续看LibPNG的文档,终于功夫不负有心人,在官方文档中看到了一下一段话:
IV. Writing
Much of this is very similar to reading. However, everything of importance is repeated here, so you won't have to constantly look back up in the reading section to understand writing.
Setup
You will want to do the I/O initialization before you get into libpng,so if it doesn't work, you don't have anything to undo. If you are not using the standard I/O functions, you will need to replace them with custom writing functions. See the discussion under Customizing libpng.
以上这段话的意思就是在使用LibPNG库的之前,必须进行IO初始化操作,如果还不能正常工作,你也不需要进行撤销操作。如果你不打算使用标准的IO函数,必须使用自定义的函数来替换他们,具体的在Custormizing这一章。好下面我们跳到这一章。
我们在这一章中找到下面这一段话:
Input/Output in libpng is done through png_read() and png_write(),which currently just call fread() and fwrite(). The FILE * is stored in png_struct and is initialized via png_init_io(). If you wish to change the method of I/O, the library supplies callbacks that you can set through the function png_set_read_fn() and png_set_write_fn() at run time, instead of calling the png_init_io() function. These functions also provide a void pointer that can be retrieved via the function png_get_io_ptr().
这段话的意思如下:输入输出操作在LibPNG库中是通过实际调用fread()和fwrite()函数的png_read()和png_write()函数来实现的。文件指针存储在png_struct结构中,并通过png_init_io()函数来初始化。如果你想改变IO方法,该库支持使用回调函数,你可以在程序运行时通过png_set_read_fn()和png_set_write_fn()函数来设置,而不需要在开始是使用png_init_io()函数。这些函数同时还提供了一个可以获得IO指针的函数png_get_io_ptr()。
png_set_read_fn(png_structp read_ptr,voidp read_io_ptr, png_rw_ptr read_data_fn)
png_set_write_fn(png_structp write_ptr,voidp write_io_ptr, png_rw_ptr write_data_fn,png_flush_ptr output_flush_fn);
voidp read_io_ptr = png_get_io_ptr(read_ptr);
voidp write_io_ptr = png_get_io_ptr(write_ptr);
//这些替换的函数必须有以下的结构
void user_read_data(png_structp png_ptr,png_bytep data, png_size_t length);
void user_write_data(png_structp png_ptr,png_bytep data, png_size_t length);
void user_flush_data(png_structp png_ptr);
说明:fwrite()函数是带有缓冲的函数,该函数只有在缓冲区满或者调用fclose()函数的时候才会调用flush()函数进行写入。上面的user_flush_fn()函数就是自定义的flush()函数。
下面是自己实现的一个简易测试:
下面两个函数是自己实现的一个write_data()函数和flush()函数。
//写入数据函数,将所有的数据写入缓冲区
void PNGAPI png_own_write_data(png_structp png_ptr, png_bytep data, png_size_t length)
{
    if (png_ptr == NULL)
        return;
    memcpy(tData->data + tData->count,data,length);
    tData->count += length;
}
//处理所有的数据,截取有效的缓冲区间,重新复制
void PNGAPI png_own_flush(png_structp png_ptr)
{
    FILE * fp= fopen("D:\\success.png","wb+");
    fwrite(tData->data,1,tData->count,fp);
    fclose(fp);
}
其中tData是TrueData类型的全局结构体指针:
struct TrueData
{
    //截获的数据缓冲区
    unsigned char * data;
    //截获数据的有效字节数,即缓冲区的第一个可用字节
    int count;
    //缓冲区的大小
    int size;
};
下面是在主函数中进行的设置。其中png_set_IHDR()函数必须放在所有png_set_*()函数的前面。
png_set_IHDR(png_ptr,info_ptr,outWidth,outHeight,8,PNG_COLOR_TYPE_RGB,PNG_INTERLACE_NONE,PNG_COMPRESSION_TYPE_DEFAULT,PNG_FILTER_TYPE_DEFAULT);
png_set_rows(png_ptr,info_ptr,_row_pointers);
png_set_write_fn(png_ptr,io_ptr,png_own_write_data,png_own_flush);
png_write_png(png_ptr,info_ptr,PNG_TRANSFORM_IDENTITY,NULL);
这是我们跟踪我们的程序,发现flush()函数并没有执行。最后跟进源代码发现需要定义一个宏才行。
在源代码中pngwrite.c中大概420行的位置有这样一段代码:
#ifdef PNG_WRITE_FLUSH_SUPPORTED
#  ifdef PNG_WRITE_FLUSH_AFTER_IEND_SUPPORTED
    png_flush(png_ptr);
#  endif
#endif
//将其改为如下格式,或者其他格式,但是必须要能执行png_flush()才行
#ifdef PNG_WRITE_FLUSH_SUPPORTED
#define PNG_WRITE_FLUSH_AFTER_IEND_SUPPORTED
#  ifdef PNG_WRITE_FLUSH_AFTER_IEND_SUPPORTED
   png_flush(png_ptr);
#  endif
#undef PNG_WRITE_FLUSH_AFTER_IEND_SUPPORTED
#endif
之后从新编译LIbPNG库,运行程序,一切正常……搞定,收工。
其实LIBPNG库的默认配置是没有定义
#define PNG_WRITE_FLUSH_AFTER_IEND_SUPPORTED
宏的,我这里将它定义出来是为了让他调用我的png_own_flush()函数。当让在我们不调用png_own_flush()函数的时候,也能正常的将所得到的的数据写入的文件,因为tData是全局变量,任意的函数都可以将它写入到文件。


