SpringBoot自动化配置之四:SpringBoot 之Starter(自动配置)、Command-line runners
Spring Boot Starter是在SpringBoot组件中被提出来的一种概念,stackoverflow上面已经有人概括了这个starter是什么东西,想看完整的回答戳这里
Starter POMs are a set of convenient dependency descriptors that you can include in your application. You get a one-stop-shop for all the Spring and related technology that you need, without having to hunt through sample code and copy paste loads of dependency descriptors. For example, if you want to get started using Spring and JPA for database access, just include the spring-boot-starter-data-jpa dependency in your project, and you are good to go.
大概意思就是说starter是一种对依赖的synthesize(合成),这是什么意思呢?我可以举个例子来说明。
传统的做法
在没有starter之前,假如我想要在Spring中使用jpa,那我可能需要做以下操作:
- 在Maven中引入使用的数据库的依赖(即JDBC的jar)
- 引入jpa的依赖
- 在xxx.xml中配置一些属性信息
- 反复的调试直到可以正常运行
需要注意的是,这里操作在我们每次新建一个需要用到jpa的项目的时候都需要重复的做一次。也许你在第一次自己建立项目的时候是在Google上自己搜索了一番,花了半天时间解决掉了各种奇怪的问题之后,jpa终于能正常运行了。有些有经验的人会在OneNote上面把这次建立项目的过程给记录下来,包括操作的步骤以及需要用到的配置文件的内容,在下一次再创建jpa项目的时候,就不需要再次去Google了,只需要照着笔记来,之后再把所有的配置文件copy&paste就可以了。
像上面这样的操作也不算不行,事实上我们在没有starter之前都是这么干的,但是这样做有几个问题:
- 如果过程比较繁琐,这样一步步操作会增加出错的可能性
- 不停地copy&paste不符合Don’t repeat yourself精神
- 在第一次配置的时候(尤其如果开发者比较小白),需要花费掉大量的时间
使用Spring Boot Starter提升效率
starter的主要目的就是为了解决上面的这些问题。
starter的理念:starter会把所有用到的依赖都给包含进来,避免了开发者自己去引入依赖所带来的麻烦。需要注意的是不同的starter是为了解决不同的依赖,所以它们内部的实现可能会有很大的差异,例如jpa的starter和Redis的starter可能实现就不一样,这是因为starter的本质在于synthesize,这是一层在逻辑层面的抽象,也许这种理念有点类似于Docker,因为它们都是在做一个“包装”的操作,如果你知道Docker是为了解决什么问题的,也许你可以用Docker和starter做一个类比。
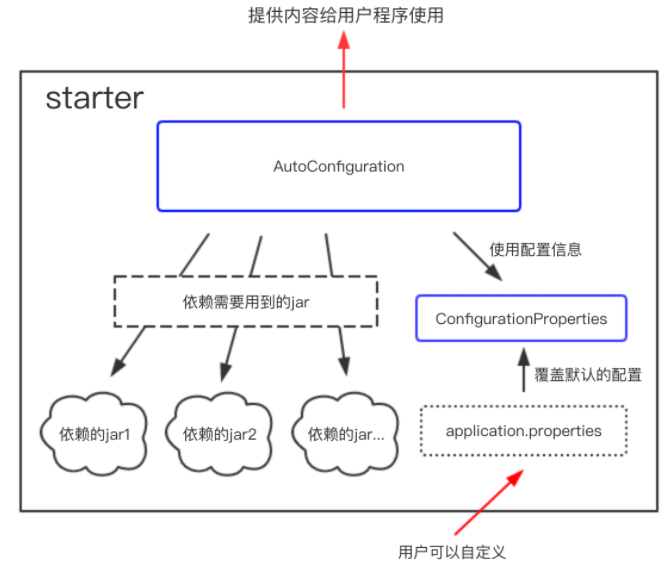
starter的实现:虽然不同的starter实现起来各有差异,但是他们基本上都会使用到两个相同的内容:ConfigurationProperties和AutoConfiguration。因为Spring Boot坚信“约定大于配置”这一理念,所以我们使用ConfigurationProperties来保存我们的配置,并且这些配置都可以有一个默认值,即在我们没有主动覆写原始配置的情况下,默认值就会生效,这在很多情况下是非常有用的。除此之外,starter的ConfigurationProperties还使得所有的配置属性被聚集到一个文件中(一般在resources目录下的application.properties),这样我们就告别了Spring项目中XML地狱。
starter的整体逻辑:

上面的starter依赖的jar和我们自己手动配置的时候依赖的jar并没有什么不同,所以我们可以认为starter其实是把这一些繁琐的配置操作交给了自己,而把简单交给了用户。除了帮助用户去除了繁琐的构建操作,在“约定大于配置”的理念下,ConfigurationProperties还帮助用户减少了无谓的配置操作。并且因为 application.properties 文件的存在,即使需要自定义配置,所有的配置也只需要在一个文件中进行,使用起来非常方便。
了解了starter其实就是帮助用户简化了配置的操作之后,要理解starter和被配置了starter的组件之间并不是竞争关系,而是辅助关系,即我们可以给一个组件创建一个starter来让最终用户在使用这个组件的时候更加的简单方便。基于这种理念,我们可以给任意一个现有的组件创建一个starter来让别人在使用这个组件的时候更加的简单方便,事实上Spring Boot团队已经帮助现有大部分的流行的组件创建好了它们的starter,你可以在这里查看这些starter的列表。
Starter原理
首先说说原理,我们知道使用一个公用的starter的时候,只需要将相应的依赖添加的Maven的配置文件当中即可,免去了自己需要引用很多依赖类,并且SpringBoot会自动进行类的自动配置。那么 SpringBoot 是如何知道要实例化哪些类,并进行自动配置的呢? 下面简单说一下。
首先,SpringBoot 在启动时会去依赖的starter包中寻找 resources/META-INF/spring.factories文件(通过autoconfigure 管理,通过服务中的springboot main 启动中@EnableAutoConfiguration(@SpringBootApplication)引入),然后根据文件中配置的Jar包去扫描项目所依赖的Jar包,这类似于 Java 的 SPI 机制。
第二步,根据 spring.factories配置加载AutoConfigure类。
最后,根据 @Conditional注解的条件,进行自动配置并将Bean注入Spring Context 上下文当中。
我们也可以使用@ImportAutoConfiguration({MyServiceAutoConfiguration.class}) 指定自动配置哪些类。
创建自己的Spring Boot Starter
如果你想要自己创建一个starter,那么基本上包含以下几步
- 创建一个starter项目,关于项目的命名你可以参考这里
- 创建一个ConfigurationProperties用于保存你的配置信息(如果你的项目不使用配置信息则可以跳过这一步,不过这种情况非常少见)
- 创建一个AutoConfiguration,引用定义好的配置信息;在AutoConfiguration中实现所有starter应该完成的操作(//添加自动扫描注解,basePackages为TestBean包路径 @ComponentScan(basePackages = "com.test.spring.support.configuration"),或者在该类中通过@Bean),并且把这个类加入spring.factories配置文件中进行声明
- 打包项目,之后在一个SpringBoot项目中引入该项目依赖,然后就可以使用该starter了
注意点:
- 自定义的starter是不能有启动入口的!即:只能作为工具类!类似jdk!
- 不要把自定义的pom写成了一个可启动的项目哈!
- 不然install后是引用不到自定义的starter里面的类的!!!
- 可对比install后的web项目 和 install后的工具类pom , 生成的jar文件的目录结构是不同的哈!!!
我们来看一个例子(例子的完整代码位于https://github.com/RitterHou/learn-spring-boot-starter)
首先新建一个Maven项目,设置 pom.xml 文件如下:
<?xml version="1.0" encoding="UTF-8"?>
<project xmlns="http://maven.apache.org/POM/4.0.0"
         xmlns:xsi="http://www.w3.org/2001/XMLSchema-instance"
         xsi:schemaLocation="http://maven.apache.org/POM/4.0.0 http://maven.apache.org/xsd/maven-4.0.0.xsd">
    <modelVersion>4.0.0</modelVersion>
    <artifactId>http-starter</artifactId>
    <version>0.0.1-SNAPSHOT</version>

    <!-- 自定义starter都应该继承自该依赖 -->
    <!-- 如果自定义starter本身需要继承其它的依赖,可以参考 https://stackoverflow.com/a/21318359 解决 -->
    <parent>
        <groupId>org.springframework.boot</groupId>
        <artifactId>spring-boot-starters</artifactId>
        <version>1.5.2.RELEASE</version>
    </parent>

    <dependencies>
        <!-- 自定义starter依赖此jar包 -->
        <dependency>
            <groupId>org.springframework.boot</groupId>
            <artifactId>spring-boot-starter</artifactId>
        </dependency>
        <!-- lombok用于自动生成get、set方法 -->
        <dependency>
            <groupId>org.projectlombok</groupId>
            <artifactId>lombok</artifactId>
            <version>1.16.10</version>
        </dependency>
    </dependencies>

</project>
创建proterties类来保存配置信息:
@ConfigurationProperties(prefix = "http") // 自动获取配置文件中前缀为http的属性,把值传入对象参数
@Setter
@Getter
public class HttpProperties {

    // 如果配置文件中配置了http.url属性,则该默认属性会被覆盖
    private String url = "http://www.baidu.com/";

}
上面这个类就是定义了一个属性,其默认值是 http://www.baidu.com/,我们可以通过在 application.properties 中添加配置 http.url=https://www.zhihu.com 来覆盖参数的值。
创建业务类:
@Setter
@Getter
public class HttpClient {

    private String url;

    // 根据url获取网页数据
    public String getHtml() {
        try {
            URL url = new URL(this.url);
            URLConnection urlConnection = url.openConnection();
            BufferedReader br = new BufferedReader(new InputStreamReader(urlConnection.getInputStream(), "utf-8"));
            String line = null;
            StringBuilder sb = new StringBuilder();
            while ((line = br.readLine()) != null) {
                sb.append(line).append("\n");
            }
            return sb.toString();
        } catch (Exception e) {
            e.printStackTrace();
        }
        return "error";
    }

}
这个业务类的操作非常简单,只包含了一个 url 属性和一个 getHtml 方法,用于获取一个网页的HTML数据,读者看看就懂了。
创建AutoConfiguration
@Configuration
@EnableConfigurationProperties(HttpProperties.class)
public class HttpAutoConfiguration {

    @Resource
    private HttpProperties properties; // 使用配置

    // 在Spring上下文中创建一个对象
    @Bean
    @ConditionalOnMissingBean
    public HttpClient init() {
        HttpClient client = new HttpClient();

        String url = properties.getUrl();
        client.setUrl(url);
        return client;
    }

}
在上面的AutoConfiguration中我们实现了自己要求:在Spring的上下文中创建了一个HttpClient类的bean,并且我们把properties中的一个参数赋给了该bean。
关于@ConditionalOnMissingBean 这个注解,它的意思是在该bean不存在的情况下此方法才会执行,这个相当于开关的角色,更多关于开关系列的注解可以参考这里。
最后,我们在 resources 文件夹下新建目录 META-INF,在目录中新建 spring.factories 文件,并且在 spring.factories 中配置AutoConfiguration:
org.springframework.boot.autoconfigure.EnableAutoConfiguration=\
com.nosuchfield.httpstarter.HttpAutoConfiguration
到此,我们的starter已经创建完毕了,使用Maven打包该项目。之后创建一个SpringBoot项目,在项目中添加我们之前打包的starter作为依赖,然后使用SringBoot来运行我们的starter,代码如下:
@Component
public class RunIt {

    @Resource
    private HttpClient httpClient;

    public void hello() {
        System.out.println(httpClient.getHtml());
    }

}
正常情况下此方法的执行会打印出url http://www.baidu.com/ 的HTML内容,之后我们在application.properties中加入配置:
http.url=https://www.zhihu.com/
再次运行程序,此时打印的结果应该是知乎首页的HTML了,证明properties中的数据确实被覆盖了。
=========================================================================================
1. start.spring.io的使用
首先带你浏览http://start.spring.io/,在这个网址中有一些Spring Boot提供的组件。
在网站Spring Initializr上填对应的表单,描述Spring Boot项目的主要信息,例如Project Metadata、Dependency等。在Project Dependencies区域,你可以根据应用程序的功能需要选择相应的starter。
Spring Boot starters可以简化Spring项目的库依赖管理,将某一特定功能所需要的依赖库都整合在一起,就形成一个starter,例如:连接数据库、springmvc、spring测试框架等等。简单来说,spring boot使得你的pom文件从此变得很清爽且易于管理。
常用的starter以及用处可以列举如下:
- spring-boot-starter: 这是核心Spring Boot starter,提供了大部分基础功能,其他starter都依赖于它,因此没有必要显式定义它。
- spring-boot-starter-actuator:主要提供监控、管理和审查应用程序的功能。
- spring-boot-starter-jdbc:该starter提供对JDBC操作的支持,包括连接数据库、操作数据库,以及管理数据库连接等等。
- spring-boot-starter-data-jpa:JPA starter提供使用Java Persistence API(例如Hibernate等)的依赖库。
- spring-boot-starter-data-*:提供对MongoDB、Data-Rest或者Solr的支持。
- spring-boot-starter-security:提供所有Spring-security的依赖库。
- spring-boot-starter-test:这个starter包括了spring-test依赖以及其他测试框架,例如JUnit和Mockito等等。
- spring-boot-starter-web:该starter包括web应用程序的依赖库。
2、如何自己写starter
2.1、示例一
-
1、选择已有的starters,在此基础上进行扩展.
-
2、创建自动配置文件并设定META-INF/spring.factories里的内容.
-
3、发布你的starter
添加依赖管理
<dependencyManagement>
        <dependencies>
            <dependency>
                <groupId>org.springframework.boot</groupId>
                <artifactId>spring-boot-dependencies</artifactId>
                <version>${spring.boot.version}</version>
                <type>pom</type>
                <scope>import</scope>
            </dependency>
        </dependencies>
</dependencyManagement>
添加starter自己的依赖
<dependencies>
        <dependency>
            <groupId>org.springframework.boot</groupId>
            <artifactId>spring-boot-starter</artifactId>
        </dependency>
        <dependency>
            <groupId>org.springframework.boot</groupId>
            <artifactId>spring-boot-starter-web</artifactId>
        </dependency>
</dependencies>
新建configuration
@Configuration
@ComponentScan( basePackages = {"com.patterncat.actuator"} )
public class WebAutoConfiguration {

    /**
     * addViewController方法不支持placeholder的解析
     * 故在这里用变量解析出来
     */
    @Value("${actuator.web.base:}")
    String actuatorBase;

//    @Bean
//    public ActuatorNavController actuatorNavController(){
//        return new ActuatorNavController();
//    }

    @Bean
    public WebMvcConfigurerAdapter configStaticMapping() {
        return new WebMvcConfigurerAdapter() {
            @Override
            public void addViewControllers(ViewControllerRegistry registry) {
                //配置跳转
                registry.addViewController(actuatorBase+"/nav").setViewName(
                        "forward:/static/nav.html");
            }

            @Override
            public void addResourceHandlers(ResourceHandlerRegistry registry) {
                registry.addResourceHandler("/static/**").
                        addResourceLocations("classpath:/static/");
            }
        };
    }

}
修改/META-INF/spring.factories
# AutoConfigurations
org.springframework.boot.autoconfigure.EnableAutoConfiguration=com.patterncat.actuator.configuration.WebAutoConfiguration
发布
mvn clean install
引用
        <dependency>
            <groupId>com.patterncat</groupId>
            <artifactId>spring-boot-starter-actuator-web</artifactId>
            <version>1.0-SNAPSHOT</version>
        </dependency>
启动访问
mvn spring-boot:run访问
http://localhost:8080/navnote
2、2、示例二
- 新建一个模块db-count-starter,然后修改db-count-starter模块下的pom文件,增加对应的库。
<dependencies>
    <dependency>
        <groupId>org.springframework.boot</groupId>
        <artifactId>spring-boot</artifactId>
        <!-- version继承父模块的-->
    </dependency>
    <dependency>
        <groupId>org.springframework.data</groupId>
        <artifactId>spring-data-commons</artifactId>
        <version>1.9.3.RELEASE</version>
</dependency></dependencies>- 新建包结构com/test/bookpubstarter/dbcount,然后新建DbCountRunner类,实现CommandLineRunner接口,在run方法中输出每个实体的数量。
package com.test.bookpubstarter.dbcount;

import org.slf4j.Logger;
import org.slf4j.LoggerFactory;
import org.springframework.boot.CommandLineRunner;
import org.springframework.data.repository.CrudRepository;
import java.util.Collection;

public class DbCountRunner implements CommandLineRunner {
    protected final Logger logger = LoggerFactory.getLogger(DbCountRunner.class);
    private Collection<CrudRepository> repositories;

    public DbCountRunner(Collection<CrudRepository> repositories) {
        this.repositories = repositories;
    }
    @Override
    public void run(String... strings) throws Exception {
        repositories.forEach(crudRepository -> {
            logger.info(String.format("%s has %s entries",
                    getRepositoryName(crudRepository.getClass()),
                    crudRepository.count()));
        });
    }

    private static String getRepositoryName(Class crudRepositoryClass) {
        for (Class repositoryInterface : crudRepositoryClass.getInterfaces()) {
            if (repositoryInterface.getName().startsWith("com.test.bookpub.repository")) {
                return repositoryInterface.getSimpleName();
            }
        }
        return "UnknownRepository";
    }
}- 增加自动配置文件DbCountAutoConfiguration
package com.test.bookpubstarter.dbcount;
import org.springframework.context.annotation.Bean;
import org.springframework.context.annotation.Configuration;
import org.springframework.data.repository.CrudRepository;
import java.util.Collection;

@Configuration
public class DbCountAutoConfiguration {
    @Bean
    public DbCountRunner dbCountRunner(Collection<CrudRepository> repositories) {
        return new DbCountRunner(repositories);
    }
}- 在src/main/resources目录下新建META-INF文件夹,然后新建spring.factories文件,这个文件用于告诉Spring Boot去找指定的自动配置文件,因此它的内容是
org.springframework.boot.autoconfigure.EnableAutoConfiguration=\
com.test.bookpubstarter.dbcount.DbCountAutoConfiguration- 在之前的程序基础上,在顶层pom文件中增加starter的依赖
<dependency>
   <groupId>com.test</groupId>
   <artifactId>db-count-starter</artifactId>
   <version>0.0.1-SNAPSHOT</version>
</dependency>- 把StartupRunner相关的注释掉,然后在main函数上右键Run BookPubApplication.main(...),可以看出我们编写的starter被主程序使用了。

2.3、总结分析
正规的starter是一个独立的工程,然后在maven中新仓库注册发布,其他开发人员就可以使用你的starter了。
常见的starter会包括下面几个方面的内容:
- 自动配置文件,根据classpath是否存在指定的类来决定是否要执行该功能的自动配置。
- spring.factories,非常重要,指导Spring Boot找到指定的自动配置文件。
- endpoint:可以理解为一个admin,包含对服务的描述、界面、交互(业务信息的查询)
- health indicator:该starter提供的服务的健康指标
在应用程序启动过程中,Spring Boot使用SpringFactoriesLoader类加载器查找org.springframework.boot.autoconfigure.EnableAutoConfiguration关键字对应的Java配置文件。Spring Boot会遍历在各个jar包种META-INF目录下的spring.factories文件,构建成一个配置文件链表。除了EnableAutoConfiguration关键字对应的配置文件,还有其他类型的配置文件:
- org.springframework.context.ApplicationContextInitializer
- org.springframework.context.ApplicationListener
- org.springframework.boot.SpringApplicationRunListener
- org.springframework.boot.env.PropertySourceLoader
- org.springframework.boot.autoconfigure.template.TemplateAvailabilityProvider
- org.springframework.test.contex.TestExecutionListener
Spring Boot的starter在编译时不需要依赖Spring Boot的库。这个例子中依赖spring boot并不是因为自动配置要用spring boot,而仅仅是因为需要实现CommandLineRunner接口。
两个需要注意的点
-
@ConditionalOnMissingBean的作用是:只有对应的ban在系统中都没有被创建,它修饰的初始化代码块才会执行,用户自己手动创建的bean优先;
-
Spring Boot starter如何找到自动配置文件(xxxxAutoConfiguration之类的文件)?
- spring.factories:由Spring Boot触发探测classpath目录下的类,进行自动配置;
-
- @Enable:有时需要由starter的用户触发*查找自动配置文件的过程。
3、 Spring Boot的自动配置
在Spring Boot项目中,xxxApplication.java会作为应用程序的入口,负责程序启动以及一些基础性的工作。@SpringBootApplication是这个注解是该应用程序入口的标志,然后有熟悉的main函数,通过SpringApplication.run(xxxApplication.class, args)来运行Spring Boot应用。打开SpringBootApplication注解可以发现,它是由其他几个类组合而成的:@Configuration(等同于spring中的xml配置文件,使用Java文件做配置可以检查类型安全)、@EnableAutoConfiguration(自动配置,稍后细讲)、@ComponentScan(组件扫描,大家非常熟悉的,可以自动发现和装配一些Bean)。
我们在pom文件里可以看到,com.h2database这个库起作用的范围是runtime,也就是说,当应用程序启动时,如果Spring Boot在classpath下检测到org.h2.Driver的存在,会自动配置H2数据库连接。现在启动应用程序来观察,以验证我们的想法。打开shell,进入项目文件夹,利用mvn spring-boot:run启动应用程序,如下图所示。

可以看到类似Building JPA container EntityManagerFactory for persistence unit 'default、HHH000412: Hibernate Core {4.3.11.Final}、HHH000400: Using dialect: org.hibernate.dialect.H2Dialect这些Info信息;由于我们之前选择了jdbc和jpa等starters,Spring Boot将自动创建JPA容器,并使用Hibernate4.3.11,使用H2Dialect管理H2数据库(内存数据库)。
4、 使用Command-line runners
我们新建一个StartupRunner类,该类实现CommandLineRunner接口,这个接口只有一个函数:public void run(String... args),最重要的是:这个方法会在应用程序启动后首先被调用。
How do
- 在src/main/java/org/test/bookpub/下建立StartRunner类,代码如下:
package com.test.bookpub;

import org.slf4j.Logger;
import org.slf4j.LoggerFactory;
import org.springframework.boot.CommandLineRunner;

public class StartupRunner implements CommandLineRunner {
    protected final Logger logger = LoggerFactory.getLogger(StartupRunner.class);
    @Override
    public void run(String... strings) throws Exception {
        logger.info("hello");
    }
}- 在BookPubApplication类中创建bean对象,代码如下:
    @Bean
    public StartupRunner schedulerRunner() {
        return new StartupRunner();
}还是用mvn spring-boot:run命令启动程序,可以看到hello的输出。对于那种只需要在应用程序启动时执行一次的任务,非常适合利用Command line runners来完成。Spring Boot应用程序在启动后,会遍历CommandLineRunner接口的实例并运行它们的run方法。也可以利用@Order注解(或者实现Order接口)来规定所有CommandLineRunner实例的运行顺序。
利用command-line runner的这个特性,再配合依赖注入,可以在应用程序启动时后首先引入一些依赖bean,例如data source、rpc服务或者其他模块等等,这些对象的初始化可以放在run方法中。不过,需要注意的是,在run方法中执行初始化动作的时候一旦遇到任何异常,都会使得应用程序停止运行,因此最好利用try/catch语句处理可能遇到的异常。


