MyBatis 之 一对一、一对多、多对多
一、前言
自己用mybatis做项目的时候,有时候会对MyBatis 的一对一,一对多,以及多对多的关系映射,学习的时候没有过深研究就草草了之了,因此会感到困惑,在此梳理下它的映射关系。
二、一对一 和 一对多
一对一和一对多比较简单,可以在一起讲。本次demo打算使用 用户表(User),地址表(Address),汽车表(Car)来表述。即:一个用户只有一个地址,两者的关系是一对一;一对多的话,即一个用户可以有多辆车,两者的关系是一对多。
1.springboot项目搭建
1.1、项目配置
本节的重点不在于springboot的pom.xml 导入了哪些包,mybatis如何配置,仅仅简单说下:
pom.xml 中添加 : mybatis-spring-boot-starter 1.3.2 和 mysql-connector-java 两个。
application.yml 配置:
复制server:
  port: 8080

spring:
  datasource:
    username: root
    password: root
    url: jdbc:mysql://localhost:3306/jpa?useUnicode=true&characterEncoding=utf-8&useSSL=false&serverTimezone=UTC
    driver-class-name: com.mysql.cj.jdbc.Driver

mybatis:
  mapper-locations: classpath:mapping/*Mapper.xml
  type-aliases-package: com.example.entity

#showSql
logging:
  level:
    com:
      example:
        mapper : debug
1.2、项目结构
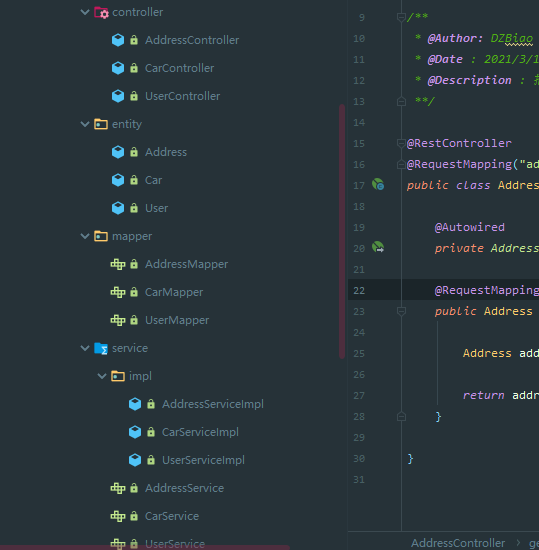
本次demo会创建controller、service、service.imp、mapper、entity等包,以及在resources文件夹下创建mapping文件夹存放mybatis的xml文件。三个表,创建三个控制层,以及也在其他各层创建其对应的接口类和接口实现类等等,在此略过。看下项目结构:
1.3 实体类代码(无get和set方法,记得自己添加)
复制public class User {

    private Long id;

    private String nick_name ; // 用户昵称

    private Address address;    //地址信息,和用户是一对一的关系

    private List<Car> cars;     //用户拥有的车,和用户是一对多的关系
    //TODO:无参构造,有参构造,get和set方法
}
//----------------------------------------------
public class Address implements Serializable {

    private Long id;               // ID

    private String province;    //省市

    private String city;        // 城市
    //TODO:无参构造,有参构造,get和set方法
}
//----------------------------------------------
public class Car implements Serializable {

    private Long id;    // id

    private String color;   // 颜色

    private String name;    // 名称

    private User user ; // 用户
    //TODO:无参构造,有参构造,get和set方法
}
1.4、UserMapper.xml 演示一对一、一对多
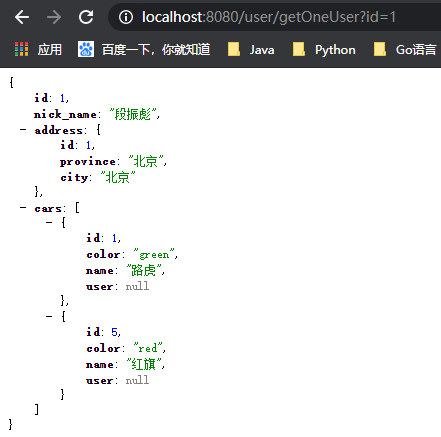
我们以用户为例,通过用户id ,获取用户的id,nick_name,地址的id、省市、城市;(一对一)以及用户所拥有的的车辆cars列表,
列表里是Car实体类 的每条信息。如图:
我们在UserController 编写 getOneAddress()方法,粘贴下控制层方法,直接到UserMapper.xml 中
复制@Autowired
private AddressService addressService ;

@RequestMapping("getOneAddress")
public Address getOneAddress(Long id){

    Address address = addressService.getOneAddress(id);

    return address ;
}
UserMapper.xml 代码 :
复制<resultMap id="BaseMap" type="com.dzbiao.springbootmybatis.entity.User">
    <id property="id" column="id" />
    <result property="nick_name" column="nick_name" />
    <!--一对一-->
    <association property="address" javaType="com.dzbiao.springbootmybatis.entity.Address" >
        <id property="id" column="id" />
        <result property="city" column="city" />
        <result property="province" column="province" />
    </association>
    <!--一对多-->
    <!--JavaType和ofType都是用来指定对象类型的,但是JavaType是用来指定pojo中属性的类型,而ofType指定的是 映射到list集合属性中pojo的类型 -->
    <collection property="cars" ofType="com.dzbiao.springbootmybatis.entity.Car" javaType="java.util.ArrayList">
        <id property="id" column="c_id" />
        <result property="color" column="color" />
        <result property="name" column="name" />
    </collection>

</resultMap>

<select id="getOneUser" resultMap="BaseMap">
    select user.*,address.* ,car.id as c_id ,car.color,car.name,car.user_id
    from user,address,car
    where user.id = #{id} and user.address_id = address.id and user.id = car.user_id
</select>
上述代码解释一下 :
首先我们id = "getOneUser"的select方法的结果映射时BaseMap,我们通过association标签和另一张表Address进行关联映射,property的值即是User表中 的 private Address address; 属性;

javaType 用来指定对象类型,在这指代的是address前面的Address类型,包括下面collection标签中的javaType,都是实体类该属性属于什么类型。比如address前面是Address类型,cars前面是List数组类型,所以下面collection标签中JavaType的值为java.util.ArrayList。

而ofType指定的是 映射到list集合属性中pojo的类型 。
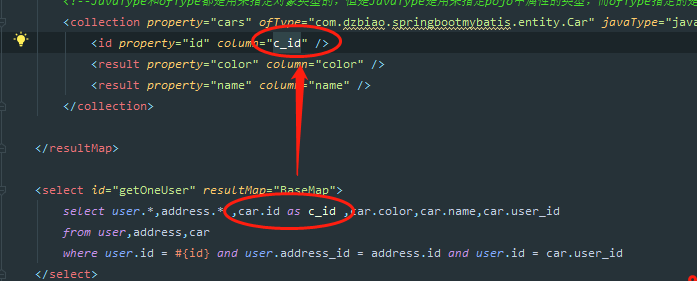
这里需要注意的是: select方法中的sql语句,查询的数据,表的id可能会相同,这样查询出的多条数据就无法映射到collection列表中,所以要在此改下查询结果集的属性,改成别名进行映射。
三、多对多映射
我们使用常见的文章(article)和分类(category)进行多对多讲解。一篇文章有多个分类,一个分类下拥有多篇文章。
复制CREATE TABLE `article`  (
  `id` int(11) NOT NULL AUTO_INCREMENT,
  `title` varchar(255) CHARACTER SET utf8 COLLATE utf8_general_ci NULL DEFAULT NULL,
  `content` varchar(255) CHARACTER SET utf8 COLLATE utf8_general_ci NULL DEFAULT NULL,
  PRIMARY KEY (`id`) USING BTREE
) ENGINE = InnoDB CHARACTER SET = utf8 COLLATE = utf8_general_ci ROW_FORMAT = Dynamic;

INSERT INTO `article` VALUES (1, 'Java基础', '这是一个java的示例文章');
INSERT INTO `article` VALUES (2, 'Python学习', 'Python学习示例');
INSERT INTO `article` VALUES (3, 'Springboot学习', 'springboot学习案例');
CREATE TABLE `category`  (
  `id` int(11) NOT NULL AUTO_INCREMENT,
  `name` varchar(255) CHARACTER SET utf8 COLLATE utf8_general_ci NULL DEFAULT NULL,
  PRIMARY KEY (`id`) USING BTREE
) ENGINE = InnoDB CHARACTER SET = utf8 COLLATE = utf8_general_ci ROW_FORMAT = Dynamic;

INSERT INTO `category` VALUES (1, 'Java');
INSERT INTO `category` VALUES (2, 'Python ');
INSERT INTO `category` VALUES (3, 'HTML');
INSERT INTO `category` VALUES (4, 'JavaScript');
INSERT INTO `category` VALUES (5, 'Linux');
INSERT INTO `category` VALUES (6, 'CSS');
INSERT INTO `category` VALUES (7, 'Go');
-- ----------------------------
-- 中间表
-- ----------------------------
CREATE TABLE `article_category`  (
  `id` int(11) NOT NULL AUTO_INCREMENT,
  `article_id` int(11) NULL DEFAULT NULL,
  `category_id` int(11) NULL DEFAULT NULL,
  PRIMARY KEY (`id`) USING BTREE
) ENGINE = InnoDB CHARACTER SET = utf8 COLLATE = utf8_general_ci ROW_FORMAT = Dynamic;

-- ----------------------------
-- Records of article_category
-- ----------------------------
INSERT INTO `article_category` VALUES (1, 1, 1);
INSERT INTO `article_category` VALUES (2, 1, 3);
INSERT INTO `article_category` VALUES (3, 1, 4);
INSERT INTO `article_category` VALUES (4, 1, 6);
INSERT INTO `article_category` VALUES (5, 2, 2);
INSERT INTO `article_category` VALUES (6, 2, NULL);
INSERT INTO `article_category` VALUES (7, 2, 4);
INSERT INTO `article_category` VALUES (8, 2, 6);
INSERT INTO `article_category` VALUES (9, 3, 1);
实体类 Article 和Category:
复制public class Article implements Serializable {

    private Integer id ; // 文章ID

    private String title ; // 文章标题

    private String content ; // 文章内容

    private List<Category> categories ; // 分类列表

}

public class Category implements Serializable {

    private Integer id ;// 分类ID

    private String name ; // 分类名称

    private List<Article>  articles ; // 文章列表
}
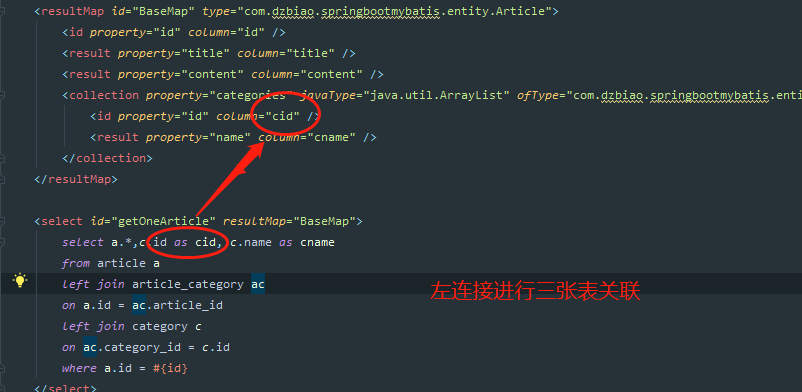
多对多映射,可以看成两个一对多。一个文章实体类有一个分类的列表,而分类的实体类则也有一个文章列表。
直接看 ArticleMapper.xml 中的代码 :
同样道理,当我们想要获取一个分类下的文章列表时,和上面一样。
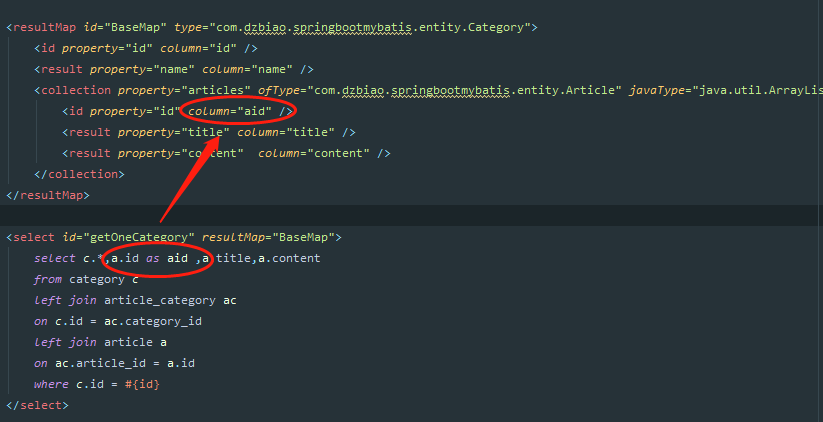
这儿也使用了左连接进行关联映射查询。
四、demo地址 :
链接:https://pan.baidu.com/s/1YF4Ys0OXaPW1uoRbdrMq3A 提取码:p3ju


【推荐】国内首个AI IDE,深度理解中文开发场景,立即下载体验Trae
【推荐】编程新体验,更懂你的AI,立即体验豆包MarsCode编程助手
【推荐】抖音旗下AI助手豆包,你的智能百科全书,全免费不限次数
【推荐】轻量又高性能的 SSH 工具 IShell:AI 加持,快人一步
· AI与.NET技术实操系列:基于图像分类模型对图像进行分类
· go语言实现终端里的倒计时
· 如何编写易于单元测试的代码
· 10年+ .NET Coder 心语,封装的思维:从隐藏、稳定开始理解其本质意义
· .NET Core 中如何实现缓存的预热?
· 分享一个免费、快速、无限量使用的满血 DeepSeek R1 模型,支持深度思考和联网搜索!
· 基于 Docker 搭建 FRP 内网穿透开源项目(很简单哒)
· ollama系列01:轻松3步本地部署deepseek,普通电脑可用
· 25岁的心里话
· 按钮权限的设计及实现