Java学习笔记:SpringMVC+MyBatis实现简单的增删改查【IDEA版】
1.前言
这段日子一直在学习Spring和SpringMVC的相关知识,看了不少的视频和文章之后,想着动手实操一下。同时也记录一下学习的过程和成果。
由于刚刚接触不久,属于新手,有错的话,可以指正,俺的态度就是:立马改!
2.项目配置说明
2.1. 首先我使用的工具:
| 开发工具 | 版本 |
| ---- | ---- | ---- |
| jdk | 1.8
| IDEA | 2019.2 |
| Tomcat | 8.0.53 |
| MySQL | 8.0.13 |
| Maven | 3.5.4 |
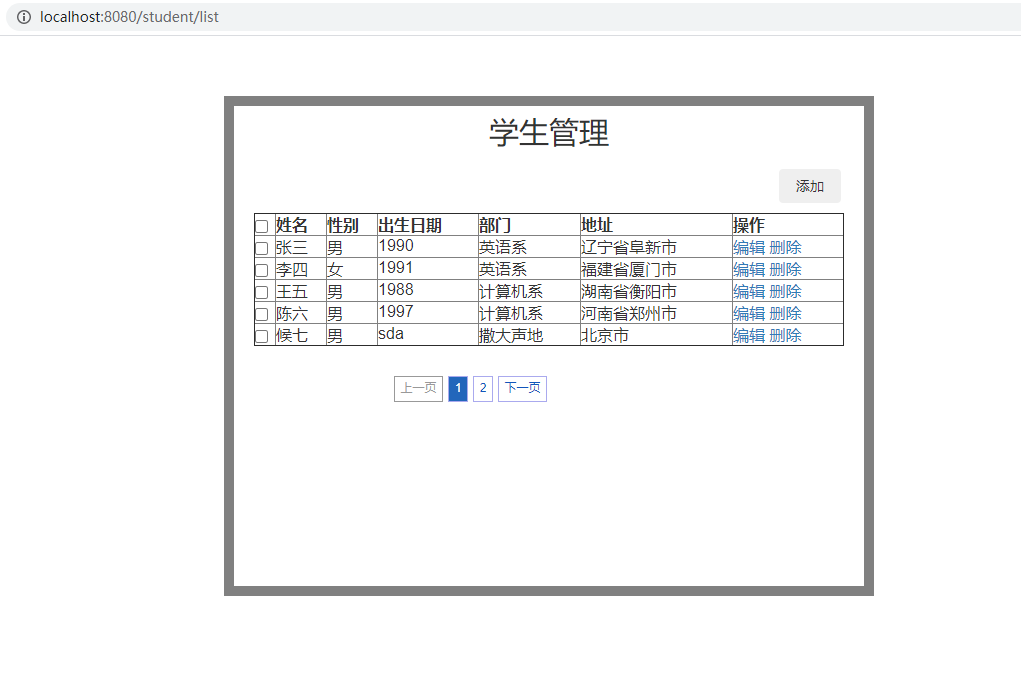
2.2. 建立数据库表:说明:这里我只建立了一张单表student,如果说需要多表查询,可以自己在此基础上自由扩展。
复制  ```
  DROP TABLE IF EXISTS `student`;
  CREATE TABLE `student`  (
    `id` int(10) NOT NULL AUTO_INCREMENT,
    `name` varchar(20) CHARACTER SET utf8 COLLATE utf8_general_ci NOT NULL,
    `sex` varchar(4) CHARACTER SET utf8 COLLATE utf8_general_ci NULL DEFAULT NULL,
    `birth` varchar(20) CHARACTER SET utf8 COLLATE utf8_general_ci NULL DEFAULT NULL,
    `department` varchar(20) CHARACTER SET utf8 COLLATE utf8_general_ci NULL DEFAULT NULL,
    `address` varchar(50) CHARACTER SET utf8 COLLATE utf8_general_ci NULL DEFAULT NULL,
    PRIMARY KEY (`id`) USING BTREE
   ) ENGINE = InnoDB AUTO_INCREMENT = 939 CHARACTER SET = utf8 COLLATE = utf8_general_ci ROW_FORMAT = Dynamic;
   -- ----------------------------
   -- Records of student
   -- ----------------------------
   INSERT INTO `student` VALUES (904, '张三', '男', '1990', '英语系', '辽宁省阜新市');
   INSERT INTO `student` VALUES (905, '李四', '女', '1991', '英语系', '福建省厦门市');
   INSERT INTO `student` VALUES (906, '王五', '男', '1988', '计算机系', '湖南省衡阳市');
   INSERT INTO `student` VALUES (915, '陈六', '男', '1997', '计算机系', '河南省郑州市');
   INSERT INTO `student` VALUES (936, '候七', '男', 'sda', '撒大声地', '北京市');
   INSERT INTO `student` VALUES (938, '钟八', '女', '1999-05-18', '园艺园林', '上海市');
   INSERT INTO `student` VALUES (939, '赵九', '男', 'sda', '撒大声地', '深圳市');

   SET FOREIGN_KEY_CHECKS = 1;

  ```
2.3.搭建springMVC项目框架,使用Maven做jar包管理。
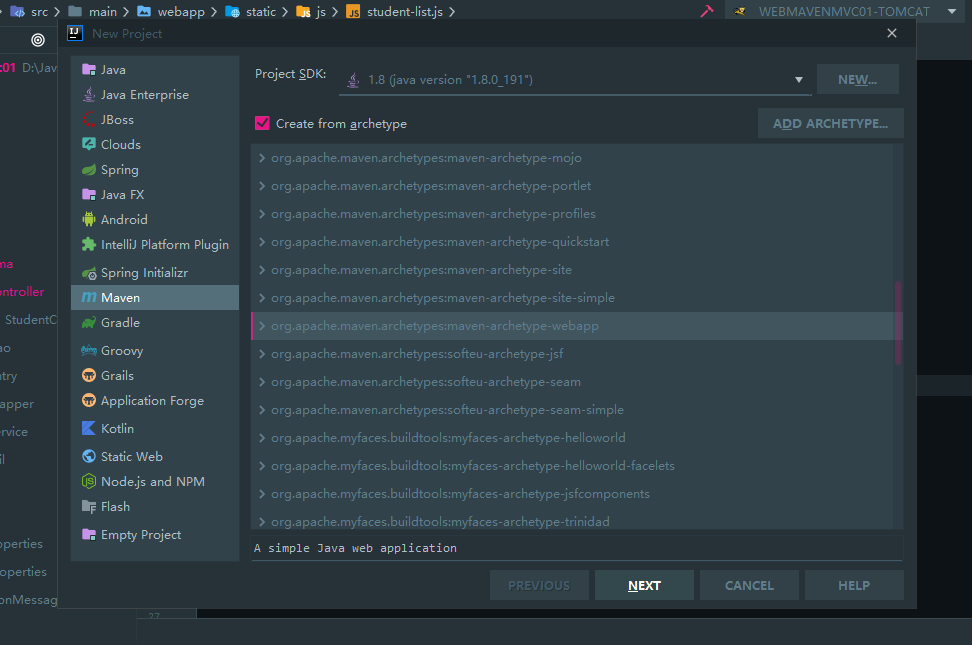
2.3.1.依次点击IDEA 的File --> NeW --> Project...,选择左边栏的Maven菜单,之后选中 Create from archetype以及 选中下面的maven-archetype-webapp,选中 之后你可以看到下面出现了一行英文:A simple Java web application. 如下图:
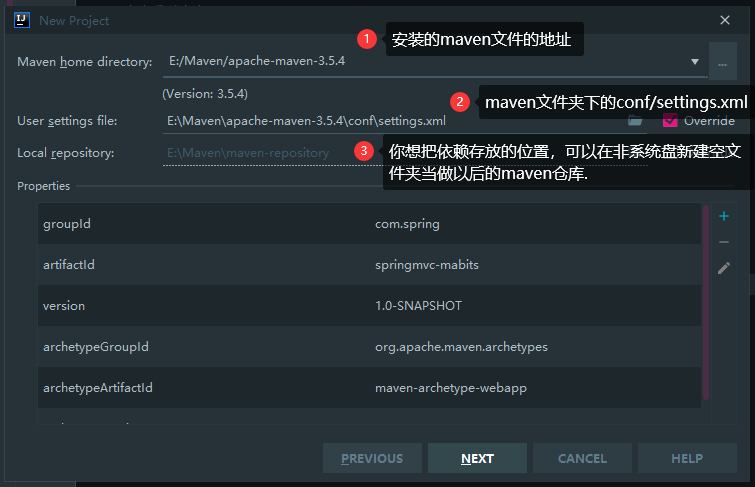
2.3.2.填写完项目名相关信息之后,就是maven本地仓库的设置,将下图的选为你的本地仓库,User settings file 文件为本地仓库的conf文件夹下的settings.xml。
2.3.3 .经过maven项目创建完成后生成的项目文件夹骨架为:

我们在此基础上创建出完整的SpringMVC常见的项目文件骨架:
复制    1. 在main文件夹下创建 java 文件夹和resources文件夹。之后在java文件夹下创建包。一般我们创建包都是域名的反写,比如baidu.com,我们创建文件夹就是 com.baidu。(注意:不是文件夹的名字是com.baidu,而是com文件夹里有个baidu文件夹.)
    2.这里我用com.itheima吧。在itheima文件夹下创建controller(控制层),service(业务层),dao(数据访问层),entity(实体层)mapper(SQL映射文件层),再加上一个utils(工具层)(可创建可不创建,自由选择)
    3.resources 文件夹创建一个spring文件夹和jdbc.properties文件。webapp下创建static和views两个文件夹,views文件夹下创建student文件夹。最后在student文件夹下创建list.jsp文件.
2.3.4.将java文件夹设为sources文件(做法是选中java文件夹,右键选择Make Directory as --> Sources Root),同理 sources 设为 Resources Root.
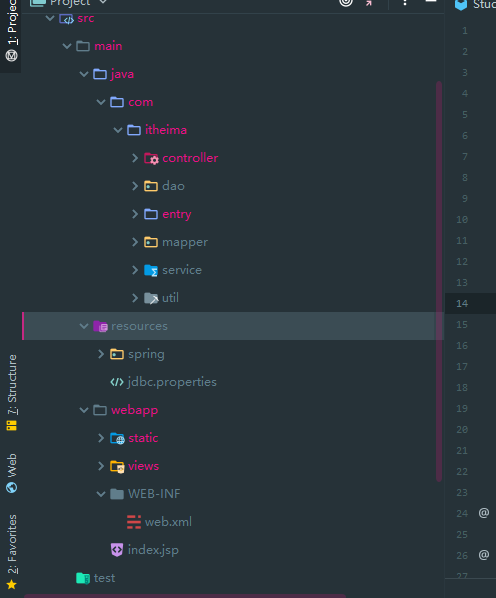
2.3.5. 添加框架支持(Add Frameworks Support),选中项目文件夹,右键点击Add Frameworks Support,然后选择spring下的SpringMVC。静待资源下载完成。下载完成后将生成的dispatch-servlet.xml和applicationContext.ml移到resources/spring文件夹下,并重新命名为:spring-mvc.xml和spring-mybatis.xml。
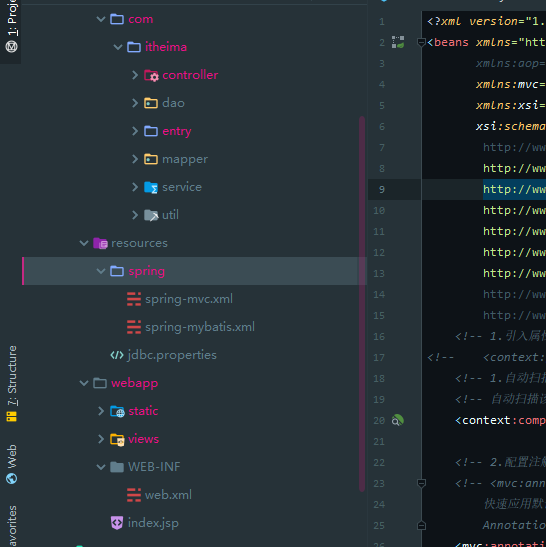
让我们再看一遍项目结构。
3.项目xml配置(开始贴代码了)
1.pox.xml文件中添加项目依赖和插件.
复制  ```
    <project xmlns="http://maven.apache.org/POM/4.0.0" xmlns:xsi="http://www.w3.org/2001/XMLSchema-instance"
     xsi:schemaLocation="http://maven.apache.org/POM/4.0.0 http://maven.apache.org/maven-v4_0_0.xsd">
    <modelVersion>4.0.0</modelVersion>
    <groupId>com.demo</groupId>
    <artifactId>SSMProDemo</artifactId>
    <packaging>war</packaging>
    <version>0.0.1-SNAPSHOT</version>
    <name>SSMProDemo Maven Webapp</name>
    <url>http://maven.apache.org</url>

    <properties>
      <project.build.sourceEncoding>UTF-8</project.build.sourceEncoding>
      <spring.version>4.3.0.RELEASE</spring.version>
    </properties>

    <dependencies>
      <!--Spring框架核心库 -->
      <dependency>
        <groupId>org.springframework</groupId>
        <artifactId>spring-context</artifactId>
        <version>${spring.version}</version>
      </dependency>
      <!-- Spring MVC -->
      <dependency>
        <groupId>org.springframework</groupId>
        <artifactId>spring-webmvc</artifactId>
        <version>${spring.version}</version>
      </dependency>
      <dependency>
        <groupId>org.springframework</groupId>
        <artifactId>spring-context-support</artifactId>
        <version>${spring.version}</version>
      </dependency>
      <!-- aspectJ AOP 织入器 -->
      <dependency>
        <groupId>org.aspectj</groupId>
        <artifactId>aspectjweaver</artifactId>
        <version>1.8.9</version>
      </dependency>
      <!--mybatis-spring适配器 -->
      <dependency>
        <groupId>org.mybatis</groupId>
        <artifactId>mybatis-spring</artifactId>
        <version>1.3.0</version>
      </dependency>
      <!--Spring java数据库访问包,在本例中主要用于提供数据源 -->
      <dependency>
        <groupId>org.springframework</groupId>
        <artifactId>spring-jdbc</artifactId>
        <version>${spring.version}</version>
      </dependency>
      <!--mysql数据库驱动 TODO:注意:如果你的mysql 是5.x,替换相应的jar包.换成5.x.x的版本. -->
      <dependency>
        <groupId>mysql</groupId>
        <artifactId>mysql-connector-java</artifactId>
        <version>8.0.11</version>
      </dependency>
      <!--log4j日志包 -->
      <dependency>
        <groupId>org.apache.logging.log4j</groupId>
        <artifactId>log4j-core</artifactId>
        <version>2.6.1</version>
      </dependency>
      <!-- mybatis ORM框架 -->
      <dependency>
        <groupId>org.mybatis</groupId>
        <artifactId>mybatis</artifactId>
        <version>3.4.1</version>
      </dependency>
      <!-- JUnit单元测试工具 -->
      <dependency>
        <groupId>junit</groupId>
        <artifactId>junit</artifactId>
        <version>4.10</version>
      </dependency>
      <!--c3p0 连接池 -->
      <dependency>
        <groupId>c3p0</groupId>
        <artifactId>c3p0</artifactId>
        <version>0.9.1.2</version>
      </dependency>
      <!-- JSTL -->
      <dependency>
        <groupId>javax.servlet</groupId>
        <artifactId>jstl</artifactId>
        <version>1.2</version>
      </dependency>
      <!-- Servlet核心包 -->
      <dependency>
        <groupId>javax.servlet</groupId>
        <artifactId>javax.servlet-api</artifactId>
        <version>3.0.1</version>
        <scope>provided</scope>
      </dependency>
      <!--JSP -->
      <dependency>
        <groupId>javax.servlet.jsp</groupId>
        <artifactId>jsp-api</artifactId>
        <version>2.1</version>
        <scope>provided</scope>
      </dependency>
      <!-- jackson -->
      <dependency>
        <groupId>com.fasterxml.jackson.core</groupId>
        <artifactId>jackson-core</artifactId>
        <version>2.5.2</version>
      </dependency>
      <dependency>
        <groupId>com.fasterxml.jackson.core</groupId>
        <artifactId>jackson-databind</artifactId>
        <version>2.5.2</version>
      </dependency>
      <!--JSR303 -->
      <dependency>
        <groupId>org.hibernate</groupId>
        <artifactId>hibernate-validator</artifactId>
        <version>5.2.2.Final</version>
      </dependency>
      <!--文件上传 -->
      <dependency>
        <groupId>commons-io</groupId>
        <artifactId>commons-io</artifactId>
        <version>2.4</version>
      </dependency>
      <dependency>
        <groupId>commons-fileupload</groupId>
        <artifactId>commons-fileupload</artifactId>
        <version>1.3.1</version>
      </dependency>

      <dependency>
        <groupId>com.alibaba</groupId>
        <artifactId>fastjson</artifactId>
        <version>1.2.47</version>
      </dependency>


    </dependencies>
    <build>
      <resources>
        <resource>
          <directory>src/main/java</directory>
          <includes>
            <include>**/*.properties</include>
            <include>**/*.xml</include>
          </includes>
          <filtering>false</filtering>
        </resource>
      </resources>


      <plugins>
        <plugin>
          <artifactId>maven-compiler-plugin</artifactId>
          <version>3.1</version>
          <configuration>
            <source>1.8</source>
            <target>1.8</target>
          </configuration>
        </plugin>
      </plugins>
    </build>
  </project>
  ```
说明:
2.web.xml文件配置:
复制  ```
      <?xml version="1.0" encoding="UTF-8"?>
        <web-app id="WebApp_ID" version="3.0"
           xmlns:xsi="http://www.w3.org/2001/XMLSchema-instance"
           xmlns="http://java.sun.com/xml/ns/javaee"
           xsi:schemaLocation="http://java.sun.com/xml/ns/javaee
           http://java.sun.com/xml/ns/javaee/web-app_3_0.xsd">

      <!--  加载spring和mybatis的配置文件 -->
      <context-param>
          <param-name>contextConfigLocation</param-name>
          <param-value>classpath:spring/spring-mybatis.xml</param-value>
      </context-param>

      <!-- 使用ContextLoaderListener初始化Spring容器 -->
      <!--若没有指定其他参数,默认查找的配置文件位置是:/WEB-INF/applicationContext.xml  -->
      <listener>
          <description>Spring容器加载监听器</description>
          <listener-class>org.springframework.web.context.ContextLoaderListener</listener-class>
      </listener>

      <!-- 配置springmvc核心控制器 -->
      <!-- spring MVC servlet -->
      <servlet>
          <servlet-name>SpringMVC</servlet-name>
          <servlet-class>org.springframework.web.servlet.DispatcherServlet</servlet-class>
          <init-param>
              <description>springMVC</description>
              <param-name>contextConfigLocation</param-name>
              <param-value>classpath:spring/spring-mvc.xml</param-value>
          </init-param>
          <!-- 启动动优先级,越小越早加载 -->
          <load-on-startup>1</load-on-startup>
      </servlet>
      <!-- Servlet访问的路径映射,所有的访问都必须经过调度用的前置控制器 -->
      <servlet-mapping>
          <servlet-name>SpringMVC</servlet-name>
          <url-pattern>/</url-pattern>
      </servlet-mapping>

      <!--编码过滤器 -->
      <filter>
          <description>字符集过滤器</description>
          <filter-name>encodingFilter</filter-name>
          <filter-class>org.springframework.web.filter.CharacterEncodingFilter</filter-class>
          <init-param>
              <description>字符集编码</description>
              <param-name>encoding</param-name>
              <param-value>UTF-8</param-value>
          </init-param>
      </filter>
      <!-- 路径映射 -->
      <filter-mapping>
          <filter-name>encodingFilter</filter-name>
          <url-pattern>/*</url-pattern>
      </filter-mapping>

      <welcome-file-list>
          <welcome-file>index.jsp</welcome-file>
      </welcome-file-list>
  </web-app>
  ```
3.spring-mvc.xml
复制 ```
<?xml version="1.0" encoding="UTF-8"?>
<beans xmlns="http://www.springframework.org/schema/beans"
xmlns:aop="http://www.springframework.org/schema/aop" xmlns:context="http://www.springframework.org/schema/context"
xmlns:mvc="http://www.springframework.org/schema/mvc" xmlns:tx="http://www.springframework.org/schema/tx"
xmlns:xsi="http://www.w3.org/2001/XMLSchema-instance"
xsi:schemaLocation="http://www.springframework.org/schema/aop
http://www.springframework.org/schema/aop/spring-aop-4.3.xsd
http://www.springframework.org/schema/beans
http://www.springframework.org/schema/beans/spring-beans-4.3.xsd
http://www.springframework.org/schema/context
http://www.springframework.org/schema/context/spring-context-4.3.xsd
http://www.springframework.org/schema/mvc
http://www.springframework.org/schema/mvc/spring-mvc-4.3.xsd
http://www.springframework.org/schema/tx
http://www.springframework.org/schema/tx/spring-tx-4.3.xsd" >
<!-- 自动扫描该包,使springmvc认为包下用了@Controller注解的类是控制器 -->
<context:component-scan base-package="com.itheima.controller" />
<!-- 2.配置注解的处理器映射器和处理器适配器 -->
<!-- <mvc:annotation-driven /> 是一种简写形式,完全可以手动配置替代这种简写形式,简写形式可以让初学者
快速应用默认配置方案。<mvc:annotation-driven /> 会自动注册DefaultAnnotationHandlerMapping与
AnnotationMethodHandlerAdapter 两个bean,是spring MVC为@Controllers分发请求所必须的。 -->
<mvc:annotation-driven />
<!-- <!– 3.Spring MVC不处理静态资源 –>-->
<!-- 静态资源映射 -->
<mvc:resources mapping="/static/js/**" location="static/js/"></mvc:resources>
<mvc:resources mapping="/static/css/**" location="static/css/"></mvc:resources>
<mvc:resources mapping="/static/images/**" location="static/images/"></mvc:resources>
<mvc:resources mapping="/static/My97DatePicker/**" location="static/My97DatePicker/"></mvc:resources>
<!-- <mvc:default-servlet-handler />-->
<!-- 4.配置内部视图解析器 -->
<!-- 对模型视图名称的解析,即在模型视图名称添加前后缀 -->
<bean class="org.springframework.web.servlet.view.InternalResourceViewResolver">
<property name="prefix" value="/views/" />
<property name="suffix" value=".jsp" />
</bean>
</beans>
```
4.spring-mybatis.xml配置
复制  ```
        <?xml version="1.0" encoding="UTF-8"?>
        <beans xmlns="http://www.springframework.org/schema/beans"
               xmlns:xsi="http://www.w3.org/2001/XMLSchema-instance" xmlns:p="http://www.springframework.org/schema/p"
               xmlns:context="http://www.springframework.org/schema/context"
               xmlns:aop="http://www.springframework.org/schema/aop" xmlns:tx="http://www.springframework.org/schema/tx"
               xmlns:mvc="http://www.springframework.org/schema/mvc"
               xsi:schemaLocation="http://www.springframework.org/schema/beans
            http://www.springframework.org/schema/beans/spring-beans-4.3.xsd
            http://www.springframework.org/schema/context
            http://www.springframework.org/schema/context/spring-context-4.3.xsd
            http://www.springframework.org/schema/aop
            http://www.springframework.org/schema/aop/spring-aop-4.3.xsd
            http://www.springframework.org/schema/tx
            http://www.springframework.org/schema/tx/spring-tx-4.3.xsd">

            <!-- 1.引入属性文件 -->
            <context:property-placeholder location="classpath:jdbc.properties" />

            <!-- 2.自动扫描service包(自动注入) -->
            <context:component-scan base-package="com.itheima.service" />

            <!-- ========================================配置数据源========================================= -->
            <!-- 3.配置C3P0数据源 -->
            <bean id="dataSource" class="com.mchange.v2.c3p0.ComboPooledDataSource"
                  destroy-method="close">
                <!--驱动类名 -->
                <property name="driverClass" value="${mysql.driver}" />
                <!-- url -->
                <property name="jdbcUrl" value="${mysql.url}" />
                <!-- 用户名 -->
                <property name="user" value="${mysql.user}" />
                <!-- 密码 -->
                <property name="password" value="${mysql.password}" />
                <!-- 当连接池中的连接耗尽的时候c3p0一次同时获取的连接数 -->
                <property name="acquireIncrement" value="${mysql.acquireIncrement}"></property>
                <!-- 初始连接池大小 -->
                <property name="initialPoolSize" value="${mysql.initialPoolSize}"></property>
                <!-- 连接池中连接最小个数 -->
                <property name="minPoolSize" value="${mysql.minPoolSize}"></property>
                <!-- 连接池中连接最大个数 -->
                <property name="maxPoolSize" value="${mysql.maxPoolSize}"></property>

            </bean>

            <!-- ========================================针对myBatis的配置项============================== -->
            <!-- 4.配置sqlSessionFactory -->
            <bean id="sqlSessionFactory" class="org.mybatis.spring.SqlSessionFactoryBean">
                <!-- 实例化sqlSessionFactory时需要使用上述配置好的数据源以及SQL映射文件 -->
                <!-- 数据源 -->
                <property name="dataSource" ref="dataSource" />
                <!-- sql映射文件路径 -->
                <!-- 自动扫描com/demo/mapping/目录下的所有SQL映射的xml文件, 省掉Configuration.xml里的手工配置
                value="classpath:com/demo/mapping/*.xml"指的是classpath(类路径)下com.demo.mapping包中的所有xml文件 -->
                <property name="mapperLocations" value="classpath:com/itheima/mapper/*.xml" />
            </bean>

            <!-- 5.配置扫描器  -->
            <bean class="org.mybatis.spring.mapper.MapperScannerConfigurer">
                <!-- 扫描com.demo.dao这个包以及它的子包下的所有映射接口类 -->
                <property name="basePackage" value="com.itheima.dao" />
                <property name="sqlSessionFactoryBeanName" value="sqlSessionFactory" />
            </bean>

            <!-- ========================================配置事务============================== -->
            <!-- 6.声明式事务管理 -->
            <!--定义事物管理器,由spring管理事务 -->
            <bean name="transactionManager" class="org.springframework.jdbc.datasource.DataSourceTransactionManager">
                <!-- 配置数据源 -->
                <property name="dataSource" ref="dataSource" />
            </bean>


        </beans>

  ```
4.实现业务逻辑
首先我们先从控制层写起。一般来说,客户端发来的请求,从控制层开始处理,控制层调用service层的逻辑代码,而service层实际上是接口层,我们在serviceImpl包下会实现这些接口,也就是间接调用了实现层的方法。而实现层会调用数据访问层(dao)的接口。最终会和mapper文件中的SQL映射连接起来。
1.首先我们在entity 创建Student 实体类,此类是数据库student表的对应类,添加对应的get/set方法,千万记住,务必要添加无参构造方法。不然项目后面运行的时候可能出现让你摸不到头脑的错误。其次,再创建一个Message类,此类数据库不做映射,其用途只是封装返回消息的类。
复制package com.itheima.entry;

/**
* @Author:Duanzhenbiao
* @Date:2020/11/17
* @Description:
*/

public class Student {

    private Integer id; // 学生ID

    private String name ; // 学生姓名

    private String sex ; // 学生性别

    private String birth; // 学生生日

    private String  department; // 学生所属部门.

    private String address ; // 学生所在地址

    // 无参构造
    public Student() { }

    public Student(String name, String sex, String birth, String department, String address) {
        this.name = name;
        this.sex = sex;
        this.birth = birth;
        this.department = department;
        this.address = address;
    }

    public Student(Integer id, String name, String sex, String birth, String department, String address) {
        this.id = id;
        this.name = name;
        this.sex = sex;
        this.birth = birth;
        this.department = department;
        this.address = address;
    }

    public Integer getId() {
        return id;
    }

    public void setId(Integer id) {
        this.id = id;
    }

    public String getName() {
        return name;
    }

    public void setName(String name) {
        this.name = name;
    }

    public String getSex() {
        return sex;
    }

    public void setSex(String sex) {
        this.sex = sex;
    }

    public String getBirth() {
        return birth;
    }

    public void setBirth(String birth) {
        this.birth = birth;
    }

    public String getDepartment() {
        return department;
    }

    public void setDepartment(String department) {
        this.department = department;
    }

    public String getAddress() {
        return address;
    }

    public void setAddress(String address) {
        this.address = address;
    }

    @Override
    public String toString() {
        return "Student{" +
                "id=" + id +
                ", name='" + name + '\'' +
                ", sex='" + sex + '\'' +
                ", birth='" + birth + '\'' +
                ", department='" + department + '\'' +
                ", address='" + address + '\'' +
                '}';
    }

}
Message消息类
复制package com.itheima.entry;

import java.util.HashMap;
import java.util.Map;

public class Message {
    // 封装的消息类 : 给前端返回json数据时用的消息类. (注:该类,数据库表不做映射.)

    //状态码 200-成功  100-失败
    private int code;

    //提示信息
    private String msg;

    public Message() { }

    public Message(int code, String msg) {
        this.code = code;
        this.msg = msg;
    }

    public Message(int code, String msg, Map<String, Object> data) {
        this.code = code;
        this.msg = msg;
        this.data = data;
    }

    //用户要返回给浏览器的数据
    private Map<String, Object> data = new HashMap<String, Object>();

    public int getCode() {
        return code;
    }

    public void setCode(int code) {
        this.code = code;
    }

    public String getMsg() {
        return msg;
    }

    public void setMsg(String msg) {
        this.msg = msg;
    }

    public Map<String, Object> getData() {
        return data;
    }

    public void setData(Map<String, Object> data) {
        this.data = data;
    }

    @Override
    public String toString() {
        return "Message{" +
                "code=" + code +
                ", msg='" + msg + '\'' +
                ", data=" + data +
                '}';
    }
}
2.我们首先在controller层中创建studentController类 ,service层创建studentService接口,dao层创建studentDao接口,mapper创建studentMapper.xml文件。service文件夹下的Impl文件夹中创建studentServiceImpl类并继承studentService,重写service接口方法。
3.增删改查我也不细说了,直接贴代码,运行吧。
studentController层:
复制package com.itheima.controller;

import com.itheima.entry.Message;
import com.itheima.entry.Student;
import com.itheima.service.StudentService;
import com.itheima.util.Util;
import org.apache.ibatis.annotations.Param;
import org.springframework.beans.factory.annotation.Autowired;
import org.springframework.stereotype.Controller;
import org.springframework.ui.Model;
import org.springframework.util.StringUtils;
import org.springframework.web.bind.annotation.RequestMapping;
import org.springframework.web.bind.annotation.RequestMethod;
import org.springframework.web.bind.annotation.RequestParam;
import org.springframework.web.bind.annotation.ResponseBody;

import java.util.List;

/**
 * @Author:Duanzhenbiao
 * @Date:2020/11/17
 * @Description: 学生表的增删改查.
 */

@Controller
@RequestMapping("/student")
public class StudentController {

    @Autowired
    private StudentService studentService;


    // 获取所有数据
    @RequestMapping("/list")
    public String selectAllStudents(Model model, @RequestParam(required=false,defaultValue="1") int page){
        // 每页的条数
        int count = 5;
        // 每页的数据
        List<Student> ls = studentService.selectAllStudents(page,count);
        // 该学生表的总学生人数.
        Integer total = studentService.getStudentTotal();
        model.addAttribute("current_page",page);//当前页
        model.addAttribute("total",total); // 总数量
        model.addAttribute("count",count);// 每页的数量
        model.addAttribute("students",ls);// 每页的学生数据.
        return "student/list";
    }

    /**
     * 添加学生对象
     * @param student
     * @return
     */
    //添加数据
    @RequestMapping(value ="/add",produces="text/plain;charset=UTF-8") // 设置UTF-8 是为了返回时网页能正常显示中文.
    @ResponseBody
    public  String insertOneStudent(Student student){
        System.out.println( student);
        int result = studentService.insertOneStudent(student);
        String  res = result == 1 ? "{'status':200,'response':'添加成功'}":"{'status':100,'response':'添加失败'}";
        System.out.println(res);
        return res;
    }

    /**
     * 编辑学生对象
     * @param student
     * @return
     */
    // 编辑数据,限定访问方法.
    @RequestMapping(value = "/edit",method = RequestMethod.POST)
    @ResponseBody
    public Message updateStudent(Student student){
        // 消息实例,备用.
        Message msg = new Message();
        // 检测传进来的参数是否为空值。
        System.out.println(student);
        boolean flag = Util.checkStudentNull(student);
        if (!flag){
            msg.setCode(100);
            msg.setMsg("fail");
            return msg;
        }
        // 简单限制之后,更新数据库
        int result = studentService.updateStudent(student);
        if(result == 1){
            msg.setCode(200);
            msg.setMsg("success");
        }
        return msg;
    }

    /**
     *  删除 student
     * @param id
     * @return
     */
    @RequestMapping("/delete")
    @ResponseBody
    public Message deleteStudent(@RequestParam(value = "id" ,required = true) int id){
        // 消息实例,备用.
        Message msg = new Message();
        // 数据库删除数据
        int result = studentService.deleteStudent(id);
        if(result == 1){
            msg.setCode(200);
            msg.setMsg("success");
        }else{
            msg.setCode(100);
            msg.setMsg("fail");
        }
        return msg;
    }


    @RequestMapping(value = "/getStudentById")
    @ResponseBody
    public Message selectStudentById(@RequestParam(value = "editID" ,required = true) int editID){
        // 实例化消息实例
        Message msg = new Message();
        // 查询对应的student数据
        Student student = studentService.selectStudentById(editID);
        if(student == null) {
            msg.setCode(100);
            msg.setMsg("fail");
            return msg;
        }else{
            msg.setCode(200);
            msg.setMsg("success");
            msg.getData().put("data",student);
        }
        System.out.println(msg);
        return msg;

    }

}
studentService层:
复制package com.itheima.service;

import com.itheima.entry.Student;

import java.util.List;


public interface StudentService {

    // 查询所有学生
    List<Student> selectAllStudents(int page,int count);

    // 添加一位学生
    int insertOneStudent(Student stu);

    // 查询该表总共有多少条数据
    int getStudentTotal();

    // 更新数据库的某条数据
    int updateStudent(Student student);

    // 通过ID查询student
    Student selectStudentById(int editID);

    // 通过ID删除对象
    int deleteStudent(int id);
}
studentServiceImpl层:
复制package com.itheima.service.Impl;

import com.itheima.dao.StudentDao;
import com.itheima.entry.Student;
import com.itheima.service.StudentService;
import org.springframework.beans.factory.annotation.Autowired;
import org.springframework.stereotype.Service;

import java.util.List;

/**
 * @Author:Duanzhenbiao
 * @Date:2020/11/17
 * @Description:
 */
@Service
public class StudentServiceImpl implements StudentService {

    @Autowired
    private StudentDao studentDao;


    @Override
    public List<Student> selectAllStudents(int page, int count) {
        int skip = (page-1)*count;
        return studentDao.selectAllStudents(skip,count);
    }


    // 添加一个学生
    @Override
    public int insertOneStudent(Student stu) {
        return studentDao.insertOneStudent(stu);
    }

    // 查询学生表总共有多少位学生.
    @Override
    public int getStudentTotal() {
        return studentDao.getStudentTotal();
    }

    // 更新数据库某条数据
    @Override
    public int updateStudent(Student student) {
        return studentDao.updateStudent(student);
    }


    // 通过ID查询student
    @Override
    public Student selectStudentById(int editID) {
        return studentDao.selectStudentById(editID);
    }

    @Override
    public int deleteStudent(int id) {
        return studentDao.deleteStudent(id);
    }
}
studentDao 层
复制package com.itheima.dao;

import com.itheima.entry.Student;
import org.apache.ibatis.annotations.Param;

import java.util.List;

/**
 * @Author:Duanzhenbiao
 * @Date:2020/11/17
 * @Description:
 */

public interface StudentDao {

    // 查询所有学生接口
    List<Student> selectAllStudents(@Param("skip") int skip, @Param("count") int count);

    // 添加一位学生.
    int insertOneStudent(Student stu);

    // 获取学生总共有多少条数据.
    int getStudentTotal();

    // 更新数据库中某条数据
    int updateStudent(Student student);

    // 通过ID查询相应对象数据
    Student selectStudentById(int id);

    // 通过 id删除相应的对象数据
    int deleteStudent(int id);
}
还剩最重要的mapper文件:studentMapper.xml
复制<?xml version="1.0" encoding="UTF-8"?>
<!DOCTYPE mapper PUBLIC "-//mybatis.org//DTD Mapper 3.0//EN" "http://mybatis.org/dtd/mybatis-3-mapper.dtd">

<!--命名空间应该是对应接口的包名+接口名 -->
<mapper namespace="com.itheima.dao.StudentDao">
    <!--查询用户信息并分页 -->
    <select id="selectAllStudents" resultType="com.itheima.entry.Student">
       select * from student limit #{skip},#{count}
    </select>

    <!-- 添加一位学生   -->
    <insert id="insertOneStudent"  parameterType="com.itheima.entry.Student" >
        insert into student(name,sex,birth,department,address) value(#{name},#{sex},#{birth},#{department},#{address})
    </insert>

    <!-- 获取学生表学生的总人数   -->
    <select id="getStudentTotal" resultType="java.lang.Integer">
        select count(*) from student
    </select>

    <!-- 通过ID更新数据   -->
    <update id="updateStudent" parameterType="com.itheima.entry.Student">
        update student set name = #{name},sex = #{sex},birth = #{birth},department = #{department},address = #{address} where id = #{id}
    </update>

    <!--  通过ID查询对应的student  -->
    <select id="selectStudentById" resultType="com.itheima.entry.Student" parameterType="int">
        select * from  student where id = #{id}
    </select>

    <!-- 通过ID删除对应数据   -->
    <delete id="deleteStudent" parameterType="int" >
        delete  from student where id = #{id}
    </delete>

</mapper>
原本我是想增、删、改、查叙述的,结果贴的代码看起来很多,所以临时改变了方式。上面的代码实现了后端的事情,可以用postman测试一下接口,接着就是前端的事了。
前端从index.jsp 页面开始,跳转到list.jsp页面,在此页面进行增删改查,看看实际效果再贴代码吧。
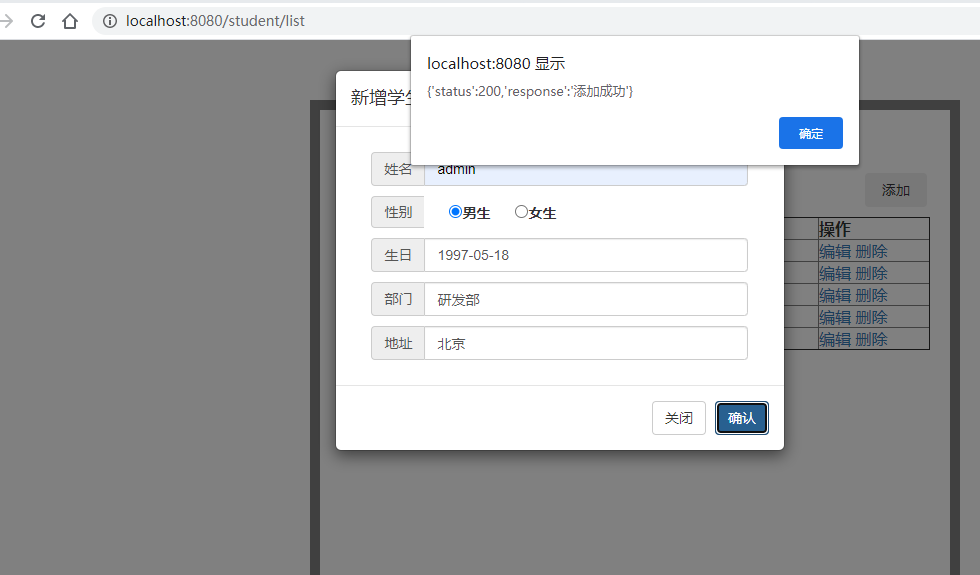
添加窗口
前端的list.jsp 页面代码:
复制<%@ page language="java" contentType="text/html; charset=UTF-8" pageEncoding="UTF-8"%>
<%@taglib prefix="c" uri="http://java.sun.com/jsp/jstl/core"%>
<html>
<head>
<meta http-equiv="Content-Type" content="text/html; charset=UTF-8">
<link href="/static/css/bootstrap.min.css" type="text/css" rel="stylesheet" />
<link href="/static/css/main.css" type="text/css" rel="stylesheet" />
<link href="/static/css/pagination.css" type="text/css" rel="stylesheet" />
<script type="text/javascript" src="/static/js/jquery-3.3.1.min.js" ></script>
<script type="text/javascript" src="/static/js/bootstrap.min.js" ></script>
<title>学生管理</title>
</head>
<body>
<div class="main">
<h2 class="title"><span>学生管理</span></h2>
<%-- 按钮组 --%>
<p class="Add_button">
<button class="btn out" style="cursor: pointer" data-toggle="modal" data-target="#addModal"> 添加 </button>
<%-- <button class="btn out" onclick="return submitForm();"> 批量删除</button>--%> <!--批量删除功能未实现.-->
</p>
<%-- 表单 --%>
<form action="deleteUsers" method="post">
<table border="1" width="100%" class="tab">
<tr>
<th><input type="checkbox" id="chkAll"></th>
<th>姓名</th>
<th>性别</th>
<th>出生日期</th>
<th>部门</th>
<th>地址</th>
<th>操作</th>
</tr>
<c:forEach var="student" items="${students}">
<tr>
<th><input type="checkbox" name="student_id" value="${student.id}"></th>
<td>${student.name}</td>
<td>${student.sex}</td>
<td>${student.birth}</td>
<td>${student.department}</td>
<td>${student.address}</td>
<td>
<a href="javascript:void(0)" class="abtn" data-toggle="modal" data-target="#editModal" onclick="editStudent(${student.id})">编辑</a>
<a href="javascript:void(0)" class="abtn" data-toggle="modal" data-target="#deleteModal" onclick="deleteStudent(${student.id})">删除</a>
</td>
</tr>
</c:forEach>
</table>
<div id="pager"></div>
</form>
</div>
<%--添加模态框--%>
<div class="modal fade" id="addModal" tabindex="-1" role="dialog" aria-labelledby="addModalLabel" aria-hidden="true">
<div class="modal-dialog">
<div class="modal-content">
<div class="modal-header">
<button type="button" class="close" data-dismiss="modal" aria-hidden="true">×</button>
<h4 class="modal-title" id="myModalLabel">新增学生</h4>
</div>
<div class="modal-body">
<form action="">
<div class="input-group">
<span class="input-group-addon" id="basic-addon1">姓名</span>
<input type="text" class="form-control" placeholder="Username" aria-describedby="basic-addon1" id="username">
</div>
<div class="input-group">
<span class="input-group-addon" id="basic-addon2">性别</span>
<label style="margin-left: 25px; padding-top: 5px;cursor: pointer;"><input type="radio" name="sex" value="男">男生</label>
<label style="margin-left: 25px; padding-top: 5px;cursor: pointer;"><input type="radio" name="sex" value="女">女生</label>
</div>
<div class="input-group">
<span class="input-group-addon" id="basic-addon3">生日</span>
<input type="text" class="form-control" placeholder="生日" aria-describedby="basic-addon1" id="birthday">
</div>
<div class="input-group">
<span class="input-group-addon" id="basic-addon4">部门</span>
<input type="text" class="form-control" placeholder="部门" aria-describedby="basic-addon1" id="department">
</div>
<div class="input-group">
<span class="input-group-addon" id="basic-addon5" >地址</span>
<input type="text" class="form-control" placeholder="地址" aria-describedby="basic-addon1" id="address">
</div>
</form>
</div>
<div class="modal-footer">
<button type="button" class="btn btn-default" data-dismiss="modal">关闭</button>
<button type="button" class="btn btn-primary" onclick="addSubmit();">确认</button>
</div>
</div><!-- /.modal-content -->
</div><!-- /.modal -->
</div>
<%--编辑模态框--%>
<div class="modal fade" id="editModal" tabindex="-1" role="dialog" aria-labelledby="editModalLabel" aria-hidden="true" >
<div class="modal-dialog" >
<div class="modal-content">
<div class="modal-header">
<button type="button" class="close" data-dismiss="modal" aria-hidden="true">×</button>
<h4 class="modal-title" id="editModalLabel">编辑学生</h4>
</div>
<div class="modal-body">
<form action="">
<div class="input-group">
<span class="input-group-addon">姓名</span>
<input type="text" class="form-control" placeholder="Username" aria-describedby="basic-addon1" id="edit_username">
</div>
<div class="input-group">
<span class="input-group-addon">性别</span>
<label style="margin-left: 25px; padding-top: 5px;cursor: pointer;"><input type="radio" name="edit_sex" value="男">男生</label>
<label style="margin-left: 25px; padding-top: 5px;cursor: pointer;"><input type="radio" name="edit_sex" value="女">女生</label>
</div>
<div class="input-group">
<span class="input-group-addon">生日</span>
<input type="text" class="form-control" placeholder="birthday" aria-describedby="basic-addon1" id="edit_birthday">
</div>
<div class="input-group">
<span class="input-group-addon">部门</span>
<input type="text" class="form-control" placeholder="department" aria-describedby="basic-addon1" id="edit_department">
</div>
<div class="input-group">
<span class="input-group-addon">地址</span>
<input type="text" class="form-control" placeholder="address" aria-describedby="basic-addon1" id="edit_address">
</div>
</form>
</div>
<div class="modal-footer">
<button type="button" class="btn btn-default" data-dismiss="modal">关闭</button>
<button type="button" class="btn btn-primary" onclick="editSubmit();">确认</button>
</div>
</div><!-- /.modal-content -->
</div><!-- /.modal -->
</div>
<%--删除模态框--%>
<div class="modal fade" id="deleteModal" tabindex="-1" role="dialog" aria-labelledby="editModalLabel" aria-hidden="true">
<div class="modal-dialog" >
<div class="modal-content">
<div class="modal-header">
<button type="button" class="close" data-dismiss="modal" aria-hidden="true">×</button>
<h4 class="modal-title" id="deleteModalLabel">删除学生</h4>
</div>
<div class="modal-body">
<p>您确定要删除此条数据吗?</p>
</div>
<div class="modal-footer">
<button type="button" class="btn btn-default" data-dismiss="modal">关闭</button>
<button type="button" class="btn btn-primary" onclick="deleteSubmit();">确认</button>
</div>
</div><!-- /.modal-content -->
</div><!-- /.modal -->
</div>
<!--分页 -->
<script type="text/javascript" src="/static/js/jquery.pagination.js" ></script>
<script type="text/javascript">
//初始化分页组件 <!--因为此处有$ {} 属于jstl,无法提取到js中 ,-->
var total=${total};// 学生总人数
var count=${count}; // 每页的数量
var page=${current_page}; // 当前页
$("#pager").pagination(total, {
items_per_page:count,
current_page:page - 1 ,
next_text:"下一页",
prev_text:"上一页",
num_edge_entries:2,
load_first_page:false,
callback:handlePaginationClick
});
//回调方法
function handlePaginationClick(new_page_index, pagination_container){
location.href="list?page="+(new_page_index+1);
}
</script>
<!-- 对数据的增删改查都提取到此js中 -->
<script type="text/javascript" src="/static/js/student-list.js" ></script>
</body>
</html>
配套的student-list.js
复制
$(document).ready(function(){
    //全选/取消全选
    $("#chkAll").click(function(){
        var checked=$("#chkAll").prop("checked");
        $("input[name='student_id']").prop("checked",checked);
    })
})


// // 批量删除按钮 :太懒了,不想做了.
// function submitForm(){
//     if($("input[name='student_id']:checked").length==0){
//         alert("请选择要删除的记录!");
//         return false;
//     }
//     return true;
// }

// 添加提交方法
function addSubmit() {
    var username = $("#username").val().replace(/^\s+|\s+$/g, ""); // 用户名(去除两边空格)
    var sex = $("input[name='sex']:checked").val(); // 用户性别(去除两边空格)
    var birthday = $("#birthday").val().replace(/^\s+|\s+$/g, ""); // 用户生日(去除两边空格)
    var department = $("#department").val().replace(/^\s+|\s+$/g, ""); // 用户部门(去除两边空格)
    var address = $("#address").val().replace(/^\s+|\s+$/g, ""); // 用户部门(去除两边空格)

    // 这里只做简单的非空限制
    if(username.length == 0 || sex == undefined || birthday.length == 0 || department == 0 || address == 0){
        alert("表单中字段不能为空!");// 简单的alert()提示框.
        return false;
    }
    // ajax 向后台发起请求.
    $.ajax({
        url: "/student/add/?" + "name=" +username +"&sex="+sex + "&birth=" + birthday +"&department="+ department+"&address=" +address,
        type: "GET",
        timeout: 3000,
        success: function (data) {
            alert(data);
            // 成功之后,关闭模态框,数据清零
            $("#addModal").modal("hide");
            $("#addModal input").val("")
            // 添加成功后刷新页面
            window.setTimeout(function () {
                window.location.reload();
            },2000);
        }, error: function (e) {
           alert("添加失败.")
        }
    });
}

// 获取要编辑的数据ID,隐藏在打开的模态框里。
function editStudent(editID){
    // 将要编辑的数据ID,隐藏在编辑模态框的 div 中.
   $("#editModal").attr("value",editID);
   // 获取该条数据
   $.ajax({
       url: "/student/getStudentById/?editID="+editID ,
       type: "GET",
       timeout: 3000,
       dataType:'json',
       success: function (json) {
           if(json["code"] == 200){
                // 数据填充
               $("#edit_username").val(json["data"]["data"]["name"]);

               if(json["data"]["data"]["sex"] == "男"){  // 性别赋值
                   $("input[name='edit_sex']").eq(0).attr("checked",true);
               }else{
                   $("input[name='edit_sex']").eq(1).attr("checked",true);
               }

               $("#edit_birthday").val(json["data"]["data"]["birth"]);
               $("#edit_department").val(json["data"]["data"]["department"]);
               $("#edit_address").val(json["data"]["data"]["address"]);
           }else{
               alert(json["msg"])
           }
       }, error: function (e) {
           alert("添加失败.")
       }
   })

}

// 确认编辑之后,触发方法.
function editSubmit() {
    var editID = $("#editModal").attr("value");
    var name = $("#edit_username").val().replace(/^\s+|\s+$/g, ""); // 用户名(去除两边空格)
    var sex = $("input[name='edit_sex']:checked").val(); // 用户性别(去除两边空格)
    var birth = $("#edit_birthday").val().replace(/^\s+|\s+$/g, ""); // 用户生日(去除两边空格)
    var department = $("#edit_department").val().replace(/^\s+|\s+$/g, ""); // 用户部门(去除两边空格)
    var address = $("#edit_address").val().replace(/^\s+|\s+$/g, ""); // 用户部门(去除两边空格)


    // 这里只做简单的非空限制
    if(name.length == 0 || sex.length == 0 || birth.length == 0 || department == 0 || address == 0){
        alert("表单中字段不能为空!");// 简单的alert()提示框.
        return false;
    }

    var  form = new FormData();
    form.append("id",parseInt(editID));
    form.append("name",name);
    form.append("sex",sex);
    form.append("birth",birth);
    form.append("department",department);
    form.append("address",address);
    $.ajax({
        url: "/student/edit/",
        type: "POST",
        data: form,
        contentType: 'application/json',
        async: false,//同步上传
        dataType:'json',
        success: function (data) {
            alert(data["code"])
        }, error: function (e) {
            console.log(e);
            alert('系统出现错误,即将自动刷新');
        }

    })
}

function deleteStudent(deleteID) {
    $("#deleteModal").attr("value",deleteID);
}

// 删除确认事件
function deleteSubmit() {
    // 获取要删除的ID
    var id = $("#deleteModal").attr("value");
    // ajax请求
    var formData = new FormData();
    formData.append("id",id);
    $.ajax({
        url: "/student/delete/",
        type: "POST",
        data: formData,
        processData: false,
        contentType: false,
        async: false,
        dataType: 'json',
        success: function (data) {
            if(data["code"] == 200){
                alert("删除成功");
                $("#deleteModal").modal("hide");
                // 两秒后刷新页面
                window.setTimeout(function () {
                    window.location.reload();
                },2000);

            }
        }, error: function (e) {
            alert('系统出现错误,即将自动刷新');
        }
    })


}
结尾:
项目代码以及静态资源文件地址 :
链接:https://pan.baidu.com/s/1fGz3OzxfHX5c1NzYR5rDhA 提取码:n1z8


【推荐】国内首个AI IDE,深度理解中文开发场景,立即下载体验Trae
【推荐】编程新体验,更懂你的AI,立即体验豆包MarsCode编程助手
【推荐】抖音旗下AI助手豆包,你的智能百科全书,全免费不限次数
【推荐】轻量又高性能的 SSH 工具 IShell:AI 加持,快人一步
· AI与.NET技术实操系列:基于图像分类模型对图像进行分类
· go语言实现终端里的倒计时
· 如何编写易于单元测试的代码
· 10年+ .NET Coder 心语,封装的思维:从隐藏、稳定开始理解其本质意义
· .NET Core 中如何实现缓存的预热?
· 分享一个免费、快速、无限量使用的满血 DeepSeek R1 模型,支持深度思考和联网搜索!
· 基于 Docker 搭建 FRP 内网穿透开源项目(很简单哒)
· ollama系列01:轻松3步本地部署deepseek,普通电脑可用
· 25岁的心里话
· 按钮权限的设计及实现