写在正文前的絮叨:
其实这个环境的搭建是很简单的,照着官网给的说明很快就可以搭建测试出来。为什么又要写出来呢?只是为了记录、保留、分享这其中遇到的坑。
这个环境之前在架构一个简单系统时,也曾经搭建过,是springsession+redis。这里先落下伏笔(是坑的来源之一)。
正文:
首先要快速搭建一个maven项目,并使用springboot ,可以去spring官网中的 https://start.spring.io/ 快速构建,添加web、redis pom即可。这里注意选择的版本(也是坑的来源之一)
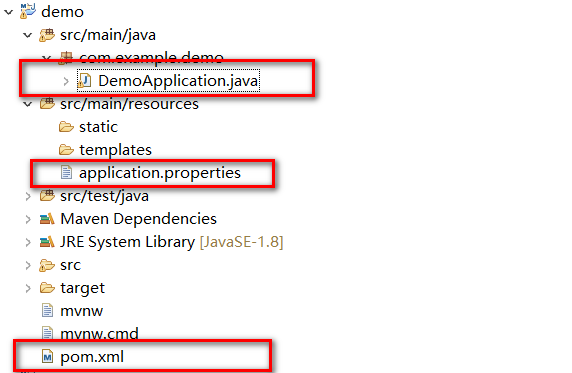
如图:目录结构。其中标红框中是要我们添加内容的。

其中:1.DemoApplication.java内容
package com.example.demo;
import java.util.List;
import org.springframework.beans.factory.annotation.Autowired;
import org.springframework.boot.SpringApplication;
import org.springframework.boot.autoconfigure.SpringBootApplication;
import org.springframework.data.redis.connection.RedisConnection;
import org.springframework.data.redis.core.StringRedisTemplate;
import org.springframework.data.redis.core.ValueOperations;
import org.springframework.web.bind.annotation.PathVariable;
import org.springframework.web.bind.annotation.RequestMapping;
import org.springframework.web.bind.annotation.RestController;
@SpringBootApplication
@RestController
public class DemoApplication {
public static void main(String[] args) {
SpringApplication.run(DemoApplication.class, args);
}
@Autowired
private StringRedisTemplate stringRedisTemplate;
@RequestMapping("/age/{age}")
public String testRedis(@PathVariable String age){
ValueOperations<String, String> ops =stringRedisTemplate.opsForValue();
ops.set("bbb", age);
RedisConnection connection = stringRedisTemplate.getConnectionFactory().getConnection();
List<String> config = connection.getConfig("hostname");
return age;
}
}
2.application.properties内容
# REDIS (RedisProperties)
# Redis数据库索引(默认为0)
spring.redis.database=0
# Redis服务器地址
spring.redis.host=192.168.
# Redis服务器连接端口
spring.redis.port=6379
# Redis服务器连接密码(默认为空)
spring.redis.password=
# 连接池最大连接数(使用负值表示没有限制)
spring.redis.pool.max-active=8
# 连接池最大阻塞等待时间(使用负值表示没有限制)
spring.redis.pool.max-wait=-1
# 连接池中的最大空闲连接
spring.redis.pool.max-idle=8
# 连接池中的最小空闲连接
spring.redis.pool.min-idle=0
# 连接超时时间(毫秒)
spring.redis.timeout=0
server.port = 9999
3.pom.xml内容
<?xml version="1.0" encoding="UTF-8"?>
<project xmlns="http://maven.apache.org/POM/4.0.0" xmlns:xsi="http://www.w3.org/2001/XMLSchema-instance"
xsi:schemaLocation="http://maven.apache.org/POM/4.0.0 http://maven.apache.org/xsd/maven-4.0.0.xsd">
<modelVersion>4.0.0</modelVersion>
<groupId>com.example</groupId>
<artifactId>demo</artifactId>
<version>0.0.1-SNAPSHOT</version>
<packaging>jar</packaging>
<name>demo</name>
<description>Demo project for Spring Boot</description>
<parent>
<groupId>org.springframework.boot</groupId>
<artifactId>spring-boot-starter-parent</artifactId>
<version>1.4.7.RELEASE</version>
<relativePath/> <!-- lookup parent from repository 2.0.0.BUILD-SNAPSHOT -->
</parent>
<properties>
<project.build.sourceEncoding>UTF-8</project.build.sourceEncoding>
<project.reporting.outputEncoding>UTF-8</project.reporting.outputEncoding>
<java.version>1.8</java.version>
</properties>
<dependencies>
<dependency>
<groupId>org.springframework.boot</groupId>
<artifactId>spring-boot-starter-data-redis</artifactId>
</dependency>
<dependency>
<groupId>org.springframework.boot</groupId>
<artifactId>spring-boot-starter-web</artifactId>
</dependency>
<dependency>
<groupId>org.springframework.boot</groupId>
<artifactId>spring-boot-starter-test</artifactId>
<scope>test</scope>
</dependency>
</dependencies>
<build>
<plugins>
<plugin>
<groupId>org.springframework.boot</groupId>
<artifactId>spring-boot-maven-plugin</artifactId>
</plugin>
</plugins>
</build>
<repositories>
<repository>
<id>spring-snapshots</id>
<name>Spring Snapshots</name>
<url>https://repo.spring.io/snapshot</url>
<snapshots>
<enabled>true</enabled>
</snapshots>
</repository>
<repository>
<id>spring-milestones</id>
<name>Spring Milestones</name>
<url>https://repo.spring.io/milestone</url>
<snapshots>
<enabled>false</enabled>
</snapshots>
</repository>
</repositories>
<pluginRepositories>
<pluginRepository>
<id>spring-snapshots</id>
<name>Spring Snapshots</name>
<url>https://repo.spring.io/snapshot</url>
<snapshots>
<enabled>true</enabled>
</snapshots>
</pluginRepository>
<pluginRepository>
<id>spring-milestones</id>
<name>Spring Milestones</name>
<url>https://repo.spring.io/milestone</url>
<snapshots>
<enabled>false</enabled>
</snapshots>
</pluginRepository>
</pluginRepositories>
</project>
最后,启动你的redis服务端,并在application.properties中正确写host的值。
启动项目,这个时候就可以发现能够写数据到redis中了。
写在正文结尾的絮叨:
上面有两处提到坑:
1.是之前有搭建过这样的环境,所以不可避免的会遗留一些配置。我的就是在本机的系统环境变量里添加了redis的连接属性配置,指向的是别的redis地址。这就覆盖了application.properties中的配置,导致我在我以为的目标redis库中永远看不到写的数据。
2.是提到的构建系统时注意版本。。我本着用新的原则,使用的是2.0.0.BUILD-SNAPSHOT版本构建的,同样的配置。启动会报找不到RedisConnectionFactory 这个Bean的错误。这个一般不会想到是版本的问题,但是我之前有搭建过,所以进行比较下,
我将原先的版本1.5.2.RELEASE进行替换,结果是成功的,然后是1.4.7.RELEASE也是可以的,但是1.3.1.RELEASE也会报错。
====总结:1.历史遗留 2.版本比较
祝好


