java多线程学习1
一:多线程简介
进程:每一个进程(程序)都有独立的代码和数据空间(进程上下文)。进程间的切换会有较大的开销,一个进程包括1--n个线程。(进程是资源分配的最小单位)
线程:同一类线程共享代码和数据空间,每一个线程有独立的执行栈和程序计数器(PC),线程切换开销小。(线程是cpu调度的最小单位)
多进程:是指操作系统能同一时候执行多个任务(程序)。
多线程:是指在同一程序中有多个顺序流在执行。
在java中要想实现多线程,主要有两种方式,继承Thread类或者实现Runable接口,至于实现Callable接口方式,不常用
二:实现多线程
(1)方式1:继承Thread类
不推荐继承Thread类,因为java是单继承,能实现接口使用的不推荐使用继承,并且Thread类也是实现了Runable接口,并且提供了run()方法用于启动线程
package com.bjsxt.thread;

/**
 * Created by Administrator on 2019/3/9.
 */
public class TestThread01 extends Thread{

    /**
     * 线程的入口点
     */
    @Override
    public void run() {
        for (int i=0;i<100;i++){
            System.out.println("一遍听歌。。。。");
        }
    }

    public static void main(String[] args){
        TestThread01 testThread01=new TestThread01();   //创建对象
        //启动线程,不保证会立即执行,只是创建了个线程,把执行权交给cpu,至于什么时候执行要看cpu调度
        //如果写成testThread01.run()就是普通方法的调用了
        testThread01.start();

        for(int i=0;i<100;i++){
            System.out.println("一遍敲代码。。。");
        }
    }
}
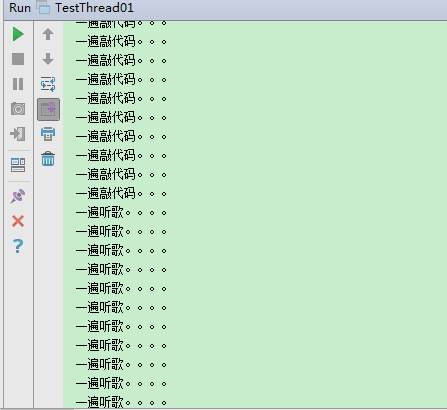
执行结果

案例:同时开启三个线程下载一个网络url图片
1、先写一个文件下载的工具类FileUtils
package com.bjsxt.thread;

import java.io.*;
import java.net.MalformedURLException;
import java.net.URL;

/**
 * Created by Administrator on 2019/3/9.
 */
public class FileUtils {

    /**
     *
     * @param url   文件远程url路径
     * @param name  文件保存位置
     */
    public void copyURLFile(String url,String name){
        try(
            //创建文件输入缓冲流,读取文件信息
            BufferedInputStream bis=new BufferedInputStream(new URL(url).openStream());
            //创建文件输出流,写出文件信息
            BufferedOutputStream bos=new BufferedOutputStream(new FileOutputStream(name));
         ) {

            byte[] bytes=new byte[1024];
            int len=-1;
            while((len=bis.read(bytes))!=-1){
                bos.write(bytes,0,len);
                bos.flush();
            }
        } catch (MalformedURLException e) {
            e.printStackTrace();
        } catch (IOException e){
            e.printStackTrace();
        }
    }
}
创建线程类,开启下载
package com.bjsxt.thread;

/**
 * Created by Administrator on 2019/3/9.
 */
public class TestThread02 extends Thread {

    private String name;
    private String path;

    public TestThread02(String name, String path) {
        this.name = name;
        this.path = path;
    }

    @Override
    public void run() {
        System.out.println(name);
        FileUtils fileUtils=new FileUtils();
        fileUtils.copyURLFile(path,name);
    }

    public static void main(String[] args){
        TestThread02 testThread01=new TestThread02("11.jpg","https://jiahongdichan.oss-cn-shenzhen.aliyuncs.com/data/2019-01-05/uploads/banner/jpg/59011546679793431.jpg");
        TestThread02 testThread02=new TestThread02("22.jpg","https://jiahongdichan.oss-cn-shenzhen.aliyuncs.com/data/2019-01-05/uploads/banner/jpg/16651546679105625.jpg");
        TestThread02 testThread03=new TestThread02("33.jpg","https://jiahongdichan.oss-cn-shenzhen.aliyuncs.com/data/2019-01-05/uploads/banner/jpg/24221546678934817.jpg");

        testThread01.start();  //开启线程1
        testThread02.start();  //开启线程2
        testThread03.start();  //开启线程3
    }
}
(2)方式2:实现Runable接口
package com.bjsxt.thread;

/**
 * Created by Administrator on 2019/3/9.
 */
public class TestThread03 implements Runnable {

    /**
     * 线程入口
     */
    @Override
    public void run() {
        for (int i=0;i<100;i++){
            System.out.println("一遍听歌。。。。");
        }
    }

    public static void main(String[] args){
        //创线程实现类
        TestThread03 testThread03=new TestThread03();
        //创建代理对象
        Thread thread=new Thread(testThread03);
        //开启线程
        thread.start();
        for(int i=0;i<100;i++){
            System.out.println("一遍敲代码。。。");
        }
    }
}
案例1:抢票,三个线程共享100张票
从这个案例可以看到实现Runable接口实现的多线程,可以共享资源。而继承Thread却不行
package com.bjsxt.thread;

/**
 * Created by Administrator on 2019/3/9.
 */
public class TestThread04 implements Runnable {

    private int ticket=100; //总票数,当前线程共享100个票


    @Override
    public void run() {
        while(true){
            if(ticket<0){
                break;
            }
            try {
                Thread.sleep(100);  //线程睡100毫秒
            } catch (InterruptedException e) {
                e.printStackTrace();
            }
            //获取当前线程的名字
            System.out.println(Thread.currentThread().getName()+"->"+ticket--);
        }

    }

    public static void main(String[] args){
        TestThread04 testThread04=new TestThread04();
        new Thread(testThread04,"线程1").start(); //开启线程,该线程的名字为线程1
        new Thread(testThread04,"线程2").start();
        new Thread(testThread04,"线程3").start();
    }
}
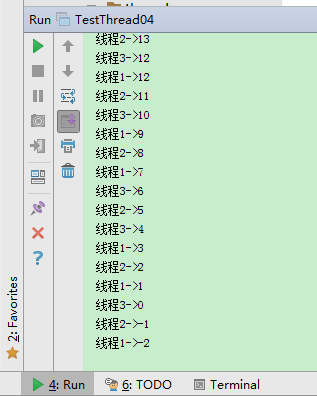
执行结果,我们看到输出的有-1,-2,而我们明明控制的当票数小于0,会退出循环,这就是出现了并发访问问题。

案例2:龟兔赛跑问题
package com.bjsxt.thread;

/**
 * 模拟龟兔赛跑
 */
public class TestThread05 implements Runnable {

    private String successPerson;   //记录胜利者

    @Override
    public void run() {
        for(int steps=0;steps<=100;steps++){
            System.out.println(Thread.currentThread().getName()+"->"+steps);    //打印当前步数
            boolean flag=isSuccess(steps);
            if(flag){
                break;
            }
        }
    }

    private boolean isSuccess(int steps){
        if(successPerson!=null){
            return true;
        }else{
            if(steps==100){
                successPerson=Thread.currentThread().getName();
                System.out.println(successPerson);
                return true;
            }
        }
        return false;
    }

    public static void main(String[] args){
        TestThread05 testThread05=new TestThread05();
        new Thread(testThread05,"wugui").start();
        new Thread(testThread05,"tuzi").start();
    }
}
(3)方式3:实现Callable接口(不重点讲,多线程高级才会用到)
package com.bjsxt.thread;

import java.util.concurrent.Callable;
import java.util.concurrent.ExecutorService;
import java.util.concurrent.Executors;
import java.util.concurrent.Future;

/**
 * 模拟龟兔赛跑
 * 第三种实现线程的方式:实现Callable接口,接口的泛型为call()方法的返回值类型
 */
public class TestThread07 implements Callable<Boolean> {

    private String successPerson;   //记录胜利者

    @Override
    public Boolean call()throws Exception {
        for(int steps=0;steps<=100;steps++){
            System.out.println(Thread.currentThread().getName()+"->"+steps);    //打印当前步数
            boolean flag=isSuccess(steps);
            if(flag){
                break;
            }
        }
        return true;
    }

    private boolean isSuccess(int steps){
        if(successPerson!=null){
            return true;
        }else{
            if(steps==100){
                successPerson=Thread.currentThread().getName();
                System.out.println(successPerson);
                return true;
            }
        }
        return false;
    }

    public static void main(String[] args)throws Exception{
        TestThread07 testThread05=new TestThread07();
        //创建执行服务
        ExecutorService es= Executors.newFixedThreadPool(2);
        //提交执行
        Future<Boolean> future1=es.submit(testThread05);
        Future<Boolean> future2=es.submit(testThread05);
        //获取结果
        boolean b1=future1.get();
        boolean b2=future2.get();
        //关闭服务
        es.shutdownNow();
    }
}
三:线程的状态
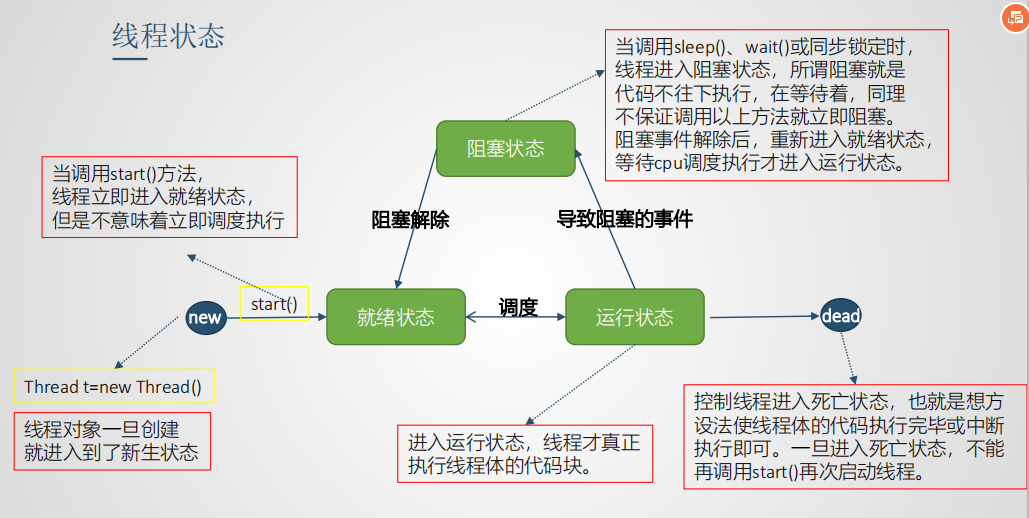
线程有五大状态,分别是:新生状态,就绪状态,运行状态,阻塞状态,死亡状态。


(1)线程停止
方法1:方法体执行完线程自会停止
方法2:调用线程(Thread类)提供的stop()/destroy()方法,不推荐,存在问题,已经被废弃
方法3:提供一个boolean型的终止变量,当这个变量置为false,则终止线程的运行(可以定期去检查这个变量)
package com.bjsxt.thread.state;

/**
 * 停止线程
 *
 */
public class TestThreadStop01 implements Runnable{

    private boolean flag=true;  //当是true线程才执行


    @Override
    public void run() {
        int i=0;
        while(flag){
            System.out.println(Thread.currentThread().getName()+"->"+i++);
        }
    }

    /**
     * 改变标记为false
     */
    public void myStop(){
        this.flag=false;
    }

    public static void main(String[] args){
        TestThreadStop01 testThreadStop01=new TestThreadStop01();
        new Thread(testThreadStop01,"线程1").start();
        for(int i=0;i<100;i++){
            System.out.println(Thread.currentThread().getName()+"->"+i);
        }
        testThreadStop01.myStop();  //改变标识,停止线程
    }
}
(2)sleep方法
特点:
Thread.sleep(1000)当前线程阻塞的毫秒数,sleep可以让线程进入阻塞状态。
sleep时间达到后线程进入就绪状态。
sleep阻塞线程时,不会释放锁。
sleep()方法是Thread类的静态方法,会阻塞所有执行该行代码的线程。
package com.bjsxt;

/**
 * Created by Administrator on 2019/4/8.
 */
public class TestSleep {

    public static void main(String[] args){
        Ticket ticket=new Ticket();
        new Thread(ticket,"线程1").start();
        new Thread(ticket,"线程2").start();
    }

}


class Ticket implements Runnable{

    private int ticketNum=100;  //共有100张票

    @Override
    public void run() {
        while(true){
            if(ticketNum>0){
                try {
                    Thread.sleep(100);
                    System.out.println("第"+--ticketNum+"张票");
                } catch (InterruptedException e) {
                    e.printStackTrace();
                }
            }else{
                break;
            }
        }

    }
}
(3)yield方法
特点:
Thread.yield() 礼让线程,让当前正在执行线程暂停,不是阻塞线程,而是将线程从运行状态转入就绪状态,让cpu调度器重新进行调度
yield()方法是Thread类的静态方法,会作用于所有执行该行代码的线程。
package com.bjsxt;

/**
 * Created by Administrator on 2019/4/8.
 */
public class TestYield implements Runnable{

    @Override
    public void run() {
        System.out.println(Thread.currentThread().getName()+"start......");
        Thread.yield();
        System.out.println(Thread.currentThread().getName()+"end......");
    }

    public static void main(String[] args){
        TestYield testYield=new TestYield();
        new Thread(testYield,"线程1").start();
        new Thread(testYield,"线程2").start();
    }
}
(4)join方法
特点:join合并线程,待此线程执行完成后,再执行其他线程,其他线程阻塞
join(long mm)方法可以传一个参数毫秒数
join是成员方法,不是静态方法,当线程对象调用该方法时,会阻塞执行这段代码的线程,等到该线程对象执行完成或者时间到了,会让cpu调度器重新进行调度
package com.bjsxt;

/**
 * Created by Administrator on 2019/4/9.
 */
public class TestJoin {

    public static void main(String[] args){
        Thread thread=new Thread(new Runnable() {
            @Override
            public void run() {
                for(int i=0;i<100;i++){
                    System.out.println(Thread.currentThread().getName()+i);
                }
            }
        },"线程a");
        thread.start();

        Thread thread2=new Thread(new Runnable() {
            @Override
            public void run() {
                for(int i=0;i<100;i++){
                    System.out.println(Thread.currentThread().getName()+i);
                }
            }
        },"线程b");

        thread2.start();
        for(int i=0;i<100;i++){
            if(i==20){
                try {
                    thread.join();
                } catch (InterruptedException e) {
                    e.printStackTrace();
                }
            }
            System.out.println(Thread.currentThread().getName()+i);
        }
    }
}
(5)获取线程的状态

package com.bjsxt;

/**
 * 测试线程状态
 */
public class TestThreadState {

    public static void main(String[] args){

        Thread thread=new Thread(()->{
            for(int i=0;i<10;i++){
                try {
                    Thread.sleep(100);
                } catch (InterruptedException e) {
                    e.printStackTrace();
                }
            }
        });
        Thread.State state=thread.getState();   //获取该线程的当前状态
        System.out.println(state);
        thread.start();
        System.out.println(thread.getState());


    }

}
四:线程的优先级
Java提供一个线程调度器来监控程序中启动后进入就绪状态的所有线程。线程调度器按照线程的优先级决定应调度哪个线程来执行。
线程的优先级用数字表示,范围从1到10
• Thread.MIN_PRIORITY = 1
• Thread.MAX_PRIORITY = 10
• Thread.NORM_PRIORITY = 5
使用下述方法获得或设置线程对象的优先级。
• int getPriority();
• void setPriority(int newPriority);
优先级的设定建议在start()调用前
注意:优先级低只是意味着获得调度的概率低。并不是绝对先调用优先级高后调用优先级低的线程。
package com.bjsxt;

import org.omg.PortableInterceptor.SYSTEM_EXCEPTION;

/**
 * 测试线程优先级
 */
public class TestPriority {

    public static void main(String[] args){
        MyPriority myPriority=new MyPriority();
        Thread thread1=new Thread(myPriority,"线程a");
        Thread thread2=new Thread(myPriority,"线程b");
        Thread thread3=new Thread(myPriority,"线程c");
        Thread thread4=new Thread(myPriority,"线程d");
        Thread thread5=new Thread(myPriority,"线程e");
        thread1.setPriority(10);
        thread2.setPriority(9);
        thread3.setPriority(8);
        thread4.setPriority(2);
        thread5.setPriority(1);
        thread1.start();
        thread2.start();
        thread3.start();
        thread4.start();
        thread5.start();
    }

}

class MyPriority implements Runnable{

    @Override
    public void run() {
        System.out.println(Thread.currentThread().getName()+Thread.currentThread().getPriority());
    }
}
五:用户线程和守护线程
• 线程分为用户线程和守护线程;
• 虚拟机必须确保用户线程执行完毕;
• 虚拟机不用等待守护线程执行完毕;
• 如后台记录操作日志、监控内存使用等
package com.bjsxt;

/**
 * 手动创建的线程默认都是用户线程
 */
public class TestThreadType {
    public static void main(String[] args){
        Thread thread=new Thread(new God());
        thread.setDaemon(true); //把该线程设置为守护线程
        thread.start();
        new Thread(new You()).start();
    }

}

class You implements Runnable{
    @Override
    public void run() {
        for(int i=0;i<100;i++){
            System.out.println("用户线程"+i);
        }
    }
}

class God implements Runnable{
    @Override
    public void run() {
        while(true){
            System.out.println("守护线程在运行。。。");
        }
    }
}
六:线程中的其他方法
isAlive() 判断线程是否还活着,即线程是否还未终止
setName() 给线程起一个名字
getName() 获取线程的名字
currentThread() 取得当前正在运行的线程对象,也就是获取自己本身

