「Android」GreenDao
译文
版本:greenDAO 3.2.2
写在前面:这个库极大的优化了我们使用SQLite数据库,但对SQLite数据库及其语法的掌握依旧是我们需要做的,不建议新手在没使用过Android原生的数据库API的情况下就使用这个。
简介:greenDAO 是一款开源的面向 Android 的轻便、快捷的 ORM 框架,将 Java 对象映射到 SQLite 数据库中,我们操作数据库的时候,不在需要编写复杂的 SQL语句, 在性能方面,greenDAO 针对 Android 进行了高度优化, 最小的内存开销 、依赖体积小 同时还是支持数据库加密。
何为ORM?
它的特征:
- 最高性能(可能是最快的Android ORM),我们也是开源的
- 容易使用
- 最小的内存消耗
- 库很小(<100KB)可以让你构建花费的时间变低并且可以避免65k方法的限制
- 数据库加密:greenDAO支持SQLCipher来保证您的用户数据安全
- 强大的社区:超过5000的GitHub stars证明了这是一个强大并活跃的社区
何为SQLCipher?Android SQLite是不支持数据加密的,这样对于用户的数据来说是不安全的(很多手机都是Root过的,其可以直接进入到/data/data/<package_name>/databases目录下面),所以,我们需要对其进行加密,一种是对内容进行加密(但数据库的结构还是能一览无余,同时这样加密后搜索会是一个问题),一种是直接对SQLite数据库进行加密,直接对数据库文件进行加密就会用到SQLCipher,它是加密工具中的一种,它是免费的,其它的多为收费。SQLCipher,完全开源,托管在GitHub(https://github.com/sqlcipher/sqlcipher)上。
谁在用greenDAO?很多顶级的Android应用依赖于greenDAO,这些APP中有一些已经有超过1000万的安装量,我们认为,这在业界证明了它的可靠性。你可以在AppBrain中查看当前的统计数据。
让我们开始使用它吧
先配置Gradle
// In your root build.gradle file:
buildscript {
    repositories {
      jcenter()
      mavenCentral() // add repository
  }
  dependencies {
      classpath 'com.android.tools.build:gradle:2.3.3'
      classpath 'org.greenrobot:greendao-gradle-plugin:3.2.2' // add plugin
  }
}
// In your app projects build.gradle file:
apply plugin: 'com.android.application'
apply plugin: 'org.greenrobot.greendao' // apply plugin
dependencies {
    compile 'org.greenrobot:greendao:3.2.2' // add library
}
或许,你也可以先看下官方的例子:
正文
Note实体和DAO实体
让我们跳进代码:在 src 文件夹你会找到笔记的实体类, Note.java。它被保存在数据库中并包含作为笔记一部分的所有数据,如id,笔记的文本和创建日期。
@Entity(indexes = {
    @Index(value = "text, date DESC", unique = true)
})
public class Note {

    @Id
    private Long id;

    @NotNull
    private String text;
    private Date date;
    ...
}
总而言之,一个实体作为一个类保存在数据库中(例如 每个对象对应一行)。一个实体包含映射到数据库列的属性。
现在做这个项目,例如在Android Studio中 Build > Make project 。greenDAO触发器会生成DAO类,如 like NoteDao.java, 这将帮助我们添加笔记到数据库。
插入和删除笔记
要学习如何添加一些笔记,请查看 NoteActivity 类. 首先,我们必须为我们的 Note 类准备一个DAO对象,我们在onCreate()中:
// get the note DAO
DaoSession daoSession = ((App) getApplication()).getDaoSession();
noteDao = daoSession.getNoteDao();
当用户点击添加按钮的时候,方法 addNote() 被调用。这里,我们创建一个新的 Note 对象并通过DAO的 insert() 方法将其插入到数据库中:
Note note = new Note();
note.setText(noteText);
note.setComment(comment);
note.setDate(new Date());
note.setType(NoteType.TEXT);
noteDao.insert(note);
Log.d("DaoExample", "Inserted new note, ID: " + note.getId());
注意当我们创建笔记的时候没有传入id。在这种情况下数据库决定笔记的id。DAO负责在返回插入结果之前自动的设置新的id(参阅日志表)。
删除日志也很简单,请参阅 NoteClickListener:
noteDao.deleteByKey(id);
更新笔记和更多
在example例子中没有展示,但是同样简单:更新笔记,只需要修改它的属性并调用DAO的update() 方法:
note.setText("This note has changed.");
noteDao.update(note);
还有其它方法来插入,查询,更新和删除实体。查看所有DAO继承的the AbstractDao class (AbstractDao类)的方法以了解更多信息。
创建数据库
你已经看到了DAOs,但是你如何初始化greenDAO和底层的数据库?通常你需要初始化一个 DaoSession,在 the Application class 里,对于整个应用通常执行一次。
DevOpenHelper helper = new DevOpenHelper(this, "notes-db");
Database db = helper.getWritableDb();
daoSession = new DaoMaster(db).newSession();
数据库由助手类 DevOpenHelper 创建,将数据库传入生成 DaoMaster 类.在DaoMaster中实现了 OpenHelper 类,它为您设置所有的数据库。不需要写 “CREATE TABLE” 语句。
然后Activities and fragments 可以调用 getDaoSession() 来访问所有的实体DAO,入上面插入和删除笔记时看到的。
扩展和添加实体
为了扩展我们的笔记或创建一个新的实体,你只需要以同样的方式修改和创建它们的Java类和注解。然后重建您的项目。
详情请参阅Modelling entities
Modelling entities
实体类
目录
为了在一个项目中使用greenDAO,你需要创建一个实体模型表示将保存数据到您的应用里。然后,基于这个模型greenDAO为DAO类生成Java代码。
模型本身是使用具有注解的Java类定义的。
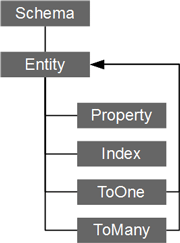
Schema
你可以开始使用greenDAO Gradle插件而无需任何额外配置。尽管如此,你至少应该考虑设置个schema的版本:
// In the build.gradle file of your app project:
android {
...
}

greendao {
    schemaVersion 2
}
此外,greendao配置元素支持许多配置选项:
- schemaVersion: The当前的数据库schema版本。这由OpenHelpers 类在schema版本间迁移。如果您修改了您实体或者数据库,则必须增加此值。默认为1。
- daoPackage: 生成DAO,DaoMaster,和DaoSession的包名。默认为你的源实体的包名称。
- targetGenDir: 生成的源文件应该保存的位置。默认生成的源文件夹放在build目录里(build/generated/source/greendao)
- generateTests: 设置为true将自动生成单元测试。
- targetGenDirTests: 生成单元测试的基础目录应该存储的地方。默认是src/androidTest/java.
Entities and Annotations
greenDAO 3 用注解来定义模式和实体。这是一个简单的例子:
@Entity
public class User {
    @Id
    private Long id;

    private String name;

    @Transient
    private int tempUsageCount; // not persisted

   // getters and setters for id and user ...
}
@Entity 注解将Java类 User 转换成数据库支持的实体。这也将指示greenDAO生成必要的代码(例如DAO)。
注意: 只支持Java类。如果您喜欢其它语言比如Kotlin,您的实体类必须任然是Java。
The @Entity Annotation
正如你在上面例子看到的那样,@Entity 注解将一个Java类标记为一个预先存在的实体。
虽然不添加任何附加参数通常很好,但是您仍然可以使用它配置一些细节。
@Entity:
@Entity(
        // If you have more than one schema, you can tell greenDAO
        // to which schema an entity belongs (pick any string as a name).

        // 如果你有超过一个schema,你可以告诉greenDAO实体所属的schema(选择任何字符串作为名字)
        schema = "myschema",

        // Flag to make an entity "active": Active entities have update,
        // delete, and refresh methods.

       // 将实体标记为"active":Active 实体有更新,删除,和刷新方法。
        active = true,

        // Specifies the name of the table in the database.
        // By default, the name is based on the entities class name.

        // 给数据库的表指定一个名字。默认,名字是基于实体的类名。
        nameInDb = "AWESOME_USERS",

        // Define indexes spanning multiple columns here.
        // 定义跨越多个列的索引
        indexes = {
                @Index(value = "name DESC", unique = true)
        },

        // Flag if the DAO should create the database table (default is true).
        // Set this to false, if you have multiple entities mapping to one table,
        // or the table creation is done outside of greenDAO.

        // 标记DAO是否应创建数据库表(默认为true)。设置它为false,如果你有多个实体映射到一张表,或者创建表是在greenDAO之外完成的。
        createInDb = false,

        // Whether an all properties constructor should be generated.
        // A no-args constructor is always required.

        // 是否生成所有属性的构造函数。总是需要一个无参数的构造器
        generateConstructors = true,

        // Whether getters and setters for properties should be generated if missing.

        // 如果错失,是否应该生成属性的getter和setter
        generateGettersSetters = true
)
public class User {
  ...
}
注意,当使用Gradle插件时,目前不支持多个模式(https://github.com/greenrobot/greenDAO/issues/356)。暂时,继续使用你的生成器项目。
Basic properties
@Entity
public class User {
    @Id(autoincrement = true)
    private Long id;

    @Property(nameInDb = "USERNAME")
    private String name;

    @NotNull
    private int repos;

    @Transient
    private int tempUsageCount;

    ...
}
@Id 注解选择一个 long/ Long 属性作为实体ID。在数据库的术语中,它是主键。参数autoincrement 是使ID值不断增加的标记(不重复使用旧值)。
@Property 当属性被映射到的时候,允许你定义一个非默认的列名。如果没有,greenDAO将以SQL-ish方式使用字段名称(大写字母,下划线来替换驼峰命名,例如 customName 将是 CUSTOM_NAME )。注意:你当前只能使用内置的常量(可以理解为关键字)来指定列名
@NotNull 使该属性在数据库端为“NOT NULL”列。通常使用 @NotNull 标记基本类型(long,int,short,byte)是有意义的,同时其包装类可以为空值(Long, Integer, Short, Byte)。
@Transient 标记属性被排除在持久化之中。用于临时状态,等等。或者,您也可以使用Java的 transient 关键字。
Primary key restrictions
目前,属性必须拥有一个 long or Long 属性作为他们的主键。 这是 Android 和 SQLite 推荐的做法。
为了解决这个问题,将您的关键属性定义为一个额外的属性,但是请为它创建一个唯一的索引。
@Id
private Long id;

@Index(unique = true)
private String key;
Property indexes
在属性中使用@Index 为相应的数据库列创建一个数据库索引。使用以下参数定制:
- name: 如果你不喜欢greenDAO为索引生成的指定名称,你也可以在这里指定它。
- unique: 添加对索引的唯一约束,强调所有值都是唯一的。
@Entity
public class User {
    @Id private Long id;
    @Index(unique = true)
    private String name;
}
@Unique 像数据库列添加唯一的约束。注意,SQLite也隐式的为其创建了一个索引。
@Entity
public class User {
    @Id private Long id;
    @Unique private String name;
}
Defaults
greenDAO 尝试使用合理的默认值,因此开发者不必一一配置。
例如数据库端的表名和列明来自实体和属性的名字。与在Java中使用驼峰命名不同,默认的数据库名字是大写的,使用下划线来分隔单词。
例如,一个名为 creationDate 将变成在数据库列 CREATION_DATE。
Relations
要学习如何增加一对一和一对多的关联,请参阅 Relations.
Triggering generation
一旦你的实体schema就位,你就可以在您的IDE中使用“Make project” 来触发代码的生成过程。或者直接执行 greendao 的Gradle task.
如果您在更改了您的实体类后遇到了错误, 尝试重新构建您的项目以确保清理旧的生成类。
Modifying generated code
在greenDAO 3中实体类是由开发人员自己创建和编辑。然而,在代码的生成过程中可能会增加实体中的源代码。
greenDAO将为它生成的方法和字段添加@Generated 注解,通知开发人员并防止代码的丢失。在大多数情况下你不比关心 @Generated.生成的代码。
作为预防措施,greenDAO不会覆盖现有代码,并且如果你手动更改生成的代码会引发错误:
Error:Execution failed for task ':app:greendao'.
> Constructor (see ExampleEntity:21) has been changed after generation.
Please either mark it with @Keep annotation instead of @Generated to keep it untouched,
or use @Generated (without hash) to allow to replace it.
正如错误消息所暗示的,通常有两种解决办法:
- 将更改还原为 @Generated.生成的代码,你也可以完全删除更改的构造器和方法。它们将在下一次构建中重新生成。
- 用 @Keep 注解代替@Generated 注解。这将告诉greenDAO永远不要触摸带注解的代码。您的更改可能会破坏实体和greenDAO其余部分之间的契约。另外,greenDAO的未来版本可能会在生成的方法中有不同的代码。所以,小心!在适当的地方进行单元测试以避免麻烦是一个好主意。
Keep sections
部分不在支持旧版本中greenDAO的KEEP部分
然而,如果Gradle插件检测到 KEEP FIELDS 部分它会自动使用 @Transient.注解字段。然后又,周围的 KEEP FIELDS注释可能会被删除。
Relations
关系
数据库表可以使用 1:1, 1:N, or N:M 的关系关联起来。如果你是一个数据库关系的新手,在我们讨论 ORM 细节之前最好先了解一下。 这里是一些讨论关系的随机链接( some random links )
在greenDAO,实体与一个或多个关系有关。例如,如果你想在greenDAO中建立一个1:n的关系,那么您将拥有一个一对一或一对多的关系。但是,注意一对一和一对多关系之间没有联系,所以你将更新这两种关系。
建立一对一的关系
@ToOne 注解定义了与另一个实体(一个实体对象)的关系。将其应用于持有其它对象的属性。
在内部,greenDAO需要一个附加属性指向目标实体的ID,该属性由 joinProperty 参数指定。如果没有此参数,则会自动创建一个额外的列来保存键。
@Entity
public class Order {
    @Id private Long id;

    private long customerId;

    @ToOne(joinProperty = "customerId")
    private Customer customer;
}

@Entity
public class Customer {
    @Id private Long id;
}
对一个关系的getter方法(在这个示例中,getCustomer())在第一次调用时延迟地解析目标实体。后续调用将立即返回先前解析的对象。
注意,如果你改变了外键的属性(这里是customerId),接下来调用getter (getCustomer()) 将会为更新的ID解析实体。
同样,如果你设置一个新的实体( setCustomer()),那么外键属性( customerId)也将会被更新。
Customer customerA = user.getCustomer();

// change the customer id
user.setCustomerId(customerIdB);
// or set a customer with a different id
user.setCustomer(customerB);

customerB = user.getCustomer();
assert(customerA.getId() != customerB.getId());
注意: 为了急切的加载到一对一的关系,请使用实体DAO类的 loadDeep() 和 queryDeep() 。这将通过单个数据库查询来解析所有 与一对一关系的实体。如果您总是想访问相关的实体,这对于性能是非常好的。
建立一对多的关系
@ToMany 定义了与一组其它实体(多个实体对象)的关系。将此应用于表示目标实体 List的属性。引用的实体必须有一个或多个属性指向拥有@ToMany的实体。
在内部, greenDAO 需要一个额外的属性来指向目标实体的ID, 这由 joinProperty 参数指定。如果此参数不存在,则会自动创建一个附加列来保存键。
@Entity
public class Order {
    @Id private Long id;

    private long customerId;

    @ToOne(joinProperty = "customerId")
    private Customer customer;
}

@Entity
public class Customer {
    @Id private Long id;
}
一对一关系中的getter方法(在这个例子中 getCustomer())在第一次调用时延迟解析目标实体。后续调用将立即返回先前解析的对象。
N注意,如果你更改了外键的属性(这里 customerId),下次调用getter(getCustomer())将解析更新ID后的实体。
另外,如果你设置了一个新的实体( setCustomer()),外键属性( customerId) 也将会被更新。
Customer customerA = user.getCustomer();

// change the customer id
user.setCustomerId(customerIdB);
// or set a customer with a different id
user.setCustomer(customerB);

customerB = user.getCustomer();
assert(customerA.getId() != customerB.getId());
注意:要急切的加载到一对一的关系,请使用实体DAO的 loadDeep() 和 queryDeep() 。这将通过单个数据库来解析所有一对一关系的实体。如果你总是访问相关的实体,这对于性能是非常好的。
建立多对多关系
@ToMany 定义了与一组其他实体(多个实体对象)的关系。将这个属性应用于表示目标实体的 List 。被引用的实体有一个或多个属性指向拥有 @ToMany 的实体。
有三种可能性来指定关系映射,只使用他们中的一个:
- referencedJoinProperty 参数:指定目标实体中指向此实体的ID的“外键”属性的名称。
@Entity public class Customer { @Id private Long id; @ToMany(referencedJoinProperty = "customerId") @OrderBy("date ASC") private List orders; } @Entity public class Order { @Id private Long id; private Date date; private long customerId; } - joinProperties 参数:对于更复杂的关系,你可以指定一列 @JoinProperty 注解。每个@JoinProperty 需要一个原始实体中的源属性和目标实体中的引用属性。
@Entity public class Customer { @Id private Long id; @Unique private String tag; @ToMany(joinProperties = { @JoinProperty(name = "tag", referencedName = "customerTag") }) @OrderBy("date ASC") private List orders; } @Entity public class Order { @Id private Long id; private Date date; @NotNull private String customerTag; } - @JoinEntity 注解:如果你正在做一个N:M(多对多)关系包含另一个连接实体/表,那么在你的属性上加上这个额外的注释。
@Entity
public class Product {
    @Id private Long id;

    @ToMany
    @JoinEntity(
            entity = JoinProductsWithOrders.class,
            sourceProperty = "productId",
            targetProperty = "orderId"
    )
    private List ordersWithThisProduct;
}

@Entity
public class JoinProductsWithOrders {
    @Id private Long id;
    private Long productId;
    private Long orderId;
}

@Entity
public class Order {
    @Id private Long id;
}
一旦运行,插件将会生成一个getter来解析被引用的实体的列表。例如,在前两种情况下:
// return all orders where customerId == customer.getId()
List orders = customer.getOrders();
解决和更新多对多的关系
多对多关系在第一次请求中解析比较慢,然后缓存在 List 对象内的源实体中。后续对get方法的调用不会查询数据库。
更新多对多关系需要一些额外的工作。因为许多列表都被缓存了,当相关实体被添加到数据库中时,它们不会被更新。以下代码说明了这种行为:
// get the current list of orders for a customer // 获取客户的当前订单列表
List orders1 = customer.getOrders();

// insert a new order for this customer // 为这个客户插入新的订单
Order order = new Order();
order.setCustomerId(customer.getId());
daoSession.insert(order);

// get the list of orders again // 再次获取订单列表
List orders2 = customer.getOrders();

// the (cached) list of orders was not updated
// orders1 has the same size as orders2 // (缓存)订单列表没有被更新 // orders1和orders2具有相同的大小
assert(orders1.size() == orders2.size);
// orders1 is the same object as orders2
// orders1 与 orders2是同一个对象
assert(orders1.equals(orders2));
因此,要添加新的相关实体,将它们手动的添加到源实体的许多列表中:
// get the to-many list before inserting the new entity
// otherwise the new entity might be in the list twice // 在插入新实体之前获取多个列表 // 否则新的实体可能在列表中两次
List orders = customer.getOrders();
// create the new entity
// 创建新的实体
Order newOrder = ...
// set the foreign key property
// 设置外键属性
newOrder.setCustomerId(customer.getId());
// persist the new entity
// 保存新的实体
daoSession.insert(newOrder);
// add it to the to-many list // 将其添加到多个列表中
orders.add(newOrder);
同样,你可以删除相关实体:
List orders = customer.getOrders();
// remove one of the orders from the database // 从数据库中删除一个订单
daoSession.delete(someOrder);
// manually remove it from the to-many list // 从对多列表中删除它
orders.remove(someOrder);
在添加、更新或删除许多相关的实体时,可以使用reset方法清除缓存列表。下一步将重新的查询相关的实体:
// clear any cached list of related orders
// 清除任何相关订单的缓存列表
customer.resetOrders();
List orders = customer.getOrders();
双向1:N 关系
有时,你想在两个方向上操纵1:N关系。在greenDAO,你必须添加一对一和一对多的关系来实现这一点。
接下来的例子展示了完成创建custormer和order实体,我们用先前的一个例子。这次,我们用 customerId 属性来创建两个关系:
@Entity
public class Customer {
    @Id private Long id;

    @ToMany(referencedJoinProperty = "customerId")
    @OrderBy("date ASC")
    private List orders;
}

@Entity
public class Order {
    @Id private Long id;
    private Date date;
    private long customerId;

    @ToOne(joinProperty = "customerId")
    private Customer customer;
}
假设我们有一个订单实体。使用这两种关系,我们可以得到客户和客户曾今创造的所有订单。
List allOrdersOfCustomer = order.getCustomer().getOrders();
例子:建立关系树
你可以通过建立一个指向自身一对一和一对多关系的实体来创建一个关系树。
@Entity
public class TreeNode {
    @Id private Long id;

    private Long parentId;

    @ToOne(joinProperty = "parentId")
    private TreeNode parent;

    @ToMany(referencedJoinProperty = "parentId")
    private List children;
}
生成的实体可以让你操纵它的父类和子类:
TreeNode parent = entity.getParent();
List children = entity.getChildren();

 浙公网安备 33010602011771号