如何基于 React 实现的指令
我们是袋鼠云数栈 UED 团队,致力于打造优秀的一站式数据中台产品。我们始终保持工匠精神,探索前端道路,为社区积累并传播经验价值。
本文作者:信居
前言
实现这个功能的想法,来源于数栈产品中开发的前端功能权限控制,相信大家都在项目中或多或少的接触和开发过这个功能。
笔者在项目中实现这个功能的做法是实现一个服务类,然后封装一个组件,组件调用服务类中的判断权限方法,然后再在需要控制权限的地方用这个组件包裹,传入权限码即可控制显示隐藏。用这种方法需要在每个需要控制权限的组件中都要引入这个组件,使用起来会比较麻烦。
由于以前使用过 ng-alain 开发项目,用到过它的权限控制模块 ACL(Access Control List),它对标签的权限控制方式是直接在标签上添加 acl 属性,然后给这个属性赋值权限码数据就可以控制标签的显示,这个控制方式使用到了 angular 中的指令功能,因此产生了如何在 React 中实现 angular 和 vue 的指令功能。
什么是指令
指令主要用来对组件的标签或者元素附加一些新的特性或者功能,改变一个 DOM 元素的外观或行为,它是对 HTML 进行扩展的基本手段
React编译和渲染
既然指令的作用是为了改变 DOM 元素的外观和行为,就需要对原有的数据或者元素属性进行修改,因此,实现指令功能最重要的一步就是要知道如何去修改组件或标签的属性和功能。
那如何去修改组件或标签的属性和功能呢,这里我们需要先了解 React 是如何对代码的编译和渲染的整个过程:
说起 React 的编译,大家最熟悉的莫过于 JSX 的编译了,在 React 的历史上,经过了两代编译器,第一代是 React 自己研发的,叫 JSXTransformer.js。
但在2015年,React 官方发表了一篇文章,表示 JSXTransformer.js 已经废弃,交给 babel 来完成 JSX 编译的编译工作,由于一代编译器早已废弃,且 babel 完全实现了 JSXTransformer.js 的功能,所以我们接下来的内容,都是围绕 babel 版本的二代编译器来展开。
babel 支持两种 React Runtime: 旧版本的 classic 和17版本引入的新的转换方式 automatic ,两种转换方式编译结果如下展示:
// 源码
const Button = () => {
  return <button>我是一个按钮</button>
}

//classic编译结果
"use strict";
const Button = () => {
  return
  /*#__PURE__*/
  React.createElement(
    "button",
    null,
    "\u6211\u662F\u4E00\u4E2A\u6309\u94AE"
  );
};

//automatic编译结果
"use strict";
var _jsxRuntime = require("react/jsx-runtime");
const Button = () => {
  return
  /*#__PURE__*/
  (0, _jsxRuntime.jsx)("button", {
    children: "\u6211\u662F\u4E00\u4E2A\u6309\u94AE"
  });
};
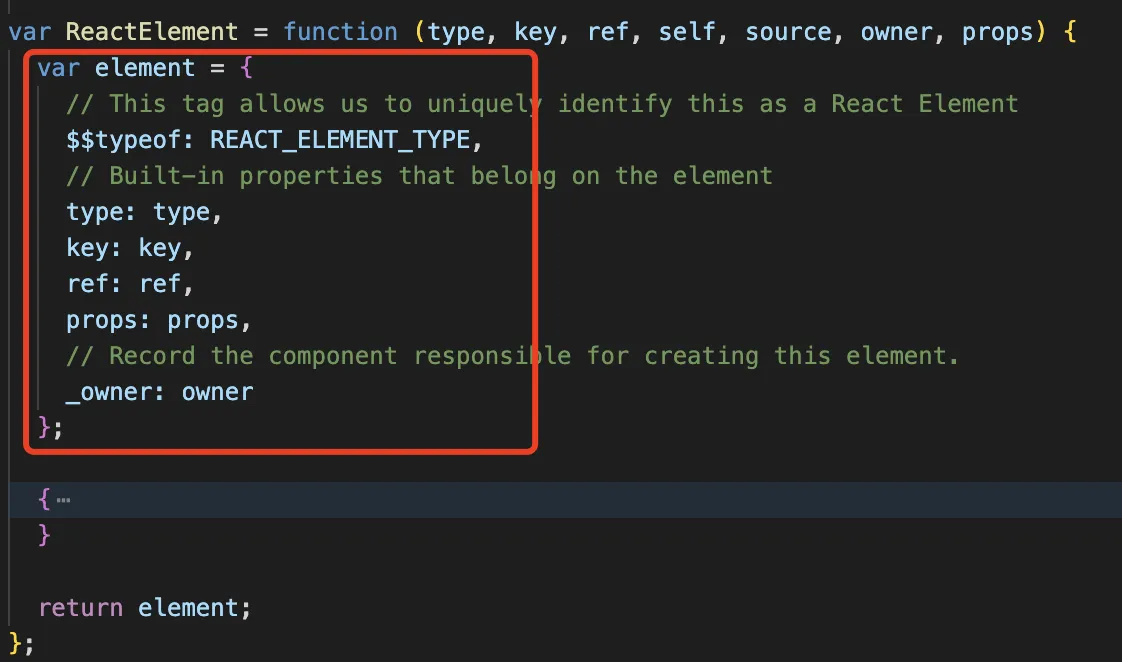
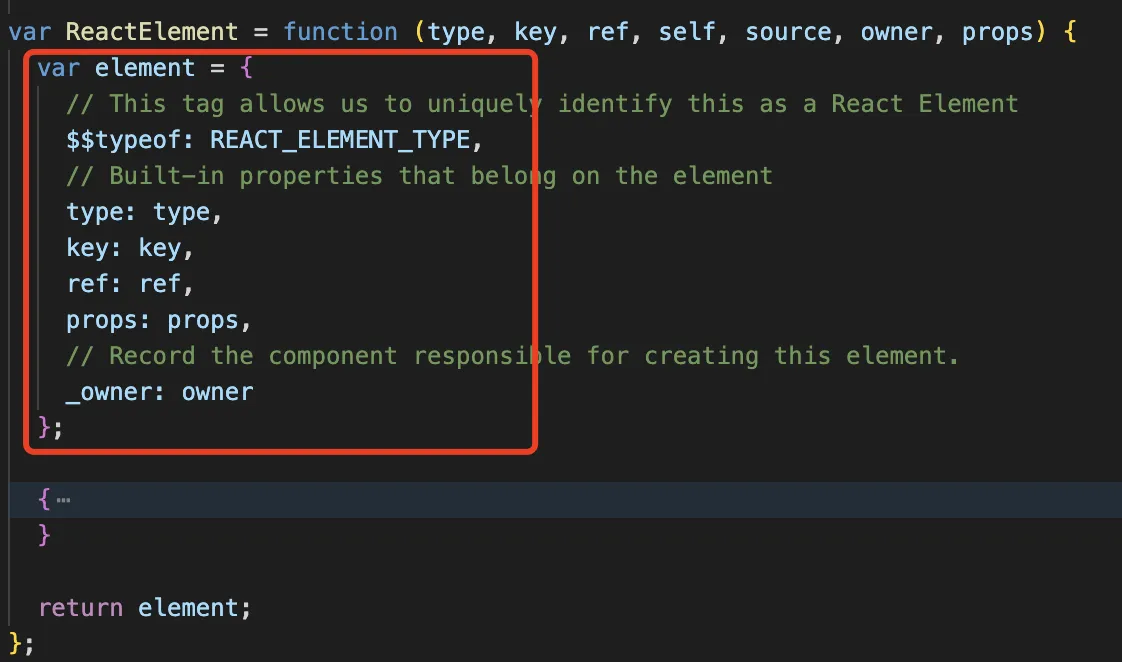
通过上面的编译结果,我们看到原始代码已经被编译成了 React.createElement 或者 jsx,从上面的编译结果可以看出为什么 react17 之前每个组件都要先引入 React,而17之后就不用了,到此,JSX 语法糖的编译完成。React.createElement 和 jsx 会依据 type 类型创建并返回一个新的 ReactElement ,如下图为 jsx 返回的 ReactElement。
通过递归执行编译方法,从而生成了由 children 属性连接起来的树 vdom,而 vdom 就是如下这样的节点对象
然后 react 先将 vdom 转成 fiber 链表,vdom 树转 fiber 链表树的过程就叫做 reconcile,这个阶段叫 render。
render 阶段会从根组件开始 reconcile,根据不同的类型做不同的处理,拿到渲染的结果之后再进行 reconcileChildren,这个过程叫做 beginWork;beginWork 只负责渲染组件,然后继续渲染 children,一层层的递归。全部渲染完之后,会递归回来,这个阶段会调用 completeWork,这个阶段会创建需要的 dom,然后记录增删改的 tag,同时也记录下需要执行的其他副作用到 effect 链表(effectList)里
全部计算完之后,就一次性更新到 dom,叫做 commit。commit 阶段才会遍历 effect 链表(effectList)根据 tag 来执行增删改 dom 等 effect,commit 阶段也分了三个小阶段,beforeMutation、mutation、layout;mutation 就是遍历 effectList 来更新 dom 的。它的之前就是 before mutation,会异步调度 useEffect 的回调函数。它之后就是 layout 阶段了,因为这个阶段已经可以拿到布局信息了,会同步调用 useLayoutEffect 的回调函数。而且这个阶段可以拿到新的 dom 节点,还会更新下 ref。至此,react从编译到渲染的大概流程就梳理清楚了
重写createElement
基于对组件或标签附加新的属性或者功能的便捷性,这里选择在编译阶段进行处理,处理方式为对 createElement 方法重写,但是在 react17 之后 babel 直接通过 jsx-runtime 的 jsx 方法编译生成的 ReactElement,因此不仅要重写 createElement 方法,还要重写 react/jsx-runtime 中的 jsx 方法,这里我参考了github上react-auto-classnames的这个仓库,它把 clsx 库集成到了 react 底层,不需要引用也能处理 className,能直接在 className 上应用 clsx 的使用方法。
如下图创建项目,其中主要的是 jsx-runtime 和 jsx-dev-runtime,详细可查看 npm 中 react 的 jsx 方法,在这里重写 jsx 相关方法并导出
依据源码,jsx 方法分别有 jsx、jsxDev、jsxs 三个方法需要重写,这里只以 jsx-runtime 为示例:
import { Fragment, jsx as jsx_, jsxs as jsxs_ } from 'react/jsx-runtime';
import { formatDirective } from '../directive';
import '../directive/default'

function jsx(type, props, maybeKey, source, self) {
    props = formatDirective(props, type)
    if (!props) return null;
    return jsx_(type, props, maybeKey, source, self);
}

function jsxs(type, props, maybeKey, source, self) {
    props = formatDirective(props, type)
    if (!props) return null;
    return jsxs_(type, props, maybeKey, source, self);
}

export { Fragment, jsx, jsxs };
因为指令需要在标签上添加属性,我们正常开发过程中会使用到 typescript 的代码提示,如果直接在原生 dom 标签上添加属性会提示错误,所以需要对 jsx 的类型进行拓展
import 'react';

type WithIntrinsicAttributesProps = { // 属性指令
  "dt-if"?: boolean | number | null | undefined, // 默认指令
  "dt-show"?: boolean | number | null | undefined,
  [name: string]: any,
};

// 在定义我们自己的JSX命名空间时,此处单独赋值以避免无限的自引用
type ReactJSXElement = JSX.Element;
type ReactJSXElementClass = JSX.ElementClass;
type ReactJSXElementAttributesProperty = JSX.ElementAttributesProperty;
type ReactJSXElementChildrenAttribute = JSX.ElementChildrenAttribute;
type ReactJSXLibraryManagedAttributes<C, P> = JSX.LibraryManagedAttributes<
  C,
  P
>;
type ReactJSXIntrinsicAttributes = JSX.IntrinsicAttributes;
type ReactJSXIntrinsicClassAttributes<T> = JSX.IntrinsicClassAttributes<T>;
type ReactJSXIntrinsicElements = JSX.IntrinsicElements;

export namespace CJSX {
  interface Element extends ReactJSXElement {}
  interface ElementClass extends ReactJSXElementClass {}
  interface ElementAttributesProperty
    extends ReactJSXElementAttributesProperty {}
  interface ElementChildrenAttribute extends ReactJSXElementChildrenAttribute {}

  type LibraryManagedAttributes<C, P> = WithIntrinsicAttributesProps & ReactJSXLibraryManagedAttributes<C, P>;

  type IntrinsicAttributes = ReactJSXIntrinsicAttributes & WithIntrinsicAttributesProps;

  interface IntrinsicClassAttributes<T>
    extends ReactJSXIntrinsicClassAttributes<T> {}

  type IntrinsicElements = {
    [K in keyof ReactJSXIntrinsicElements]: ReactJSXIntrinsicElements[K] & WithIntrinsicAttributesProps;
  };
}
注册指令
目前我暂时将指令的回调方法定为 create 和 mounted 两个
create: 组件渲染之前,在 createElement 的时候,在这个生命周期可以处理组件 props,然后组件渲染的时候,可以拿到处理后的 props。注意这个方法只要组件一重新 render,就会触发一次。如果返回 false 这个组件就不渲染了。接收参数 value 为指令值,props 为指令所在组件或标签的 props
mounted:dom 元素和组件渲染的时候触发,正常情况只会触发一次。如果组件多次销毁和渲染,每次渲染都会触发这个方法。 这个方法里面不能处理 props,但是可以拿到组件引用或 dom 元素引用 ref,可以去调用组件或 dom 元素的方法。接收参数 value 为指令值,props 为指令所在组件或标签的 props,ref:如果是组件则是组件引用,如果是 dom 元素就是 dom 的引用。
export type Directive = {
    create: (value: any, props: Record<string, any> | null) => Record<string, any> | null | boolean,
    mounted?: (value: any, props: Record<string, any> | null, ref: any) => void
}
注册指令通过调用 bindDirective 方法,传入指令名称和操作组件或属性的回调函数即可,注册的指令存放在 Map 中,相同指令这里不支持重复注册
export const directiveMap = new Map();

/**
 * 注册指令
 * @param {string} attribute 指令名称
 * @param {} directive 指令
 */
export function bindDirective(attribute, directive) {
    if (attribute && !directiveMap.get(attribute)) directiveMap.set(attribute, directive);
}
指令注册之后如何实现指令功能呢,这里就需要说到上面重写 jsx 方法中的 formatDirective,在这个方法里面触发 create 和 mounted 的回调,然后在 create 或者 mounted 中实现对应指令的功能,这里 create 方法主要以修改组件或标签的 props 进而修改组件或标签的属性或者功能。
const refMap = new WeakMap();

/**
 * 处理props
 * @param {*} props
 * @param {*} type
 * @returns
 */
export function formatDirective(props, type) {
    if (!props) return null;
    let current = {};
    for (let [key, _handle] of directiveMap) {
        if (hasOwnProperty.call(props, key)) {
            current = {
                key,
                directive: directiveMap.get(key)
            }
            if (current && current.directive) {
                props = current.directive.create(props[current.key], props)
            }
            if (!props) return null;
        }
    }
    // 判断是否为类组件
    const isClass = (func) =>  {
        return typeof func === 'function'
          && /^class\s/.test(Function.prototype.toString.call(func));
    }
    // 纯函数组件没有ref
    if (typeof type === 'function' && !isClass(type)) {
        return props;
    }
    const originRef = props.ref;
    props.ref = (ref) => {
        if (!ref) return;
        const oldProps = refMap.get(ref)
        if (!oldProps && current && current.directive && current.directive.mounted) {
            current.directive.mounted(props[current.key], props, ref);
        }

        if (originRef) {
            if (isFunction(originRef)) {
              originRef(ref);
            } else if (hasOwnProperty.call(originRef, 'current')) {
              originRef.current = ref;
            }
        }
        if (!oldProps) refMap.set(ref, props);

    }

    return props
}
mounted 方法中使用的 ref,就是给每个非函数组件的 props 注入了 ref,然后在 ref 的回调中拿到组件或 dom 的引用,将拿到的引用存到 WeakMap 中,后面 ref 回调再执行的时候拿当前的 ref 去 WeakMap 中检查是否已经存在,如果存在说明已经渲染过,就不再执行 mounted 方法,因为组件每次渲染都会触发两次 ref 的回调,所以需要先判空,这里有一个问题是组件每次重新渲染后,ref 的引用会改变,在 WeakMap 中无法匹配上一次渲染的ref,所以 mounted 也会触发多次,但是原生 dom 不会有这个问题,目前暂未找到解决方案,所以暂时 mounted 方法最好只应用于原生 dom。
使用说明
指令库功能完成后就是如何使用,首先通过 npm 安装该依赖,然后后面的配置以正常通过 create-react-app 脚手架创建的项目为例去展示。
如果项目使用了 typescript,需要修改 tsconfig.json 文件
{
  "compilerOptions": {
    "jsx": "react-jsx", // 此处react17之前的配置是"jsx": "react",但是如果改为"react-jsx"也能编译,并且编译走的也是17+的jsx方法
    "jsxImportSource": "rc-react-directive",
  }
}
修改 package.json 文件,添加 babel 属性
"babel": {
    "presets": [
      "react-app",
      [
        "@babel/preset-react",
        {
          "runtime": "automatic", // runtime设置为automatic表示使用jsx方法编译
          "importSource": "rc-react-directive"
        }
      ]
    ]
  },
添加完以上配置就可以在项目中使用指令库中的内置指令了
function App() {
  return (
    <div className="App">
      <p dt-if={0}>test_if</p>
      <p dt-show={1}>test_show</p>
    </div>
  );
}
自定义指令
目前内置指令较少,所以这个库也提供了自定义指令的入口,只需要在项目入口从 rc-react-directive/directive 引入 bindDirective 方法就可以创建自定义指令了。语法如下
import { bindDirective } from 'rc-react-directive/directive'
bindDirective('name', {
  // value:当前指令的值
  // props:当前组件的props
  create: (value, props) => {
    // dt-show 的实现
    let style = {
        display: 'none'
    }
    if (!value) {
        props.style = {
            ...(props.style || {}),
            ...style
        }
    }
    return props
  },
  // 这个方法里面不能处理props,但是可以拿到组件引用活dom元素引用,可以去调用组件或dom元素的方法
  // value:当前指令的值
  // props:当前组件的props
  // ref:如果是组件则是组件引用,如果是dom元素就是dom的引用。
  mounted: (value, props, ref) => {
    console.log(ref)
  }
})
总结
这个指令库目前来说还不够完善,其中还有许多问题需要解决,比如组件的 mounted 方法重复触发问题,ref 的处理在所有类型的组件或标签里面是否合理、是否正确,以及指令名称在标签的属性类型中提示是否能更加友好。同时还有许多常见内置指令的开发,比如 model 数据双向绑定、for 循环指令等等。
不过在完成这个库的开发过程中,也对很多知识点有了更清晰的认识:
- react 的编译和渲染的过程,其中部分源码的了解,以及 react17 前后的部分差异
- 如何去重写 createElement 和 jsx
- WeakMap 的作用以及使用
最后
欢迎关注【袋鼠云数栈UED团队】~
袋鼠云数栈 UED 团队持续为广大开发者分享技术成果,相继参与开源了欢迎 star


【推荐】编程新体验,更懂你的AI,立即体验豆包MarsCode编程助手
【推荐】凌霞软件回馈社区,博客园 & 1Panel & Halo 联合会员上线
【推荐】抖音旗下AI助手豆包,你的智能百科全书,全免费不限次数
【推荐】博客园社区专享云产品让利特惠,阿里云新客6.5折上折
【推荐】轻量又高性能的 SSH 工具 IShell:AI 加持,快人一步
· 清华大学推出第四讲使用 DeepSeek + DeepResearch 让科研像聊天一样简单!
· 推荐几款开源且免费的 .NET MAUI 组件库
· 实操Deepseek接入个人知识库
· 易语言 —— 开山篇
· Trae初体验